M_George
Well-known member
Check the relay. That and any capacitors could cause it to draw a lot of current on startup.

See post #3 in the following link for wiring diagrams; post #5 for relays and caps. --> http://www.garagejournal.com/forum/showthread.php?t=249539Does the stator body with the windings need to be grounded to the frame? I've replaced bearings and the motor rotates freely, but as soon as I turn it on it hums then trips the breaker. I've tested resistance of all the windings and it looks fine. The windings all have continuity to each other, but not the body.
See post #3 in the following link for wiring diagrams; post #5 for relays and caps. --> http://www.garagejournal.com/forum/showthread.php?t=249539
If the field coils and rotor are not aligned properly on assembly, the rotor can spin freely by hand but 'bind' when power is turned on.
To maintain the proper air-gap, use of four 0.010" shims, between the rotor and stator.
http://www.garagejournal.com/forum/showpost.php?p=5181709&postcount=7017
Thanks for the info, I'll check it out. I disassembled the relay completely, cleaned it and tested continuity. What should the relay coil resistance be? 0 ohms?
That's what I would expect. See the following SlideShows for the 2 different style relays I have dissected.
4CR Style --> http://s786.photobucket.com/user/torqueman2002/slideshow/CM%20011%20Start%20Up%20Relay
2CR Style --> http://s786.photobucket.com/user/to...1/2HP and does not have a starting capacitor.
After reassembling it, I added the light to the relay and switch, and the light worked. I then added the windings only, turned it on and it tripped the breaker almost instantly. The resistance of the windings adds up correctly.
Last week, I had it set up and got a small shock from the actual body (it's unpainted currently) and assumed it was ground fault due to lack of paint.
That sounds like a short of one or more windings to the case. Leave the grinder assembled, but disconnect all the electrical connections.
Connect one leg of your Ohm meter to case (ground), then test each electrical connection -- they should not have continuity to the case (ground). Fix the short, and reassemble and verify the fix.
I'll get numbers again shortly. Any ideas?
Sorry for slow reply.Where did you get the info Bub? (Correction: Dr. Block!) Here is what I have (so far) but open to correction if off (and some Conflicts...)
257 Allegretti & Co & Paramount; Paramount (now Poulan), who continued the Delco model Block Grinders
306 Belsaw Machinery Co.
397 Delco Products Corp. (Motors and grinders)
And Some conflicting info:
115 Packard Electric 1890 -1932 - from 32 on a division of General Motors (Division of General Motors - Purchased by Delco in 1932) 1890 -1932 - from 32 on a division of General Motors
In 1943, Sunlight Electric's small motor production was consolidated with Packard
115 1917-33 Sunlight - Sunlight Electrical Manufacturing Co. Purchased by Delco in 1932 Sunlight Sm Motor production consolidated w/Packard Electric (Division of General Motors) in 1943 - "In January 1940 the Sunlight Electrical operations were separated from Delco (Conflict) "It is believed that both Sunlight and Packard built motors and grinders for Sears"
Please see my comments in RED.
There is more than 1 way to repair that, but here's what I would try.Thanks. So I got it to spin for a few seconds, and I think the issue is my windings are slightly damaged. Uh... well I was going to take a picture and well the starting lead connector fell off.
How can I repair this, recrimp the lead? What spray should I apply to avoid shorting?
There is more than 1 way to repair that, but here's what I would try.
The copper colored 'bare' looking wire is actually coated in a varnish type insulation - IIRC. That needs to be scrapped off and the connector w/ Red wire needs to be removed, leaving as much of the Red wire as possible.
Then, I'd splice the Red wire and copper wire with an insulated, water proof connector. ie: Polyolefin Heat Shrink **** Connector, Waterproof Crimping Terminal
You may not need to insulate the thin wire, but if it is necessary -- you can use shrink tubing or ie: Gardner Bender LTB-400 Liquid Electrical Tape, Easy-on, Waterproof.
That's too bad, but it may be OK to use.Nice, I just ordered some Liquid Electrical Tape.
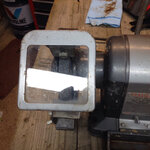
Does it matter if the starting wires are shorted to each other? Here is a picture since GJ has issues with embedding imgur.
https://i.imgur.com/yBPJ697.jpg
Great find!
 Nice score.
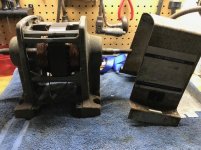
I jumped on this one minutes after it appeared on Craigslist for $35. It's got everything but one of the tool rests, removed for the tool sharpener.
Brad


That would be my guess, points for not trashing it...but not too safeShall we assume the stock motor is dead and the P.O. Figured a way around that problem?

Here's a really nice 1/2 hp commercial for sale in the San Jose area:
https://sfbay.craigslist.org/sby/tls/6104192871.html


There was one like this in our area. Older pre-Block converted to run with an external motor.That would be my guess, points for not trashing it...but not too safe
How did that one get on my bench??


That's too bad, but it may be OK to use.
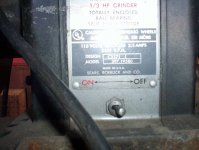
First - confirm the resistance of the start winding is within 10% of spec.
Then - carefully separate the individual wires just enough to allow a coating of the following --> MG Chemicals Red GLPT Insulating Varnish. Allow to dry and place the wires in the original orientation.
BTW - that is probably where the short to the case (ground) is/was.
Finally - reassemble, verify the rotor is aligned and does not rub, verify there are no shorts to ground, then power up.
Well, I went through and coated all the exposed windings with varnish. I tried to power it on multiple times, even spun it then flicked the switch, and as soon as I did the arbor stopped in it's tracks. It looks like I'm going to have to rewind this thing. Any suggestions on where to purchase good windings and the gauges required?
I recall you have a Split Phase 1/2hp model, and not really worth putting that kind of money into it. Time to part it out or look for a donor grinder that needs your parts.
Stripped block grinder $19.95 see eBay item number:172663419362I hear ya. I would like to learn how to rewind this thing myself, but am also wanting to get a grinder up and running. I'm fine with spending money, if it allows me to learn a new skill.
As far as the windings, are they aluminum windings coated with a varnish? When exposed, they have a light metallic color, not a copper color. Does anyone know the gauge of the starting windings and the main windings? I can get the measurements, but I'd prefer accurate numbers from someone with a working grinder, haha. I'd like to replace the windings with a more modern approach, I believe nylon coated windings with paper insulation and wraps for integrity and strength.
I'm also looking for a suitable replacement starting relay to use for testing. I've completely ripped my current relay apart and tested all the continuity and resistance through it and believe it is working fine. I'd like to purchase a more modern replacement, but am unsure of exactly what specs are required.
If I can get this thing in a working state, I'd definitely post my troubleshooting and experience, in order to help out other people.
I don't recall a post where that's been done in this thread al least.I hear ya. I would like to learn how to rewind this thing myself, but am also wanting to get a grinder up and running. I'm fine with spending money, if it allows me to learn a new skill.
As far as the windings, are they aluminum windings coated with a varnish? When exposed, they have a light metallic color, not a copper color. Does anyone know the gauge of the starting windings and the main windings? I can get the measurements, but I'd prefer accurate numbers from someone with a working grinder, haha. I'd like to replace the windings with a more modern approach, I believe nylon coated windings with paper insulation and wraps for integrity and strength.
I'm also looking for a suitable replacement starting relay to use for testing. I've completely ripped my current relay apart and tested all the continuity and resistance through it and believe it is working fine. I'd like to purchase a more modern replacement, but am unsure of exactly what specs are required.
If I can get this thing in a working state, I'd definitely post my troubleshooting and experience, in order to help out other people.


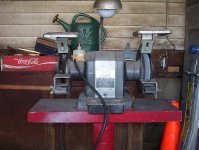
My first ever bench grinder restoration. Obviously it will need the eye shields and a few other things. Let's see how it goes.
Nice find!Just picked this up last night off Craigslist. I've been looking for one for quite a while now.
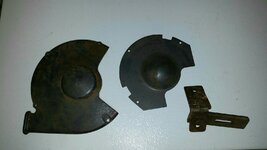
Needs to be cleaned up, but is complete with both eye shields, tool rests, light and quench tray. Mounted on a very heavy stand.
")