

You are using an out of date browser. It may not display this or other websites correctly.
You should upgrade or use an alternative browser.
You should upgrade or use an alternative browser.
Lift modifications Thread- Lets see them!
- Thread starter ndm
- Start date
Just installed a breaker box on my column. One for the lift and one breaker for my welding outlet
Pics or it aint true!!

I decided to install emergency kill switch just in case raise button sticks.
I stand on a ladder sometimes when I have to raise my sons Jeep Cherokee up high and if button ever stuck when up on ladder I can hit the STOP

I stand on a ladder sometimes when I have to raise my sons Jeep Cherokee up high and if button ever stuck when up on ladder I can hit the STOP
Last edited:


I cant see a picI decided to install emergency kill switch just in case raise button sticks.
I stand on a ladder sometimes when I have to raise my sons Jeep Cherokee up high and if button ever stuck when up on ladder I can hit the STOP

Nice. I think this is a must do mod for meSorry pics didn't save to phone last night.
Last edited:
Falcon67
Well-known member
I cant see a pic
My post 103, same deal - STDP 2 HP rated switch in a box next to the pump. Switch is off when lift not being run.
My post 103, same deal - STDP 2 HP rated switch in a box next to the pump. Switch is off when lift not being run.
I just feel better now with switch at arms reach

My post 103, same deal - STDP 2 HP rated switch in a box next to the pump. Switch is off when lift not being run.
I just feel better now with switch at arms reach
I have a crazy 4 year old and i would feel better knowing that he cannot somehow operate the lift too when I am not there. Kid can somehow turn things off or on even when they are not in reach. Just last week we got cold in the house and realized he turned off the thermostat. Then my neighbor texted me that the christmas lights looked great on a dreary rainy day. I guess he somehow got to the remote control and decided that he wanted lights on. (BTW My christmas lights were frozen solid so I could not remove them)
The one I have has a small hole on the start button that takes a padlock as well for keeping kids safe
17 dollars on Amazon
https://d27ewrs9ow50op.cloudfront.net/manuals/d4151_m.pdf
17 dollars on Amazon
https://d27ewrs9ow50op.cloudfront.net/manuals/d4151_m.pdf
Last edited:
Falcon67
Well-known member
I have a crazy 4 year old and i would feel better knowing that he cannot somehow operate the lift too when I am not there. Kid can somehow turn things off or on even when they are not in reach. Just last week we got cold in the house and realized he turned off the thermostat. Then my neighbor texted me that the christmas lights looked great on a dreary rainy day. I guess he somehow got to the remote control and decided that he wanted lights on. (BTW My christmas lights were frozen solid so I could not remove them)
That's lock out switch level ingenuity.
 I have a couple of lockouts similar to what excavator posted (less the paddle), they are high up on the wall and control the power to the mill and lathe. Those are only on when in use. I would have put one on the lift but the contacts points on the ones I have are really too small to effectually clamp the incoming 10 gauge wire.
Last edited:
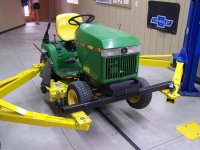
I lift my Kubota with straps. It weighs about 1800lbs

Neat way to lift a mower. Worthy of this thread I think.
lakeroadster
Well-known member
Neat way to lift a mower. Worthy of this thread I think.
I used one of the square tubing leg extension from my engine hoist and welded a piece of square tube to the side of it, and drilled two holes in it and plug welded nuts inside the tube. This allows the square tube to be bolted to the arms of the lift and prevent the tube from rolling for or aft. This tube lifts the front of the tractor.
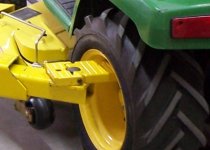
The rear arms simply engage the rear wheels.
Attachments

Last edited:
77Mini
Well-known member
Not sure if this is a lift modification but I set up some permanent lighting for working underneath.

rburke65
Well-known member
lakeroadster....... You have a photo of the rear wheel engagement? Thanks.
Not sure if this is a lift modification but I set up some permanent lighting for working underneath.
Nice!
lakeroadster
Well-known member
lakeroadster....... You have a photo of the rear wheel engagement? Thanks.
Added photo to above link...
Last edited:
Found another good addition to this thread.

“THIS IS MY BENDPAK” – MAKING THIS LIFT MINE (Part 2 of ?)…
AN AIR ACCUMULATOR BOTTLE FOR THE LOCKS (COMPRESSORLESS OPERATION)
BendPak has a great lock system on their HD-9 lifts, but is requires air to release them. No problem if that bothers you, they offer a clever little accessory to capture the air being forced out of the hydraulic cylinder upon lifting and store it in a small air bottle. This pressurized air can then be used to disengage the locks.
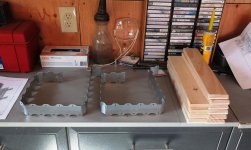
It looked easy enough to build on my own so I decided to save a few bucks. The very first thing I did was search for a nice air bottle. I picked these up for a song. Bimba has been a staple in the pneumatics game for decades so I figured I couldn't go wrong even with used ones. And it's not like there are any parts to wear out.
Since I'm sure volume of the tank is a key factor (too big and it won't generate enough pressure, too small and very little air will be captured before popping the safety valve), I'm glad there were two different sizes in my pair to test with.
Here are all the parts that mount underneath the power side runway. Note that I ended up using both bottles and I will explain the reason why shortly.
I mounted the air bottle bracket to existing hoops that retain the hydraulic hose so I didn't have to drill any holes in visible surfaces in the runway.
Some pipe clamps hold the bottles up in the bracket. There is about 1” of clearance to that lift cable running through that area.
A bracket was added for the inlet manifold by the lock release button. It mounted in the one spot that didn’t have something sandwiched between the rubber and the motor base plate.
The regulator/gauge and auxiliary air connections are now in place. If something goes wrong with my bottle system, I can shut off the regulator valve and hook up an air hose to either the quick disconnect or to the Schrader valve. Arrows point to the two auxiliary inputs for compressed air.
I don’t know if this was necessary, but after removing the air return line coming from the lift cylinder, I added a breather to replace the fitting.
(continued)


Same source as the above post


“THIS IS MY BENDPAK” – MAKING THIS LIFT MINE (Part 1 of ?)…
BendPak’s latest advertising slogan for their lifts is "This is my BendPak", "There are many, but this one's mine"
So it’s time to make this lift mine. I knew this purchase was going to be a pretty good distraction to finishing up the Asylum interior, and it’s coming true with a whole slew of lift-related projects popping up.
I’ll start with a few small things just to warm up the old typing fingers.
A COUPLE OF COSMETIC UPGRADES
Some hole plugs for the column base plates – just so someone isn’t concerned about me not anchoring this lift to the floor.
Some caps for the tops of the columns – it’s not polite to have your studs hanging out in public.
SOME PROTECTION FOR THE PAINT
Protection so the caster kit won’t mar the paint on the columns. Unlike the sheets I put under the column posts, these tend to slide a bit too easily for my liking, but I don’t intend to use them much so I guess it is fine

This material is easily cut on the paper shear.
And the holes were added with a spade bit.
Okay, it's on to something a little more involved before I lose your attention.


Lightened ramps. Great idea IMO

I priced aluminum ramps and decided to go this route with a plasma cutter. Lightened them up and made nice holes to lift them.
It lightened each ramp just over 8 lbs. It's really makes them easy to move with the holes. I never leave them attached when the lift is in the air. One dent in the head was enough.
Ramp Handles..
http://www.garagejournal.com/forum/attachment.php?attachmentid=330354&d=1396312129
I found it was a combination of weight and awkward size that made the ramps hard to deal with. Adding handles helped a lot and now they can be carried around like a suitcase. I found the center of gravity (balance point) of the ramp and placed the handles there so the ramps would hang level when carrying them.
The full story in my build thread is here: Link

http://www.garagejournal.com/forum/attachment.php?attachmentid=330354&d=1396312129
Found here
http://www.garagejournal.com/forum/showthread.php?t=363448


http://www.garagejournal.com/forum/showthread.php?t=363448
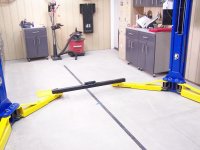
Years ago I made a crossbar from 2 7/8" pipe to span my lift arms and try to lift a trailer. Didn't work in that instance (bigger trailer) but I finally got to use it on this little 2-horse bumper pull.
1 3/8" solid drops in where the lift pads would go.
No calcs, just used my judgement as a metalworker. If I'm wrong I'm the one who suffers.
isb cornbinder
Well-known member
I tried to buy some equipment from a hoarder person. He was living in a warehouse situation that was part of a 100 year old bridge. The access to the "Office" and his living quarters was from a normal set of doors. The rear access was via a larger commercial roll-up door which opened onto a loading dock. To get his vehicles up to the loading dock level, he uses a Bendpac HD9. A vehicle is driven onto the lift then lifted up to the level of the loading dock and driven into his space.
This guy told me that he and his family have a 100 year lease, with the city, on the space. I found his collection of interesting things mind-boggling. The cars were all in need of restoration but represented brands like Porsche, Ferrari, Alfa, "E" type Jag, and a few hemi muscle cars. He had a bunch of early MG and Triumph sports cars and a Facel Vega.
I was there to make a deal on some tools but we were never able to settle on a price.
I have driven over this bridge hundreds of times and never ever thought there was treasure a few meters below the traffic.
I used to get this guy's permission to park my Porsche outside his office when I took our sailboat out for a day-sail. I had no idea what was in his space and one day we would meet on other terms.
Last edited:
gipraw
Well-known member
I love the kill switch idea. I don't have one on mine because I can touch the outlet when I am using the lift and it is 110v, so would be easy to unplug, but it is a great, easy safety device.
Plastikosmd
Well-known member
- Joined
- Nov 17, 2016
- Messages
- 1,254
Some runways for my smaller stuff on the column lifts

Some runways for my smaller stuff on the column lifts
Those column lifts are fricking cool. I dont know why but I just get a kick out of them.
Plastikosmd
Well-known member
- Joined
- Nov 17, 2016
- Messages
- 1,254
I do like the portability and adaptability especially now with the wireless communication and power demand
lakeroadster
Well-known member
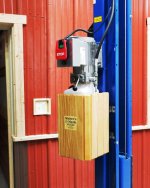
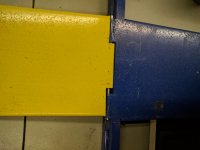
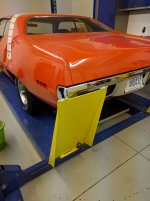
Power unit Reservoir Guard
Ever since I bought my lift in 2007 I've worried about bumping into the reservoir and dumping the fluid all over the floor.
So I made a guard.
The guard attaches to the steel lift column using an internal steel structure.
The outside is made from 3/4" thick pine that is screwed to the steel frame. Why wood? I built it from scraps I had, and the wood "look" ties in with all the wood trim in the barn.
Since it kind of looks like a barrel / cask I added a Maker's Mark label....
Attachments

Last edited:
Re: Power unit Reservoir Guard
Nice!
Ever since I bought my lift in 2007 I've worried about bumping into the reservoir and dumping the fluid all over the floor.
So I made a guard.
The guard attaches to the steel lift column using an internal steel structure.
The outside is made from 3/4" thick pine that is screwed to the steel frame. Why wood? I built it from scraps I had, and the wood "look" ties in with all the wood trim in the barn.
Since it kind of looks like a barrel / cask I added a Maker's Mark label....


Nice!
I work on Dirtbikes a lot so I made an adapter so I could lift them on my 2-post. It works great. I can remove every part but the frame and foot pegs safely and without having to bend over.
View media item 79792
View media item 79791
View media item 79792
View media item 79791
JSK
Well-known member


MrSurly
Well-known member
WOW! I cn't stop saying it. So many cool ideas!
Bamafan
Well-known member


I don't get it. How does it free up space if it leaves a big hole in the floor? Or is that last pic showing a second set of ramps going over the hole?
OCD
Well-known member
Super tall BP lift turned into a basement elevator.
That is cool!! Really really cool!!
I work on Dirtbikes a lot so I made an adapter so I could lift them on my 2-post. It works great. I can remove every part but the frame and foot pegs safely and without having to bend over.
View media item 79792
View media item 79791
WOW, that is very cool. Both mods!
I wonder if the same bike idea could be done for a larger size bike?
....
And wow!! that elevator would be so nice in my house.
Yellow1098
Active member
- Joined
- Jul 7, 2013
- Messages
- 39
I'm looking for something like this with maxjax for my Ducati 1098
gygeneral
Well-known member
Mopar Garage
Member
Installed a LED light kit to my new 4 post hoist. The results are amazing!!!


I am sure this would work fine for a sport bike. Maybe not a Harley but they make store bought adaptors for that.
View media item 80031
View media item 80031