To avoid these ads, REGISTER NOW!

Maxjax Installs: Post Here

RAYJAY

Well-known member
Joined
May 29, 2006
Messages
2,638
Location
UNION DALE PA
So its cool, I will agree.

However, other than doing minor work, like changing oil. Which would still be hard for me to do with a MaxJak

I am 6'6 I can't even sit down in a chair under that thing.

You can't take your wheels off on it, unless you loosen them before you leave the ground.

What do you guys use it for?

I have been looking at getting a solid 4 post lift.

why can't you loosen the wheels in the air? i do it all the time from jack-stands now i just use the impact gun,
the reason for the maxjax is when you don't have 12 to 14 foot ceiling height for a full 2 or 4 post lift , a mid rise lift will work also but you don"t have the access to the center of the car or truck
and uses for maxjax are : I could drop transmissions no problem , full motor and transaxle with sub frame on my SHO's brake work will be at the right height all of this in a 8.5 high ceiling. If your 6foot 6 inches tall your going to be ducking on any lift out there.a 4 post is ok i would never buy one there is not much i could do with one beside exhaust work and storage, for me with a 4 post there is no way to lift the body off of the sub frame,

Jeff
 
To avoid these ads, REGISTER NOW!

Thruxton

Well-known member
Joined
Dec 30, 2010
Messages
767
Location
Virginia
I wouldn't use air hose for hydraulic fluid...most air hose is rated for 300psi or so...

With all respect I think the question was can hydraulic hose be used as air hose. I would think it could, but definitely would be overkill. Plus it is usually a lot stiffer (at least in my experience) and therefore not as convenient.
 

jweezy

Member
Joined
Jan 11, 2011
Messages
8
Oh okay, I understand you guys.

About removing the wheels, I don't use a impact gun on the wheels, I use a torque wrench, I try to be very presice on the lugnut torque.

I am not one of the guys on this forum with some huge garage. I have an attached garage. Its a 20x24 and the ceiling is 11 feet tall. More than enough for 2 cars.

For some reason I just don't feel safe under the portable 2-post lift (I never been underone). Its a great idea, I looked at them not to long ago, I just wish I had the guts to do it.

I know they are like 1,800 at costco, same price as a 4 post lift.

I do a lot of work to my car, sometimes a lot of suspension work with the KWV2 I have. and using Jacks, freakin *****.

I am looking for a safe, valuable option.
 
Last edited:

bmwohio

Well-known member
Joined
Jul 8, 2010
Messages
366
Location
Columbus, OH
Oh okay, I understand you guys.

About removing the wheels, I don't use a impact gun on the wheels, I use a torque wrench, I try to be very presice on the lugnut torque.

I am not one of the guys on this forum with some huge garage. I have an attached garage. Its a 20x24 and the ceiling is 11 feet tall. More than enough for 2 cars.

For some reason I just don't feel safe under the portable 2-post lift (I never been underone). Its a great idea, I looked at them not to long ago, I just wish I had the guts to do it.

I know they are like 1,800 at costco, same price as a 4 post lift.

I do a lot of work to my car, sometimes a lot of suspension work with the KWV2 I have. and using Jacks, freakin *****.

I am looking for a safe, valuable option.

A torque wrench serves no purpose when taking the lugs off, you only need it when you put them back on. In fact some torque wrenches only tighten and not loosen. I am precise too, and always use a TW. I think we all mean that you can lift the car and not worry about loosening before you lift if you have an impact of some sort.
 

DogP

Active member
Joined
Jul 9, 2010
Messages
39

Thanks... lots of vague options, but I think I can find what I want, and it looks like I can get the 45 degree angle right on the hose :) .

And yes, I was asking about using hydraulic hose on an air compressor... it doesn't need to move, just get from the compressor to where I want to mount the air hose reel. I can't find short 3/8" air hoses, but short 3/8" hydraulic hoses seem easy to find.

Pat
 

Falcon67

Well-known member
Joined
Jun 11, 2009
Messages
18,371
Location
Merkel, TX
Thanks... lots of vague options, but I think I can find what I want, and it looks like I can get the 45 degree angle right on the hose :) .

And yes, I was asking about using hydraulic hose on an air compressor... it doesn't need to move, just get from the compressor to where I want to mount the air hose reel. I can't find short 3/8" air hoses, but short 3/8" hydraulic hoses seem easy to find.

Pat

My big compressor is connected to my air piping with a 3/4" x 36" hydraulic hose from Tractor Supply.

Lugs and air: Show car - yes, I would use a breaker bar and a nice socket to loosen the lugs with the tires still on the ground. Everything else gets the air pistol. 250 ft/lbs zips them right off before the wheel figures out what's going on. Same with crank bolts - you don't have to rig up some method to hold the crank, you just blast 'em out. Air wrenches eat chrome lugs after a while but chrome lug nuts are not that expensive. All lugs are torqued to spec with a torque wrench, especially the race cars.

I'm 6'1" and I could use a Max, no problem. I hit my head on everything anyway, so that's an expectation. Bald guy says "wear a hat, get a helmet" :lol: If you have an 11' ceiling, you have more flexibility in a lift choice than many of us.
 
Last edited:

DogP

Active member
Joined
Jul 9, 2010
Messages
39
It was a lot harder to find a 3/8 npt 45 degree swivel fitting than any other part of this job. I looked all over the web/ebay,Tractor Supply (where I bought the hoses and fittings) and Northern tool (where the lift came from), none of them had one. I did not go to any hydraulic shops...the only place I found one was at Aeroquipts website.

http://www.aeroquip.cc/2049-6-6sinternalpipeswivelxexternalpipe45degreeelbow.aspx

you need 3/8 to 3/8 just in case you did not know...

If I had planned to do what I did when I was assembling the lift I could have changed the fittings at the lift cylinder to make the line (with a 90 degree) go the direction I wanted. But since the lift was already assembled this was the easiest way...I simply unscrewed the quick release fitting, screwed the 45 on and reconnected the fitting. The fitting with shipping cost about $24.00 (not cheap but again I couldn't find it anywhere else) But the end result is it is EXACTLY the way I want it now and it works great. Hope this helps and post some pix!

I think I know what I need now... just wanted to clarify on this... I think the one you linked to isn't correct for us... I believe this is what we want:

http://www.aeroquip.cc/2088-6-6sexternalpipexinternalpipe.aspx .

The one you linked to adapts NPSM to NPT, which I don't think is correct (NPSM isn't tapered, and AFAIK everything else is NPT, which is tapered). The one I linked to I believe is the standard tapered NPT.

Can anyone confirm this? They also have the hose couplers, so I think I'll order the cheap Northern Tool hoses and couple them with: http://www.aeroquip.cc/2096-6sinternalpipexinternalpipe.aspx .

Thanks,
Pat
 

demoderbydave

Well-known member
Joined
Nov 4, 2010
Messages
114
Location
Spencer Mass
You are correct sir. the fitting I listed is tapered on one end...I did not see any one that wasn't...maybe I did not look hard enough?? If you find a better one list a link...BUT It works fine with teflon tape...The one i got has one end that is a swivel. That makes it MUCH easier to get it exactly where you want it and then stay there while you tighten it. Again I am talking about simply removing the quick release fitting that came with the lift and installing this 45 fitting ...swivel side down towards the floor, screwed simply into the fitting that screws into the lift cylinder and reinstalling the same quick disconect fitting that now SHOULD point staright up parallel to the column.

I am sure if I looked hard enough and had thought it (realizing that would have been a concern earlier :headscrat) I could have found a premade hose with one already on it. Like most of us I deal with a situation as it rears its ugly head :wtf:....

Just out of curiosity who takes lugnuts OFF with a torque wrench? Long before I ever got my little maxjax ...even when using a lowly floorjack I would always loosen the lugs A BIT before lifting...I would be willing to bet that every owners manual (who reads them)that comes with every car shows the average putz to do that before trying to remove a flat tire using the ****** stuff that comes with the car...

I am not trying to insult anyone and I am not in anyways claiming to be any expert at anything...other than plugging a toilet :thumbup:.. But come on...
 
Last edited:

DogP

Active member
Joined
Jul 9, 2010
Messages
39
I believe everything we want is tapered on all ends (NPT)... the one you linked to is tapered on one end, but not the other. I think putting a tapered end into a non-tapered hole will work, but may not seal as well. I'm going to order: http://www.aeroquip.cc/2088-6-6sexternalpipexinternalpipe.aspx , which I believe is tapered (NPT) on both ends, but you're right... it's not swivel. If I attach it to the hose side, it should be easy enough to get lined up exactly like I want though.

Pat
 

Joe From NY

Well-known member
Joined
Feb 25, 2010
Messages
527
Location
NY
...Just out of curiosity who puts lug nuts ON with a torque wrench? ...


I use these torque sticks and they work fine: http://www.amazon.com/dp/B000IX3BSM/?tag=atomicindus08-20

You look up your specified lugnut torque in your service manual, and you use the correct extender for that foot lbs.

21lbJCfIH8L._SL500_AA300_.jpg
 
Last edited:

DogP

Active member
Joined
Jul 9, 2010
Messages
39
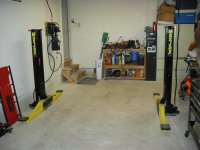
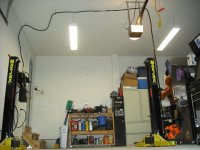
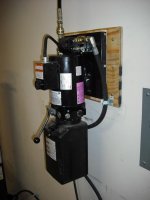
I finally got all the parts I needed and got it permanently set up :) . I'll get pics up this weekend, but just a quick recap in case it'll help anyone else who attempts this.

I mounted the pump on the wall with some bolts, mounting the existing bracket from the Maxjax cart to a couple 2x4s, bolted to a piece of 3/4" plywood, bolted to studs in the wall.

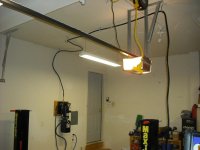
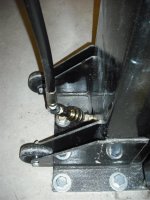
For the far lift pillar, I used the existing two hoses, coupled with this coupler: http://www.aeroquip.cc/2096-6sinternalpipexinternalpipe.aspx . Then attached this 45 degree adapter on the hose: http://www.aeroquip.cc/2088-6-6sexternalpipexinternalpipe.aspx then connected the existing quick connect. With the 45 degree, the hose goes straight up to the ceiling. On the pump for the far side, I installed a 90 degree adapter: http://www.aeroquip.cc/2085-6-6sexternalpipexexternalpipe.aspx , to go straight up to the ceiling on that end as well.

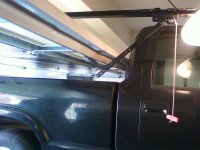
For the close side, I used this 10ft hose: http://www.northerntool.com/shop/tools/product_200383958_200383958 . It looks and feels nice... I'm very happy with it, especially for the price. I used the same 45 degree adapter on the hose at the pillar, and then the quick connect. I attached this right angle to the hose: http://www.aeroquip.cc/2089-6-6sexternalpipexinternalpipe.aspx , and then the normal quick connect to that for the pump side.

On the close side, I decided to put the right angle on the hose rather than the pump because this will also be the side I use with the motorcycle adapter, which connects to the port right below it (and it wouldn't be particularly easy to get two right angles right next to each other). I could have also put the right angle on the hose for the far side, but I didn't want to waste any hose length as I was unsure if I'd have extra (which I do).

Of course, this is what worked and was convenient for me... there's probably lots of combinations that work. All connectors for these hoses are 3/8 NPT (also called Pipe), which have a tapered thread.

For mounting the hoses to the wall/ceiling, I used some rubberized bike hooks: http://www.homedepot.com/webapp/wcs...-_-202305569-_-202305571-_-N&locStoreNum=4607 , and spring grips: http://www.homedepot.com/h_d1/N-5yc...splay?langId=-1&storeId=10051&catalogId=10053 .

I haven't lifted a vehicle with it yet, but after bleeding the cylinders, it seems to be working great, just like before.

Anyway, thanks a ton for the help and ideas... it's much more usable, and looks great!
Pat
 

Ramrod39

Member
Joined
Jul 1, 2010
Messages
8
Going back to the achors. Why drill 5.5 inch deep holes if the required concrete thickness is 4 inches? Is it OK to drill into the soil below the slab?
 

DogP

Active member
Joined
Jul 9, 2010
Messages
39
DogP,
I am curious to see how yours came out!
Post some pix.You will love the Maxjax...I sure do.

Yeah, I love the Maxjax... and with this mod, the floor and work area is even more open. It used to be a little tight for me w/ the workbench, pump, and hoses while a car was up on the lift, but it's great now. Well worth the minor added cost and time to do. IMO, Dannmar should sell a semi-permanent install kit (include a wall mount, extra hose, connectors, etc). I'll post some pics of the install tonight.

Going back to the achors. Why drill 5.5 inch deep holes if the required concrete thickness is 4 inches? Is it OK to drill into the soil below the slab?

I believe the anchors themselves are about 5" long, so you need to drill a hole deep enough for the entire anchor to go down into. You probably only need 4" thick concrete because the anchor only bites on the upper part, and apparently 4" has sufficient strength.

Others have recommended drilling all the way through, so if you mess up, you can just pound the anchors through and install a new one. I tried to drill through, but I only had an 8" long drill bit, and it only made it through in one spot... but the anchor install was really no big deal (drill, hammer, tighten).

Pat
 

DogP

Active member
Joined
Jul 9, 2010
Messages
39
Here's some pics of my install... you can see the pump mounted on the wall, the mounting/routing of the hoses, and rest of the mess in the garage ;) .

I used the hooks in places where there was some pressure of a turn (they're strong), and the clips to hold it in place (pretty weak, but keep it from moving). If I ever need to undo it, I just pop the hoses out of the clips and pull them over the hooks. Also, there's a little bit of extra hose that I routed along the ceiling... that way if I need to move the pump or the post, I can just move the clip.

Pat
 

Attachments

  • DSCF2926.JPG
    DSCF2926.JPG
    87 KB · Views: 690
  • DSCF2932.JPG
    DSCF2932.JPG
    88 KB · Views: 617
  • DSCF2927.JPG
    DSCF2927.JPG
    68.8 KB · Views: 559
  • DSCF2924.JPG
    DSCF2924.JPG
    39.1 KB · Views: 564
  • DSCF2930.JPG
    DSCF2930.JPG
    42.8 KB · Views: 538
  • DSCF2928.JPG
    DSCF2928.JPG
    70.7 KB · Views: 529
  • DSCF2929.JPG
    DSCF2929.JPG
    44.8 KB · Views: 495

murph3204

Well-known member
Joined
Nov 19, 2010
Messages
72
Location
Houston, TX
nice job on the install DogP. It looks like you have plenty of ceiling clearance but are limited by your garage door. do you plan to make any alterations there? I'm still on the fence about getting one. I have an 8' ceiling plus lose a few inches when the door is up. how far apart are the posts?
 
To avoid these ads, REGISTER NOW!

DogP

Active member
Joined
Jul 9, 2010
Messages
39
nice job on the install DogP. It looks like you have plenty of ceiling clearance but are limited by your garage door. do you plan to make any alterations there? I'm still on the fence about getting one. I have an 8' ceiling plus lose a few inches when the door is up. how far apart are the posts?

Thanks... the ceiling is about 10'3" (except for one beam going across), but it was too short for most regular lifts, and the portability of the Maxjax made me decide to go for it. The garage door actually doesn't affect the lift when it's closed (the opener and rails are outside the lifting area), though with it open, it affects most vehicles (but not my truck - see attached photo :) ).

Not that I need the overhead space for the lift, but I would like to get a jackshaft opener though... I'll have to see about getting one that'll work w/ my garage (I have very limited clearance on the sides). The posts are 115" apart, which works okay for my vehicles, but if I had the space, I'd probably go just a little bit wider (every vehicle I've tried has had the arms mostly retracted, and it can be a little tight getting in/out of the car with the posts).

That looks pretty good! It sure is nice not to trip over the hoses...do you notice one side lifting slower than the other?

It is VERY nice not tripping on the hoses, and I can roll my chair anywhere on the floor. I was having to get off my chair under the car and get out, because the hoses were in the way of rolling all the way out. And actually, oddly enough... I used to have one side that lifted slower than the other, but they seem to be lifting evenly now.

Pat
 

Attachments

  • SSPX0091.jpg
    SSPX0091.jpg
    90 KB · Views: 400

Joe From NY

Well-known member
Joined
Feb 25, 2010
Messages
527
Location
NY
grab a bungee cord to hold the DOWN lever against the tank. It beats standing there holding it when the lift is on the way down.
 

DogP

Active member
Joined
Jul 9, 2010
Messages
39
grab a bungee cord to hold the DOWN lever against the tank. It beats standing there holding it when the lift is on the way down.

Yeah, I saw a couple of you guys do that... definitely a good idea, and I'll probably end up grabbing a bungee to do the same once I get sick of holding it. So far, it hasn't been a big deal to me to hold the lever while lowering though. It seems safer as I'm standing out of the way, and can stop it if I need to... and nobody uses a bungee to press the lift button so... ;) .

Pat
 

DogP

Active member
Joined
Jul 9, 2010
Messages
39
I've had a car on this thing nearly the entire time since I posted this picture and it's still working lovely, and still staying safe. Good purchase :)

Yeah, but that car weighs what... 45 lbs? ;) Heh, but I agree... this thing is great. I just replaced the rear brakes on my minivan last night and it had no problem lifting, holding, and lowering... and it made the job so much easier. And since the van needs all the room it can get, the pump mounted out of the way on the wall freed up a lot of valuable space.

Pat
 

demoderbydave

Well-known member
Joined
Nov 4, 2010
Messages
114
Location
Spencer Mass
Hey...don't knock a Miata... If you have never driven one you don't know what you are missing! I think I have more fun in my summer driver 94 M edition than I do in my 78 Pro street Camaro!
 

a3tripod

Well-known member
Joined
Dec 30, 2008
Messages
89
I don't believe I've seen anywhere where an install was changed from 110v to 220v. Does anyone have direction has to how that is done? I'm ordering my MaxJax a soon as Uncle Sam repays me, and I have a 220v circuit waiting in the wings. Also, to be sure I'm getting the best deal, can people advise where the best place is to get it?
 

demoderbydave

Well-known member
Joined
Nov 4, 2010
Messages
114
Location
Spencer Mass
I believe you can order it in a 220 volt configuration...why you want to is another question. Mine works fine plugged into a standard 110 outlet. And when/if I ever want to use it elsewhere it is much simpler to just be able to plug it into a standard outlet... My opinion for what it is worth.

I ordered mine through Northern tool on ebay, it was the best deal I could find at the time...got an extra 45.00 in ebay bucks... The prices have come down a bit since I got mine 5 months ago.

If you google maxjax you will come up with quite a few places that sell it. Mine came from Garage equiptment superstore. (northern apparently orders it elsewhere).:headscrat
 
Last edited:

regguy1

Well-known member
Joined
Dec 15, 2009
Messages
4,053
Location
On Mount Olympus with Zeus
I don't believe I've seen anywhere where an install was changed from 110v to 220v. Does anyone have direction has to how that is done? I'm ordering my MaxJax a soon as Uncle Sam repays me, and I have a 220v circuit waiting in the wings. Also, to be sure I'm getting the best deal, can people advise where the best place is to get it?


Best Deal I've found
$1899.00 Shipped at Costco:

http://www.costco.com/Browse/Produc...540&Ns=P_Price|1||P_SignDesc1&lang=en-US&Sp=C
 

a3tripod

Well-known member
Joined
Dec 30, 2008
Messages
89
I brought a 220v circuit into that bay just for this reason, so I'd like to use it. Besides, 220V has less amp draw and the pump works a little faster in that configuration as well. I'm not going anywhere anytime soon, so the need to have 110v readily available isn't a concern.

I saw Costco's price as well...but was hoping to avoid paying taxes. Oh well...
 

T.W.Dustin

Member
Joined
May 16, 2010
Messages
11
Location
Chandler, AZ
I just ordered mine today from Rudy at Garage Equipment Supply in Moorpark, CA. The "Corvette Forum" (corvetteforum.com) has a group purchase arrangement w/ Garage Equipment Supply right now for $1800 shipped. It might be around the rest of the week but it sounds like it is ending very soon.
 

DogP

Active member
Joined
Jul 9, 2010
Messages
39
Hey...don't knock a Miata... If you have never driven one you don't know what you are missing! I think I have more fun in my summer driver 94 M edition than I do in my 78 Pro street Camaro!

Nope, not knocking them... they are really fun cars... just poking fun at how light they are, compared to some of the heavy cars that many of us have. Your 78 Pro street Camaro weighs what... the same as 2 Miatas? ;)

I brought a 220v circuit into that bay just for this reason, so I'd like to use it. Besides, 220V has less amp draw and the pump works a little faster in that configuration as well. I'm not going anywhere anytime soon, so the need to have 110v readily available isn't a concern.

I saw Costco's price as well...but was hoping to avoid paying taxes. Oh well...

Costco looks like a good deal... Northern Tool has them for $2k w/ free shipping, but they may also charge tax, depending on the state (I think I paid VA tax when I ordered parts from them a few weeks ago). But if you can get in on the Corvette forum group buy, that should be the best for sure.

When I ordered my Maxjax from Dannmar (group buy), I initially requested 220V, though they talked me out of it, saying the difference in operation really isn't noticeable. They seemed to only recommend it if you need it (i.e. international). I'll bet the change isn't difficult to do though... typically to change something like this, you just need to change which taps on a transformer you're connected to.

Pat
 
Last edited:

drmoonshine

Well-known member
Joined
Aug 17, 2010
Messages
327
Location
Oxnard, California
Nope, not knocking them... they are really fun cars... just poking fun at how light they are, compared to some of the heavy cars that many of us have. Your 78 Pro street Camaro weighs what... the same as 2 Miatas? ;)


Costco looks like a good deal... Northern Tool has them for $2k w/ free shipping, but they may also charge tax, depending on the state (I think I paid VA tax when I ordered parts from them a few weeks ago). But if you can get in on the Corvette forum group buy, that should be the best for sure.

When I ordered my Maxjax from Dannmar (group buy), I initially requested 220V, though they talked me out of it, saying the difference in operation really isn't noticeable. They seemed to only recommend it if you need it (i.e. international). I'll bet the change isn't difficult to do though... typically to change something like this, you just need to change which taps on a transformer you're connected to.

Pat
So you don't need the extra voltage unless you abroad? I'm confused as to why?
 

kbuhagiar

Well-known member
Joined
Dec 27, 2005
Messages
1,732
Location
Escondido, CA
So you don't need the extra voltage unless you abroad? I'm confused as to why?

As I understand it (correct me if I'm wrong), when you have a choice, 220 is always more desirable, because it more efficient than 110. When 220 wiring is used, a smaller amount of current is required than with 110 wiring. Power is measured in watts. Thus, to achieve 900 watts of power, 4.1 amps would be required with 220 wiring, whereas approximately 8.2 amps would be required with 110 wiring.

Of course, in an application such as this, where power is applied in short bursts, it may be a moot point (as opposed to, say, an always-on situation, such as a ventilation fan).
 

T.W.Dustin

Member
Joined
May 16, 2010
Messages
11
Location
Chandler, AZ
As I understand it (correct me if I'm wrong), when you have a choice, 220 is always more desirable, because it more efficient than 110. When 220 wiring is used, a smaller amount of current is required than with 110 wiring. Power is measured in watts. Thus, to achieve 900 watts of power, 4.1 amps would be required with 220 wiring, whereas approximately 8.2 amps would be required with 110 wiring.

Of course, in an application such as this, where power is applied in short bursts, it may be a moot point (as opposed to, say, an always-on situation, such as a ventilation fan).

I agree w/ the moot point comment - unless you are putting cars up and down many many times per day in a business setting, you will not likely suffer from bigger electrical bills or loss of work time from slightly longer rise times. Going down should be somewhat even.
 

DogP

Active member
Joined
Jul 9, 2010
Messages
39
Assuming this is like most things I deal with that can be converted to work with various voltages... inside the pump there is a transformer. Lets say that the pump runs internally from 24V. So, to get from 120V to 24V, they have a transformer that scales the voltage down 5x (but in turn, increases current 5x). The same transformer can have a tap that brings it down 10x, to be used at 240V. So, it's actually using the same amount of power (where power is in Watts... i.e. current x voltage).

Since apparently the lift is slightly faster at 240V, I'm guessing the high voltage tap is actually not 10x, but more like 9x... causing more voltage to go to the pump, making the pump to go slightly faster. A similar thing can be done on some transformers that have taps for high/low line voltage, or use in Japan. Japan uses 100V, so if you connect to a 100V tap and feed it 120V, the output voltage will be 20% higher.

But, your electric bill won't be any larger/smaller by changing to 240V (except for any differences in efficiency of the transformer)... since electricity is billed in KWh (Kilowatt-hours), and a Watt is Volts*Amps (120*15 = 240*7.5). Well, in this case the 240V version will cost more while running, assuming it's going faster because it's using more power (Watts), though the increased speed of lifting means less time on.

BTW, lowering vehicles doesn't use any power at all, it just opens a valve releasing pressure (or something to that effect).

Pat
 

drumbe

New member
Joined
Sep 10, 2010
Messages
1
I don't believe I've seen anywhere where an install was changed from 110v to 220v. Does anyone have direction has to how that is done? I'm ordering my MaxJax a soon as Uncle Sam repays me, and I have a 220v circuit waiting in the wings. Also, to be sure I'm getting the best deal, can people advise where the best place is to get it?

Hey there A3tripod, after reading the other replies to your question, I did not see an answer to your 110 to 220 question. I am pretty sure the right answer can be had by calling Danmark, who distributes the lift. I feel that the answer will be to have an exchange of the 110 unit that comes with it, for a 220. They might do it for free.... They have excellent customer service. I have used it several times.... Good Luck... Post once you get an answer.....

Drumbe....:)
 

petee_c

Well-known member
Joined
Oct 4, 2010
Messages
3,027
Location
KW area, Ontario CANADA
Couple of questions for maxjak owners.

My present 3 bay garage might get a lift. I have almost 10' for the ceiling, so not ideal for a full size lift, after you count clearance for a raised garage door, tracks etc.

I am assuming that my garage floor meets the 4" minimum for a Maxjak lift. I will drill a pilot hole at a later date to test. (If not, Maxjak tells me I need to cut out and pour a 4'x4' x 12" pad under each post. - which is more concrete than I would want to mix myself)

I have expansion cracks cut into my floor between each bay. I would want to put the lift in the middle bay (I think).

Anyways, the expansion cracks are 124" apart. The bolts need to be 6" away from the cracks.

That means that the outer edges of the baseplates would be 112", and if the template on the Dannmar site is correct, that would mean the inside of the posts would be about 95" apart.

Is that too tight to leave up for everyday parking?

I have a 2001 Porsche Boxster S that would go there in the summer, or a 2002 Jetta in the winter. According to specs I looked up on the web, they are about 70" wide.

Do you have both arms equal when lifting? Should/Can the arms on the heavier side of the vehicle be shorter?

Can I lift the vehicle with it a little closer to the passenger side post than the driver side? to ease getting out of the vehicle?

Thx,
Peter
 
To avoid these ads, REGISTER NOW!
Top Bottom