Re: Maxjax Installs: Torque loads and more
I recently installed my own MaxJax and would like to describe some of the insights I gained in the process. First off, in reading through this thread, there was a lot of discussion about the installation process. My purchase of the unit was this March (2011) and I believe my copy of the Danmar instruction manual has the correct process, to wit: a washer and nut offset from the anchor by 5/8’s of an inch. The Wej-It instructions say ½”, so that was close enough. What I discovered in driving the anchor in was that the nut wanted to walk down the length of the bolt from the shock of the hammer blows, so I taped the nut to the bolt to keep it from rotating.
Followed the Wej-It instructions to the letter and the first anchor set below the surface of the concrete so all was well. Looking at the construction of the anchor I decided to epoxy the remaining anchors just above the expansion sleeve, insert and set all the anchors and immediately torque everything with the columns in place and let the epoxy set overnight. More on this later.
I want to share something about the torque values here that may be of use and is the primary reason for this post. There are a couple of calculators on the internet that for a given bolt size and torque will tell you what the tension is in the bolt.
Here’s one from Norbar
http://www.norbar.com/calculators/torque-tension-calculator.aspx
and another from “Engineer’s Edge” (with torque in inch-pounds)
http://www.engineersedge.com/calculators/torque_calc.htm
Norbar’s is better, and what’s impressive are the numbers. A grade 8 5/8” bolt has a maximum load of 19549 lbs, at a torque of 188 lb-ft. So the bolt is way over capacity. Of course you wouldn’t try to tighten the bolt/anchor combination that much, but just going to (say) 75 lb-ft yields 7750 lb’s of resistance in the anchor (move the yield stress slider in the Norbar calculator to vary the torque – all the numbers here are convenient rough approximations).
Danmar calculates 3238 lbs tension per bolt for a 3000 lb load with the arms fully extended so at 75 lb-ft of torque(7750 lbs) to set the anchor, you have more than double the capacity needed. In theory then, you could set your preload to 44 ft lbs (4480 lbs) and with the lift loaded be about at your installed AND TESTED capacity (4480 preload + 3238 load = 7718 total) for the anchor. There would be no guaranteed safety margin however, in my opinion.
You can play with your own parameters to decide how much torque you want to set the anchor at and feel comfortable. I went to 85 ft-lbs (8900 lbs/anchor). My entire car is 3180 lbs. That load is approx. 1500 lbs per bolt per the nominal lift extension. That gives me 8900-1500 or 7400 lbs of preload possible. So if I preset the bolts at say 50 lb-ft of torque, that uses (per the calculator) 5200 lbs of the 7400 lb budget and I remain below my tested installation conditions with a safety margin. Less preload would seem to guarantee more safety margin but I don’t think you would want to finger tighten the mounting bolts. It’s not clear to me what governs a minimum torque setting.
Anyway I hope this load discussion is clear, helpful, and of course correct. My big point is that when you torque the bolts you use some of the capacity of the anchor, when you load the car you use more, and the only thing you know for sure about your remaining margin is where you set the anchor. That is not necessarily the actual capacity of the anchor.
I want to mention a couple of other things.
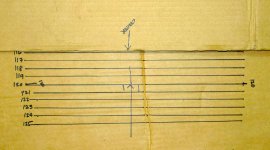
My existing floor was 2500 psi concrete , less than 4” and cracked. A complete “no-go”. The rework in the ‘garage floor cutout’ attachment is an elongated “H” with the posts at the end. The maximum tension (i.e. the weight of the car) on the new “seven sack” pour is along the full width of the “H”. Any unbalanced load is along the height of the “H”.
A rule-of-thumb for the amount of rebar was to have the cross-sectional area be about 1-2%. The rebar was epoxied into the existing floor as shown in the ‘rebar’ attachment.
I made a template of the column bolt holes to position the rebar and insure that the anchors would drop in between the rebar. Later the template told me where to place the column to drill the holes.
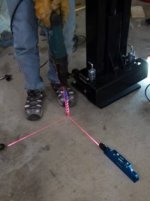
The epoxy (Simpson Epoxy Tie) I put on the anchors was useful as a potential tell-tale. It smoothly bridges the anchor to the concrete (I smoothed it with my finger initially). After it hardened, I torqued the bolts, lifted the car and let it sit for a day. Taking things apart, I inspected the epoxy for any cracks to determine if the anchors had moved (as I said, they are set below the concrete). Didn’t see any so I have to assume that the anchors didn’t move with the additional car load.
Last thing - one of the construction guys in the neighborhood says NOT to gradually increase the drill size as you hammer/drill out the holes but just go with the final drill. Otherwise the bigger drill will “walk” a bit in the smaller holes. Also jam. I think he’s right as two of the holes I started that way were enlarged and I had to epoxy in Power-Serts, as my Power-Drops wouldn’t bite. The remaining holes were drilled his way.


")