To avoid these ads, REGISTER NOW!

Mezzanine time

OP
I

IPACA9

Well-known member
Joined
Jul 18, 2013
Messages
489
Location
Independence, Mo
I sure hope you have an impact driver ! If not, now is the time to buy one !!

Simpson gives you a 1/4" hex adapter but it is not very good. Buy a decent one.

Make sure your joist are tight to the hangers and that the top of the joist is flush to the top of the beam. Might need a helper to hold things if you have shoulder issues.
Oh yeah. Got a couple Milwaukee and craftsman ones. Also having my rolling scaffolding has been quite handy.

I've been using the Fastenmaster ThruLocks to join the beams to the posts. These things were awesome so it sold me on going with the other fasteners.
3fef26b05586a3e425c9d0152db30f6b.jpg
 
To avoid these ads, REGISTER NOW!
OP
I

IPACA9

Well-known member
Joined
Jul 18, 2013
Messages
489
Location
Independence, Mo
Well it's been a long week. I really only get to work on this thing at night when everyone goes to bed or if I get some time on the weekend between all the family stuff.

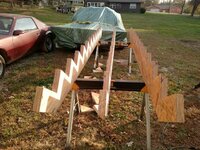
I got all the posts set in place and this time I decided to go ahead and anchor the post bases with 5" x 5/8" anchors. Tell ya what. Trying to do that with my Milwaukee or Dewalt was quite a chore and killed two $13 bits with six holes. Enough of that. I hit my buddy up and borrowed his Bosch Rotary Hammer. That thing makes a huge difference and saves the bit. I had a problem with a couple of the anchors not grabbing and spinning so I wound up slotting the top of the bolt to hold with my flathead on a ratchet and using a wrench to tighten them down. I then had to grind off the top of the bolt that was sticking up. Real pain in the ***. I now know to be very careful when using that hammer drill and make sure it does wobble or chew up the hole. The first couple anchors were a learning experience bit I think I'm getting the hang of it.
99ba2b4adedc4063296f180fd484c955.jpg

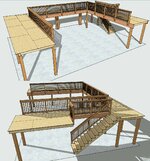
After getting all post bases down and screwing my notched posts into them I was moving on the outer beams. The beams are secured to the posts using Fastenmaster's ThruLoks and then every 12 inches I staggered their HeadLoks to join the double beams together. I knocked those out and figured it was enough for the night.
d9bb88c6b94820372d0d714e89fbb7e0.jpg

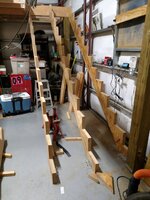
The next day I got home about the same time my wife did and we had some time to kill before the kids got home from school. She helped me get the first LVL into place. Using the uprights I hoisted them up using my heavy tie straps. I would pull one end up a few feet and tie it off then do the other side. Eventually we got the first one there and set into the notch. I ran a couple screws in it to hold it. The kids came home and it was done for the rest of the day till they went to bed.
b77986661d321bc3b3adc3458fe2e469.jpg

That evening I joked about doing the 2nd LVL myself. My wife thought I was joking but after they went to bed I just couldn't sit there and do nothing. I had to try. So up it went. Having two people made it easier to keep the beam upright but I just had to make sure I had tension pulling on the top of the other side. I got it as far as I could before my arms were killing me so I tied it off and figured "tomorrow you're mine!". My wife was a little pissed at me in the morning when I showed her what I had accomplished. 1b447798c09d7ff9792e855269f56a2b.jpg
75c57c03822b84523f2bf95cd343a778.jpg
55325b3854a63487e28148b5fb310ce5.jpg

The next day I was at it. I had to bring the 2nd beam up behind the first, over the top and set it into place on the front. Once it was there I clamped it and sank my ThruLoks into them and the TrussLoks to join them all together.
84e3ce86787cfeaf3c9d1e9a286cc62a.jpg
9969f2fbf725dd2a9582c23299fab527.jpg

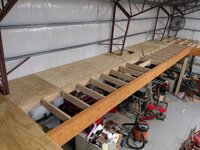
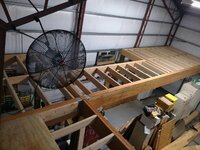
Next I was on to the joists. I went 16" on center and decided to go with 3/4" T&G plywood for the decking. I was really thinking about going with some OSB for it but figured I'd spend the extra money.
8ed34b7b01b9b552b072a796e1094956.jpg

I just spread the plywood across it for now so that I can put some things up there from the other side of the building. I got to clear that area for the second deck. This time it will have stairs.
1940649aaf876b621205f2c25fedf265.jpg
 
OP
I

IPACA9

Well-known member
Joined
Jul 18, 2013
Messages
489
Location
Independence, Mo
It is actually fun for me but very tiring. I spend all day crouched under a dash installing remote starters or leaning into a trunk putting amplifiers in so at the end of the day I have to drive on.

This thing is a rock. Hardly any shimmy to it at all. It will tighten up more when I put the flooring on. I'm trying to decide if I should glue and screw it or just screw it down. Also I'm undecided to fasten it to the uprights right behind me in the picture and or even in the corners. Maybe with some threaded hooks or something without actually screwing into them but we will see after the other side is done and the bridge hung between may not even need it.

Speaking of hanging the bridge. These Simpson hangers are pretty impressive. Very thick and heavy. These will hang the 11" LVL across the middle.1ee51b221d5817e771ccb71a679813f9.jpg
 
Last edited:
OP
I

IPACA9

Well-known member
Joined
Jul 18, 2013
Messages
489
Location
Independence, Mo
I'm also trying to decide if I want a 5 foot deck across the back or six foot. The deeper deck will give a little more height for under those trusses. Already across the back they are about 5 feet from the future flooring. I already knew I would have to duck under them when crossing over to the other side. I'll have to light them with foam so I don't "Bing" a head on them. A small inconvenience but it was either make the flooring lower and cut my windows off or go high and deal with ducking the framework. I also wanted the height above me head when under the mezzanine. Another thing to come into play is how far out am I before it interferes with the nose of a vehicle when it goes on a future lift. I'll make that decision when the time comes to hang the beams.
 

MagKarl

Well-known member
Joined
Oct 15, 2012
Messages
684
Location
Olympia, WA
I think I'd build the two big areas and save the connecting portion for last. You might find the connector catwalk is a lot of effort and material for what you get out of it in the end. Might not be necessary if you dedicate one to storage of stuff you don't frequently access.
 
OP
I

IPACA9

Well-known member
Joined
Jul 18, 2013
Messages
489
Location
Independence, Mo
I think I'd build the two big areas and save the connecting portion for last. You might find the connector catwalk is a lot of effort and material for what you get out of it in the end. Might not be necessary if you dedicate one to storage of stuff you don't frequently access.
I'll be building the other side then doing the catwalk across. The right side in front of the stairs will be a couch or a few chairs and TV for now. Something my kids or a customer can chill while I work on a vehicle. The other side will be multiple work stations for RC cars/planes, models or whatever other hobbies we have. The catwalk will have shelving built between the upright framing for storage. I'm going to make some curtains or something that will slide in front of them.
 
OP
I

IPACA9

Well-known member
Joined
Jul 18, 2013
Messages
489
Location
Independence, Mo
Any updates?
Sorry I left this thread hanging. I've posted pictures here and there in other threads and forgot about this one. It's been a slow process but it's getting there. Time this summer has been taken up with scout camps, working on mom's property, a couple trips and just plain laziness due to heat.

Since I had the LVLs stacked on the left when delivered I needed to get the 14" deep ones over to the other side of the garage. My wife was still recovering from shoulder surgery so I had to think of a way of getting the beams out of the building and back over to the other side myself. I strapped my dolly to the end to put some wheels on the end of it. Super heavy but with some muscle I got them where they needed to be. e3ab13a9849e02259e86ea6a486c5891.jpg
c08fbef42841ef23d8e7aaf9138cca58.jpg
6a78a4a85e141e9a4dc57449c5ccb1d0.jpg

Then I was back to building the right side where my stairs will be
d2cd5e7009e388883efdd6649a944eb2.jpg
d3443fc9eeeb7d7f455958507b3d33a3.jpg
bfcee2db7cf39f351008adcf212553d5.jpg
a77ef71ebfb87ea3fe8f19d39aad80d6.jpg
 
OP
I

IPACA9

Well-known member
Joined
Jul 18, 2013
Messages
489
Location
Independence, Mo
Figured I'd share what hardware I've been using.

For joining my beams to my notched posts I've chosen Fastenmaster ThruLoks.
9f62add9fad0411c8798fcb94a7e1dcb.jpg3fa41374b55ce5fae366c2dbb01ce2aa.jpg

For attaching my LVL beams together I've chosen Fastenmaster's TrussLoks which have now been replaced with a different flatter head version similar to the HeadLock screws.
2f7247ad8e942ca049775e1c6628be79.jpg
df72a35e28e53de2e2bba50da2519eee.jpg

For joining my dimensional beams together I chose Fastenmaster's HeadLok screws.
48a4781672f23af0cb131d6dd0d1f537.jpg
629ba60efc26064f5c35a13d9728b0ca.jpg

Joist hangers are attached using Simpson StrongTie screws.
574b523fdabcab21464913f0d1eb0d98.jpg
7282efc9c648bee217c599e95af2c773.jpg
 
OP
I

IPACA9

Well-known member
Joined
Jul 18, 2013
Messages
489
Location
Independence, Mo
Next I moved on to the hangers for the back section.
a26a9ba1eedd9c4ce5f509f27b4d6d27.jpg
645ab2a87d12f8ae9c12196fc51901c4.jpg
8d0286d8498a0385d4444f5662a3d855.jpg
c708d6482bc76871027bc40fdc804edb.jpg

I then mounted my posts and back beams
5e8c5ed3de392187c186c5c1c423e4fd.jpg

Moved on the the joist hangers
95511bb24cb09c8e4f105f5237c654bc.jpg

Cross bracing between my joists
92f94e8cab0fe356ad6caa79bd8f5239.jpg
27fe6c6f18037a15a0bd4dcb950249d4.jpg
8a683799cbc3f50c4ee923de387c80be.jpg
bc3c9bc323bd9c484c490ef864b6640e.jpg
 
Last edited:
OP
I

IPACA9

Well-known member
Joined
Jul 18, 2013
Messages
489
Location
Independence, Mo
Next I moved onto my stairs and this is where I'm at. The last month has had a ton of stuff happening amd I've had not time to work out there plus the heat and humidity has just been ridiculous.

My first stringers were cut out of the 2x12 kiln-dried hem-fir I picked up last November. I shouldn't have even cut into them. After I was done I decided they were too cracked up to want to use. It was a learning process though. I have never cut stringers before. Kinda a pain in the *** really.
d6445403ac3b9568bc9f177af42fad48.jpg
89fe57242888fbf2ff617e7e55660059.jpg
3ad58fc3e368705d8f96557042655eed.jpg

After deciding I didn't want to use these stringers I went and bought some 11-7/8" LVLs to make them out of. Should have thought of that in the first place. c373bb209f2570e8950692486a6792b5.jpg
9cdeae27f1824eb1a16041f9572d1e15.jpg

I still have two more stringers to cut. Just so much going on right now. I need to buy a couple fans and just get my *** on it!
 

bczygan

Well-known member
Joined
Nov 4, 2009
Messages
22,002
Location
DETROIT! Arsenal of Scrappers
Incredible job!

Beautiful mezzanine! Stout!

I should have thought about LVL's for stringers and mentioned them to you. They are the best solution. A Fine Homebuilding type choice.

Bill
 

95riosnake

Well-known member
Joined
Oct 26, 2013
Messages
394
Location
Pittsburgh, PA
Great project! Very stout design in its second iteration. The mezzanine will add a lot of character to the space in addition to the usefulness.
 
OP
I

IPACA9

Well-known member
Joined
Jul 18, 2013
Messages
489
Location
Independence, Mo
I'm still undecided on what I'm going to do with the railings . I find myself looking at people's decks and taking it all in. I want it to look cool but don't want to spend an arm and leg on it. Also there's going to be a lot of cool stuff displayed on them as well.
 
OP
I

IPACA9

Well-known member
Joined
Jul 18, 2013
Messages
489
Location
Independence, Mo
I also talked to worldwide about adding a 20x30 addition to the building. This side will be about 3 feet taller for some headroom and it will have a full 2nd floor in it. If everything goes well it will happen in November.e079b0147e75edc0dbe37d7cffa5acaf.png
 

bczygan

Well-known member
Joined
Nov 4, 2009
Messages
22,002
Location
DETROIT! Arsenal of Scrappers
I'm still undecided on what I'm going to do with the railings . I find myself looking at people's decks and taking it all in. I want it to look cool but don't want to spend an arm and leg on it. Also there's going to be a lot of cool stuff displayed on them as well.

Your railing, to me, should have very little visual complexity, while providing access and safety.

And it should be demountable at some points, so you can remove sections of it to load things up and down.

I would install some metal pockets on the outside face of the LVL's and then install metal stanchions in the pockets. No closer together than 8' on center. Start at one end with a single, then every 8' have a double pocket or two single ones side by side. Metal top and bottom rails and clear poly-carbonate panels for the face.

This would give you a good view up there and access, while providing safety.

Just noticed you want to display things ON them. So the fixed ones, or all of them, could have solid panels, which could be plywood with a painted surface. Then the decision is do you want a continuous smooth wall or panels with posts marking where each panel begins and ends. The way it looks will be in the details. Deciding whether things will be displayed (The wall behind the mezzanine or the face of the railing, will help you decide whether it should be clear of opaque.

Bill
 
Last edited:
OP
I

IPACA9

Well-known member
Joined
Jul 18, 2013
Messages
489
Location
Independence, Mo
Looks great! Thanks for the update, that addition looks exciting too
Plans are to have the upstairs for the pool table, bar and lounge area for everyone. Downstairs will be my woodshop area

My custom 8' Peter Vitali table has been crated up since I moved from our old house three years ago. Can't wait to get it setup again.
15043d60cbba335c65ab0354e0500225.jpg
 
Last edited:
To avoid these ads, REGISTER NOW!
OP
I

IPACA9

Well-known member
Joined
Jul 18, 2013
Messages
489
Location
Independence, Mo
Well after some delays with our huge Estate auction and other things I'm getting back at it. I've started laying down the plywood for the back deck and soon I'll move to the right side. Today I rode the bike around and priced the lumber needed to do the railings. I priced Cedar, Home Depot's "cedar toned" pressure treated and pine. I think I'll still pull the trigger on going with cedar just to do it. It's indoor so I don't need anything treated but will cost a little more. In the meantime I sat down and drew up some new railing to know exactly what I need. Love working with Sketchup to get the measurements and all. 1decec3c9bf34f5f3034a8bf2333a2b8.jpg
 

Attachments

  • 1decec3c9bf34f5f3034a8bf2333a2b8.jpg
    1decec3c9bf34f5f3034a8bf2333a2b8.jpg
    237.6 KB · Views: 10
OP
I

IPACA9

Well-known member
Joined
Jul 18, 2013
Messages
489
Location
Independence, Mo
94a8d854189dec6c66c38100ebe1b2a8.jpg

It was getting toasty up there so I had to quick mount a fan using some tonneau cover clamps. :)
dcd339f4107108cf6309c8e345901438.jpg
ff8e0913619d2295702de1124f9c4650.jpg
 

Attachments

  • 94a8d854189dec6c66c38100ebe1b2a8.jpg
    94a8d854189dec6c66c38100ebe1b2a8.jpg
    161.2 KB · Views: 6
  • dcd339f4107108cf6309c8e345901438.jpg
    dcd339f4107108cf6309c8e345901438.jpg
    159 KB · Views: 5
  • ff8e0913619d2295702de1124f9c4650.jpg
    ff8e0913619d2295702de1124f9c4650.jpg
    136 KB · Views: 14
OP
I

IPACA9

Well-known member
Joined
Jul 18, 2013
Messages
489
Location
Independence, Mo
I am so happy that someone with little experience did their research and mounted the beams ON TOP OF the post.
I figured that out before even researching. It just makes sense.

A funny thing that I noticed today is when researching on ways to do railing posts they have changed it to where it's recommended or even code to mount the full 4x4 post outside the beam for strength instead of notching it. Lowes still sells notched posts.

dce9a4cfe18732cd2705d3cbb2d88815.jpg
 

Attachments

  • dce9a4cfe18732cd2705d3cbb2d88815.jpg
    dce9a4cfe18732cd2705d3cbb2d88815.jpg
    175.6 KB · Views: 13
OP
I

IPACA9

Well-known member
Joined
Jul 18, 2013
Messages
489
Location
Independence, Mo
Finally had some time and knocked out my other two LVL stringers. Man these get old fast. It'll be nice to walk up to the mezzanine soon vs climbing a ladder
38e89fb2e9feecf6b6921dac1fb249f3.jpg

0091dcb16a638e83ea2d7258b7363e18.jpg
 

Attachments

  • 0091dcb16a638e83ea2d7258b7363e18.jpg
    0091dcb16a638e83ea2d7258b7363e18.jpg
    98.5 KB · Views: 4
  • 38e89fb2e9feecf6b6921dac1fb249f3.jpg
    38e89fb2e9feecf6b6921dac1fb249f3.jpg
    217.4 KB · Views: 3

theoldwizard1

Well-known member
Joined
Feb 22, 2011
Messages
43,073
Location
SE MI
I am so happy that someone with little experience did their research and mounted the beams ON TOP OF the post.

I am so happy that someone with little experience did their research and mounted the beams ON TOP OF the post.
I figured that out before even researching. It just makes sense.
Maybe to you, but not to dozens of other DIYer. Lag to the side, through bolts or even nails have been used !

I am becoming less of a fan of ledger boards for connecting a deck to a house because it has been done wrong so many times,
 
OP
I

IPACA9

Well-known member
Joined
Jul 18, 2013
Messages
489
Location
Independence, Mo
Got the stringers mounted up. Hopefully tread and risers tomorrow

eb0f4d8ec338cd7d481e52e7c8c82cf8.jpg
9bcb07c52f9d6b5fd62a5870990a0a54.jpg
144c2cff42092fb9270fa987909e8a5b.jpg
296eba016e42e0f71f649439cb5144ef.jpg
 

Attachments

  • 296eba016e42e0f71f649439cb5144ef.jpg
    296eba016e42e0f71f649439cb5144ef.jpg
    131.4 KB · Views: 4
  • 144c2cff42092fb9270fa987909e8a5b.jpg
    144c2cff42092fb9270fa987909e8a5b.jpg
    153.3 KB · Views: 4
  • 9bcb07c52f9d6b5fd62a5870990a0a54.jpg
    9bcb07c52f9d6b5fd62a5870990a0a54.jpg
    150.9 KB · Views: 5
  • eb0f4d8ec338cd7d481e52e7c8c82cf8.jpg
    eb0f4d8ec338cd7d481e52e7c8c82cf8.jpg
    154.5 KB · Views: 5
OP
I

IPACA9

Well-known member
Joined
Jul 18, 2013
Messages
489
Location
Independence, Mo
Cut my 13 treads and risers today. Tomorrow I will round over the nose of the treads and get them all fastened down but in the morning I have a new 12x20 lofted barn shed being delivered that I got a great deal on. It will get all my mowers and yard **** out of my shop finally and free up a ton of room.

f4872cf83ac88c5e4a0cef0990792690.jpg


d67cef3043befaef838e2f0afb138676.jpg
 

Attachments

  • f4872cf83ac88c5e4a0cef0990792690.jpg
    f4872cf83ac88c5e4a0cef0990792690.jpg
    104.6 KB · Views: 2
  • d67cef3043befaef838e2f0afb138676.jpg
    d67cef3043befaef838e2f0afb138676.jpg
    27 KB · Views: 4

bryceaugustine

Well-known member
Joined
Jan 5, 2013
Messages
56
are you willing to share some details about your new shed? 12x20 is what i want for my backyard. wall height? height to peak? cost? delivery/installation fee? i assume is came from classic building sales. i have been making plans to build mine on a concrete pad, but knowing i have some options would be nice. getting a pre-built 12x20 from home depot was a bit more then i was willing to spend. i think i can build it significantly cheaper, but the time to do so is the issue.
 

theoldwizard1

Well-known member
Joined
Feb 22, 2011
Messages
43,073
Location
SE MI
are you willing to share some details about your new shed? 12x20 is what i want for my backyard. wall height? height to peak? cost? delivery/installation fee?
Contact the place that builds them. They can add a foot or 2 here or there for not much additional cost.

In general their floors ****. Either pour a slab or search GJ and find what other have done (remove sod, gravel, PT framing, etc.)
 

Jo Diesel

Well-known member
Joined
Aug 26, 2015
Messages
402
Location
St. Johns MI
I was wondering why you put your stairs there until I seen your window. Awesome mezzanine.

Are you still going to put an addition off the back ?
 
OP
I

IPACA9

Well-known member
Joined
Jul 18, 2013
Messages
489
Location
Independence, Mo
I beat myself up over stair placement and how I wanted them. I want to build a closet under them to put my compressor and other things. The previous owner stubbed it out for water and waste but I'll have to figure how to get it to the septic tank.

I'm going to add to the left side but it's on hold for now.
 
OP
I

IPACA9

Well-known member
Joined
Jul 18, 2013
Messages
489
Location
Independence, Mo
are you willing to share some details about your new shed? 12x20 is what i want for my backyard. wall height? height to peak? cost? delivery/installation fee? i assume is came from classic building sales. i have been making plans to build mine on a concrete pad, but knowing i have some options would be nice. getting a pre-built 12x20 from home depot was a bit more then i was willing to spend. i think i can build it significantly cheaper, but the time to do so is the issue.
I'll get some measurements for you tomorrow. Today was fast paced. We got the building delivered and then had to run and empty moms storage building so we wouldn't get hit for another month. We sold her smaller 10x12 garden building and bought this.

I priced the buildings from several different places and also priced to build one myself. I'm just too busy for that. It's getting cooler and my remote starter season is starting. Pretty soon I'm going to be in the streets working 14+ hours a day as usual. This building happened to be a repo and I got it for a great price.

Watching delivery was really neat and the guy was pretty cool. The wireless Mule machine is pretty amazing. Things to do are building up the ground around it, installing a front door and windows, build a covered porch and put a large garden in front of it for mom.

23d9c9fc82865598e8c59f46c7ce3c3b.jpg
3209f5739f38e5b146c3a24c5c64e4a5.jpg
5be7a516296c0d1aa67f3e7818cecc5c.jpg
8322e973b0969146918706986abbd71c.jpg
 

Attachments

  • 8322e973b0969146918706986abbd71c.jpg
    8322e973b0969146918706986abbd71c.jpg
    280.6 KB · Views: 6
  • 3209f5739f38e5b146c3a24c5c64e4a5.jpg
    3209f5739f38e5b146c3a24c5c64e4a5.jpg
    100.1 KB · Views: 4
  • 23d9c9fc82865598e8c59f46c7ce3c3b.jpg
    23d9c9fc82865598e8c59f46c7ce3c3b.jpg
    172.8 KB · Views: 5
  • 5be7a516296c0d1aa67f3e7818cecc5c.jpg
    5be7a516296c0d1aa67f3e7818cecc5c.jpg
    217.1 KB · Views: 6

bczygan

Well-known member
Joined
Nov 4, 2009
Messages
22,002
Location
DETROIT! Arsenal of Scrappers
I like the use of LVL's for stair stringers and the use of 3 of them. Should be plenty strong. But if you want them even stronger, simply cut the span in half by supporting them with a short wall or posts at the mid-span.

Even more useful when using dimensional lumber stringers.

Bill
 
OP
I

IPACA9

Well-known member
Joined
Jul 18, 2013
Messages
489
Location
Independence, Mo
I like the use of LVL's for stair stringers and the use of 3 of them. Should be plenty strong. But if you want them even stronger, simply cut the span in half by supporting them with a short wall or posts at the mid-span.

Even more useful when using dimensional lumber stringers.

Bill
I'll be building a wall under it anyways for the closet/compressor room :)
 
To avoid these ads, REGISTER NOW!
Top Bottom