To avoid these ads, REGISTER NOW!

Motorman55's Garage...The Beginning

OP
M

Motorman55

Well-known member
Joined
Apr 10, 2016
Messages
2,631
Location
South Jersey
The FLH's bad battery notwithstanding, I tested out the lights on the FLH using my 12V test bench battery. A quick connection with small jumper cables and the FLH lit up like a Christmas tree. From the dash speedo light to the tail lights and directional lamps, all are a go.
 

Attachments

  • IMG_4440.jpg
    IMG_4440.jpg
    150.1 KB · Views: 29
To avoid these ads, REGISTER NOW!
OP
M

Motorman55

Well-known member
Joined
Apr 10, 2016
Messages
2,631
Location
South Jersey
I took the XLCH Sporty off the lift and moved the Handy lift more to the center of the garage before putting the FLH on it. This gave me plenty of working room now all around the bike.

The FLH will remain on the lift for awhile as I make the needed repairs and complete the general maintenance which will include an oil and oil filter change, air filter and new spark plugs to name just a few.

Its also due for a new set of tires and tubes. Not sure yet which ones I'm going to go with at this point, except they will be of a vintage style tread design in keeping with the 46 year old FLH's styling.
 

Attachments

  • IMG_4451.jpg
    IMG_4451.jpg
    154 KB · Views: 32
  • IMG_4452 (2).jpg
    IMG_4452 (2).jpg
    157 KB · Views: 28
OP
M

Motorman55

Well-known member
Joined
Apr 10, 2016
Messages
2,631
Location
South Jersey
Once the FLH was on the lift, I pulled the plugs and scoped the inside of the cylinders. Except for some carbon buildup on the piston domes, everything looks good to go with the initial bump start.

I use this Snap-On scope a lot. One of the best tools I ever purchased.
 

Attachments

  • IMG_4458 (2).jpg
    IMG_4458 (2).jpg
    154.9 KB · Views: 29
OP
M

Motorman55

Well-known member
Joined
Apr 10, 2016
Messages
2,631
Location
South Jersey
Opened up the cone and checked out the points and condenser. Lots of meat left on the points, so probably leave them alone for now. "If it ain't broke, don't fix it".

Couldn't help but give the cone a little test polishing while I was standing there. Should polish up nicely when I get to it.
 

Attachments

  • IMG_4485.jpg
    IMG_4485.jpg
    135.4 KB · Views: 20
  • IMG_4487.jpg
    IMG_4487.jpg
    147.7 KB · Views: 22
OP
M

Motorman55

Well-known member
Joined
Apr 10, 2016
Messages
2,631
Location
South Jersey
Next I pulled the air filter assembly, which is in very nice shape. Looks like a new foam filter is in order..... Put it on the 'Part $ List'.

The carb is a Bendix/Zenith USA which is correct for a 1974 FLH. Choke and Throttle cables work freely and will get a good lube job before I'm finished with the carb.

As for the carb itself, it'll get a good cleaning in and out and maybe a rebuild on the bench if required.
 

Attachments

  • IMG_4484.jpg
    IMG_4484.jpg
    120.6 KB · Views: 19
  • IMG_4482 (2).jpg
    IMG_4482 (2).jpg
    134 KB · Views: 19
  • IMG_4483.jpg
    IMG_4483.jpg
    154.3 KB · Views: 18
OP
M

Motorman55

Well-known member
Joined
Apr 10, 2016
Messages
2,631
Location
South Jersey
One of the first repairs I wanted to do was rebuild the front brake master cylinder. Once I got it off the bike and on the bench it was disassemble time.

Even with my expensive set of Snap-On snap ring plyers and a few others brands, I couldn't find one that would fit inside the housing to grab a hold of the snap ring holding the piston inside the cylinder.

After a few minutes fumbling with that, I took a pin punch that fit into the piston and pushing down on it, I grew a third hand and pried out the snap ring with a screwdriver....done. The snap ring is toast, but I've got a new one to replace it. A little air pressure thru the front brake line fitting and the piston and packing popped out.

After a good cleaning of all the internal parts and a quick hit with the brass wire wheel on the outside to remove any old flaking paint and crud, it was time to reassemble it.

Now to give it a couple coats of black paint to natch the original sheen.
 

Attachments

  • IMG_4431.jpg
    IMG_4431.jpg
    147.6 KB · Views: 23
  • IMG_4445.jpg
    IMG_4445.jpg
    148 KB · Views: 22
  • IMG_4491.jpg
    IMG_4491.jpg
    149.4 KB · Views: 21
OP
M

Motorman55

Well-known member
Joined
Apr 10, 2016
Messages
2,631
Location
South Jersey
So at this point in time I did a quick visual check of the front and back brake caliper pads.

The front pads (1st pic) looks pretty good, as well as the front disc. Can't say the same for the back brake pads (2nd pic). The pad material is virtually gone. Soooo....Put it on the "Part$ List".

Another candidate for "The Part$ List" may be the rear disc.
 

Attachments

  • IMG_4462 (3)_LI.jpg
    IMG_4462 (3)_LI.jpg
    111.2 KB · Views: 20
  • IMG_4459_LI (4).jpg
    IMG_4459_LI (4).jpg
    112.6 KB · Views: 20
  • IMG_4461.jpg
    IMG_4461.jpg
    136.4 KB · Views: 19
OP
M

Motorman55

Well-known member
Joined
Apr 10, 2016
Messages
2,631
Location
South Jersey
Picked up a new battery today. NAPA was the only one close to me that had a HD-12 battery to fit the FLH in stock.

Put it up on the bench and filled the cells with electrolyte and set it on 2amp charge for a couple hours per the instructions.

Tomorrow I'll install it in the bike and give the motor a test bump start.
 

Attachments

  • IMG_4496.jpg
    IMG_4496.jpg
    153.3 KB · Views: 10
OP
M

Motorman55

Well-known member
Joined
Apr 10, 2016
Messages
2,631
Location
South Jersey
Looking around the garage/shop I can see I made a hell of a mess this past week. Going to have to straighten up a little tomorrow too.
 
OP
M

Motorman55

Well-known member
Joined
Apr 10, 2016
Messages
2,631
Location
South Jersey
Today I installed the battery on the FLH and after removing the spark plugs I did a test bump start to make sure everything turned smoothly.

After reinstalling the spark plugs I went with a full start up. A few hits on the starter button and adjusting the chock cable the motor fired up and settled down to a nice idle.

Still lots more to do on the bike before it sees the road again, but happy with the progress I've made so far.
 
OP
M

Motorman55

Well-known member
Joined
Apr 10, 2016
Messages
2,631
Location
South Jersey
Waiting for some parts to come in the mail for the 74 FLH. Once I get them, I'll update the progress of the Big Twin.

Meanwhile I'm continuing to clean up the shop. Probably hang another shelf or two as I need to store some of the vintage accessory parts I took off the FLH that I will not be putting back on.
 
OP
M

Motorman55

Well-known member
Joined
Apr 10, 2016
Messages
2,631
Location
South Jersey
The high temperatures outside and inside the garage these last couple days here NJ has kind of been slowing me up to do anything in the garage or on the FLH.

Except for ordering some more parts for the bike this past Saturday, not much is getting done, with the exception of in the garden for the wife.

Should get some parts in tomorrow, so that'll prompt me into doing stuff in the garage even if it is hot.
 
Last edited:
OP
M

Motorman55

Well-known member
Joined
Apr 10, 2016
Messages
2,631
Location
South Jersey
Took delivery of some motorcycle parts and a case of 60wt oil today.

After checking the parts for fit and finish, turns out the supplier shipped the wrong air filter, otherwise the rest were ok. I'll order another A/F and hopefully the supplier will get it right the second time.

After pulling out the old Autolite plugs, I gapped a pair of new Champion spark plugs and installed them in the Harley FLH . (I put this tool kit together just for gapping plugs, points and setting the timing on my Harleys). Once the plugs were in and wires reconnected, I hit the start button and the B/T fired right up and settled down to that nice thumping sound that only a B/T Shovelhead motors makes.

I let the motor run for awhile to get the oil hot and circulating to see how much motor oil was coming thru the rear chain oiler hose. I turned the screw on the oil pump that controls the flow of oil drops per minute to the rear chain all the way in to shut it off completely. I want to start using chain lube and not motor oil from the pump to lube the chain from now on.

After that I started removing the rear brake master cylinder for its rebuilding. Still have to remove both the front and rear brake calipers for rebuilding too.
 

Attachments

  • IMG_4519.jpg
    IMG_4519.jpg
    147.6 KB · Views: 25
  • IMG_4518.jpg
    IMG_4518.jpg
    149.3 KB · Views: 30
  • IMG_4523.jpg
    IMG_4523.jpg
    148 KB · Views: 26
Last edited:
OP
M

Motorman55

Well-known member
Joined
Apr 10, 2016
Messages
2,631
Location
South Jersey
Update on the 74 Harley FLH

Yesterday I received the correct UNI foam air filter to replace the wrong one sent by my supplier last week. I like that this filter is Made in the USA. These UNI foam filters require them to be soaked in a special oil to work correctly. Not going to do that until I'm ready to install it.

Today I placed a couple parts orders for the Harley. Should have these parts inside of a week. These parts will enable me to rebuild the rear brake system and includes a new Russell stainless steel brake rotor and Avon MKII Safety Mileage tire and tube. This will keep me busy for a couple days.

Meanwhile, its back to cleaning and polishing.
 

Attachments

  • IMG_4530.jpg
    IMG_4530.jpg
    149 KB · Views: 13
OP
M

Motorman55

Well-known member
Joined
Apr 10, 2016
Messages
2,631
Location
South Jersey
I haven't really done anything to improve on the garage itself as I'm too busy taking care of two houses and properties this season. What time I have left has been dedicated to working on the 74 FLH.

Of course these lousy 90+ degree hot and humid days these past few weeks in New Jersey hasn't helped any either. Still I need to get the FLH road ready for the great Fall weather, so its sweat or sink.
 
OP
M

Motorman55

Well-known member
Joined
Apr 10, 2016
Messages
2,631
Location
South Jersey
I like Sunday deliveries! Too bad the rest of my order won't be here until Monday night or Tuesday at the earliest.
 

Attachments

  • IMG_4533.jpg
    IMG_4533.jpg
    140.1 KB · Views: 21
  • IMG_4531.jpg
    IMG_4531.jpg
    149.1 KB · Views: 20
OP
M

Motorman55

Well-known member
Joined
Apr 10, 2016
Messages
2,631
Location
South Jersey
A few more goodies for the FLH Harley came in yesterday. Tracking shows I might have some more parts coming via FedEx today too. Of course we're dealing with the Hurricane right now, so not sure if they'll deliver at all. :fingersx:

Although it was hot and humid, again, I worked for a couple hours in the garage yesterday before calling it quits. :mad: If the weather would just cool off a little, I could be a lot more productive.
 

Attachments

  • IMG_4534.jpg
    IMG_4534.jpg
    125.3 KB · Views: 15
OP
M

Motorman55

Well-known member
Joined
Apr 10, 2016
Messages
2,631
Location
South Jersey
Progress report on the 74 FLH

FLH got a little light or rather a little less lights.

I want to remove the large aluminum headlight nacelle to make polishing it easier, but before I can do that I needed to remove the original chrome spot lamps and directional lamps and existing mounting hardware which I did today.

Once I get the cowl off I'll need to do a little electrical wiring to facilitate the installing of the original Factory crossbar and mounting hardware that FedEx delivered today.

Moving along....🙂
 

Attachments

  • IMG_4540.jpg
    IMG_4540.jpg
    148.2 KB · Views: 7
  • IMG_4541.jpg
    IMG_4541.jpg
    145.7 KB · Views: 5
OP
M

Motorman55

Well-known member
Joined
Apr 10, 2016
Messages
2,631
Location
South Jersey
More parts arrived for the 74 FLH

Its an original Factory correct style light bar and mounting hardware. This bar and mounting hardware will correctly locate the original lamps shown in the pic.

What's nice about this set-up is the wires from the spot lamps and directional lamps all run thru the bar and up into the headlight cowl making for a very clean look. 😎
 

Attachments

  • IMG_4539.jpg
    IMG_4539.jpg
    149.7 KB · Views: 8
OP
M

Motorman55

Well-known member
Joined
Apr 10, 2016
Messages
2,631
Location
South Jersey
Top: New rear master cylinder replacement parts all line up and awaiting the master cylinder which I'm almost done cleaning.

Bottom: The rear brake pedal, mounting plate and small parts all cleaned and de-rusted and ready for reassembly.
 

Attachments

  • IMG_4544.jpg
    IMG_4544.jpg
    149.7 KB · Views: 8
To avoid these ads, REGISTER NOW!
OP
M

Motorman55

Well-known member
Joined
Apr 10, 2016
Messages
2,631
Location
South Jersey
My Handy Lift doesn't have the drop out plate like the new ones, so I have to improvise a little to raise the rear tire up off the Handy Lifts deck enough to remove a rear tire.

This time my truck's scissor jack and a couple wood blocks are getting the job done. I need to buy a decent scissor lift that's made just for this purpose.
 

Attachments

  • IMG_4555.jpg
    IMG_4555.jpg
    133.8 KB · Views: 45
  • IMG_4556.jpg
    IMG_4556.jpg
    100.3 KB · Views: 28
OP
M

Motorman55

Well-known member
Joined
Apr 10, 2016
Messages
2,631
Location
South Jersey
I finished rebuilding the FLH rear brake master cylinder and set it aside for now.

Also removed the rear wheel along with the rear brake caliper assembly. Once I got the wheel off I removed the brake disc and sprocket from the hub. Those parts will be replace along with a new Avon tire and tube.

Meanwhile, the big 'banana' rear brake caliper went up on the work bench for disassembly and cleaning before it gets new seals and brake pads.

Lots to do.
 

Attachments

  • IMG_4552 (2).jpg
    IMG_4552 (2).jpg
    124.6 KB · Views: 15
  • IMG_4562.jpg
    IMG_4562.jpg
    118.5 KB · Views: 16
  • IMG_4565.jpg
    IMG_4565.jpg
    151.3 KB · Views: 19
  • IMG_4561.jpg
    IMG_4561.jpg
    149 KB · Views: 14
OP
M

Motorman55

Well-known member
Joined
Apr 10, 2016
Messages
2,631
Location
South Jersey
Today I disassembled the 74 FLH's rear brake caliper for rebuilding and started cleaning some of the parts while others soak in degreaser/cleaner.

If everything looks good I'll be starting the rebuild tomorrow.
 

Attachments

  • IMG_4578.jpg
    IMG_4578.jpg
    152.1 KB · Views: 15
  • IMG_4561.jpg
    IMG_4561.jpg
    149 KB · Views: 14
OP
M

Motorman55

Well-known member
Joined
Apr 10, 2016
Messages
2,631
Location
South Jersey
Been awhile since I posted here, so I'll start with what I did today. Then I'll back track to catch up over the next several posts.

I started working on a small box to mount on my 74 FLH luggage carrier. It'll serve as a combination Tool Box and First Aid Kit holder. This will free up the saddle bags for storing our shorty helmets and various motor clothes and accessories as needed.

So far I drilled the box for and temporarily fitted a pair of Harley Factory original spring loaded mounting brackets from an old Harley luggage box. This will allow the box to be quickly put on and off.

After that I sanded the box down and prepped it for paint. Thinking Gloss Black or Black Wrinkle for the finish. Not sure yet which one I'll go with. Will try and get that done in the next couple days.

After removing the spring loaded mount, I used some rust remover to clean up the bottom of the carrier and the spring loaded mounting brackets.
 

Attachments

  • IMG_5115.jpg
    IMG_5115.jpg
    88.7 KB · Views: 17
  • IMG_5114.jpg
    IMG_5114.jpg
    73.9 KB · Views: 18
  • IMG_5116.jpg
    IMG_5116.jpg
    150.8 KB · Views: 23
OP
M

Motorman55

Well-known member
Joined
Apr 10, 2016
Messages
2,631
Location
South Jersey
Continuing with the 74 FLH project and picking up where I left off on Post #184.

After removing the old tire and tube and setting up my HF tire changer, I cleaned up the original wheel and mounted a new Avon 5.10x16 tire and tube.

Next I balanced the tire/wheel assembly and installed a new Russell stainless 10-1/2" rear brake disc. The rear sprocket was like new so I cleaned it up and re-installed it.

Lastly I painted the raised lettering white with a paint pen.
 

Attachments

  • IMG_4639.jpg
    IMG_4639.jpg
    88 KB · Views: 17
  • IMG_4642.jpg
    IMG_4642.jpg
    158.9 KB · Views: 17
  • IMG_4715.jpg
    IMG_4715.jpg
    150 KB · Views: 19
  • IMG_4718.jpg
    IMG_4718.jpg
    110.2 KB · Views: 19
  • IMG_4720 (2).jpg
    IMG_4720 (2).jpg
    149.1 KB · Views: 22
OP
M

Motorman55

Well-known member
Joined
Apr 10, 2016
Messages
2,631
Location
South Jersey
The after de-rusting pics of the carrier and spring loaded brackets. I used Rust-oleum Rust Dissolver Gel in the spray bottle. This stuff goes on thick like aircraft paint remover and acts pretty fast. I sprayed it on and brushed it all around and into the cracks with a chip brush. I left it on for about an hour and then rinsed it off with water. I think they came out pretty good.
 

Attachments

  • IMG_5113.jpg
    IMG_5113.jpg
    151.6 KB · Views: 20
  • IMG_5136 (2).jpg
    IMG_5136 (2).jpg
    128.4 KB · Views: 19
  • IMG_5138.jpg
    IMG_5138.jpg
    148.1 KB · Views: 16
  • IMG_5157.jpg
    IMG_5157.jpg
    74.3 KB · Views: 24
Last edited:
OP
M

Motorman55

Well-known member
Joined
Apr 10, 2016
Messages
2,631
Location
South Jersey
Painted the tool box for the 74 FLH flat black on the bottom and a semi-gloss black on the top and sides.

Once it was dry I re-installed the lock assembly and the original pair of Harley spring loaded mounting brackets made for attaching to the chrome luggage rack.

Not quite finished with the box yet.
 

Attachments

  • IMG_5166.jpg
    IMG_5166.jpg
    113.9 KB · Views: 17
  • IMG_5167.jpg
    IMG_5167.jpg
    127.1 KB · Views: 21
Last edited:
OP
M

Motorman55

Well-known member
Joined
Apr 10, 2016
Messages
2,631
Location
South Jersey
Well, there's no putting it off any longer. So today I made some changes to the garage/shop layout.

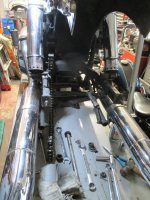
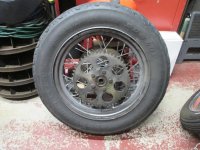
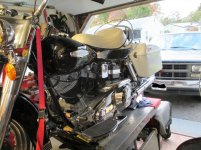
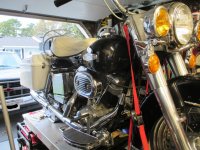
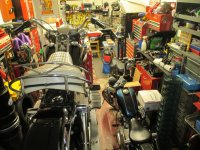
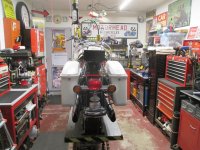
With the addition of the 74 FLH Harley 95% back together along with the 74 XLCH Harley, there's just not enough room to work in the shop comfortably. I hated to redo the shop again but I need the additional floor space more then bench space at this point.

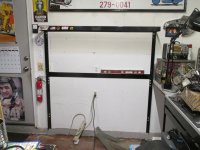
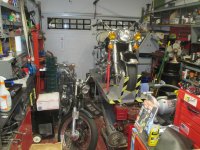
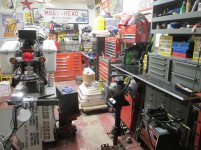
I started by taking the 5 ft. black motor bench apart that was up against the back wall. I left the back portion of the black bench with the upper shelf intact and raised it a few inches to clear and rest on the cement footing that sticks out an annoying 1/2" past the sheetrock along the bottom of the wall. This enabled me to screw the frame flat against the wall.

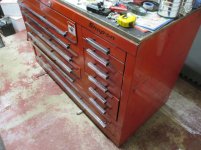
Once that was done I moved the big 1,000 lb. red tool cabinet (no wheels) using a couple of round bars and my large 4' pry bar. Slowly but surely I was able to move it forward while at the same time turning it 90 degrees to **** it up against the back wall. It was going to be a tight fit. I had to shift the 4' long black electrical bench about 1/4" to the right to make it fit flush against the corner top board. This allowed me to keep the 'L' shape of the benches.

Yes I'm losing my motor bench, but then I can always use the electrical bench to hold a motor or the Handy lift itself as a bench. Hell, I can always just slap together a motor stand if need be.

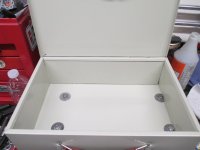
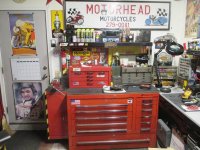
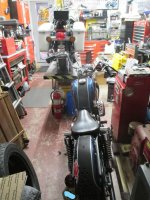
Once the big red tool cabinet was in place, I mounted the side cabinet to the left. I did have to switch the side cabinet's door so it would swing to the left for it to open all the way and allow the three drawers inside to pull out.

I ended the night by setting some of the smaller boxes and old gray Craftsman tool box up on top of the large red cabinet and the radio and a few smalls on top of the black shelf. I have a major mess and lots more to do but this was the hardest part of the redo.

I like it... :)
 

Attachments

  • IMG_5182.jpg
    IMG_5182.jpg
    140.4 KB · Views: 57
  • IMG_5181.jpg
    IMG_5181.jpg
    157 KB · Views: 59
  • IMG_5183.jpg
    IMG_5183.jpg
    149.6 KB · Views: 65
  • IMG_5184.jpg
    IMG_5184.jpg
    149.5 KB · Views: 64
  • IMG_5188.jpg
    IMG_5188.jpg
    156.7 KB · Views: 81
Last edited:
OP
M

Motorman55

Well-known member
Joined
Apr 10, 2016
Messages
2,631
Location
South Jersey
Rather then try to show everything I've done to the 74 FLH in the last 3 months, I'll just post a couple pics to show the progress so far.

The bike's been taken apart and gone thru from top to bottom, from polishing up the aluminum headlight nacelle, cleaning up all the original nuts and bolts to rebuilding the brakes, lighting, new oil and fuel lines and lots of general maintenance. Its not done yet, but getting there.

I still have to take off the front tire/wheel assembly from the front end, then clean up the front wheel, install a new tire and tube, finish the front brakes rebuild and installation.

This was all done while working in a confining area. Thus the need to redo the shop layout again.
 

Attachments

  • IMG_5140.jpg
    IMG_5140.jpg
    153.1 KB · Views: 40
  • IMG_5176_LI.jpg
    IMG_5176_LI.jpg
    157 KB · Views: 38
  • IMG_5175_LI.jpg
    IMG_5175_LI.jpg
    158.2 KB · Views: 38
  • IMG_5177_LI.jpg
    IMG_5177_LI.jpg
    147.4 KB · Views: 34
  • IMG_5032.jpg
    IMG_5032.jpg
    152.9 KB · Views: 35
OP
M

Motorman55

Well-known member
Joined
Apr 10, 2016
Messages
2,631
Location
South Jersey
This will give you a good idea of why I needed to move the big red tool cabinet to the back wall of the garage, even though it meant losing the black motor bench.

It was a great layout when I first set it up and only had the blue 74 XLCH Harley in the garage. But now with both Harleys residing in the small 12 x 22 one car garage, I need more open floor space.

The next step to do starting today is to push the gray Handy Lift forward into the center of the back half of the garage floor. This will leave 3 feet of working space in front and on both sides of the lift while leaving the front half of the garage's center floor space open for parking one or both bikes as needed.

YES, I created a real cluster f**k over the past few months while rebuilding the 74 FLH, but now its time to clean it up.

And to think it started out so nice and clean and organized...oh well.
 

Attachments

  • IMG_5150.jpg
    IMG_5150.jpg
    162 KB · Views: 65
  • IMG_5151.jpg
    IMG_5151.jpg
    156.7 KB · Views: 58
Last edited:

Matias

Well-known member
Joined
Feb 28, 2015
Messages
616
Location
Finland
That toolbox sure seems a pig to move! I understand the need for the added space, nothing more irritating that having to move in your own garage like Catherine Zeta-Jones in Entrapement ;)

The toolbox turned out nice, and your FLH is going forward nicely. Good luck for those last jobs on the front!
 
OP
M

Motorman55

Well-known member
Joined
Apr 10, 2016
Messages
2,631
Location
South Jersey
That toolbox sure seems a pig to move! I understand the need for the added space, nothing more irritating that having to move in your own garage like Catherine Zeta-Jones in Entrapement ;)

The toolbox turned out nice, and your FLH is going forward nicely. Good luck for those last jobs on the front!

This is at least the third time I've had to rearrange the garage to fit everything in and still have room to work. Harder to do things in a 1 car garage/shop, but it is what it is, so I have to be flexible as circumstances change.
 
OP
M

Motorman55

Well-known member
Joined
Apr 10, 2016
Messages
2,631
Location
South Jersey
Yesterday I was able to move the Handy Lift to the back end of the garage.

The Handy Lift doesn't roll on four wheels like some other lifts. It only has two 5" steel forward facing wheels on the front. So, once again I used my trusty 4' Mayhew Dominator prybar to slowly move the lift, with the 74 FLH Harley on it, about eight feet forward and leaving three feet of space between the big red tool cabinet and the front of the lift.

Now I have 10 feet of space between the back of the lift and the garage door. Enough space to park two motorcycles side by side.

As you can see in the pic, I still have to clean up the mess I made, which I started to do today.
 

Attachments

  • IMG_5206_LI (2).jpg
    IMG_5206_LI (2).jpg
    118.4 KB · Views: 52
OP
M

Motorman55

Well-known member
Joined
Apr 10, 2016
Messages
2,631
Location
South Jersey
Installed the first piece of aluminum angle trim to the right side bench/shelf. I wanted a nice smooth edge on top, so I drilled and screwed one side of the angle under the bench. Makes for a nice clean look I think.

Also made a little headway in cleaning up the shop. Got a long way to go, but at least I'm not tripping over stuff. Really need to find a place to store the large white Harley luggage box.
 

Attachments

  • IMG_5220.jpg
    IMG_5220.jpg
    159.6 KB · Views: 47
  • IMG_5219.jpg
    IMG_5219.jpg
    151.7 KB · Views: 50

Matias

Well-known member
Joined
Feb 28, 2015
Messages
616
Location
Finland
That aluminium trim piece sits nicely!

It's getting a lot cleaner compared to early photos. While I was looking at them previously, I was thinking to myself with that much stuff around and so little space, could you utilize the space over the door? Especially those luggage boxes could be sotred on the wall over the door?
 
OP
M

Motorman55

Well-known member
Joined
Apr 10, 2016
Messages
2,631
Location
South Jersey
That aluminium trim piece sits nicely!

It's getting a lot cleaner compared to early photos. While I was looking at them previously, I was thinking to myself with that much stuff around and so little space, could you utilize the space over the door? Especially those luggage boxes could be sotred on the wall over the door?

Yeah I made a big mess. I was getting around to building a shelf over the garage door in the summer, but that was put on hold when I brought the 74 FLH Harley into the garage. Now that the Harley is mostly done, the exception being installing the front brakes and installing a new tire and tube on the front wheel, I'm looking to putting up a nice deep shelf over the garage door sometime this month.
 
OP
M

Motorman55

Well-known member
Joined
Apr 10, 2016
Messages
2,631
Location
South Jersey
Continued cleaning up and getting the garage/shop squared away. Starting to look good again. I can actually walk thru it without tripping over motorcycle parts and stuff.

I even found a place to store the large white luggage box that goes to the 74 FLH. After I put it up on the shelf I was able to store some spare parts off the 74 FLH in it.

Still more to do like sorting thru some stuff I want to run to the dump. Tired of moving them from one spot to another and frequently finding myself tripping over them.
 

Attachments

  • IMG_5227.jpg
    IMG_5227.jpg
    157.9 KB · Views: 57
  • IMG_5225.jpg
    IMG_5225.jpg
    160.9 KB · Views: 59
  • IMG_5241.jpg
    IMG_5241.jpg
    128.9 KB · Views: 50
Last edited:
OP
M

Motorman55

Well-known member
Joined
Apr 10, 2016
Messages
2,631
Location
South Jersey
Wow, two months gone by already and I've done nothing worth while in the garage or on the Harley's. No Heat in the garage yet. This is the first winter in years that I haven't had to deal with those painful splits in my fingers from working in the cold and cleaners.

In the meantime I ordered and received a new Avon 5.10-16 tire, tube and rim band for the 74 FLH's front wheel. Won't get to it though until the weather warms up. Likely late March or early April.

Today Amazon delivered two new 12v Battery Tenders for the Harley's also. Those I'll get set up tomorrow. Shouldn't take too long.
 
Last edited:
To avoid these ads, REGISTER NOW!
Top Bottom