To avoid these ads, REGISTER NOW!

MP&C Shop Projects

OP
M

MP&C

Well-known member
Joined
Oct 21, 2009
Messages
4,396
Location
Leonardtown, MD
Hi Robert,

I noticed that you have been using HK epoxy primer up until you sprayed the doors. Now you used southern polyurethane's epoxy primer. Any reason for the switch? I am trying to find a good primer to use as I make repairs.

Here's a home brewed video (not mine) showing a torture test of SPI's adhesion... enjoy!


To avoid these ads, REGISTER NOW!

outtaplace

Active member
Joined
Jan 21, 2011
Messages
37
Location
Central NJ
Robert & Bob,

Thanks for sharing your information on the fresh air breathing systems and the 3M masks. I will start searching for a fresh air system on Craigslist tonight.

Another recommendation question for Robert (this may have come up before however I'm sure everyone won't mind a reminder):

What brand/size media blasting cabinet do you use and what are your recommendations for a cabinet and media?

Thanks again for all the great info!!
 
OP
M

MP&C

Well-known member
Joined
Oct 21, 2009
Messages
4,396
Location
Leonardtown, MD
For media it depends on what you are blasting. For sheet metal components you want a fine grade media, too large of media and the peening action against the metal will cause warping. The other issue is lower your pressure, this is the other factor in causing warping. Think of it this way, get a big hammer, swing it hard, you'll inflict all kinds of damage. A small hammer and taps is less likely to damage the sheet metal. So when we blast on sheet metal parts we back the compressors pressure down to about 50 psi. Here is the media I use, which is a garnet:


photobucket-9746-1378770229276.jpg


Here is the model blast cabinet I have, I bought it used and a smoking deal, or I likely wouldn't have one this size. 58w, 34d, 36h. On the 55 we are working on, both front fenders and both doors have been inside. Not much wiggle room, but in there just the same.


1536_L_1c271c42.jpg


On a size recommendation, it all depends on what you're looking to blast. I wouldn't recommend going out and getting what I have, the price has gone up considerably in the past ten years. But I've seen a guy take an early 70's Chevy p/u cab, put a hopper in the bottom and gloves through the firewall, and he can blast about anything he likes. I'd say keep your eyes open for CL or auction deals. For media, stay away from sand. Most sands also contain caustic salts, and that's the last thing you need imbedded into your sheet metal before covering it with primer. I've seen a few guys that sanded primer off a couple years after application only to find rust underneath. One guess what they blasted with... Black Beauty is another good media to use, but again, use the Fine grits only..
 

outtaplace

Active member
Joined
Jan 21, 2011
Messages
37
Location
Central NJ
Robert,

Again, thanks for the info. A quick google search led me to your cabinet and the retail price is...a bit more than I suspected :( Needless to say I will be scouring craigslist for a blasting cabinet as well.

Thanks!!
 
OP
M

MP&C

Well-known member
Joined
Oct 21, 2009
Messages
4,396
Location
Leonardtown, MD
Yeah, I paid less than half that price, couldn't pass it up..


Tonight's update. We took delivery on some nice used core support side panels from Jay Hammond's Chevy Parts. The others were quite mangled, so this will save quite a bit of time in making a set.


Picture%201994.jpg


Kyle finishing up the battery hold down modification...


Picture%201993.jpg


Picture%201995.jpg


Picture%201996.jpg


We also mocked up an MT24F battery...


Picture%201998.jpg


The factory version of this battery location for an air conditioned car also calls for a "zee" bracket to the back side of the core support.


Picture%202002.jpg


Picture%201999.jpg


So with dimensions taken, a practice piece was cut out of poster board...


Picture%202000.jpg


Picture%202001.jpg


Laid out on some 16 GA CRS...


Picture%202004.jpg


And got a bit more blocking done across the door gaps..


Picture%202003.jpg


Picture%202006.jpg
 

wrenchr

Super Moderator
Staff member
Joined
Jul 29, 2007
Messages
11,603
Location
Michigan
Yeah, I paid less than half that price, couldn't pass it up..


Tonight's update. We took delivery on some nice used core support side panels from Jay Hammond's Chevy Parts. The others were quite mangled, so this will save quite a bit of time in making a set.


Picture%201994.jpg


Kyle finishing up the battery hold down modification...


Picture%201993.jpg


Picture%201995.jpg


Picture%201996.jpg


We also mocked up an MT24F battery...


Picture%201998.jpg


The factory version of this battery location for an air conditioned car also calls for a "zee" bracket to the back side of the core support.


Picture%202002.jpg


Picture%201999.jpg


So with dimensions taken, a practice piece was cut out of poster board...


Picture%202000.jpg


Picture%202001.jpg


Laid out on some 16 GA CRS...


Picture%202004.jpg


And got a bit more blocking done across the door gaps..


Picture%202003.jpg


Picture%202006.jpg

You make it look easy!! :bowdown:
 

don long

Well-known member
Joined
Mar 31, 2012
Messages
8,841
Location
southern california
Sweet work there Robert
Nice to see the old wagon take on some color

Thanks for refreshing my memory on air masks. I have a face mask but have been using a filter 1/2 mask for the little spraying that I have been doing
No More

I went back a few pages to catch up tonite and I like the way you held the round corner piece in place then snapped off the handle after tacking your main piece into place

I'll be watching you a bit closer.
Thanks for the tips

Don
 
OP
M

MP&C

Well-known member
Joined
Oct 21, 2009
Messages
4,396
Location
Leonardtown, MD
Thanks Don! Yeah, you can never be too safe with isocyanates. Some real horror stories out there. Here's one just for an eye opener, it shows that POR actually DOES contain isocyanates, and that their website is really **** for actually telling you what you're working with and how to properly protect yourself:


http://67-72chevytrucks.com/vboard/showthread.php?t=166722


Today Kyle cut out the battery tray's zee bracket, and I had told him we should tip the top lip first and then make the vertical bends...


Picture%202007.jpg


Picture%202008.jpg


Picture%202010.jpg


As you can see, it turned out horribly, and sometimes I need a learning curve myself... :lol:

We had used a narrow bottom die to tip the top flange, and should have also used something different for the vertical bends.


Picture%202015.jpg


So let's back up and punt, here bending the vertical bends FIRST and using a roll former die to keep any markings to a minimum. We did a partial bend here, then did a partial tip, and jumped back and forth a few times for a much better result:


Picture%202018.jpg


Picture%202019.jpg


Picture%202020.jpg


Plug welded through the thinner battery hold down into the 16 ga metal of the zee bracket using a Letter A sized holes and enough heat for weld penetration to show on the back side...


Picture%202021.jpg


Picture%202022.jpg


Picture%202023.jpg


Picture%202024.jpg


Also did more fine tuning on the front end today..


Picture%202011.jpg


Picture%202025.jpg


Picture%202026.jpg


Test fit of the "early" side emblem..


Picture%202012.jpg


Picture%202013.jpg
 
OP
M

MP&C

Well-known member
Joined
Oct 21, 2009
Messages
4,396
Location
Leonardtown, MD
Thanks!


We noticed the driver's side hood gap was a bit tight and then noticed a difference in the end plates on the core support. The driver's side appears bent straight, so some hammer action made them more consistent and helped out the gap issue..


Picture%202038.jpg


Picture%202039.jpg


Picture%202040.jpg


After checking the hood brace to core support for any fitment issues, we noticed some cutouts that will allow the air around the radiator. This opening, although minimal, was re-formed with a couple of fancy chisels..


Picture%202027.jpg


Picture%202028.jpg


Picture%202029.jpg


Picture%202030.jpg


Picture%202031.jpg


The excess metal ruffles were addressed easily with the kick shrinker...


Picture%202032.jpg


Picture%202033.jpg


The next opening was a bit more substantial, and would require some replacement metal. Here was our first attempt at a bead along the edge of the panel..


Picture%202036.jpg


The dies would not permit quite enough length, so we used a vee die off the press brake and a 1/2" steel rod to make a radius die for the mag brake..


Picture%202041.jpg


Picture%202042.jpg


...and between that and a straight die in the press brake, the edge bead was formed...


Picture%202045.jpg


...here transposing the crease locations...


Picture%202043.jpg


Picture%202044.jpg


To pre-stretch the areas for the diagonal vee beads, we loaded these in the bead roller....


Picture%202046.jpg


Picture%202047.jpg


This didn't appear to add enough stretch, so the linear stretch die was used in the Watervliet planishing hammer....


Picture%202048.jpg


Picture%202049.jpg


Vee was added using 3/4 wide female bead die and a narrow tipping die..


Picture%202050.jpg


A bit of heat was added to make it a bit easier to transition the round and vee beads together...


Picture%202053.jpg


Picture%202054.jpg


Picture%202055.jpg


Picture%202056.jpg


....and this one we'll get formed up on Wednesday night and get both welded in place...


Picture%202057.jpg
 

aggierailroad

Well-known member
Joined
Jan 8, 2012
Messages
581
Location
Houston, TX
Robert, two things, if you don't mind a hijack.

1) you make me sick

2) can you recommend for a guy with limited room, the use of pneumatic (or even electric) shears? I've some limited experience with them, and think I can manage large radius curves, but don't want to waste my tool money. If you do like them, can you recommend a brand, and maybe speak about what kind of cutting radius you can get out of them?

Thanks in advance, feel free to PM me or move or whatever! Keep up the awesome work!
 

rockwithjason

Well-known member
Joined
Jan 8, 2006
Messages
2,633
Location
Las Vegas
keit makes a pretty good double cut shear. another option is to buy an HF version and test it. if you like it you can replace it later with a quality version
 
OP
M

MP&C

Well-known member
Joined
Oct 21, 2009
Messages
4,396
Location
Leonardtown, MD
Robert, two things, if you don't mind a hijack.

1) you make me sick


I'm going to count that as the second best compliment ever received.... :lol:


Robert, two things, if you don't mind a hijack.

2) can you recommend for a guy with limited room, the use of pneumatic (or even electric) shears? I've some limited experience with them, and think I can manage large radius curves, but don't want to waste my tool money. If you do like them, can you recommend a brand, and maybe speak about what kind of cutting radius you can get out of them?

Thanks in advance, feel free to PM me or move or whatever! Keep up the awesome work!


The only "handheld" shears I've used was an electric Bosch similar to this....


Bosch%20Shear%20Shears,%201500C%20(EN)%20r20039v33.png


I used it when installing the metal roofing on my house and shop. We had ordered it a bit long and this was much better than fighting tin snips. As we were doing standing seam roof, we had to cut some relief cuts on the vertical bends as this shear doesn't like making those kind of turns. On a flat surface they worked very well, although I didn't make real sharp turns to be able to speak to that. But given the offset jaw dealio I don't think they will do a real tight radius. These were a set that I had borrowed from work and don't work there anymore, so now it's back to tin snips.. :willy_nil
 

Duke55

Well-known member
Joined
Jan 18, 2013
Messages
370
Location
Utah
I do not have these shears but plan on getting one someday. The Makita version of the type of shears Robert identified above. Lazze has a video where he talks about the use of durability he has seen with the Makita JS1600. For any not familiar with Lazze he is another very talented metal worker and has very informational videos on his website.

http://http://www.lazzemetalshaping.com/
 

joeswamp

Well-known member
Joined
Jul 25, 2007
Messages
2,418
Location
Massachusetts
HF makes a set of electric shears that work really well -- they are great for rough cutting your pieces and you can then use good tin snips for the final precision trimming (after shaping). I think the HF shears are like $40-50.
 
To avoid these ads, REGISTER NOW!

SnapOnBodyTech87

New member
Joined
Nov 16, 2014
Messages
1
I have been following your posts on this forum and others for years. I am a body man by day, but do restorations and custom work at night. You're work is always top notch, I have actually learned a lot from your posts. I have a request. I just finished my own small shop, and I was wondering if you could take pictures of yours. I'm just curious as to how you have it set up. Thanks
 
OP
M

MP&C

Well-known member
Joined
Oct 21, 2009
Messages
4,396
Location
Leonardtown, MD
Welcome to the site! I don't have recent pictures of all the eqpt, but do have this layout of the shop (drawn to show the air system) if that helps. The shop is 52w x 34d outside dims.


AirSystem.jpg


Looking at the bottom right corner of the paint booth, the equipment along the outer wall of the paint booth and working around clockwise is as follows:

Diacro 24" press brake, qty 2, sheet metal rack, pexto 137 jump shear, welding table, 48" magnetic brake, Lennox TE150 nibbler (Pullmax type machine)

Continuing around the back wall, Fasti bead roller, 4 story welder (hypertherm 185 tig, Miller 211 Mig, Snap on dent puller, Miller timer controlled spot welder) Erco Kick shrinker/stretcher, tool box, Purple 28" throat English wheel, Lockformer 24" throat band saw.

Continuing around right wall, Skat blast 1536 blast cabinet, Delta Rockwell Radial arm drill press, 2 pedestal buffing stands, Southco Lathe.

Front wall between left and middle bay doors, pedestal grinder with reclaimation.
 
Last edited:
OP
M

MP&C

Well-known member
Joined
Oct 21, 2009
Messages
4,396
Location
Leonardtown, MD
I had a bit of a short night as I had to pick up the young'n from after school activities, so most of the progress this evening was Kyle's efforts.


Making the patch for the center relief, starting with adding the radius to the bottom edge... This uses a bottom vee die from the Diacro and a 1/2" rod to form the radius..


Picture%202058.jpg


Picture%202059.jpg


Test fit of the radius...


Picture%202060.jpg


Trimming out the hood brace...


Picture%202061.jpg


Scribing the patch....


Picture%202064.jpg


Trimming some of the excess on the bandsaw, and then fine tuning with the snips....


Picture%202066.jpg


Picture%202067.jpg


Picture%202068.jpg


I did work a bit more on hood gaps.. an official gap gauge shown here....


Picture%202073.jpg


Picture%202075.jpg


Also took some radiator leak preventative measures....


Picture%202069.jpg


Picture%202070.jpg


Trimming the other patch for the hood brace....


Picture%202072.jpg


Kyle persuading the patch's crease over a bit. This uses a glancing blow to keep the crease's new location from sliding down on the anvil...


Picture%202071.jpg


Both pieces clamped in place, we'll get some welding done on Saturday...


Picture%202076.jpg
 
Last edited:

GRN96WS6

Well-known member
Joined
Dec 23, 2012
Messages
2,193
Location
SOMD
Just curious, don't have to answer if it'd too personal but is kyle getting paid as well as knowledge transfer?

Your work is fantastic, I'd love to redo a car someday but metal work scares me.
 

wbrian63

Well-known member
Joined
Mar 31, 2010
Messages
843
Location
Houston, TX
Maybe you've covered this before, and if so, apologies for asking again...

Could you do a topic on the various grinding tools you use for surface prep, weld dressing, final grinding, etc.

I'm particularly interested in the brands of consumables you use. I know that some are better than others.

For instance, I have a small pneumatic right-angle grinder that I use with 2" and 3" roloc flap wheels and clean & strip discs. I get these discs from Lehigh Valley Abrasives.

For dressing welds, I use a .045 disc in my Dewalt 4-1/2 grinder. I've found that the Dewalt brand discs last longest and produce the least dust.

I've also got a straight-style (as opposed to right-angle) pneumatic die grinder that I use with a variety of carbide burrs to work in areas that are too confined for larger tools.

I appreciate the time you take to educate those of us willing to learn.
 
OP
M

MP&C

Well-known member
Joined
Oct 21, 2009
Messages
4,396
Location
Leonardtown, MD
The following shows my process for grinding welds and what tools are used. The first step in cleaning up the weld, I use a 3" x 1/16 cutoff wheel, shown here in an angle die grinder. (the angle die grinder will get into some tighter spots than the straight one)

Picture258.jpg


Picture259.jpg


Picture260.jpg


Picture261.jpg


By using the cutoff wheel to grind, you have a contact patch of about 1/16 x 1/4. Comparing to a flap disc, for an example, which has a contact patch at least 4 times that amount. The more contact area, the more heat generated, for more of a chance for additional shrinking. The cutoff wheel also has a less obstructed view of the area to insure you don't go too far in grinding or inadvertently hit the parent metal to the sides of the weld. Next, just like using a drill bit, let the abrasive tool do the work, you don't need or want to lean on it. Also, I don't waste my time with HF or swap meet cut off wheels. If you've ever used them, then you have seen the brown haze they leave in the air as they quickly disintegrate. I prefer to use premium cut off wheels, rated for stainless steel. I have used Norton, Sait, Metabo, etc., but they all are rated for stainless or I don't buy them. Cost more? Sure does. But any extra spent on the premium product is more than made up for in less changout, less brown haze, longer abrasive life. Here is a thread I did on showing the grinding process, rather than me write it again... :bounce:

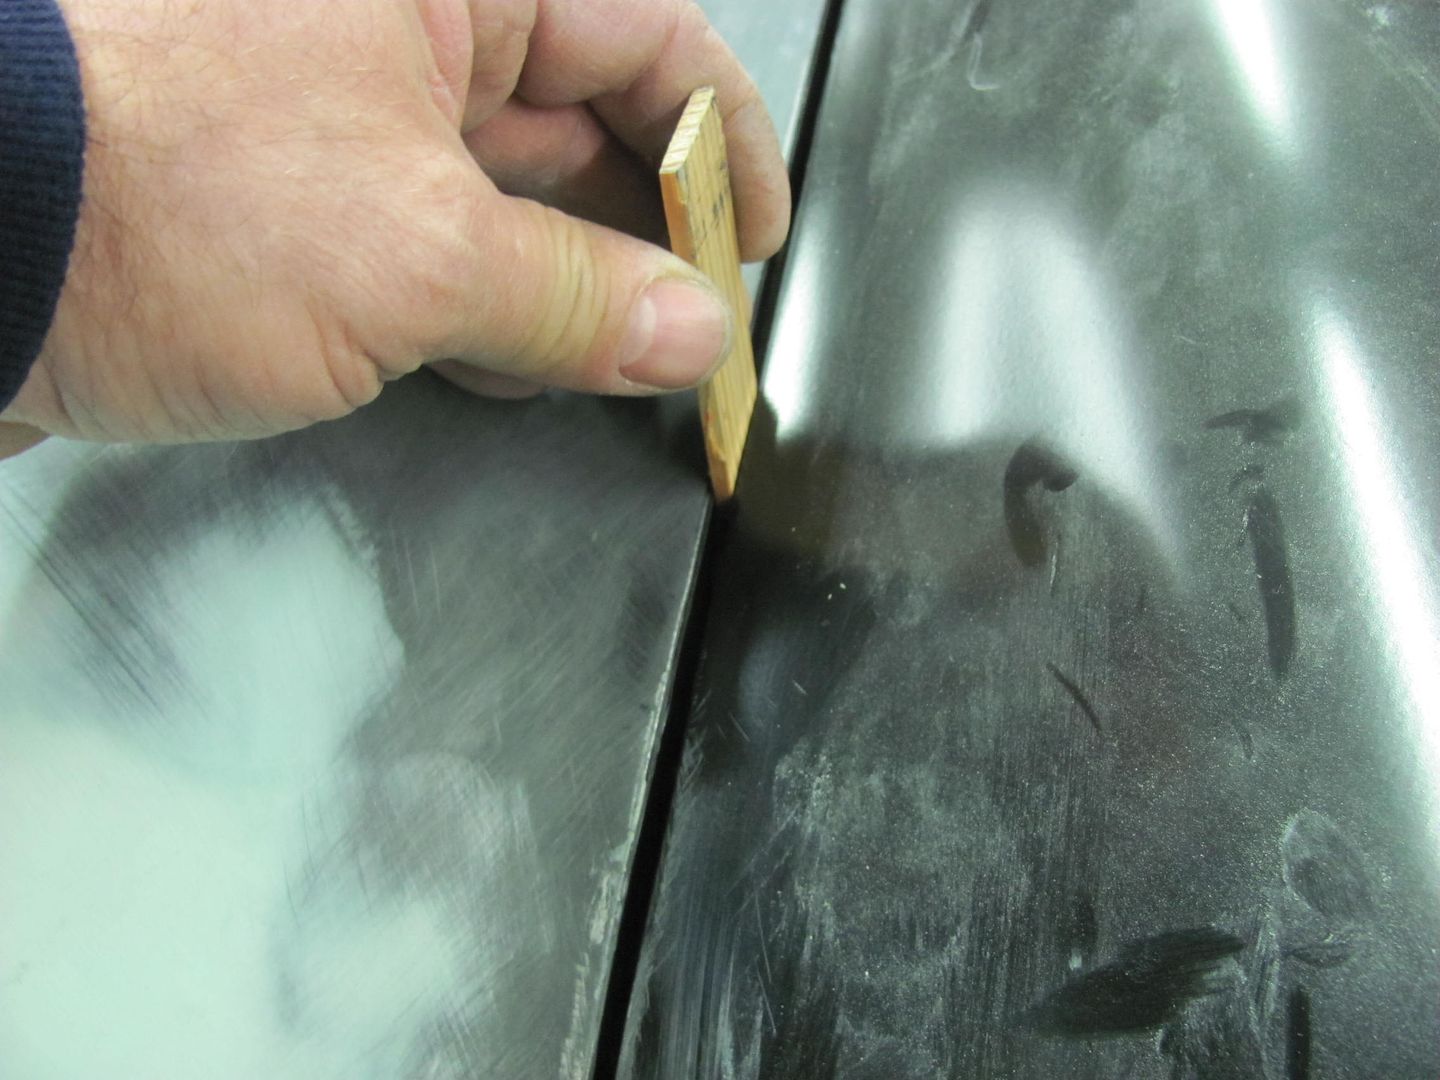
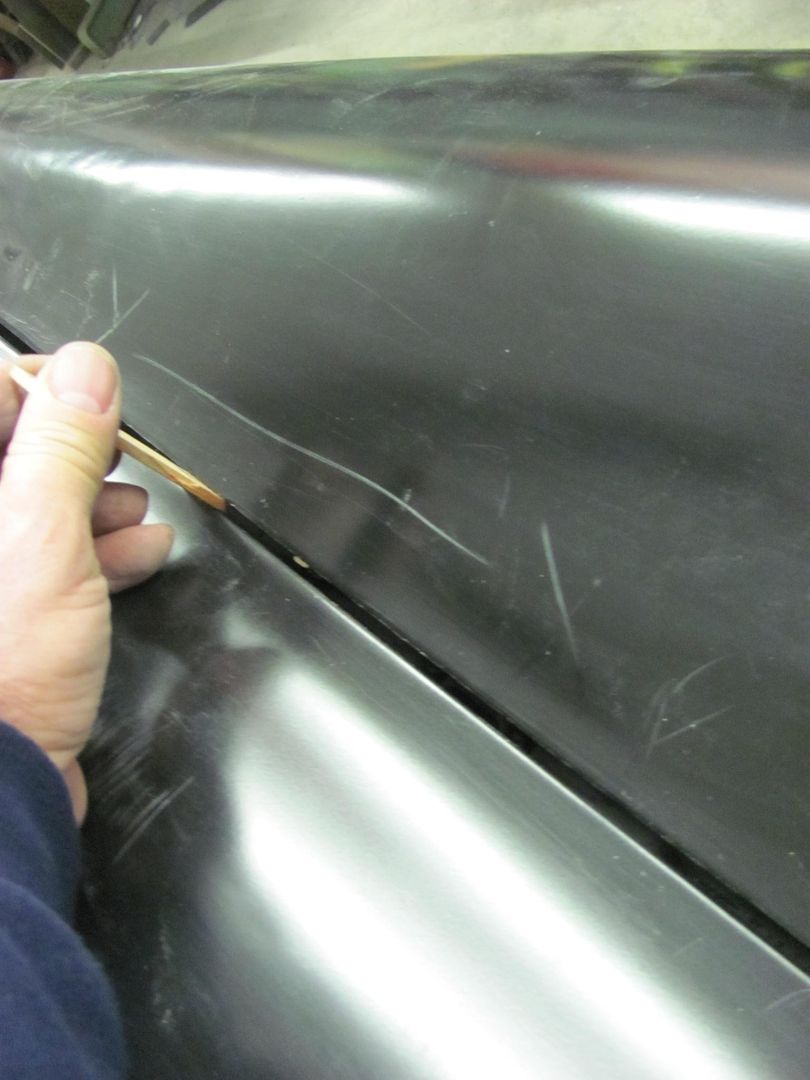
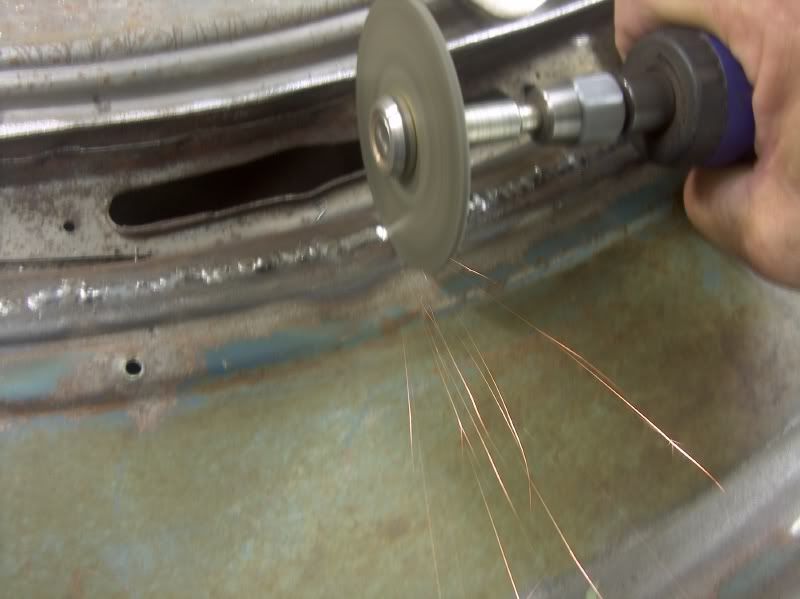
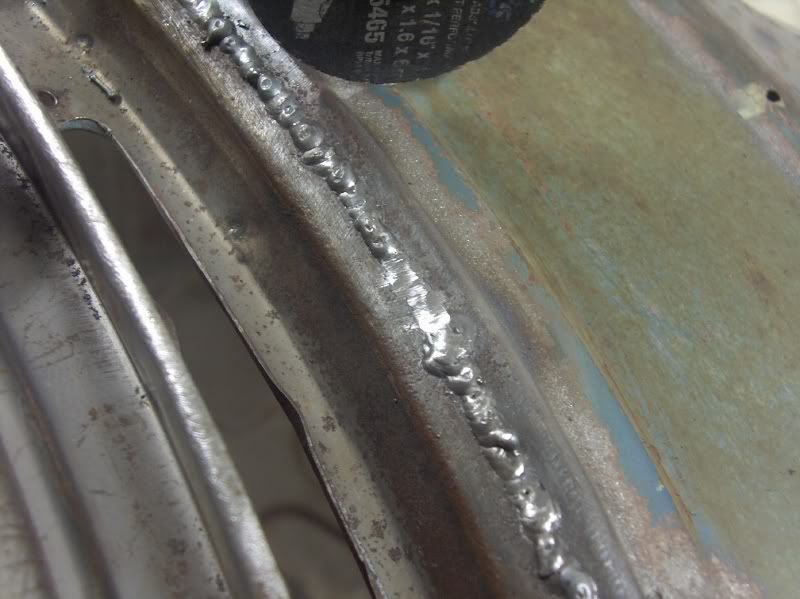
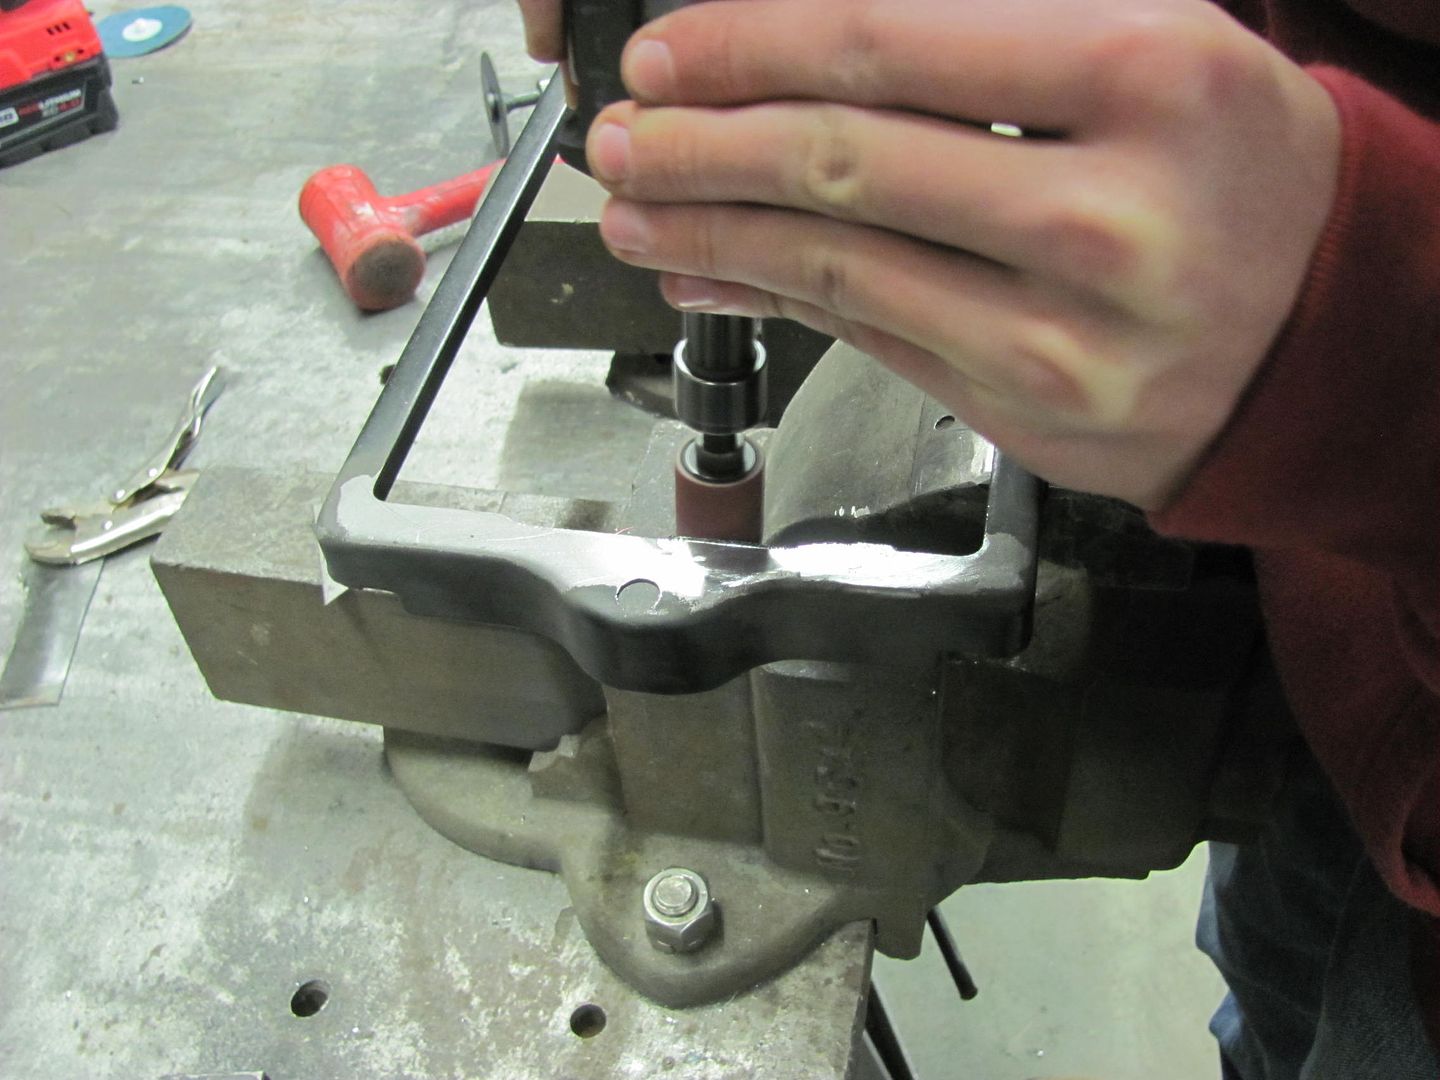
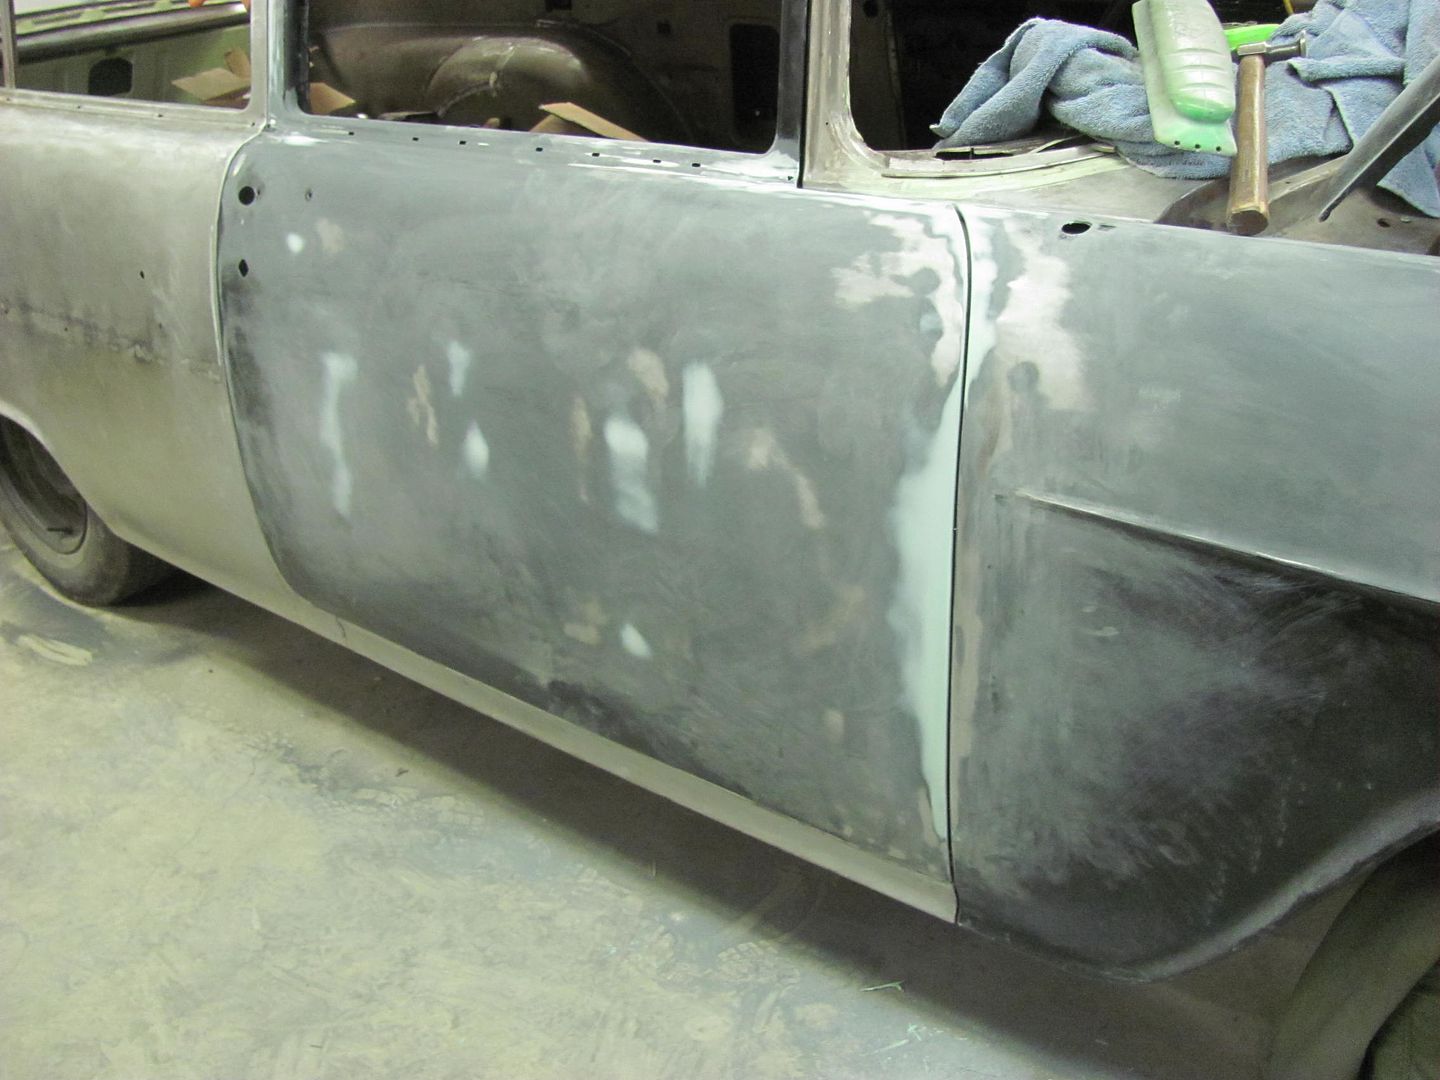
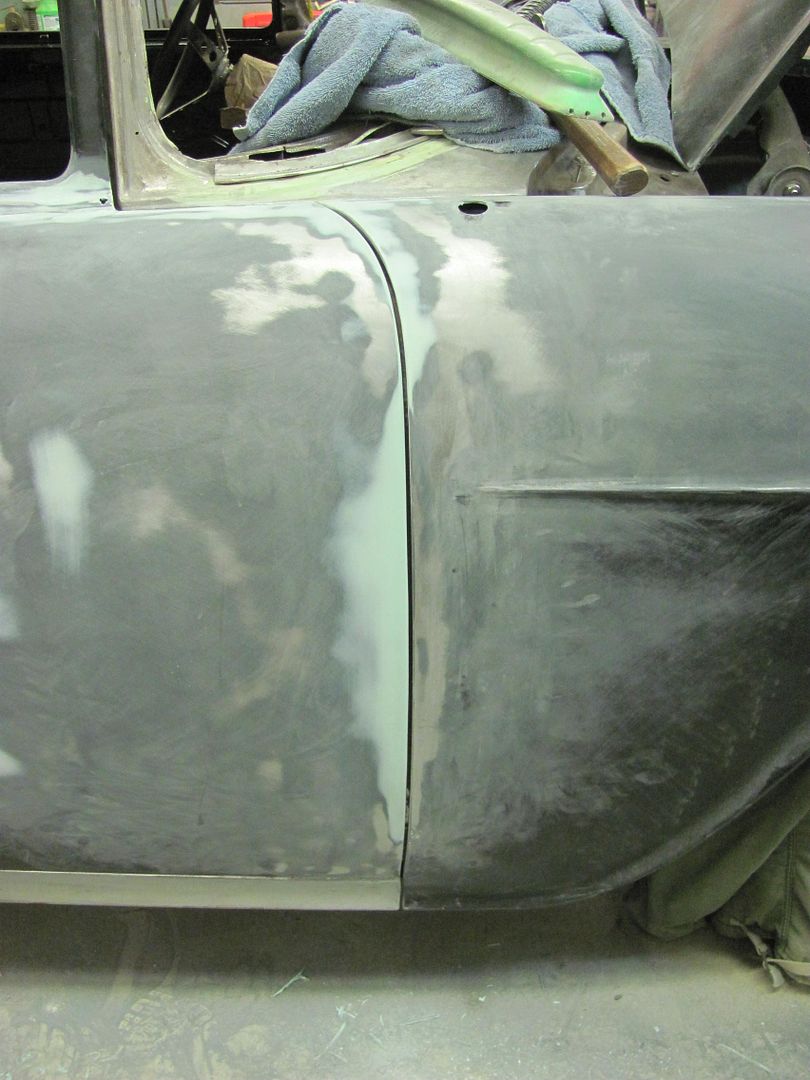
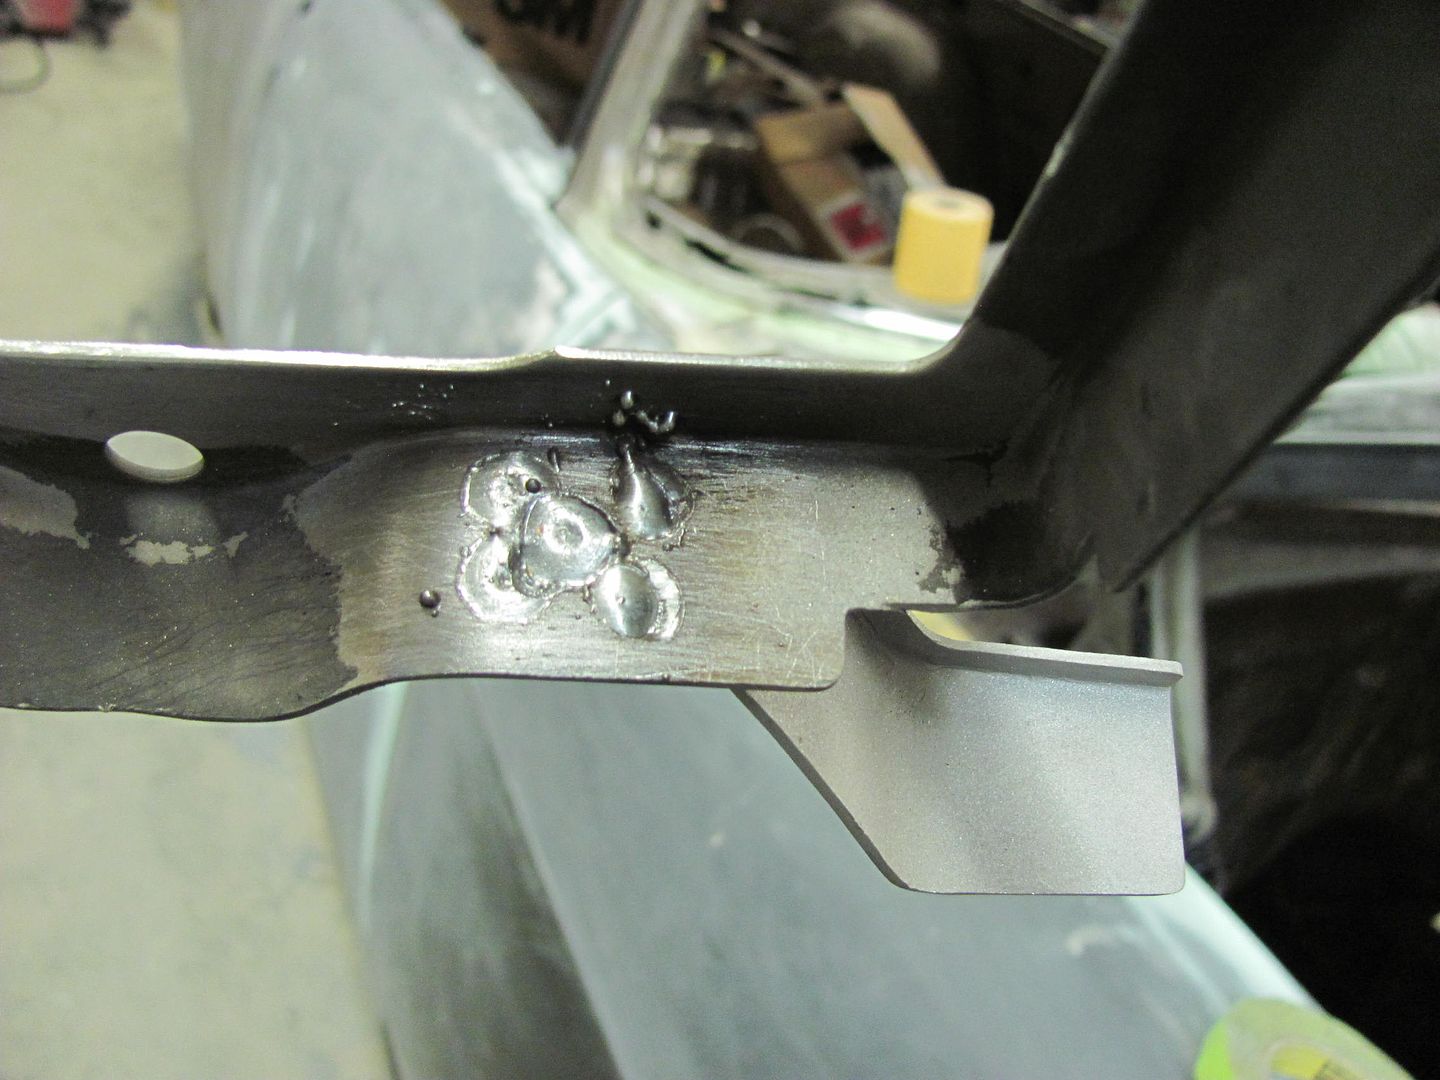
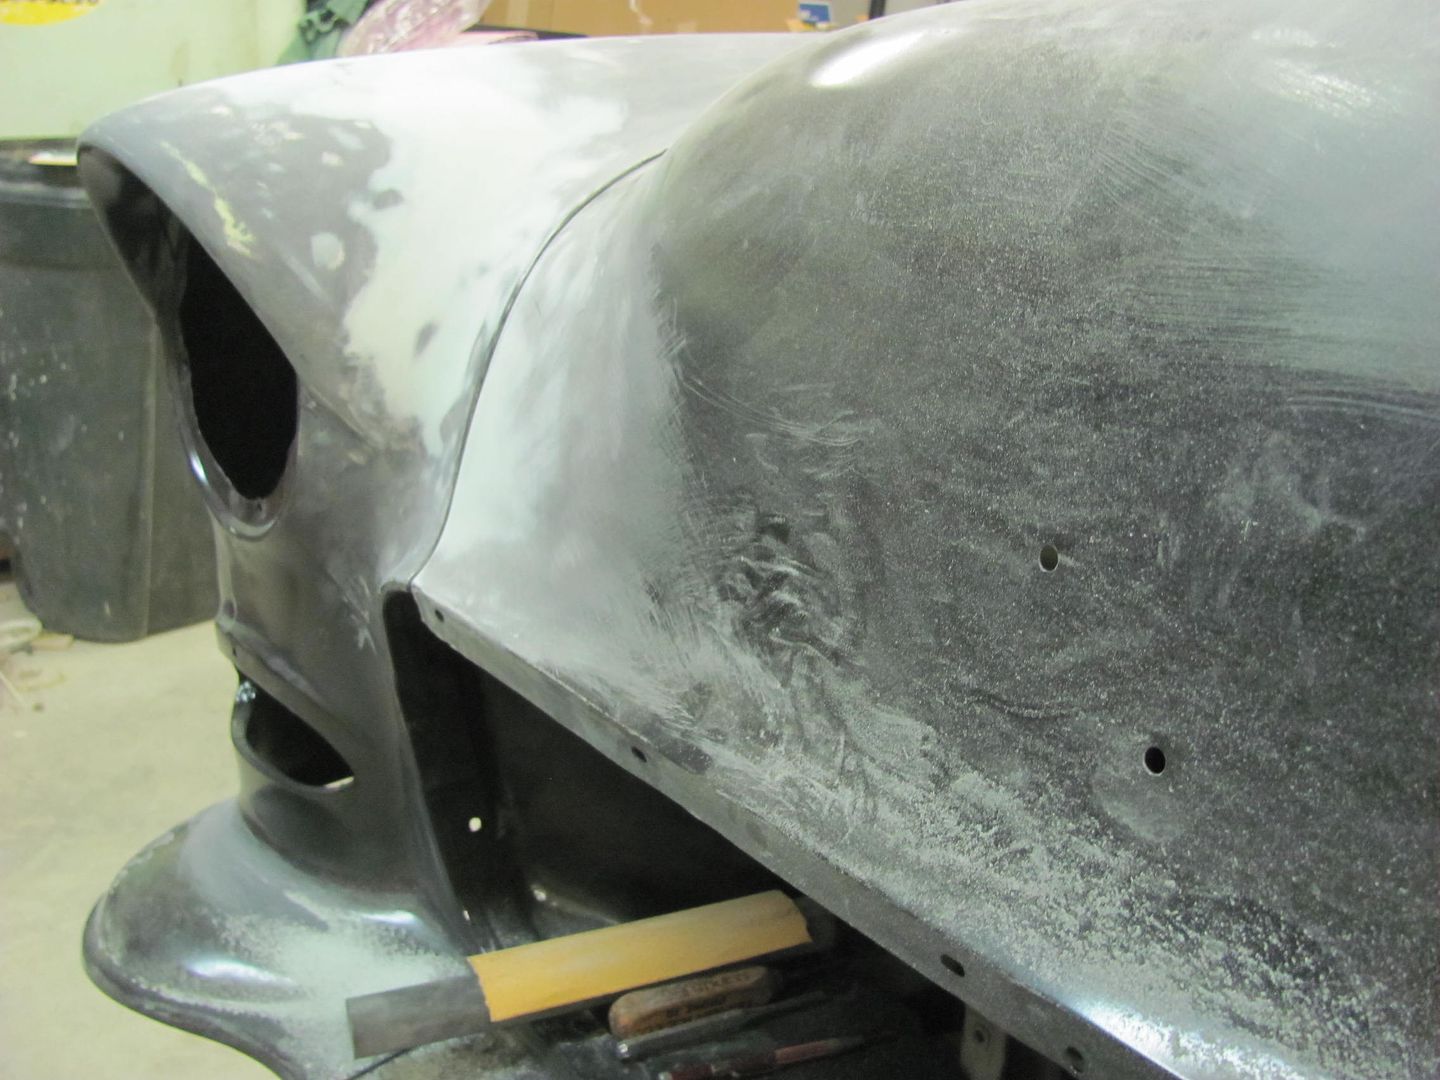
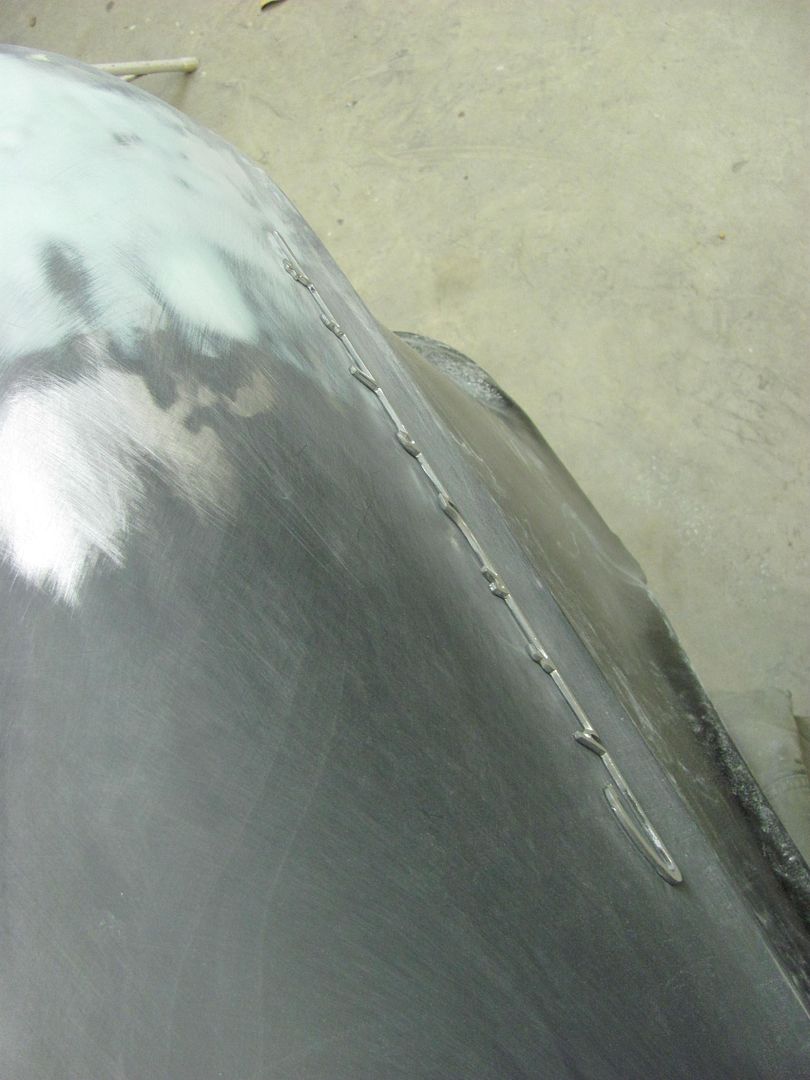
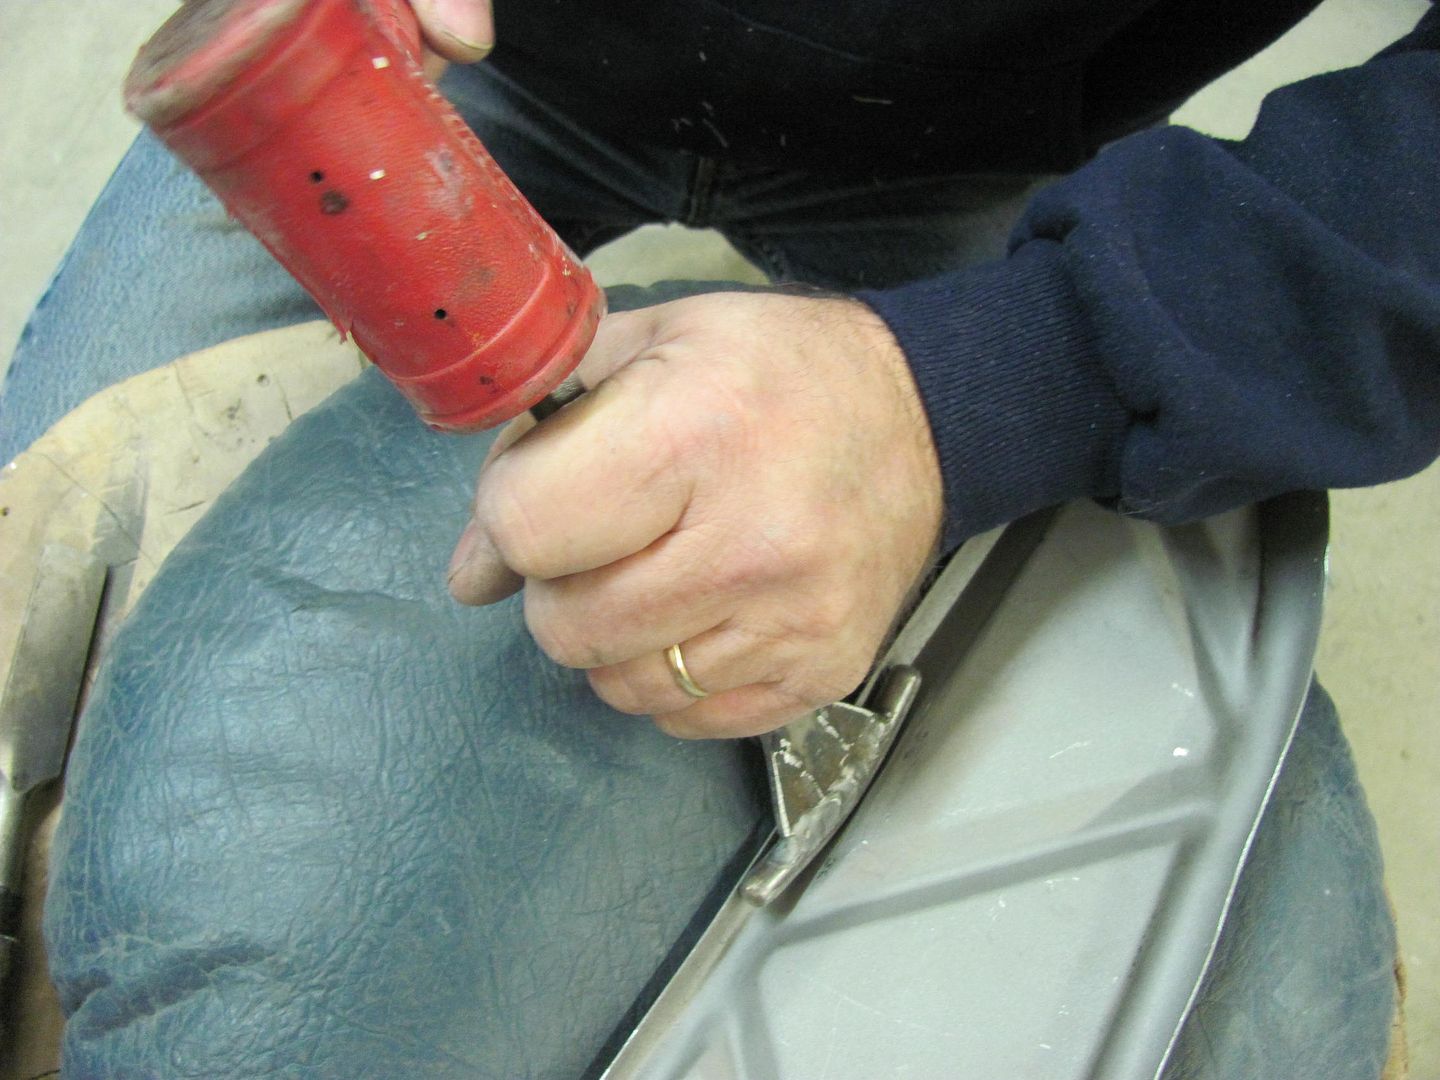
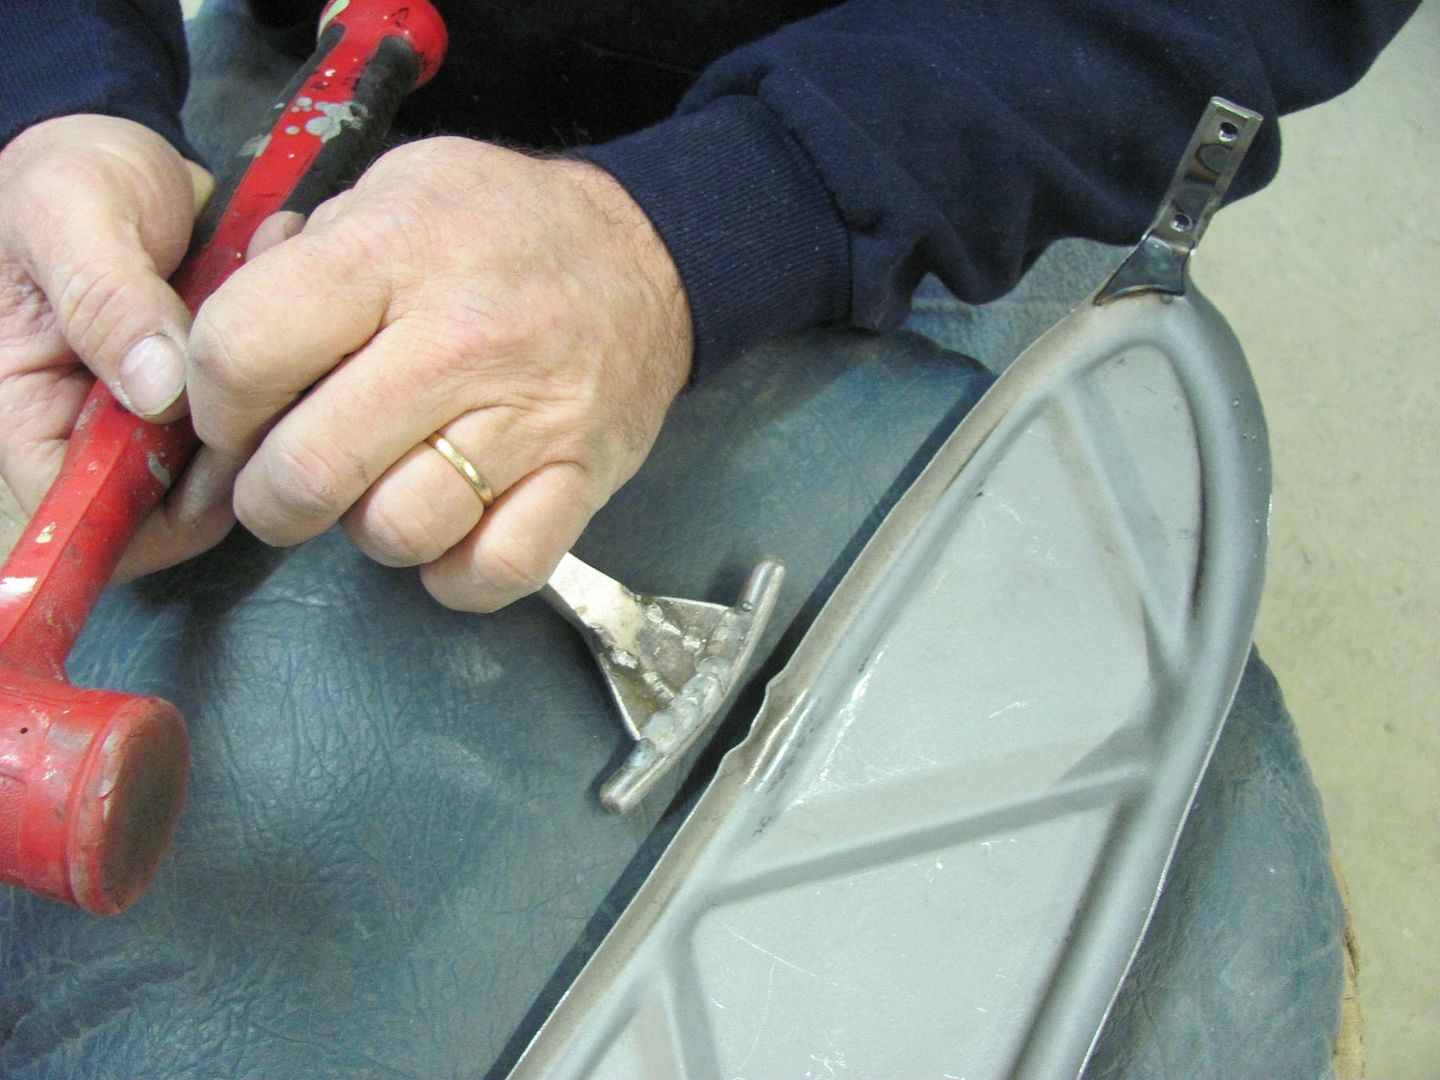
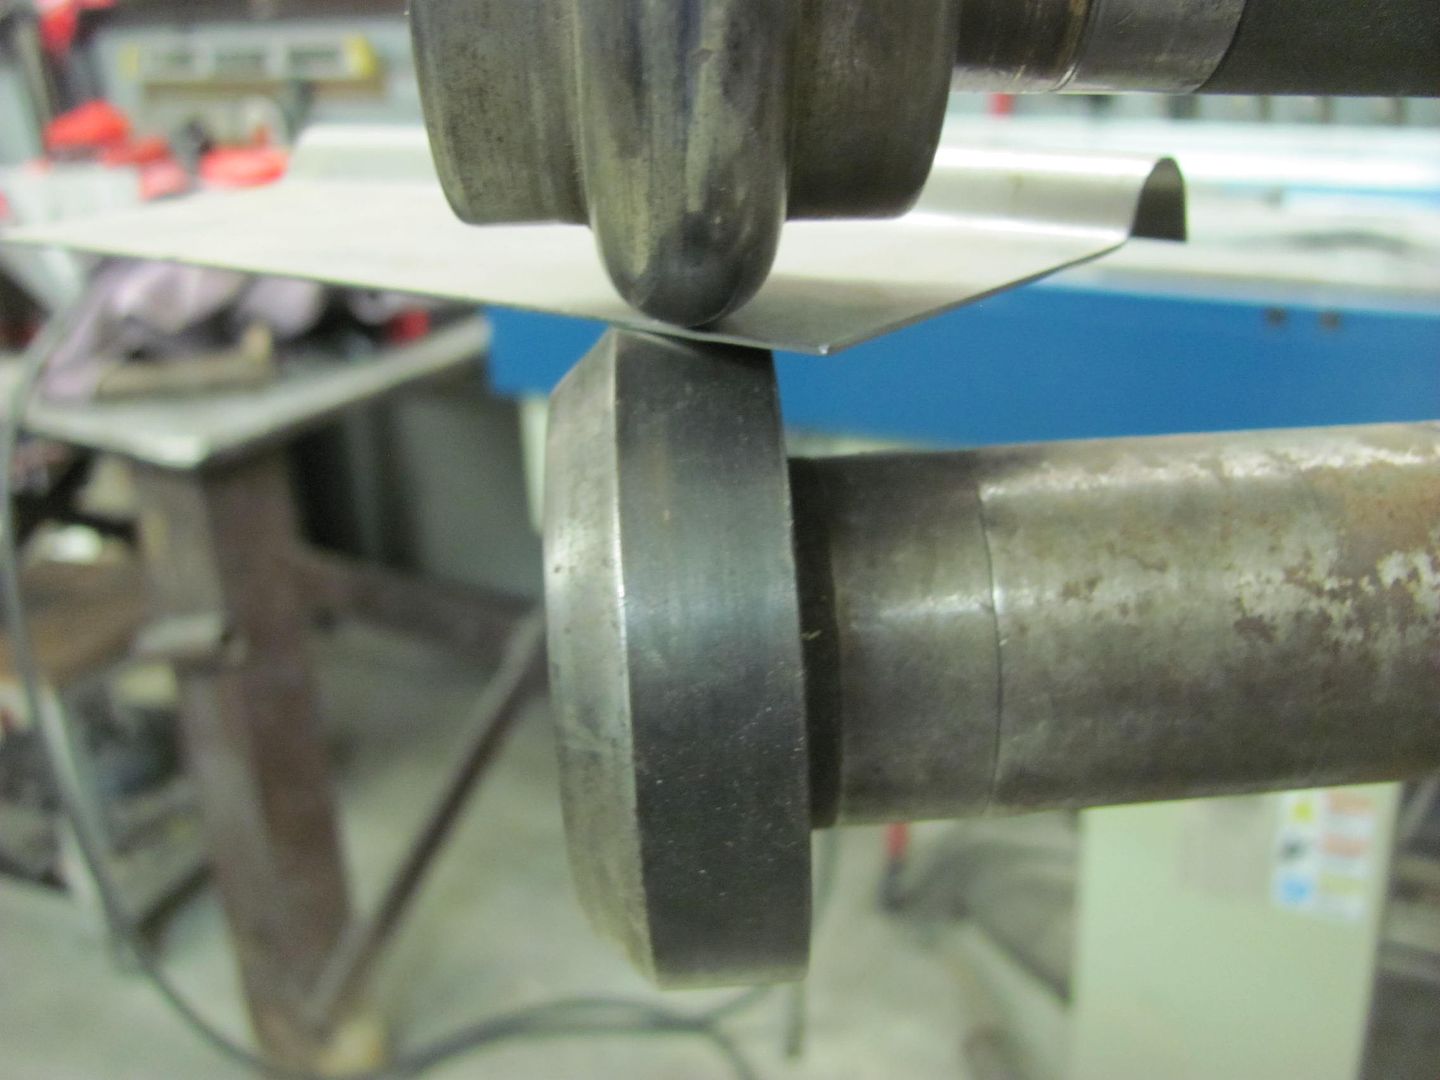
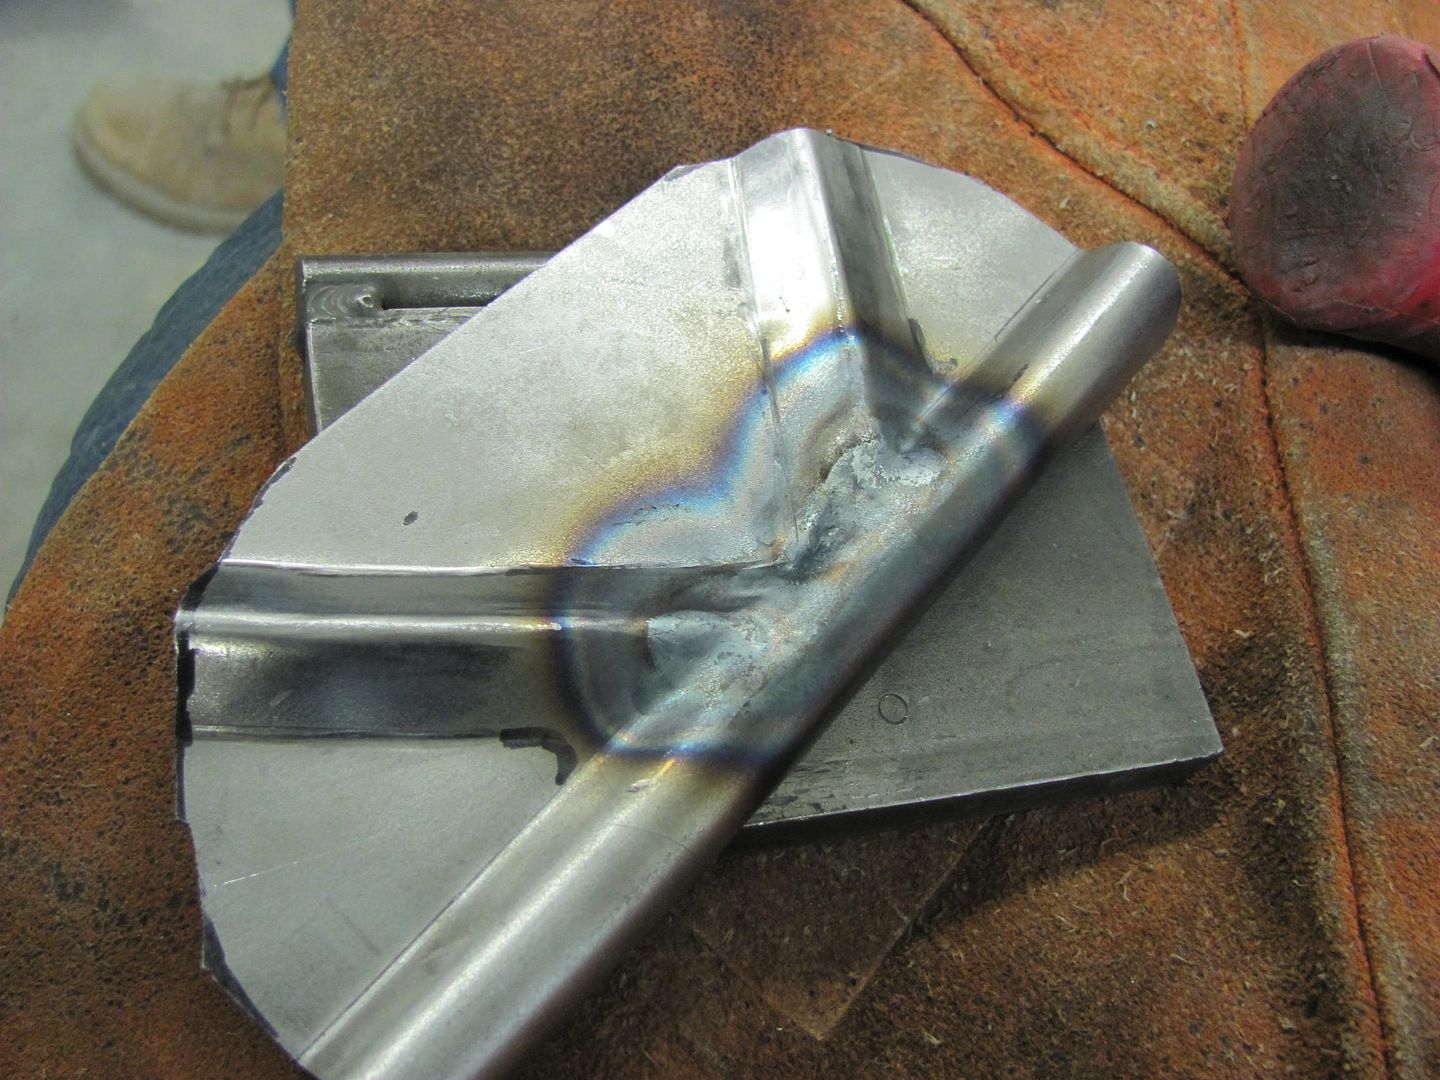
I had a request to explain my process for grinding down the welds, so here goes. It's kinda hard to take pictures and grind at the same time, but we'll do the best we can.

HPIM5793.jpg


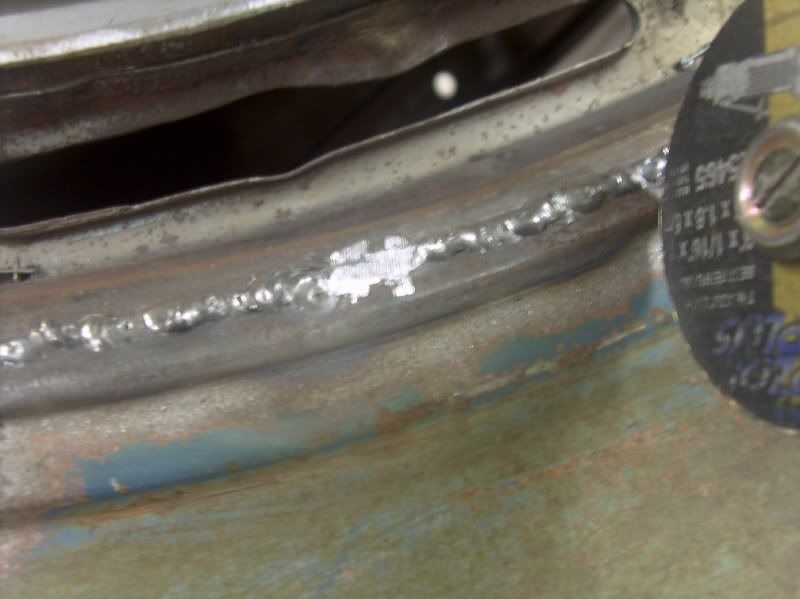
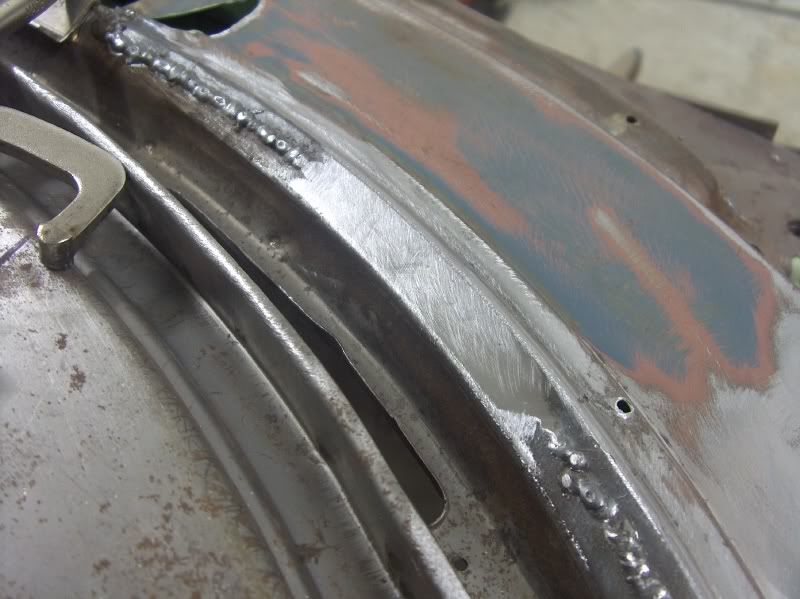
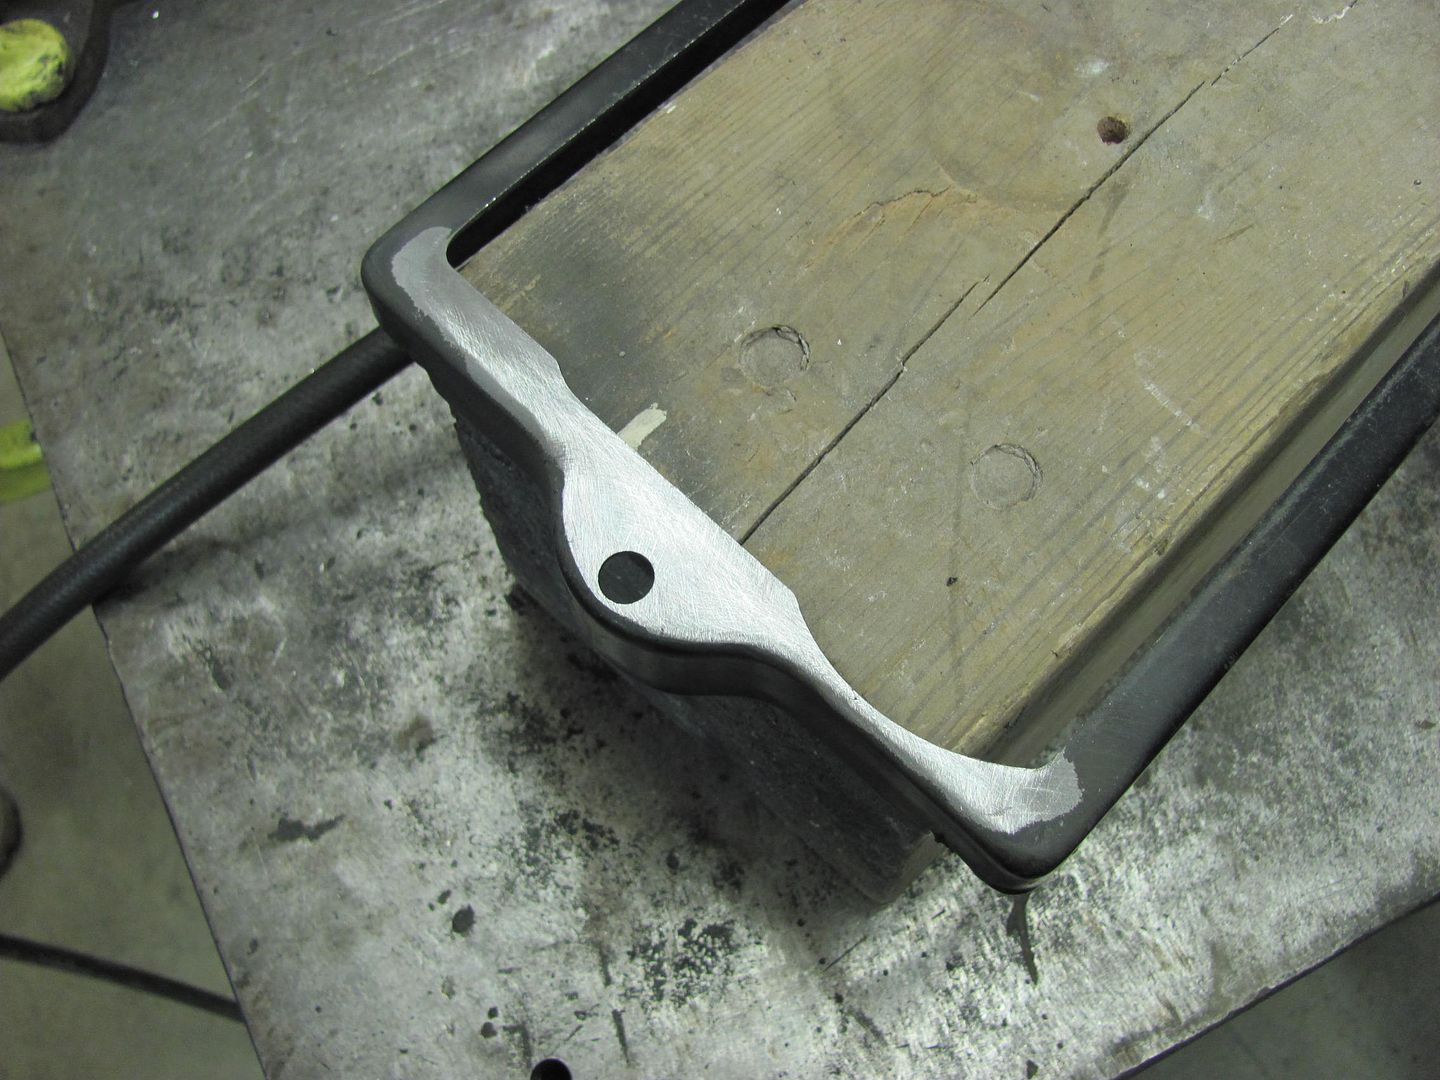
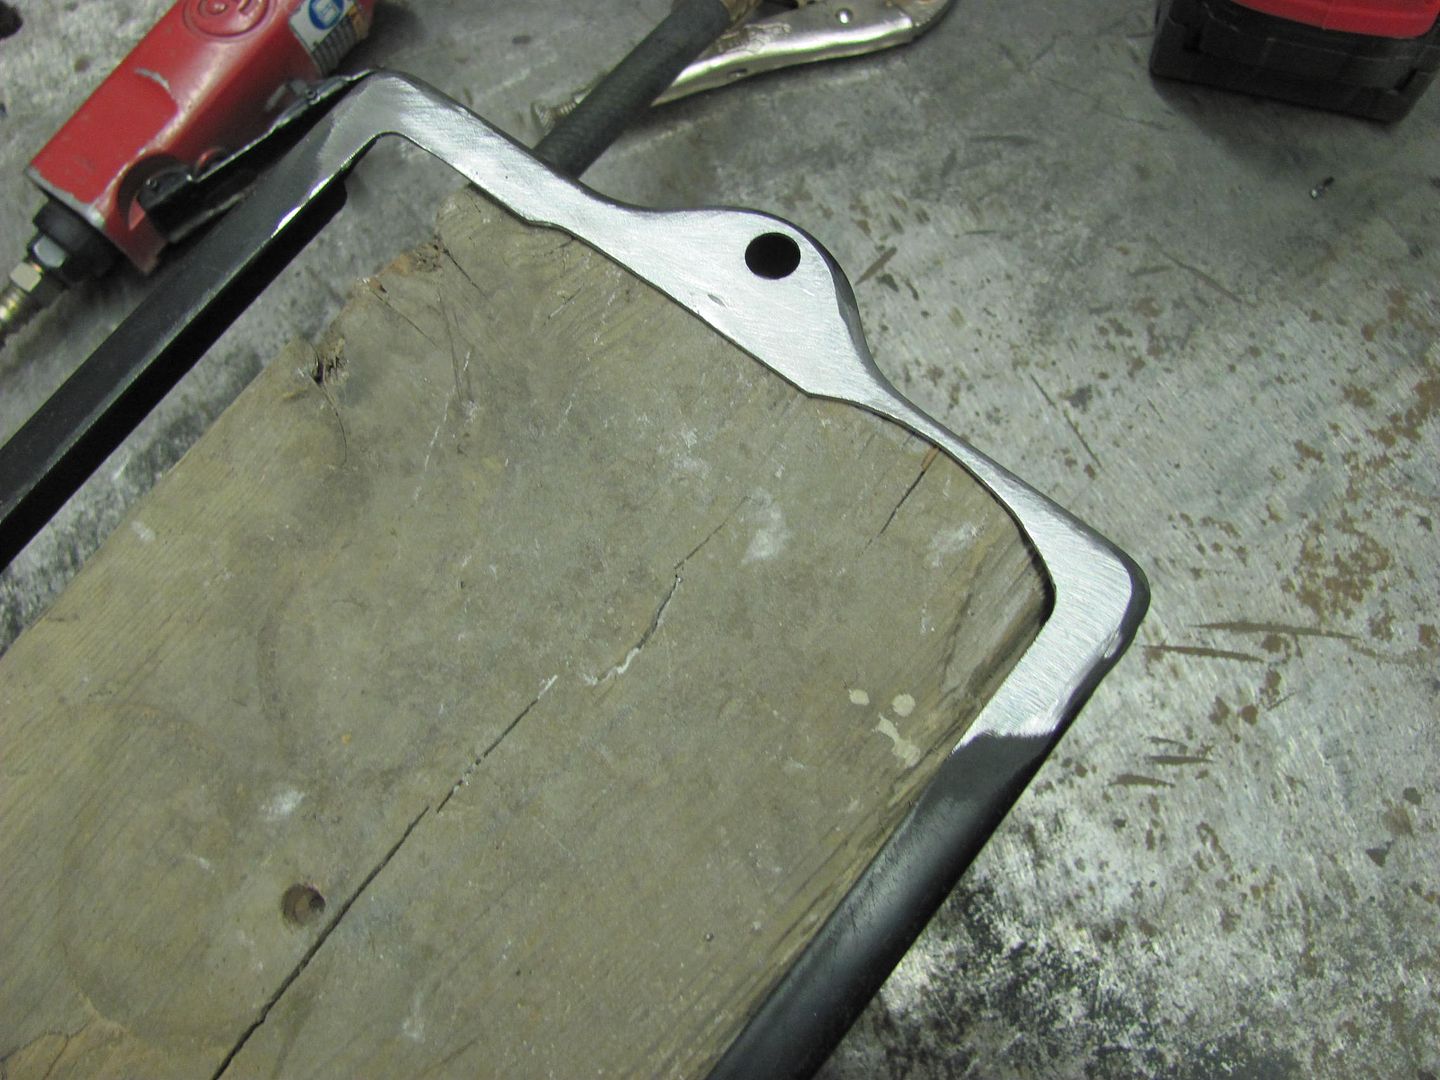
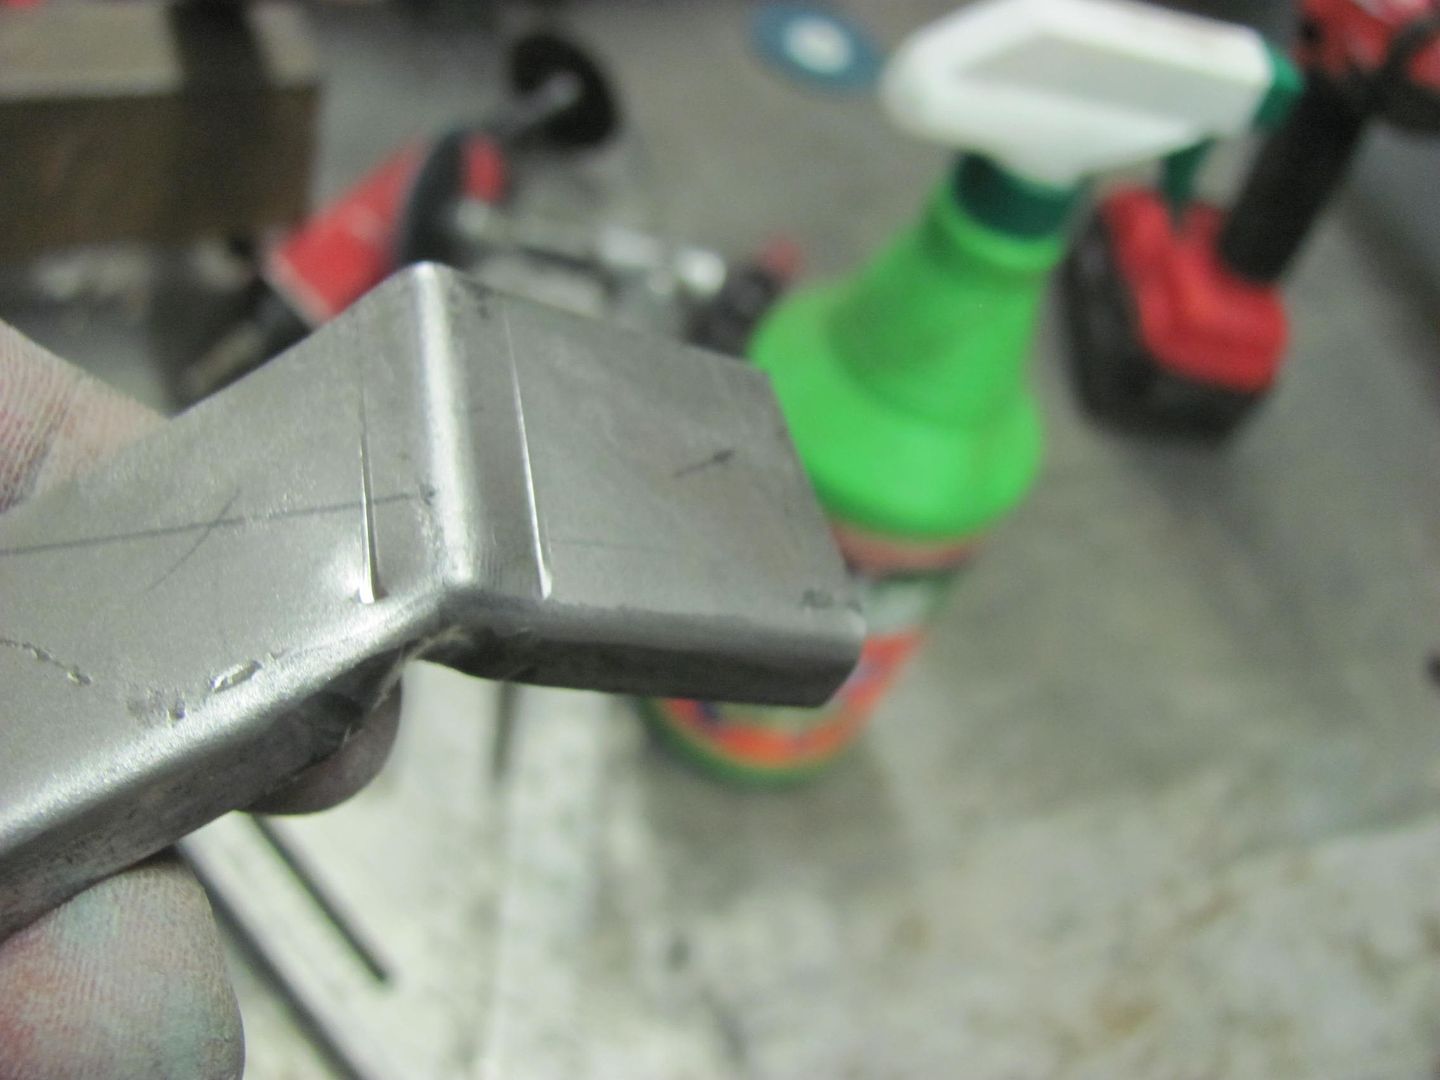
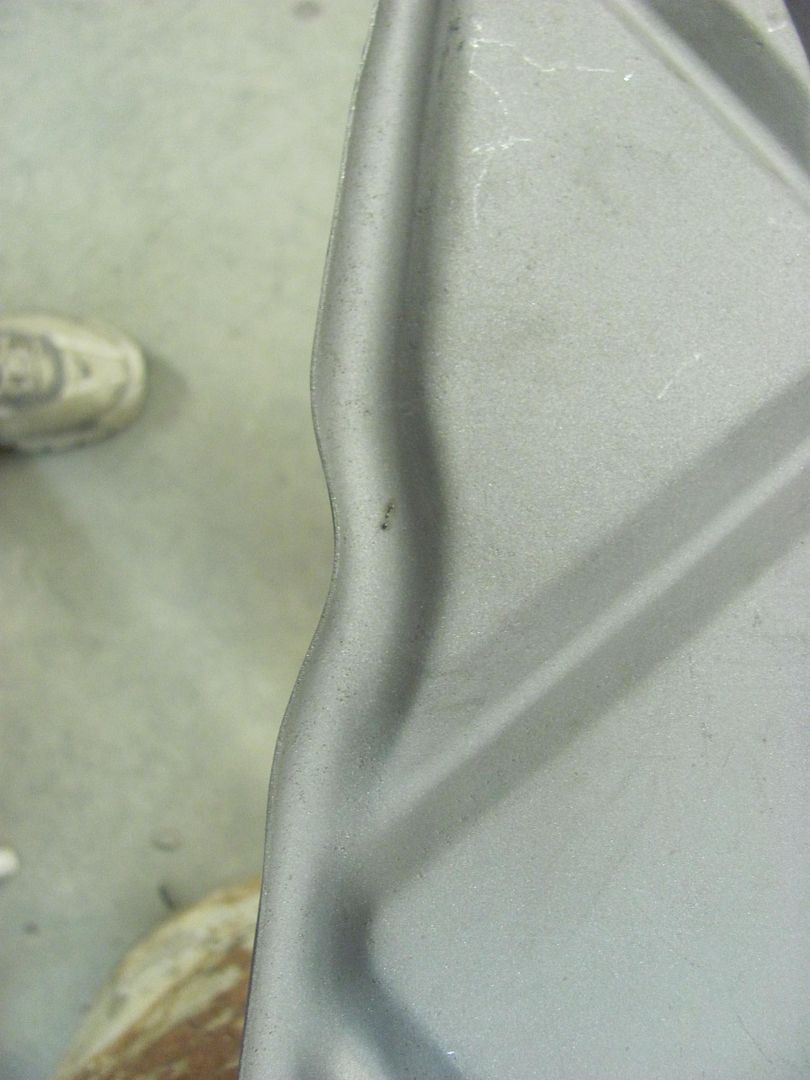
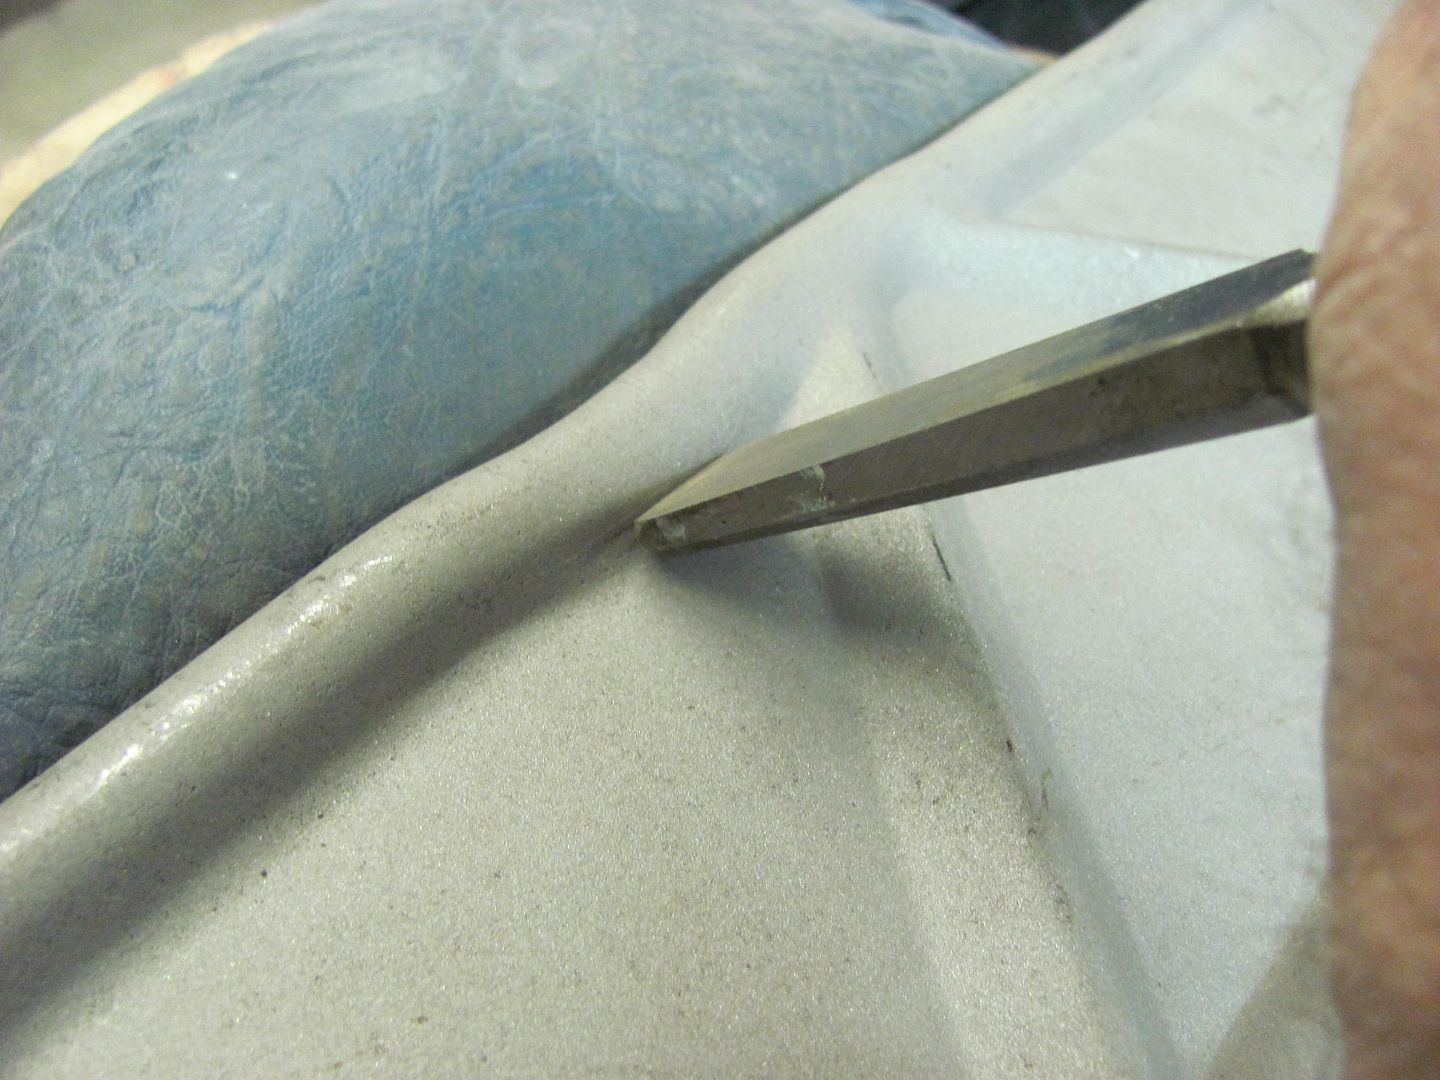
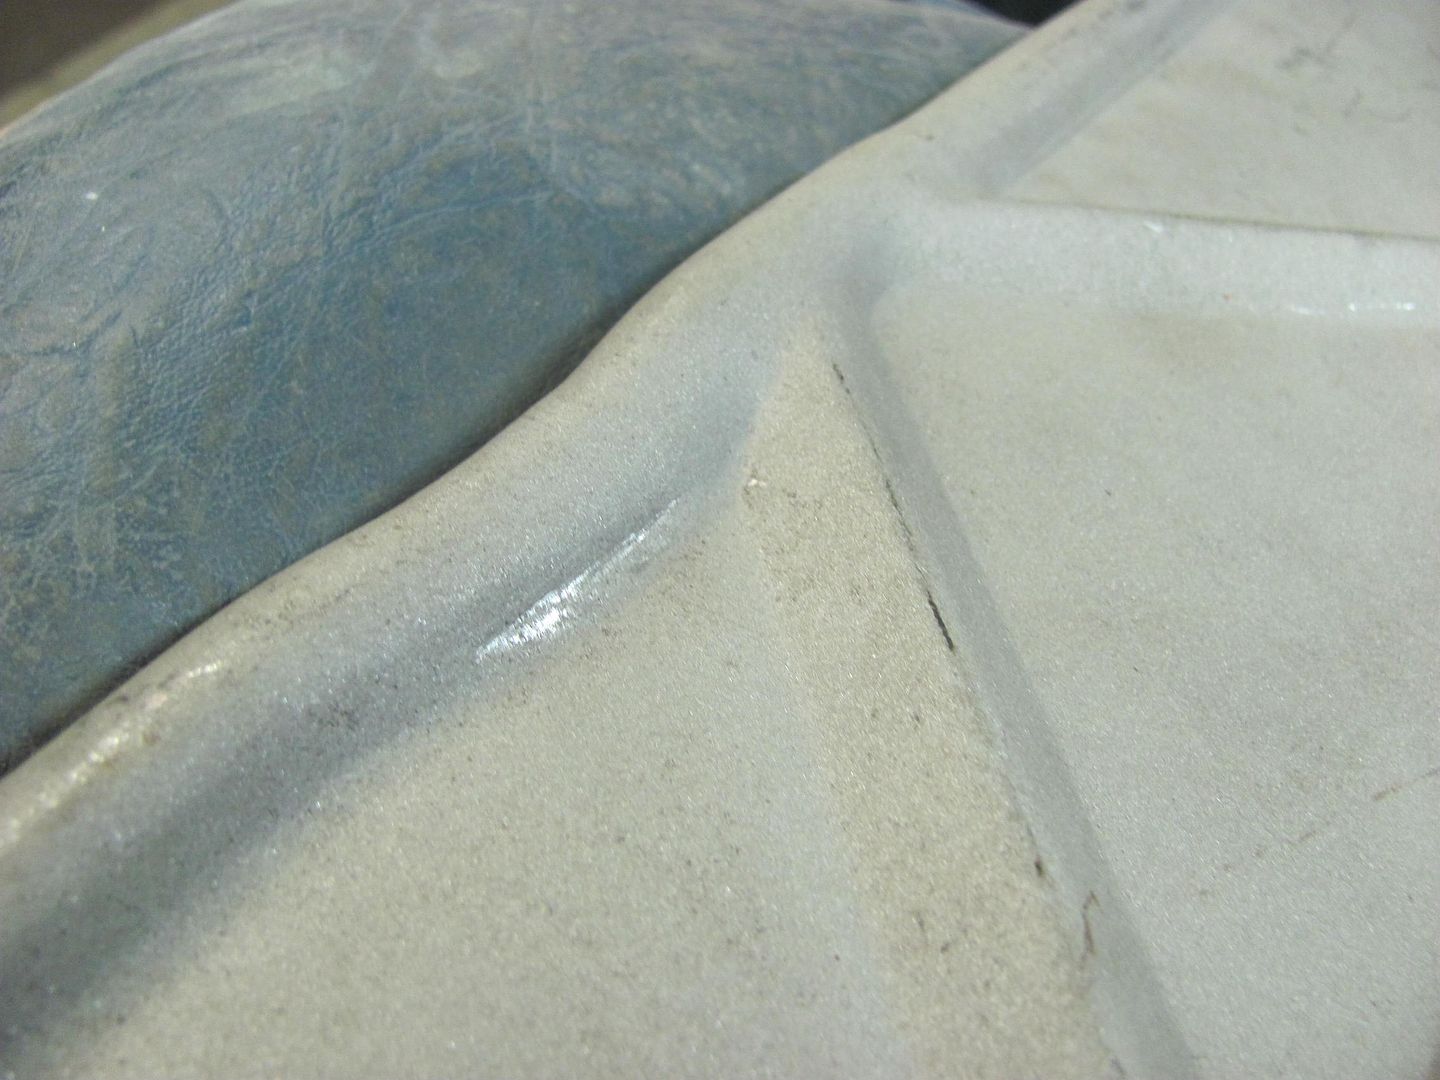
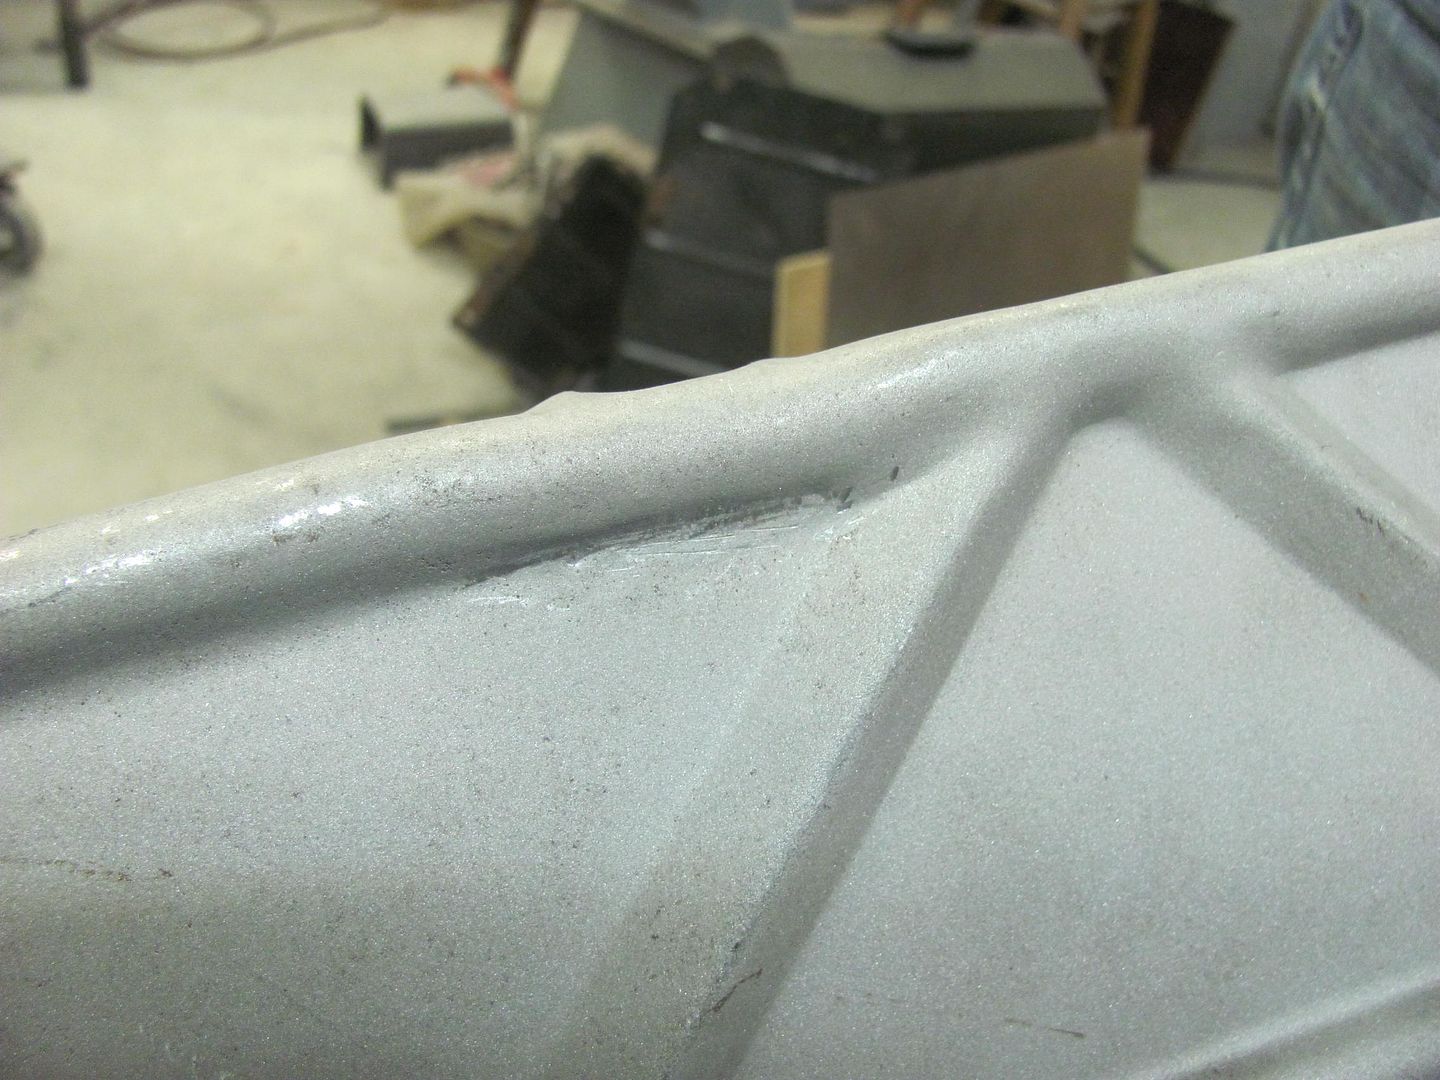
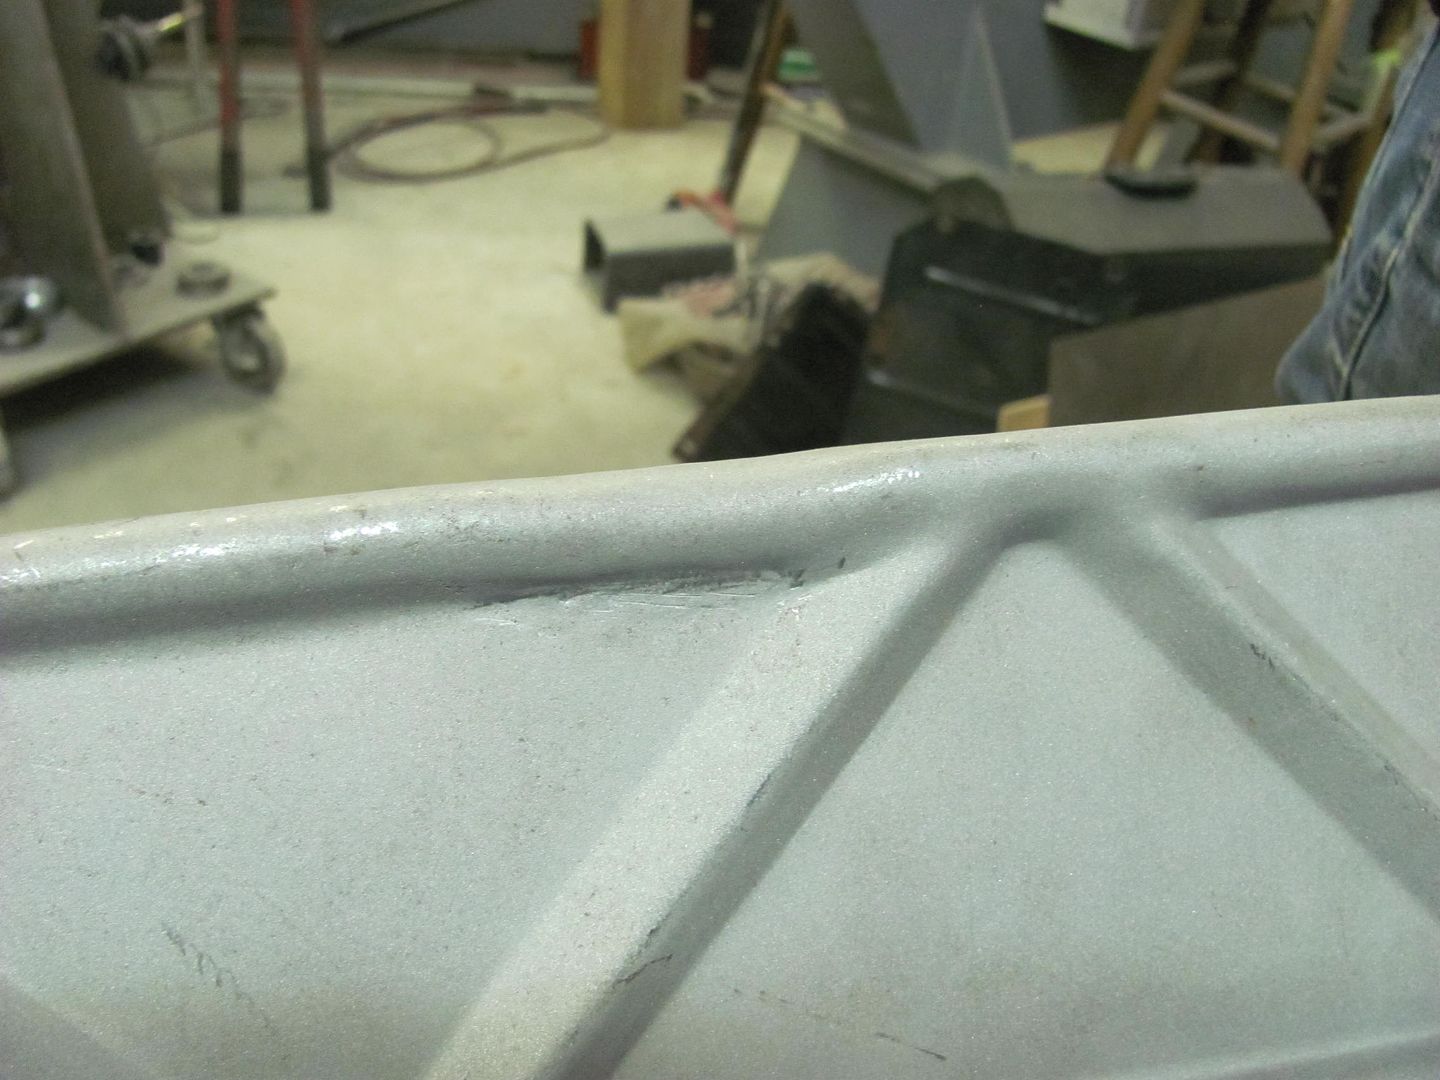
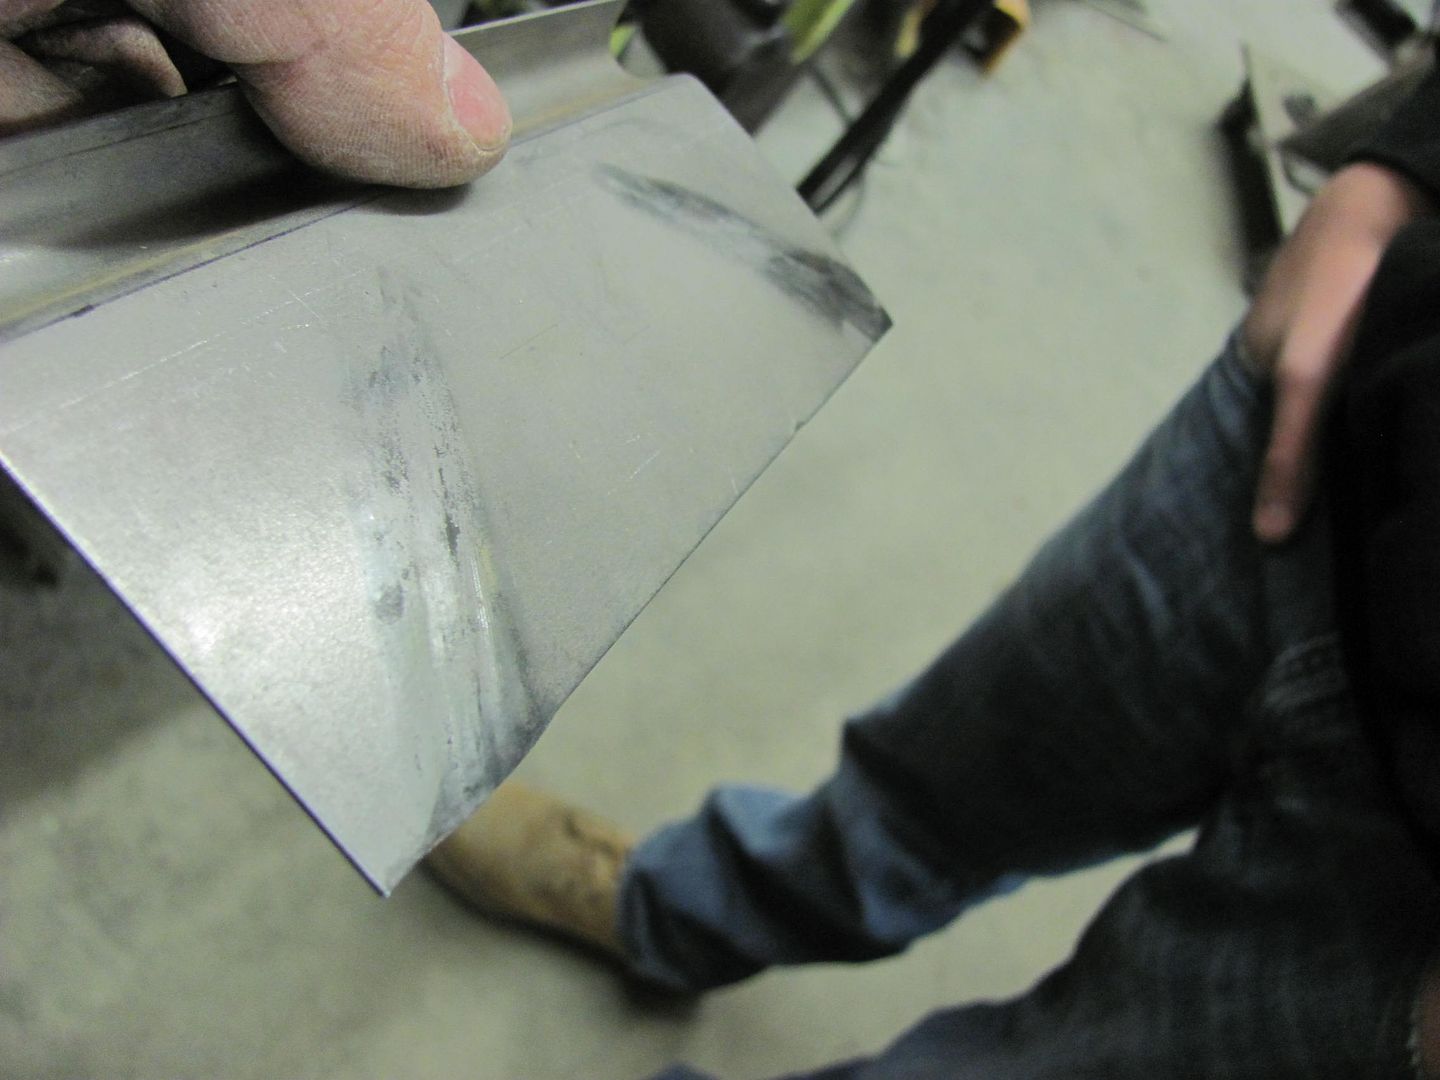
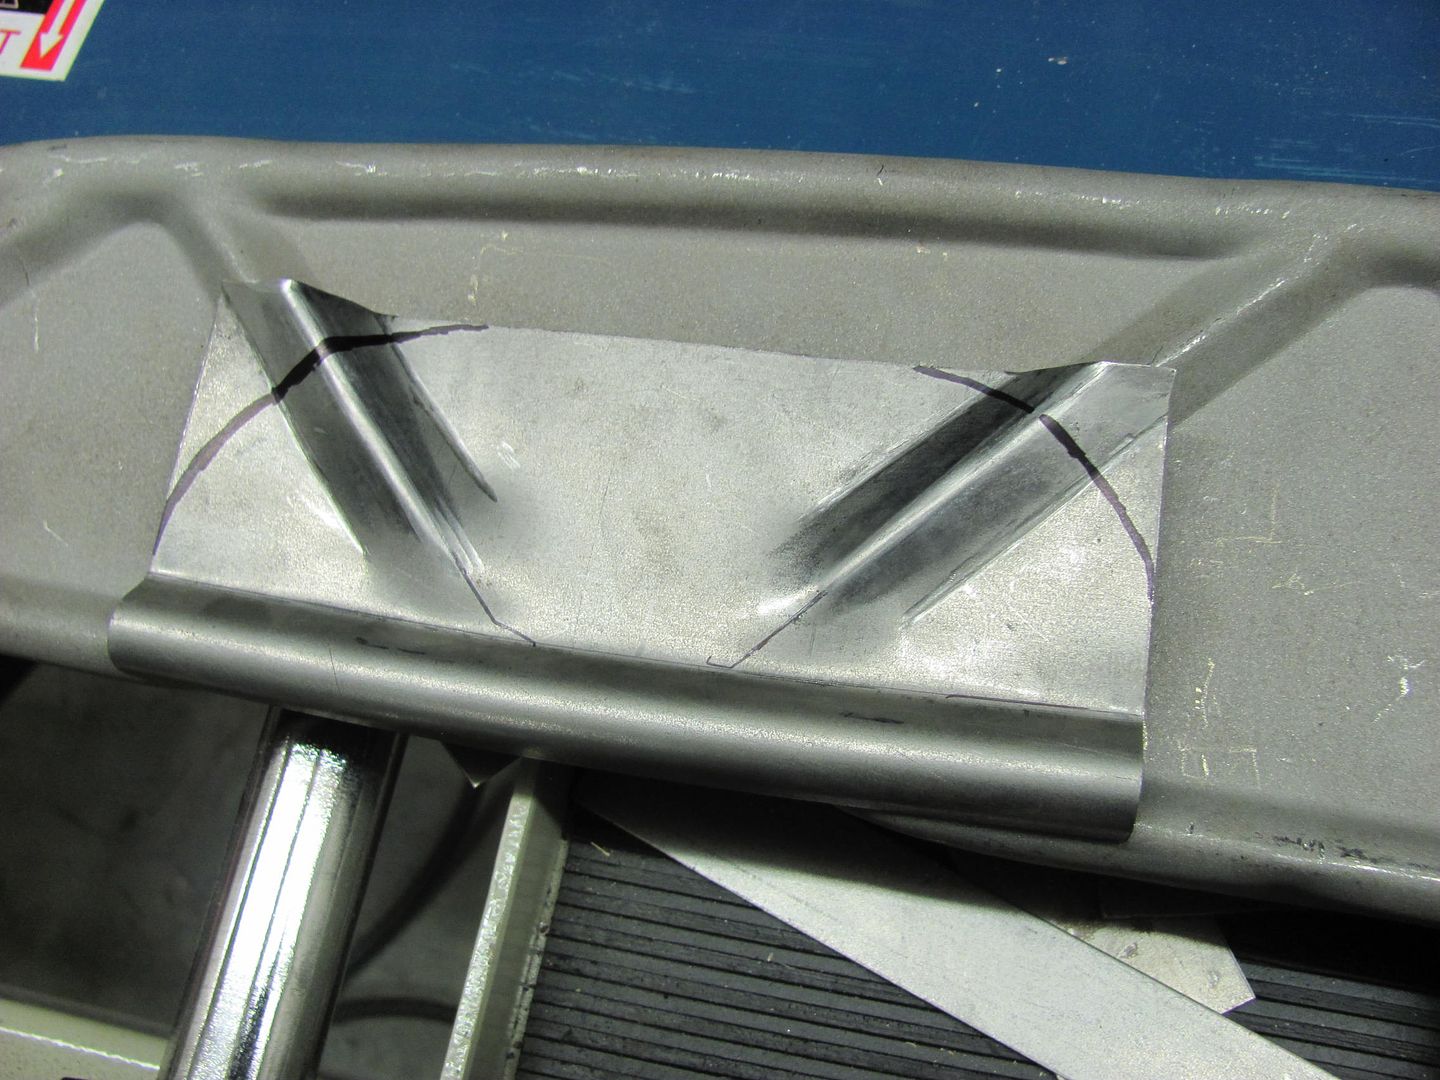
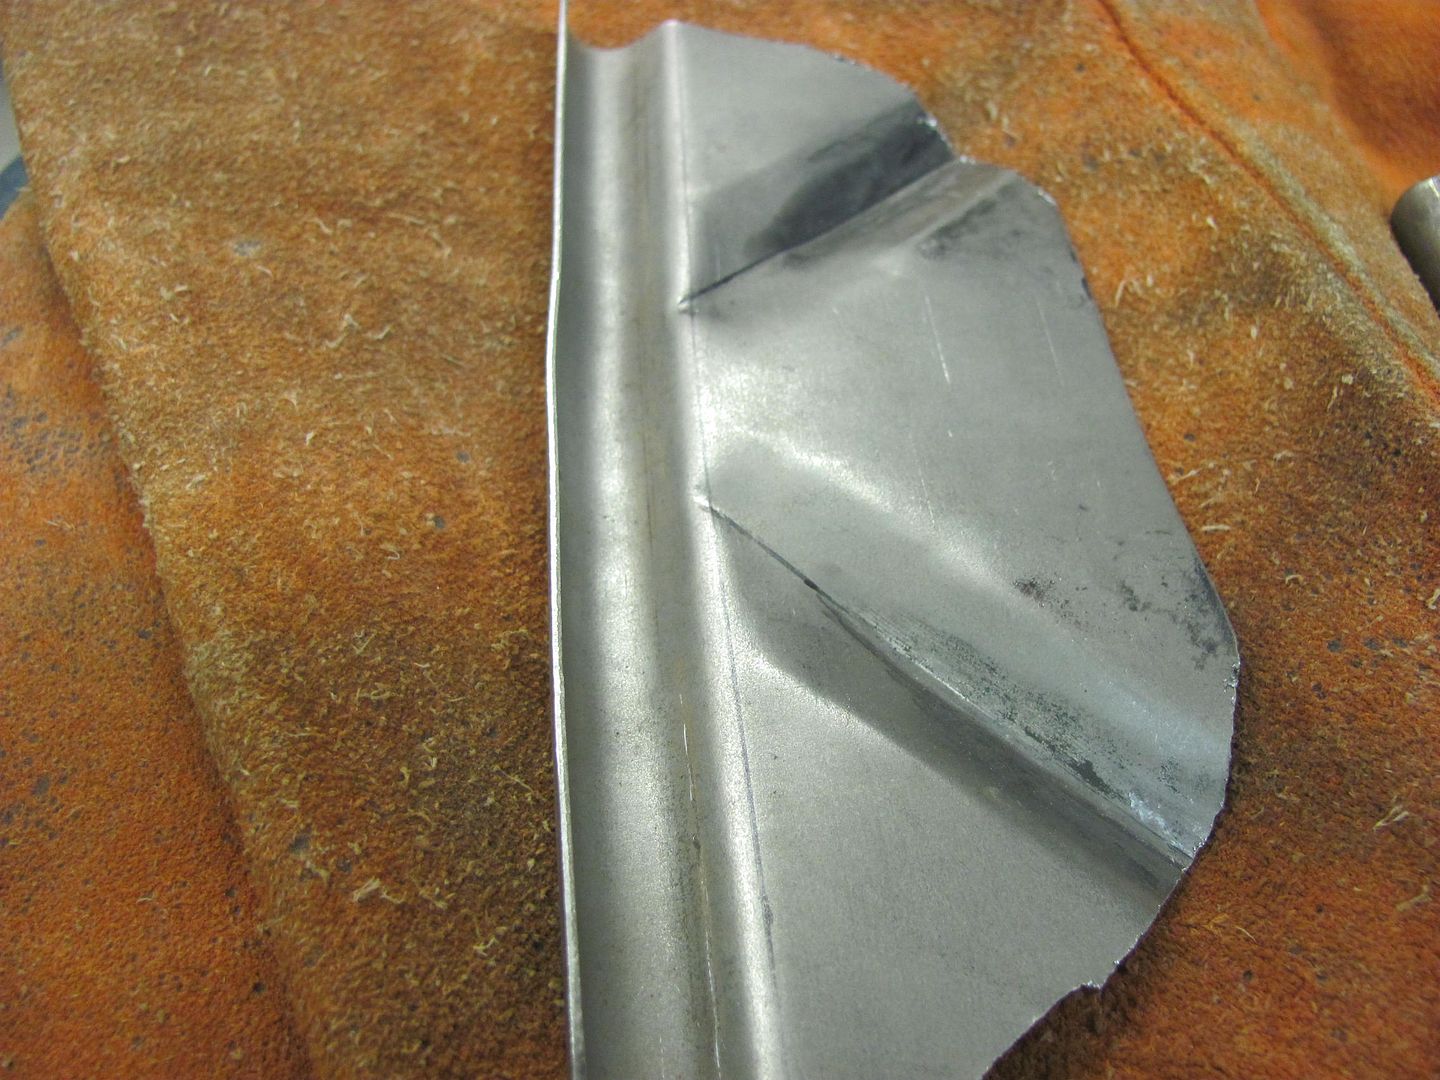
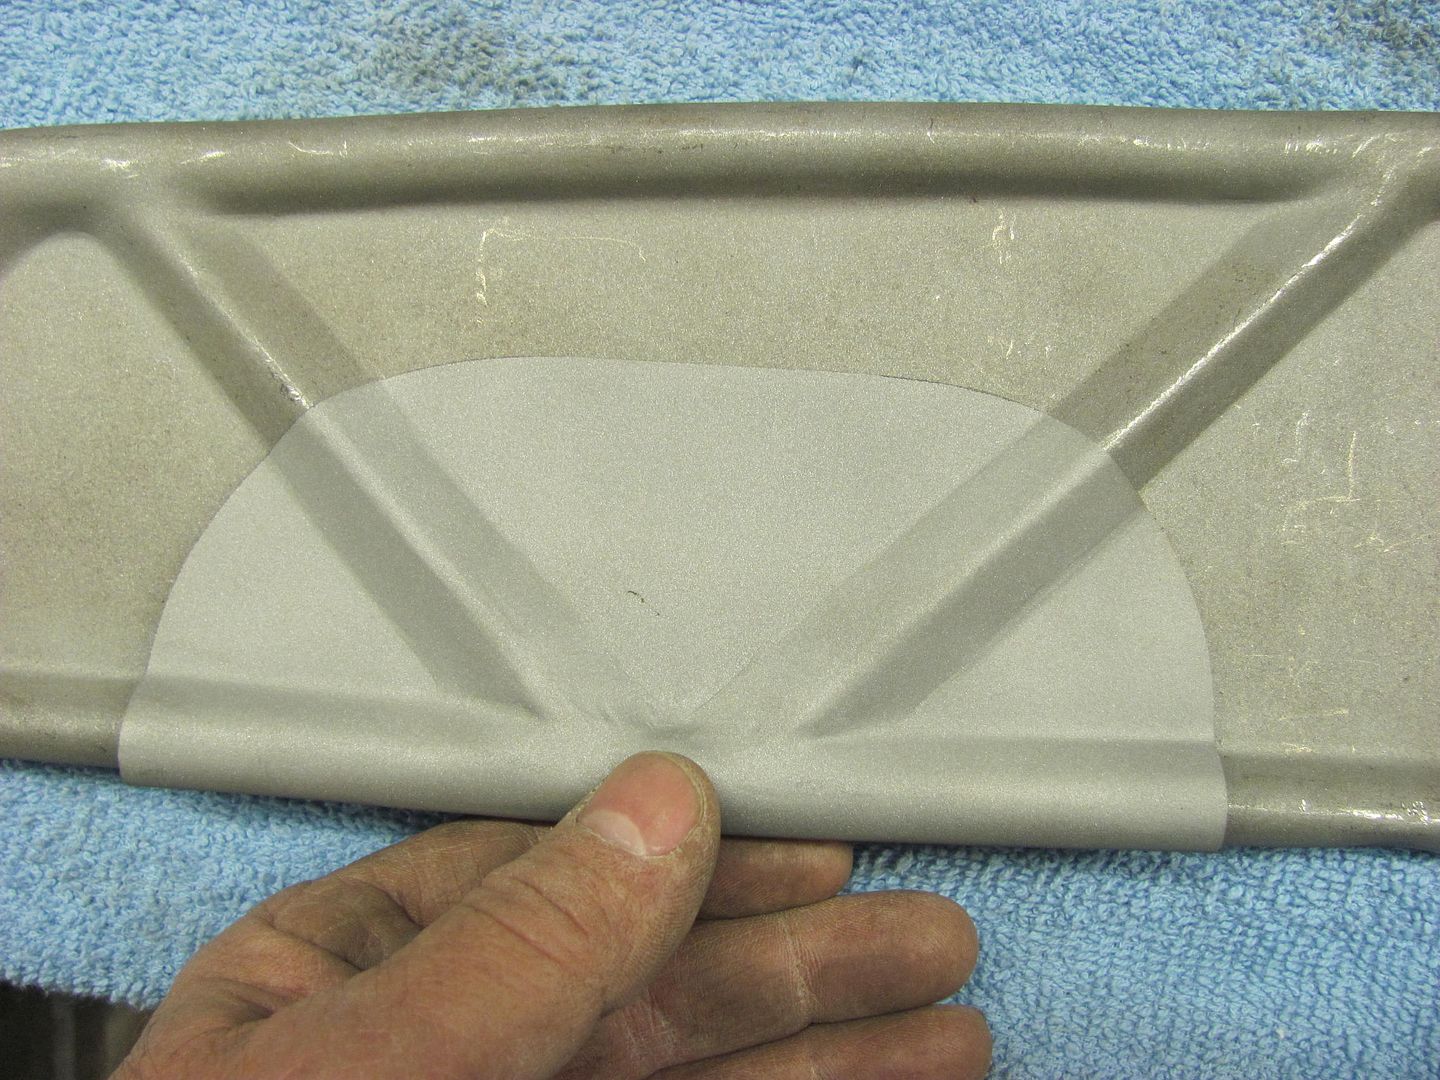
I use a 3" cutoff wheel, 1/16 thick, and hold it perpendicular to the weld bead. I work this back and forth along the weld bead, covering about a 1/2" area. Don't sit in one spot or it will tend to cut and not grind. next, if we just stayed in the center of the weld bead, you would wind up with a concave depression in the middle of the weld when done, so make a few passes down the middle, then work toward one side, then the other, in attempt to keep what you are grinding fairly flat. Try to stop when you are just above the surface of the sheet metal, or otherwise you will have grinding gouges, like some of the ones shown here: :mad:

HPIM5795.jpg


HPIM5794.jpg


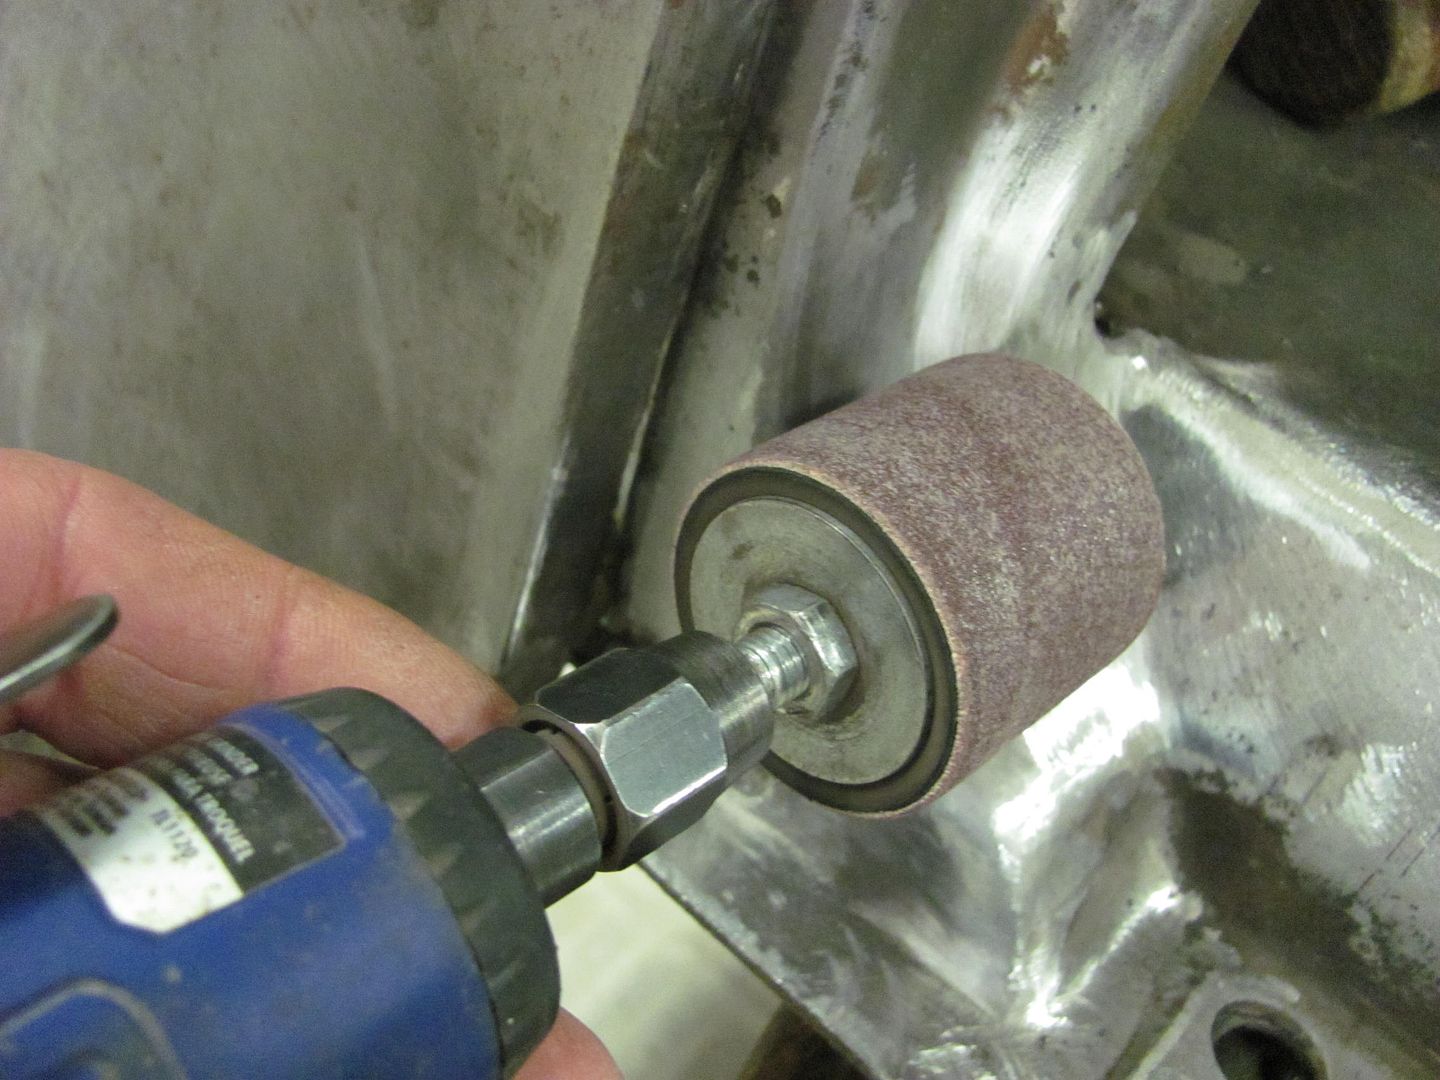
This takes a bit of patience and finesse (something I'm still working on), but getting rid of the bulk of the weld in this fashion seems to make the sanding discs last quite a bit longer. After the welds are down to a workable level, switch to the 3" angle sander, I use a 60 grit sanding disc.

HPIM5796.jpg
Next, once the bulk of the grinding is done, the next step will depend on the shape of your panel, or how far in a tight corner you are..

Picture262.jpg


Picture263.jpg


Picture264.jpg


Picture265.jpg


Picture266.jpg


Picture267.jpg


All of the tools are held by hand, no jig, but use your opposite hand to form a "tripod" to stabilize, or rest the other on. Use gradual, consistent, motion to get consistent results. Again, let the abrasive do the work, no need to lean on the tool...


I also have a video I did more recently on grinding welds...


https://www.youtube.com/watch?v=V2WHT_zMOE8
 

terryo1965

Well-known member
Joined
Nov 22, 2011
Messages
75
Location
Ann Arbor, Michigan
Hey Robert, the wagon is looking good, nice progress! I decided to put a sedan gas tank in my '57 Nomad and I think I remember you did the same in your wagon. Could you please post the pictures of the steel structure you made to hold the tank? I looked at a kit from Earle Williams but it looks like to bolts to the cargo floor. I think the way you did it was a better way to go.
Thanks,
Terry
 
OP
M

MP&C

Well-known member
Joined
Oct 21, 2009
Messages
4,396
Location
Leonardtown, MD
Terry, I made the framework for the wagon floor which also mounts the tank using stock straps. I think you are correct in that the EW kit makes use of stock floor and support members. The cargo floor of the wagon and trunk floor of the sedan will have differences where this scenario may or may not be easily adapted. (disclaimer :willy_nil)


Details for the "shoes" that keep the tank in place....

49a8205d.jpg


5ddb4706.jpg


6147a040.jpg


4a51df84.jpg


ebe07335.jpg


f2127dc7.jpg


b3092a77.jpg


2f61a44c.jpg


9922ce71.jpg


5729025a.jpg


ac26eecb.jpg


6250ec07.jpg
 

terryo1965

Well-known member
Joined
Nov 22, 2011
Messages
75
Location
Ann Arbor, Michigan
Robert,
That's exactly what I was looking for. I think your mount is the way to go. I will send you a picture of mine when it's done! I can't thank you enough, you are great resource to have when I jam!!!
Thanks,
Terry
 

ng8264723

Well-known member
Joined
Aug 28, 2006
Messages
732
Location
Oakham MA
Robert that thing is rusty underneath. Are you going to have it blasted? Seems one would do the bottom first?...
 
OP
M

MP&C

Well-known member
Joined
Oct 21, 2009
Messages
4,396
Location
Leonardtown, MD
Those are old pictures before the body was blasted. We do have to blast the frame still, that will be done after the body goes back on the rotisserie..
 
Last edited:

Ohmthis

Well-known member
Joined
Jan 20, 2013
Messages
3,000
Location
Outside of Louisville KY
Robert, great job! It's been awhile since I've posted (vacation home needs some work and trying to pour the floor for my shop). Did you use some kind of contour gauge to know to use the 1/2" bar stock for the radius? You give me so many ideas. I also found your thread on making a homemade ******* out of a spring. It's on my list to make soon. Thanks again for taking the time to document all of these awesome lessons.
 
OP
M

MP&C

Well-known member
Joined
Oct 21, 2009
Messages
4,396
Location
Leonardtown, MD
Guys, thanks for the comments and questions!

Anthony, I had picked up some used press brake dies a few years back, which included some home-made radius dies. One was a short piece of narrow vee with a 1/2 rod welded across the bottom, similar to what we used on the mag brake. I had used this clamped in the vise to correct some of the wave in the bottom edge of the hood brace prior to making the decision to fill in all the relief holes. So it was just by chance more than anything that I had already used this die to be able to determine the size from there. I guess if a person had a selection of round stock it would be just as easy to hold a piece in there to compare what fit, what didn't.
 

wbrian63

Well-known member
Joined
Mar 31, 2010
Messages
843
Location
Houston, TX
I use the same technique for dressing welds (learned it from you), except I use a thinner wheel in my 4-1/2" angle grinder. This is far from an ideal situation due to the size of the wheel and companion guard, and also that you can't control the speed.

I was thinking about converting to your method with the cutoff wheel in the right-angle grinder, but I wasn't able to find a mandrel.

Where did you get the mandrel to attach the 3" wheel to your angle grinder?

Interesting about stainless-steel rated. I've not been paying that premium because I'm not working with SS. Hadn't thought about the quality of the product being better. Lehigh Valley Abrasives says the difference is the SS-rated products don't contain stuff in the abrasives or in the bonding agents that contaminate SS, so I figured what's the point.

Now I know different. Next time I buy cutoff discs I'll make the jump - the price differential isn't that bad.

Appreciate your responses to this point - especially if you can point me to that 1/4" shaft arbor.

Regards
 
OP
M

MP&C

Well-known member
Joined
Oct 21, 2009
Messages
4,396
Location
Leonardtown, MD
Can't remember where I got it from, but this is the one I have, one screw is straight 1/4 shank for the cut off wheels with 1/4 holes, second screw has 3/8 shank for cut off wheels with 3/8 holes. Arbor piece has 3/8 relief cut in it for the larger shank bolt.


http://www.grainger.com/product/CLESCO-Cut-Off-Wheel-Mandrel-1F544


****edit....just went to Tractor Supply, they have the same style for 5.99


1F542_AS01
 
Last edited:

broncorick

Well-known member
Joined
May 30, 2007
Messages
71
Location
Indianapolis
Nice work on blocks. Use to do these when I was blacksmithing to form horse shoe swedges, etc. WIsh I had a trip hammer for work like that too. Great thread
 
To avoid these ads, REGISTER NOW!
Top Bottom