To avoid these ads, REGISTER NOW!

MP&C Shop Projects

To avoid these ads, REGISTER NOW!

Bears Fan

Well-known member
Joined
Jan 26, 2012
Messages
3,437
Location
Indiana
IMG_6108.jpg


Damn! That is cool :beer:
 

Monza Harry

Well-known member
Joined
Dec 29, 2018
Messages
1,433
Location
Windsor ON
Nice sign, love the chrome drum hardware being utilized.


Is the sign being made for a man-cave or is it for an actual business?

I agree with this hardware remark, [first thing to wander through the vacant space I call my head when I first laid eyes on that pic'] that clearly brings that up a detail level or three! Harry
 
Last edited:
OP
M

MP&C

Well-known member
Joined
Oct 21, 2009
Messages
4,396
Location
Leonardtown, MD
A Merry Christmas to all, best wishes for health and prosperity..


And some Holiday music to get you going…..


.
 
OP
M

MP&C

Well-known member
Joined
Oct 21, 2009
Messages
4,396
Location
Leonardtown, MD
Mike and I did some spring cleaning in the shop today, and got some things off the floor. Brackets made of 1/8 hot rolled steel.


B3F9DC96-6757-42A8-A750-1F15AC68D84C.jpg

8D64239B-A9DC-4E13-AA83-F04C0E12E42B.jpg

B9DC74A8-6ACE-43EC-AA22-0874A10865E4.jpg
 

Bob Heine

ALLIANCE MEMBER
Joined
Oct 24, 2009
Messages
10,703
Location
Boca Raton, Florida
Robert, sorry to see that. If you need to know the name of the photo for retrieval, click on the "Sorry" and then press F12. The photo ID shows up in the window at the bottom of your screen. Doesn't help us but it's a way for you to find out which picture PB is making unavailable.
 
To avoid these ads, REGISTER NOW!
OP
M

MP&C

Well-known member
Joined
Oct 21, 2009
Messages
4,396
Location
Leonardtown, MD
Thanks Bob, the only reason I was still dicking with PhotoBucket after the extortion caper was all the linked picture posts in this thread (and elsewhere) that would have to be uploaded manually to replace the linked ones.. I don't have time to go back and fix 165 pages, but guess I'm uploading moving forward.
 
OP
M

MP&C

Well-known member
Joined
Oct 21, 2009
Messages
4,396
Location
Leonardtown, MD
One of my former classmates from high school caught up with me a few months back, and had some work he wanted done on a hood for his Tubbed V8 Plymouth Arrow. Still has the same car from HS almost 4 decades later.. He said he wanted a more professional job over what was done back then..


attachment.php


He had bought an NOS hood for it some years back, so at least he has something solid to work with.. He said the metal flopped a bit around the opening he cut, so I thought we'd make some new bracing on the underside while we were at it. Here's the phenolic dies made for the Lennox to form the new bracing..


attachment.php


Here's a test sample run...


...and a test fit


attachment.php


Next, the bracing we wanted to install needed to go around the bigass hole, and some of the existing brace needed removing.


attachment.php


attachment.php


Our new brace designed to go around the hole... cut in the flat and run through our dies..


attachment.php


And here's about where it will sit....


attachment.php


.
 

Attachments

  • IMG_6209.jpg
    IMG_6209.jpg
    109.7 KB · Views: 1,078
  • IMG_6294.jpg
    IMG_6294.jpg
    104.6 KB · Views: 1,081
  • IMG_6202.jpg
    IMG_6202.jpg
    132.6 KB · Views: 1,092
  • IMG_6205.jpg
    IMG_6205.jpg
    58.5 KB · Views: 1,075
  • IMG_6229.jpg
    IMG_6229.jpg
    65.3 KB · Views: 1,073
  • IMG_6231.jpg
    IMG_6231.jpg
    79.4 KB · Views: 1,071
  • IMG_6244.jpg
    IMG_6244.jpg
    122.8 KB · Views: 1,075
Last edited:
OP
M

MP&C

Well-known member
Joined
Oct 21, 2009
Messages
4,396
Location
Leonardtown, MD
Rather than screw up one of the last remaining NOS Plymouth Arrow hoods in existence, let's do a test sample first.. To strengthen the opening, we'll add a 1/8 wire edge protruding upward, which will also help to keep things out.....somewhat. Here's our new dies for the 1/8 wire... This is the "inlet" side...


attachment.php


Side view shows the ramps that will add the joggle


attachment.php


We're using a 22 x 22 piece of 19 gauge for our sample, and folding a 5/16 flange, which needs a bit of stretching to keep things flat. so a rounded hammer on the top of the stump adds a bit of stretch, then a linear stretch hammer and dolly to stretch further and fold things over..


attachment.php


with the flange folded, the sample is run through our dies to form the joggle


attachment.php


1/8 stainless is rolled in our tubing bender/straightener, sized, and TIG welded to form a continuous ring. Then it gets laid in the channel and the flange staked over in various spots to hold it in place using the linear stretch hammer..


attachment.php


Hammering process to fold the flange over. Linear stretch hammer used to add a bit more stretch and to minimize marks left behind..


Finished sample...


attachment.php


….and checked to the brace


attachment.php
 

Attachments

  • IMG_6245.jpg
    IMG_6245.jpg
    67.6 KB · Views: 1,108
  • IMG_6246.jpg
    IMG_6246.jpg
    63.2 KB · Views: 1,102
  • IMG_6249.jpg
    IMG_6249.jpg
    73.6 KB · Views: 1,099
  • IMG_6252.jpg
    IMG_6252.jpg
    72 KB · Views: 1,098
  • IMG_6253.jpg
    IMG_6253.jpg
    105.1 KB · Views: 1,106
  • IMG_6257.jpg
    IMG_6257.jpg
    120.3 KB · Views: 1,109
  • IMG_6258.jpg
    IMG_6258.jpg
    88.9 KB · Views: 1,109
OP
M

MP&C

Well-known member
Joined
Oct 21, 2009
Messages
4,396
Location
Leonardtown, MD
Thanks fellas!

With the practice behind us, lets see what we can do to this hood. The outer circle is the mark for our fold, or opening size. The inner circle is the cut for our flange that will wrap around the 1/8 wire..


attachment.php


Getting our tin snips started...


attachment.php


Hole cut with no filing, no sanding, and absolutely no metal "splinters".


attachment.php


If you have issues with tin snips AT ALL, I recommend Bill Gibson's tin snip video... One of the best training/refresher videos on tin snips..


Next, on to the underside. We have four places where these areas of the old structure was cut out that need to go. Opening the hood to see these remnants would just kill the look, so let's see if we can mimic a factory look here.


attachment.php


A piece of 16 gauge was used as a heat shield and using the Meco torch and the barrel end hammer, reshaped the offset back to flat...


attachment.php


attachment.php


Like it came that way..


attachment.php
 

Attachments

  • IMG_6316.jpg
    IMG_6316.jpg
    107.2 KB · Views: 1,091
  • IMG_6314.jpg
    IMG_6314.jpg
    88.4 KB · Views: 1,090
  • IMG_6312.jpg
    IMG_6312.jpg
    89.2 KB · Views: 1,091
  • IMG_6308.jpg
    IMG_6308.jpg
    75.5 KB · Views: 1,083
  • IMG_6302.jpg
    IMG_6302.jpg
    68.8 KB · Views: 1,087
  • IMG_6299.jpg
    IMG_6299.jpg
    56.3 KB · Views: 1,090
  • IMG_6298.jpg
    IMG_6298.jpg
    49.1 KB · Views: 1,088
OP
M

MP&C

Well-known member
Joined
Oct 21, 2009
Messages
4,396
Location
Leonardtown, MD
Thanks!


With the hole cut now we need to fold a flange to wrap around the 1/8 wire. The linear stretch hammer and a heel dolly is used to stretch the flange that will be folded down, then a tipping tool takes the flange down about halfway. Then I needed to get in the thick of things, further stretching and hammering over to a 90* flange.


attachment.php


attachment.php


Once the flange is folded, the Lennox is used to add the joggle for our wired edge..


Bottom side....


attachment.php


attachment.php


Top side....


attachment.php


attachment.php


Next we'll get the wire ring sized and some epoxy primer in the channel for some rust prevention.
 

Attachments

  • IMG_6322.jpg
    IMG_6322.jpg
    135.6 KB · Views: 1,048
  • IMG_6324.jpg
    IMG_6324.jpg
    82.9 KB · Views: 1,044
  • IMG_6328.jpg
    IMG_6328.jpg
    93.6 KB · Views: 1,046
  • IMG_6329.jpg
    IMG_6329.jpg
    49.1 KB · Views: 1,040
  • IMG_6330.jpg
    IMG_6330.jpg
    64.5 KB · Views: 1,045
  • IMG_6331.jpg
    IMG_6331.jpg
    66.1 KB · Views: 1,042

Matias

Well-known member
Joined
Feb 28, 2015
Messages
616
Location
Finland
Great work on the hood! Thanks for posting the links to additional videos. Those are precious and I bookmark them for later reference.
 

BORING HOP YARD

Well-known member
Joined
Jan 13, 2007
Messages
1,098
Location
Boring Oregon
Tin snip video was a great refresher! The metal work on the hood is spot on, I'm always amazed at how well finished your metal work is. Nice work Robert!
 
OP
M

MP&C

Well-known member
Joined
Oct 21, 2009
Messages
4,396
Location
Leonardtown, MD
Thanks for following along guys!


Our 1/8 stainless wire "ring" was formed using our tubing roller, the tool shown here in the vise when we were bending fuel line a few months back....


The ring was then sized to fit, ends TIG welded together, filed, and media blasted for paint adhesion. The channel and surrounding area was abraded with some 120 grit and some SPI epoxy brushed into the channel. The wire gets laid into the channel and another brush coat on any bare spots. Then the flange is staked down using the linear stretch hammer to hold the wire in position...


Then the flange is hammered over as we did previously with our test sample.


After our initial coat of primer had dried, we brushed around the perimeter to seal the wire and flange.


Next will be adding our new structural member to the bottom side.


.
 
Last edited:
OP
M

MP&C

Well-known member
Joined
Oct 21, 2009
Messages
4,396
Location
Leonardtown, MD
Thanks guys!

So last week I had a speed run to SC and had a chance to stop by and check on cousin JB at his upholstery shop. One of the side projects he was working on is a lowered Radio Flyer wagon for his nephew..


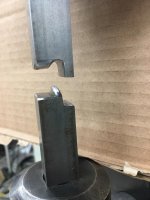
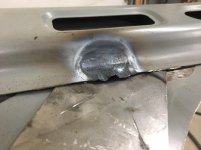
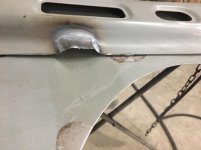
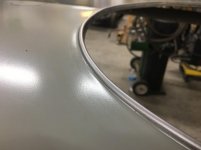
He has limited metalwork equipment in his shop and I noticed the rear tire mounts had a small amount of flex under load. I have a bit more equipment for such tasks, so offered to make him a set that was a bit more stout. I happened to have a piece of 3/16 stainless that would serve the purpose. Two pieces were cut out, clamped together, and filed/sanded to be identical parts. The press brake was used to add the bends.. This shows the difference in thickness....


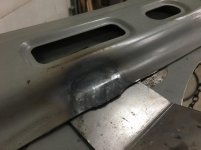
Then 1/2" holes were drilled to accommodate the 1018 steel rod for the axle shafts.. The rod was pushed about 2/3 in, tacked, and checked for perpendicular. Then TIG fusion welded and fillet welded using 312 rod.


Drill the mounting holes and these will be ready to ship back to SC.


I have been out of the Golden Elixer/liquid crack known as Throwback Mountain Dew for quite a while now as our local Pepsi distributor stopped carrying it. As I left JB's shop I saw a Piggly Wiggly food store and thought that the perfect place to stop and check inventory. As luck would have it, SC folks have a much better palate for cool liquid refreshment and still have it on the shelf. I bought all they had..


Now being the resourceful type, I did a location search for all the Piggly Wiggly's heading north. I stopped at a qty of 20, figure that will hold me until the next trip to JB's..


And with the shop inventory restored, all is right with the world..


Last edited:

shortykorte

Well-known member
Joined
Sep 1, 2014
Messages
8,034
Location
Tallahassee, Fl
Cool wagon project. At the Moultrie swap meet, a lot of people build custom wagons to carry their purchases.
I see you like your Dew like I like my DrP. [emoji106]


Shorty Korte
Always remember quality in QST

Sent from my iPhone using Garage Journal
 
To avoid these ads, REGISTER NOW!
Top Bottom