You are using an out of date browser. It may not display this or other websites correctly.
You should upgrade or use an alternative browser.
You should upgrade or use an alternative browser.
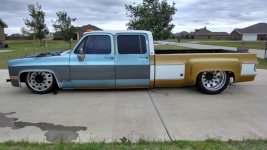
My 1975 Chevy Dually Build
- Thread starter 75Dually
- Start date

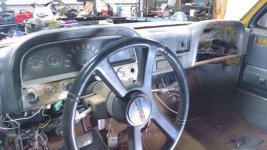
Several months ago I had put a picture on this thread of the dash in my 61 Chevy parts truck, and talked about potentially putting it in the dually. Well today I got out the implements of destruction, and went to town on both dashes. The dually dash came out super easy (trust me when I say I was surprised), and the 61 dash fought me at every turn. However I won that battle! So out it came kicking and fighting. I graduated from bigger hammer school folks...
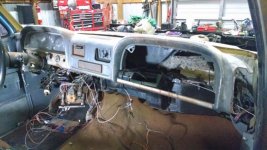
Seeing that I am mostly done with the air ride stuff for the time being I wanted something else to tackle. So now the hard work begins. I will tack it in and start to add all the sheet metal fillers.
This is going to be a lot of work, but nothing I can't handle. However the end result is going to be worth it.
Attachments

Kevin54
MEMBER EMERITUS
Blah, blah, blah....Dually this, Dually that. Sell me that damned Buick!!!!!! 
J/K...it's all coming together great. Looking forward to seeing how everything turns out. A while back....a few years, they had a pick of a ually in one of the roddin' magazines, and it had the interior out of a '62 Impala in it. The Dually was black with a red interior. It was totally badass with a '62 Impala dash in it. I don't think I have any pics on this computer, but if I find some, I'll post 'em up.
Quite a few Dually's in here also http://www.gmt400.com/forum/showthread.php?1183-Official-Dually-Picture-Thread!!/page4&
Last edited:
Blah, blah, blah....Dually this, Dually that. Sell me that damned Buick!!!!!!
J/K...it's all coming together great. Looking forward to seeing how everything turns out. A while back....a few years, they had a pick of a ually in one of the roddin' magazines, and it had the interior out of a '62 Impala in it. The Dually was black with a red interior. It was totally badass with a '62 Impala dash in it. I don't think I have any pics on this computer, but if I find some, I'll post 'em up.
Quite a few Dually's in here also http://www.gmt400.com/forum/showthread.php?1183-Official-Dually-Picture-Thread!!/page4&
I think I know the truck you are talking about. Is it this one?
That poor Buick has enough dust on it to choke a mule! Got to get it cleaned off and back on the street!
Attachments
Got to playing around with the new dash after I got all the old switches and knobs pulled. I put the 91 burb instrument panel in the gauge opening, and it does not look that bad. OK it does not look that good either, but I just don't have the budget right now for new gauges, maybe sometime in the future, but not right now. I would like a full set of Autometer in there, hmmm a speedo, tach with playback.....
Attachments
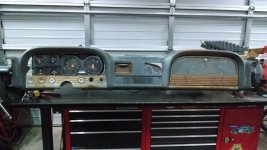
I worked on the dash this weekend. Yeah I know my trial balloon with the old gauges above was a dog, but hey you gotta try...
So after taking all the components out of each dash unit I found that there was a ton of similarities in the speedo. In fact the bolt patterns were the same to mount it to the rear plate! So that got me to thinking, what if I could use all the old gauges out of the 91 burb? So I tore it completely apart and then tore the 61 dash down as well. So I spent some quality time at home depot finding some of the small parts I needed, then I got back to the shop and made the dash unit below. The speedo is bolted in to the original location. The only thing I had to do to it was trim the bottom to fit the housing. All the other gauges are mounted from the back using JB weld and some small standoffs so the back lighting would come through. Right now I have to find some plexi glass to finish up the front, and I still have to finish up the wiring and install the lights for the turn signals.
Now to get that dash welded in...
Attachments

texchappy
Well-known member
Hey neighbor!
And howdy Neighbors!
GirchyGirchy
Well-known member
That's pretty cool! Nice work on the gauges.
caper150
Well-known member
all that work to make it look like that,m hell I could have sold you our shop one and all you need to do was add the air ride.
http://www.landlstreetrods.com/1998WesternHauler.html

THE TRUCK RUNS! Fired up on the first turn of the key!!! After 2 years of sitting and tons of work that was a major hurdle. Talk about a happy camper!
Now that it runs I am going to finish up the Accuair install and run the calibration phase tonight. I am going to take video of the calibration and post it on YouTube. A long night ahead but man I can't wait to see it lift off the ground under it's own system.
Now that it runs I am going to finish up the Accuair install and run the calibration phase tonight. I am going to take video of the calibration and post it on YouTube. A long night ahead but man I can't wait to see it lift off the ground under it's own system.
Squashfest81
Well-known member
Great solution for the guages. That dash will look killer in there.
Great solution for the guages. That dash will look killer in there.
Thanks man! Yeah sometimes it pays to not reach for the wallet first and stop and think a bit to find a solution.
Gonna go play in the shop for the rest of the evening and try to get the air ride up and running.

I was having a couple of issues with the calibration on the Accuair system so I called their tech support today. The system was throwing a "Ride height sensor travel warning". Their tech support is really good by the way.
If you go back in my posts I showed where I am using a 1/2" Airbaggit valve. The valve is fine and works with their system. The issue, or at least part of the issue is this valve is to fast for their ECU. My valve would exhaust to fast for the sensors, thus the ECU would not be able to pick up the rapid change, and so it would throw the "Ride height sensor travel warning". So I had to slow it down. What I did was take the brass muffler off the valve and replace it with a 1/2" ball valve. This way I could fine tune the rate of the air coming out the exhaust side. This worked really well.
So the system could now go through the calibration phase... Well almost... The other issue I ran into is it would not raise the front end very high. Maybe 1"-2", but no more than that. The rear worked fine, but the front was not cooperating. So I again called the tech support line, and they said to raise the tank pressure. The cool thing about the Accuair system is you can change the tank pressure switch with your iPad, iPhone, in cab rocker switch, or Accuair touch pad (or even soon to be Andriod app!!!). The stock pressure is set at 150psi, but you can change it to 175psi or even up to 200psi all with the touch of your finger. Pretty cool in my book! So tonight I will change the setting to 175psi and see if that does the trick, and if not I will move it up to 200psi (hope I don't have to go that high...)
I let you know what happens... Stay tuned...
Last edited:
A major milestone in my project. I got the Accuride finally working right. I did a video tonight of it going through the 3 different raise and lower modes. My son was in the front seat clowning around. Check it out!
awesome!

1. 210 York compressor - eBay - 73-84 VOLVO 240 260 YORK 210 A/C COMPRESSOR
2. Build mounting bracket - Local steel supplier - 1/4" Plate, 3/4"tubing 1/8"wall, 1/2" all thread, and associated bolts nuts and washers
3. V-Belt - Napa - Drive belt
4. Alternator pulley - Kilby Enterprises - Part #061-003
5. Oil fix - sheet metal screw - Size screw to fit oil hole tightly
6. Flange fittings - Kilby Enterprises - Part #28723
7. Intake filter - eBay - Air Compressor Intake Filter Silencer 1/2" NPT Metal Housing
8. Dip stick - Kilby Enterprises - Part #99-431
9. Oil/Water separator - eBay - 1/2" Particulate filter moisture for compressed air systems air compressor F704
10. Coalescing filter system - eBay - Coalescing Intermediate Oil Removal Filter, NPT 1/2 Inch
11. Main air line from compressor - Local tractor dealership - Gates 1/2" hydraulic line with 1/2" NPT swivel ends
12. ISO relay - Napa - ISO automotive 12V relay
13. Check valve - eBay - 1/2" Threaded In-Line Brass Spring Check Valve
Above is the items list for what I used to build my York 210 project. I have not listed every nut, bolt, and brass fitting. That is for you to source locally at Home Depot or Lowes or ??? This is not a shopping list, but hopefully a reference for you to use on the major items you will need to source. I listed each major item, the supplier or place I purchased it from, and the description of the parts. Where I have the part number I gave it, but note I did not give the V-Belt part number, each and every project is going to be different than mine so the best thing I can tell you is to visit your local Napa store or local parts store and they can help you size the belt. On the items I bought on eBay. Simply cut and paste the description into their search box and the item I bought should come up. If not it will get you a selection of similar items.
Some advice: As most others that have tackled this type of project would tell you, patience and precision is everything. Take your time and be precise. Belt alignment is super critical. Which means your bracket has to be right on the money. I spent more time than I want to admit making sure the belt was as dead on as I could get it. If you have a laser level, shine it down the valleys of the pulley's, or take a good straight edge and make sure that you have proper alignment. Make sure you have really good electrical connections. Use quality hardware (nuts, bolts, washers, etc..) it shows in the final product.
I hope the above list helps. I have enjoyed this portion of my build a lot. If you have questions I can help with let me know and I will do what I can...
![IMG_20140505_193730326[1].jpg](/forum/data/attachments/258/258467-54a42009a281249989d7e2ff3dde6e69.jpg)
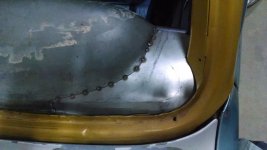
Working on the dash tonight. I fastened the dash down to the cowl and then began to make the forms that I will use to cut out the sheet metal. I used manila file folders and cut them up to fit the shape I wanted.
Tomorrow I will cut out the sheet metal and begin the fun work!
I have all my air vents picked out for the AC system now. I will have to modify the existing duct system to make it work, but that was to be expected... I am also going to work on how I send the rear compartment AC as well. Got some interesting ideas for that as well...
I also will be installing the stereo system fairly soon. I have not picked out a head unit yet. So many choices... At least I know it will fit in original slot. I took an old DIN chassis receiver tonight and checked the dimensions, and it was perfect.
Attachments


Today was an interesting day. I met one of my new neighbors. He is the graphic designer for RPM Magazine! He is building a super cool pro street mustang (new body style).
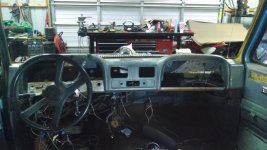
I also got some work done on the dually. Just as I got started cutting out the sheet metal for the dash my 15 year old scroll saw died... So off to Sears I went to buy a new one. Once I got back I finished cutting out everything I needed and got busy beating the metal into submission. Then I tacked welded everything in and did the end cap on the passenger side.
Tomorrow I will finish up the drivers side and get to finishing up the attachment points so it is solid all the way around. After that I will start on the AC vents. Whew! Lots of stuff to still do... Stay tuned...
Attachments


Tonight I was checking on the Google Play store and there was the new Android App for Accuair iLevel! So I down loaded it and went out to the shop and tried it on the truck (OK it worked just the same as the Apple app I was already using) but it worked perfectly. So now I only need one device to run everything in the truck, iLevel, Bluetooth to the stereo, GPS speedometer, Maps, etc.. Super cool!!!
So if you have iLevel go download the app and throw that Apple device out the window... Just kiddin'!
So if you have iLevel go download the app and throw that Apple device out the window... Just kiddin'!
I ordered my seats tonight. I have been looking at a ton of OEM solutions (take outs and junk yard stuff) and aftermarket as well. Below is what I chose. Some may not like them, and some will, but I have spent thousands of miles in similar seats and they are really comfortable.
I could not find any OEM seats that did not look like hell. So I went aftermarket. I will be doing a custom console that will go from the dash to the rear of the cabin. Still working on some renderings, but I have a good idea what I want just need to get it down on paper.
I also ordered my new carpet as well. Hopefully this dash will be done in a couple of weeks and I can finish up the interior and get on the paint. Ready for this ride to be done!
Attachments

Man this has been a long week... work has been super busy with lots of traveling, but I did get some work done on the truck.
I got the mounting tabs done on the dash last night, yeah I know parts you can't see, but they take as much if not more time than the parts you do see. Especially if you want them done right.
I have started working on the drivers side dash sheet metal. Should have it completed tonight. I also took out the old ash tray and cleaned up and metal worked the opening. I am going to use the old stereo opening for the AC controls. Next I will have the dash sprayed in primer so I can start to work on the body filler (bondo). After that I will shoot another couple of coats of primer and then shoot the interior in the final color.
My seats came in as well as the carpet. Can't wait to get them installed. Things are starting to come together...
Attachments

xJoey Dubsx
Well-known member
badass man! Got a bagged 00 dakota myself.
Man this has been a long week... work has been super busy with lots of traveling, but I did get some work done on the truck.
I got the mounting tabs done on the dash last night, yeah I know parts you can't see, but they take as much if not more time than the parts you do see. Especially if you want them done right.
I have started working on the drivers side dash sheet metal. Should have it completed tonight. I also took out the old ash tray and cleaned up and metal worked the opening. I am going to use the old stereo opening for the AC controls. Next I will have the dash sprayed in primer so I can start to work on the body filler (bondo). After that I will shoot another couple of coats of primer and then shoot the interior in the final color.
My seats came in as well as the carpet. Can't wait to get them installed. Things are starting to come together...
Nice work on the dash fillers!
The dash is now in permanently! I got it sanded down and the bare sheet metal primed. Then I got out the Bondo and slung some of that goo. I like body filler, just don't like to sand it, but them are the breaks!
I also got the first color on the glove box laid down. I will do the second color tomorrow once it has time to dry over night. It is going to be subtle but very cool once it is all done. I think you guys will like it once it is all done.
I hope to get lots of work done tomorrow. Stay tuned...
I also got the first color on the glove box laid down. I will do the second color tomorrow once it has time to dry over night. It is going to be subtle but very cool once it is all done. I think you guys will like it once it is all done.
I hope to get lots of work done tomorrow. Stay tuned...
Attachments

Got to playing around with then new seats today. I just pulled them out of the boxes and set them inside the truck. They are going to need frames fab'd up for them, but I just wanted to see them inside the truck. They are super comfortable, beats the heck out of the bench seat any day!
I started tonight to look at the center console, but it got late and that is a task for another day...
I started tonight to look at the center console, but it got late and that is a task for another day...
Attachments


neonnblack
Well-known member
The four buckets look sick.
Got to playing around with then new seats today. I just pulled them out of the boxes and set them inside the truck. They are going to need frames fab'd up for them, but I just wanted to see them inside the truck. They are super comfortable, beats the heck out of the bench seat any day!
I started tonight to look at the center console, but it got late and that is a task for another day...
Very cool! What kind of seats are they? I need some for my subaru

Very cool! What kind of seats are they? I need some for my subaru
I don't know the brand name, but here is the eBay link from the guys I bought them from. http://www.ebay.com/itm/2X-JDM-BLACK...p2047675.l4066
If you think about it after you see them they are cheaper priced than buying a bench seat upholstery kit. Actually the kits that I found were higher priced than those racing seats delivered to my door.

Just a quick pic on the seat frame I have been working on. I have the 3 other frames getting close to finish welding. Should be done by mid day tomorrow with those, and then it is on to the rest of the interior. Gotta get that dash finished and in paint!
I have also been working on a lot of small items so I can get the truck turned around in the shop, blow the bed apart, and finish all the items on my check list for the rear of the truck. I am tired of seeing the bed area not finished and sitting there unpainted.
Remember to thank the men and women who serve and have served our country in the armed forces. They are amazing people, and deserve our thanks and friendship!
Attachments

I did get all the seat frames completed today (just have 2 of them to paint tomorrow)! 3 just like the above frame (see above pic), all holes drilled, tapped, fully welded, and ground smooth. Whew it was fun, but I am glad it's done!
Kaotik79 stopped by today and picked up my old seats. Great to meet him and I hope those seats help out the cause. Glad they are out of the shop, they were taking up too much room!
Tomorrow after church I am going to drill all the mounting holes into the floor and get all the seats bolted down. Then after that (if I don't have any gremlin's to fight) I will try and work on the dash to get the bondo finished.
I ordered my stereo from Crutchfield! See the enclosed pics. I have used Kenwood systems for years, and have always been impressed with the sound and quality of their products. I hope this system is as good as the last unit I bought. I am also putting 2 10" Kicker subs.
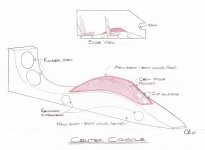
I will try and post a rendering of the center console I am working on. It should really be nice when completed.
I will try and post a rendering of the center console I am working on. It should really be nice when completed.
Attachments

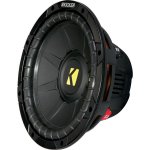
I ordered my stereo from Crutchfield! See the enclosed pics. I have used Kenwood systems for years, and have always been impressed with the sound and quality of their products. I hope this system is as good as the last unit I bought. I am also putting 2 10" Kicker subs.
I will try and post a rendering of the center console I am working on. It should really be nice when completed.
Very cool! No plans for a box in front of the rear bags and a tunnel in to the cab? I sat in one with 4 15" subs and it was crazy!
It has been raining like cats and dogs here in Lubbock today, so it was the perfect day to clean out the shop. Because the truck now runs I decided to pull it out of the shop, and power wash the underside before we start on paint. Snapped a couple of pics before putting it up before the next big cloud came along.
I got all the seats finally mounted today. They look cool! Now to get that dash done and out of the way... :wink:
I got all the seats finally mounted today. They look cool! Now to get that dash done and out of the way... :wink: