
You are using an out of date browser. It may not display this or other websites correctly.
You should upgrade or use an alternative browser.
You should upgrade or use an alternative browser.
My 1975 Chevy Dually Build
- Thread starter 75Dually
- Start date
looking good, your neighbors will probably be happy when you finish!
Actually what is really funny is most of my neighbor's are hot rodders or Harley guys (guys wishing they were real biker dudes, but just aren't... You know the type...) So I live in a super cool neighborhood. Trust me it is really rare, I know, I have lived where I am seen as "that car guy..."
Oh yeah and I forgot I also have 2 neighbors who race SCCA. They are Porsche dudes, but I don't hold that against them...

banzaitoyota
Well-known member
Got some work done on the dash tonight. Started working on fitting the side vents. The pic below is only in a very rough stage. I worked the rest of the night refining the hole and the vent to fit perfectly in the space. Started on the passenger side, but that will have to wait until tomorrow.
My stereo stuff showed up today! Can't wait until I can start on the center console.
Slowly but surely this dash will get done...
My stereo stuff showed up today! Can't wait until I can start on the center console.
Slowly but surely this dash will get done...
Attachments
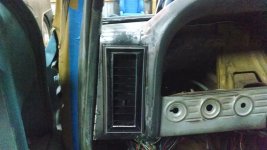
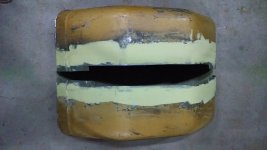
Working on the dash this evening. I got the holes cut for the passenger side AC vent, the stereo, and the eLevel rocker switch.
So after I finished cutting all those holes out I started work on the AC ducting. I am going to use as much of the stock ducting as possible out of the donor burb, but every vent is going to need a custom attachment point and ducting to be made. So I started with the passenger vent which was going to be the easiest. It has a flex hose running from the main plenum over to it so I made the rest of the duct out of fiberglass tonight. See the pics below. Once it dries I will see if it needs a second layer of fiberglass. Other than that it is just a simple 90 degree elbow.
The 2 center vents are going to be the most difficult. Both of them use the same ducting and there is not a lot of room in there. Also I have to deal with the new stereo as well. The space limitations are tight, but I will do what I can to make it as clean as possible.
Other than that the dash is really coming along. I want to have it finished up as quickly as possible because the center console and the body work is going to take up the bulk of my time from now on
Attachments
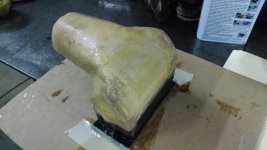
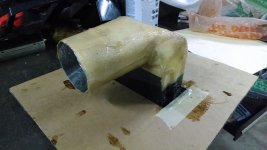
So I added another layer of fiberglass this morning to the elbow I made last night and let it dry. Then I did a trial fit and that is the pic below. Fit perfectly!
I mainly worked on the two center air ducts today. I started making the mounting plate and cutting up the ducts so that it will all be one unit when finished. So far I am about half way done.
I mainly worked on the two center air ducts today. I started making the mounting plate and cutting up the ducts so that it will all be one unit when finished. So far I am about half way done.
Attachments

Nice work. I see a bit of mud action over the welds.
Yeah that area needed a better transition so I decided to blend it in. Almost thought of leaving the welds just ground down, but nah this ain't no patina truck! BTW I love the patina truck movement, no hatter here.
In fact wait till you see my next ride... Stay tuned!
Very nice work!
I'm actually about to do this as well, although not to the extent of yours. I'd like to get it as low as I can without touching the frame and might do airbags in the rear (if I can inboard them...or mount them aft of the axle like semi's do). I want the bed to be completely functional just like stock. I want to stay with 19.5's as well...I think. Definitely not 10-lug stuff...no way I can afford that.
What I'm starting with:
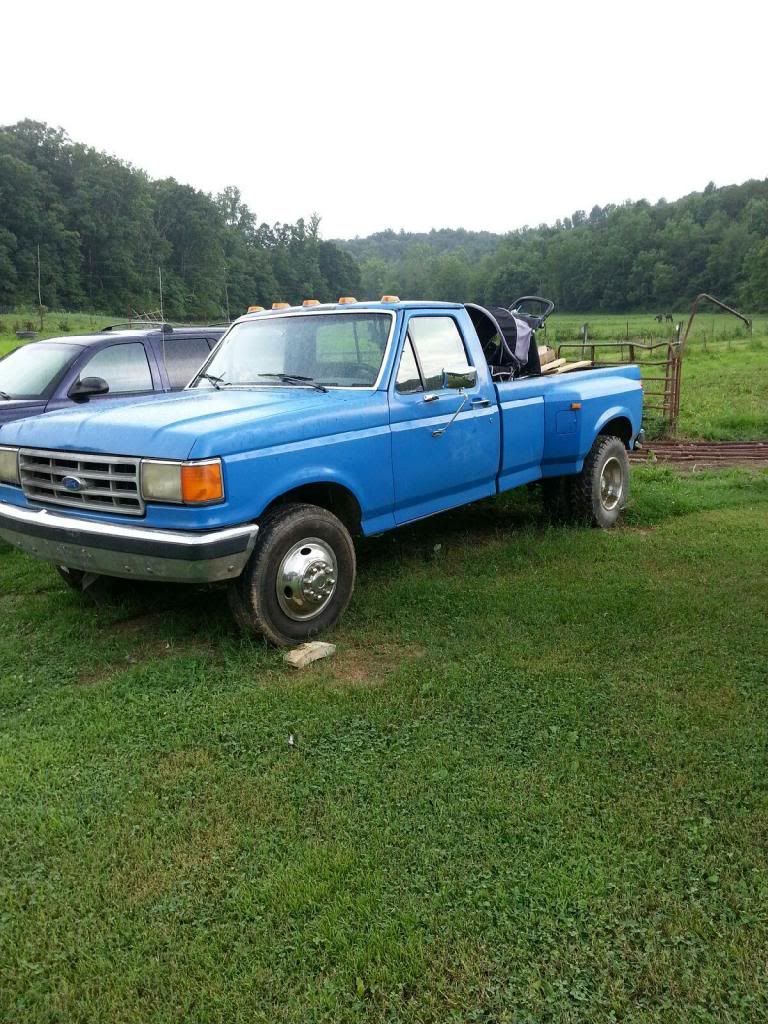
What I want it to resemble:

I'm actually about to do this as well, although not to the extent of yours. I'd like to get it as low as I can without touching the frame and might do airbags in the rear (if I can inboard them...or mount them aft of the axle like semi's do). I want the bed to be completely functional just like stock. I want to stay with 19.5's as well...I think. Definitely not 10-lug stuff...no way I can afford that.
What I'm starting with:
What I want it to resemble:
I have replaced the swivel connectors on top of the valve for push in air brake connectors. The original swivel connectors were prone to leak on two of to bags, and I know that the air brake connectors do not leak, period.
So while I was taking the rear of the truck apart getting ready for paint I decided to put the new connectors in. I have these air brake connectors on each of the bags, and they have worked flawlessly, so it made sense to eliminate any potential problem spots while I had the whole mess apart.
So while I was taking the rear of the truck apart getting ready for paint I decided to put the new connectors in. I have these air brake connectors on each of the bags, and they have worked flawlessly, so it made sense to eliminate any potential problem spots while I had the whole mess apart.
Attachments

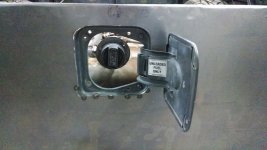
Been away doing some training for work, and have really missed working on the truck. I did get back to it tonight though. I started on the tailgate panel. This panel sits in between the gas tank and the actual tailgate.
No it is no where near finished. The top portion that is bent over the top tube needs to be metal worked, and I ran out of welding wire tonight just as I was tack welding the fuel door on... Naturally... It's 10 o'clock and I run out of wire... Perfect...
The fuel door is out of the donor burb. As you can see I will have the OEM door on it. I do not have the rubber bumpers inside it, but when it do the door will sit flush. I plan on making a box behind the door bolting to the filler tube to give it that OEM look. Should look cool when it is all done and painted up.
Attachments


Been away doing some training for work, and have really missed working on the truck. I did get back to it tonight though. I started on the tailgate panel. This panel sits in between the gas tank and the actual tailgate.
No it is no where near finished. The top portion that is bent over the top tube needs to be metal worked, and I ran out of welding wire tonight just as I was tack welding the fuel door on... Naturally... It's 10 o'clock and I run out of wire... Perfect...
The fuel door is out of the donor burb. As you can see I will have the OEM door on it. I do not have the rubber bumpers inside it, but when it do the door will sit flush. I plan on making a box behind the door bolting to the filler tube to give it that OEM look. Should look cool when it is all done and painted up.
that going to be hidden behind the tail gate ?

OK I have been a bum lately... We just got back off a long vacation, but before we left I did get the inner tailgate finished. I got the inside sprayed with bed liner and welded in. I also got the frame work for the air tanks done as well but don't have any pics right now. Maybe tomorrow I will take some and post them.
Glad to be back! Ready to get back to work on my ride! I see that while I was away that some questions were answered... and I did not even have to lift a finger on the keyboard!
Now the push to get it done is really on. My goal is to have it (at least in primer) before the end of July so I can take it to the Heat Wave show in Austin. I actually like to have a dead line. To me there is nothing better than a thrash to get a project done. I did so many of these during the years we did Power Tour that I have lost track. We finished one car at 3 AM the day we left, and that ride went over 3000 miles on it's maiden voyage and never missed a beat. I just hope this truck follows the same track...
Attachments

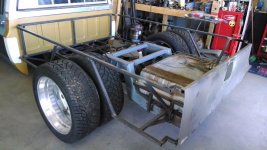
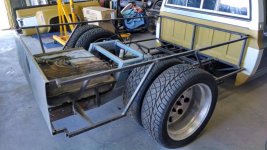
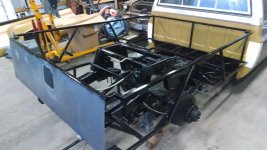
Got busy today and took both of the rear fenders and the front of the bed off. My son helped me get it done quicker than I could have alone, and those bed sides are a ****** to handle alone so I was glad for his help.
As you can see it is a naked bed area now. In one of the shots I have pulled the tank out. I am getting ready to finish this portion of the build. All I need to do right now is do the inner fenders, clean up the welds, and wire brush everything down getting ready for paint. I am going to do the tubes in black and the inner portion of the fenders in black bed liner.
After all that I am going to start on the body work on the rear fenders and the tail gate. If that goes well I will most likely shoot the primer coats, and then a color coat before reassembly. I will do the final color coats once I have everything back in place. That way I won't risk scratching everything up.
Attachments

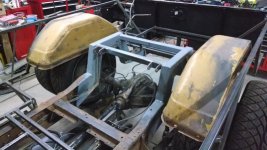
So last night I was in the shop doing some tear down on the rear end and suspension getting ready for paint. I also did some finish welding on the bottom of the notch. Stuff I had told myself I would get to eventually, so last night I procrastinated no longer!
Funny thing was that we have had some actual rain in Lubbock recently (Gasp! I know right!!) So my 13 year old son came out to the shop to keep me company and talk my ear off (naturally while I am trying to weld!) And due to the rain we now have mosquito's and some flying ants. Well these guys just love bright lights! And every time I was using the welder my son was noticing how I was attracting an entire congregation of mosquito's and flying ants. They were not messing with me at all, but were just hanging around. So when I crawled out from under the truck there was a ton of these critter's crawling around. Most of them I helped out the door with my big shop broom, no rent check no stay! Man the things I put up with to build hot rods!!
Oh well it is a thousand times better than sitting on my rump watching ESPN! ;P
Tonight I got the inner fenders installed. I now need to fill in the gap with sheet metal, but that is tomorrows job.
Been getting a lot of small parts painted up. Now I just need to wire brush everything, shoot the black paint, and get this rear end buttoned up!
Stay tuned...
Been getting a lot of small parts painted up. Now I just need to wire brush everything, shoot the black paint, and get this rear end buttoned up!
Stay tuned...
Attachments

Got the inner fenders just about completed. Bought a new electric metal sheer this morning and put it to use immediately. I cut out the filler plates for the inner fenders. Man you talk about a tool you wish you had 10 years ago... All I have left to do is sand the Bondo down and shoot the bed liner on them.
Tomorrow I will shoot the rear frame, rear end, and bed area. Whew I am ready to be done with this portion of the build...
Tomorrow I will shoot the rear frame, rear end, and bed area. Whew I am ready to be done with this portion of the build...
Attachments
PAINT SHINNY PAINT! Another major milestone for my ride! Now to let it dry and then put everything back together.
Whew it was HOT this weekend and the shop was even hotter! Lucky we had a nice breeze the whole time. I finished up the couple of last items and then shot the black. Glad to have this behind me and moving on to the body work and finishing the interior.
Ready to drive this beast!
Whew it was HOT this weekend and the shop was even hotter! Lucky we had a nice breeze the whole time. I finished up the couple of last items and then shot the black. Glad to have this behind me and moving on to the body work and finishing the interior.
Ready to drive this beast!
Attachments

Looks good. Tell us more about the shear?
Chris
Chris the sheer I got was from Harbor Freight. The pic is below. Normally I do not buy cheap items like this. Not to put down Harbor Freight ( I actually like them quite a bit), but when I buy a tool like this I normally expect to keep them for a number of years. I don't mind spending more if I know I am getting a superior tool. However I really wanted to give it a try to see how good it would be. Right out of the box this sheer really impressed me. It cut 14gauge like it was butter. I have a couple more panels I need to cut and I know this will make short work of it.
Actually I would recommend it for someone who does occasional sheet metal work. If you don't have one go get it and you will be glad you did, and if it breaks in a year or less then you only out $45 buck or even less if you use their 25% coupon!
Attachments

Progress, progress, progress... I tell ya there is nothing better than having all your tools laid out, the shop locked so no one can bother you, and the right tunes cranked up. I can make some serious progress if that is the case!
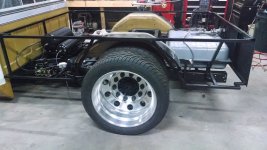
Well as you can see I got a lot of the major items put back on. The tank got some paint thrown at it, the air tanks have a new home, and the rear end is back together.
Tomorrow will be the rest of the small items and getting the air system all hooked back up.
Getting closer...
Well as you can see I got a lot of the major items put back on. The tank got some paint thrown at it, the air tanks have a new home, and the rear end is back together.
Tomorrow will be the rest of the small items and getting the air system all hooked back up.
Getting closer...
Attachments


Got the rest of the parts on the rear bolted back on finally, and got her off the jack stands. Still need to finish up the inner fenders, but that is not super critical right now.
Starting back on the interior tomorrow. Hope to get all the new AC ducts molded and button up the dash. Tons of fun!
Hope everyone has a great and safe 4th of July!
Starting back on the interior tomorrow. Hope to get all the new AC ducts molded and button up the dash. Tons of fun!
Hope everyone has a great and safe 4th of July!
Attachments
So tonight after I got back from a week long business trip I went out to the shop and cleaned off the fab table (badly in need of a major clean up!) and laid the passenger rear fender up on the table getting it ready for body work. The only real thing I got done on it was removal of the trim and getting the running lights out.
Tomorrow I will start to weld up all the holes and get the body work cleaned up and prep it for primer.
Got a lot of body work ahead of me... Better get to it and get this thing in paint.
Tomorrow I will start to weld up all the holes and get the body work cleaned up and prep it for primer.
Got a lot of body work ahead of me... Better get to it and get this thing in paint.
Attachments

Worked all day on the passenger side rear fender and the dually fender. I welded a small plate over the old gas filler location. Shot primer on everything at the end of the day. The pic below is the passenger fender on the drivers side. So not only is it on the wrong side, but it is backwards! Actually it was just left there to dry... So I had to snap that shot...
I will start on the opposite side tomorrow. I still have some small spots on the passenger side to finish up, but that will only take a little while. Have I mentioned that I don't like bodywork, but I am to cheap to pay someone to do it for me.
Can't wait to get this rear end painted up and put back together!
Attachments

Dude I'm jealous, I tried to get a truck just like yours years ago(with a similar idea) . It sat behind the ladies house for years and she wanted to much for it, the neighboring lot had a bunch of old barn wood and reclaimed type wood that caught fire. The truck became a casualty.
Serious Bummer! There are a couple of dually's around West Texas that I have found just sitting. I am keeping them all in mind in case I get a wild hair to build another one. In fact I saw one today that is in really good shape.


I can't wait until I get to the painting stage! However it feels lately like I have Mr. Miyagi saying "Sand the deck!" "Right circle, left circle... Sand the deck Danielsan." "Breath in, breath out..." I did not know that doing the body work on my dually was going to teach me Kung Fu, but what the heck!