To avoid these ads, REGISTER NOW!

Between 265 & 485 SQ/FT Nick's Two-Car Detached Vdub Garage

Workspaces sized between 265 and 485 squarefeet.
OP
N

nicholam77

Well-known member
Joined
Dec 18, 2016
Messages
2,673
Location
Minneapolis, MN
Thanks, @bj383ss ( Bret ). Got it installed this weekend:

IMG-1513.jpg

Other things that got done this weekend:

In keeping with the smart switches, I installed another at the top of our basement stairs. Also a TP-Link Kasa switch, but a 3-way. It was a huge PITA to install, probably over an hour.

IMG-1496.jpg

TP-Link switch on the right, existing Inovelli Red Z-Wave switch on the left. As mentioned in the previous post, smart switches tend to take up a lot of room, and require a neutral. And the existing boxes in my house tend to be small. It's a puzzle packing it all in!

But.... after a lot of patience and a few swear words I eventually had success.

IMG-1524.jpg

Literally the only thing I'm going to use this smart switch for is to set a timer for it being on. It's constantly left on. No joke I'm turning it off 20 times a day.
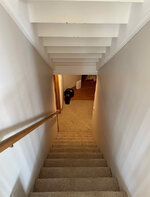
IMG-1525.jpg

So the automation is... if it's on for 2min, turn itself off. And of course it's included in various routines that use all lights, like shutting everything off at night or when we leave the house. Working great so far.

I got a lot of other stuff done. Pressure washed our patio. @loganb was daring enough to show off his toes to Garage Journal recently so I thought I'd do the same :ROFLMAO:

IMG-1491.jpg

First mow of the season. Weeds are coming in, but after 2.5 bags of grass seed the lawn is less dead and patchy.

IMG-1530.jpg

And following @bdbecker 's recommend, I picked up some of this Nevr Dull and polished my tips ;)

IMG-1514.jpg
IMG-1505.jpg
IMG-1506.jpg

They don't look brand new, but I'm pretty pleased. I washed with soap, then used wheel cleaner and a scotch brite pad to clean the inside rim which was complete black and caked on. Hadn't been cleaned since installed, 6 yrs ago. Then the Nevr Dull and buff it out.

IMG-1508.jpg

I was actually quite surprised how it changes the look of the rear, before the exhaust was not very noticeable and faded into the diffuser.
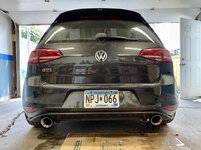
IMG-1515.jpg
IMG-1516.jpg

Lastly, I was inquiring in @Denwood thread about his recent wireless mesh outdoor internet setup at his camp site, and impulse ordered a new TP-Link outdoor access point for the garage. I have their Deco mesh units in the house (two of them, hardwired), but they don't reach the patio that well, and the garage not at all.

This wouldn't be a huge issue, except about a 5 block radius around my house is an LTE and 5G dead zone. I have to rely on WiFi calling. So if I pop out to the garage, I don't reliably get calls, emails, texts, etc.

IMG-1518.jpg

The good news, I did get it connected to the mesh (wirelessly). And was able to make a WiFi call with no issues.

The bad news, I'm only pulling 10 Mbps download, and the wireless mesh connection is "medium".

I think the ultimate plan is to run Cat6 from the house to the shed, and mount this access point on the back of the shed (covered under gable eave). It's outdoor rated, so can withstand rain, snow, extreme temps, etc. The wired connection plus outdoor placement should give me some pretty good numbers in the back yard and garage. Hoping to get to this fairly soon.

On top of these little projects, we went for multiple walks, took the kids to the splash pad, went to a birthday party at the grandparents, swimming lessons, and more. It helped that it was 90° F and sunny, I get motivated when it's nice out. It was an action-packed weekend!

🍻
 
To avoid these ads, REGISTER NOW!

loganb

ALLIANCE MEMBER
Joined
Dec 29, 2011
Messages
5,579
Location
Omaha, NE
GJ getting risque with all these toe's showing up lol...well played

And speaking of impulse buys....your review the other day on the TP-Link motion switch got me to buy the 2-pack...supposed to show tomorrow or Tuesday. One is going into the garage so we don't have to worry about turning the lights off after the wife leaves or pulling into the garage without enough light...motion sensor for the win!

Not sure where I'm going to put the other switch...possibly the master bath....the switch there is unfortunately hidden behind the doors going in so the door motion would activate it and think my wife would appreciate the scheduled brightness adjustment....have to play with that to see how dim we can get those lights as don't really need the 6 bulbs above the vanity at 2am
 
OP
N

nicholam77

Well-known member
Joined
Dec 18, 2016
Messages
2,673
Location
Minneapolis, MN
GJ getting risque with all these toe's showing up lol...well played

:ROFLMAO:

And speaking of impulse buys....your review the other day on the TP-Link motion switch got me to buy the 2-pack...supposed to show tomorrow or Tuesday. One is going into the garage so we don't have to worry about turning the lights off after the wife leaves or pulling into the garage without enough light...motion sensor for the win!

Cool! You'll have to let me know what you think.

For the garage, I'm not sure how well the motion sensor will detect a car pulling in. It's a PIR sensor, which detects heat energy in the form of infrared radiation from bodies... i.e. humans, and larger dogs. I've never tried with a car, and while they might give off heat, I'm not sure how reliable it will be... you'll have to let us know!

Depending on where the switch is located and how sensitive you set it, it will detect people getting out of the car once parked, to light the way into the house, which is still nice.

Not sure where I'm going to put the other switch...possibly the master bath....the switch there is unfortunately hidden behind the doors going in so the door motion would activate it and think my wife would appreciate the scheduled brightness adjustment....have to play with that to see how dim we can get those lights as don't really need the 6 bulbs above the vanity at 2am

I think a bathroom is an ideal place for this switch. Maybe a kitchen, too. I was able to dim the LEDs in our main floor bath to almost nothing, smoothly. It also has an optional fade up / fade down effect when the lights come on or off, which is very pleasing.

I won't go so far as to say having bathroom lights come on dim at night is life-changing, but it's really, really nice.

Again with the PIR sensor... it's not going to detect the bathroom door moving. Just a warm body. And it needs line-of-sight, so if I'm reading you correctly, you'd have to walk in and then close the door until the light switch "sees" you. I set mine on the most-sensitive setting so this happens pretty instantaneously. On the plus side, having the switch behind the door, it won't light up as you walk past like mine sometimes does.

If they offer a turbo nozzle for your pressure washer, buy one. The difference is night and day when cleaning sidewalks.

Oooh, I'll look into this! Funny, I've never come across these. My pressure washer is electric and on the the mild end of pressure ratings, so I could see this being helpful for sure.
 

loganb

ALLIANCE MEMBER
Joined
Dec 29, 2011
Messages
5,579
Location
Omaha, NE
Interesting....thanks for the advice on the PIR side...your understanding of the usage and potential issues is spot on and hadn't paid that much attention but will update as to how it goes!

And kay speaks truth on the turbo nozzle or rotary 0 degree nozzle as that's basically what it is...your 0 degree/pencil stream with a mechanism inside it to rotate the stream around. I wore out several of them growing up cleaning livestock barns...they're awesome. They also have an added bonus of they add some nice counterweight to the tip of the wand and improve balance of the wand....combine the right size one with a zip tie on the gun handle to hold the trigger in and you can do a lot of washing with minimal fatigue!
 

Bob Heine

ALLIANCE MEMBER
Joined
Oct 24, 2009
Messages
10,707
Location
Boca Raton, Florida
My pressure washer is electric and on the mild end of pressure ratings, so I could see this being helpful for sure.
Nick, I can't tell from the photo but if it's like my Sun Joe electric, the pressure nozzle doesn't screw on but the nozzle is adjustable. I can't use standard nozzles or guns with the setup that comes with the machine.
Sun Joe Wand.jpg
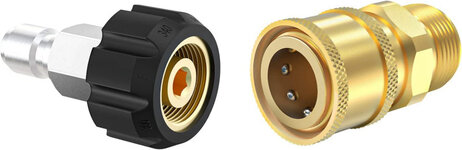
I converted my Sun Joe to use an industry standard pressure washer hose and wand. The pressure washer fitting on my Sun Joe is a male threaded M22, which allows me to attach a standard pressure washer hose. All you need to do the conversion is a standard pressure washer hose and standard wand. I hate screwing hoses and nozzles together so mine have quick connects with male plugs and female couplers. The most common quick connect kits come with female M22 threaded plugs and male M22 threaded couplers.
Pressure Hose Quick Connects.jpg
The standard hoses have female M22 ends so you use the male threaded couplers on the right. The machine and wands have male threads so you use the plugs on the left. I have a couple of 25-foot hoses as well as a 50-foot extension hose with an M22 male plug on one end of the hose. It's the reverse setup, which is less common but still available.
Pressure Hose Quick Connects Opposite.jpg
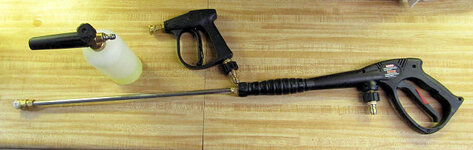
For patio cleaning I recommend the long wand but for a foam cannon I recommend the stubby wand. Something about swinging a quart bottle of soap at the end of a long wand (with one hand) disturbs me.
Foam Cannon with Wand.jpg
The ends of these wands have smaller 1/4-inch quick connects that take all kinds of nozzles, including the turbo Kay mentioned.
Gun and Nozzles.jpg
You can avoid the whole quick connect trouble and expense with nothing more than an M22 male/male ****** for that extension hose.
 
OP
N

nicholam77

Well-known member
Joined
Dec 18, 2016
Messages
2,673
Location
Minneapolis, MN
Nick, I can't tell from the photo but if it's like my Sun Joe electric, the pressure nozzle doesn't screw on but the nozzle is adjustable. I can't use standard nozzles or guns with the setup that comes with the machine.

Thanks for the info, Bob. Mine is a Greenworks, 1500 psi, 1.2 GPM. The want that came with it uses the 1/4" quick-connect system, and came with a 40° and 25° nozzle. Should take one of the turbo nozzles just fine.

I'll have to check, but I'm pretty sure the pressure hose that connects the machine to the wand is the M22 threaded you were talking about. That... I can't stand, it's too short and constantly curls up. I would love to get a longer hose without has much "cable memory". If you have a good one you like, let me know!

I do have a foam cannon with 1/4" quick-connect, which works fantastic, but agree on the wand length. I'm currently borrowing a Ryobi One+ EZ Clean from my dad to see how that works for car washes. Haven't tried it yet, but it's cordless, not super strong but more pressure than a garden hose to knock dirt off wheels etc, and has a rotating nozzle with several "modes" to quickly switch from pressure to rinsing. Has short and long extension for the wand. As fun as a foam cannon is, I feel like this might do the job for car washes and solve my cord/hose management woes.
 

kaymccampbell

Well-known member
Joined
Feb 27, 2015
Messages
29,584
Location
Upstate New York
Thanks for the info, Bob. Mine is a Greenworks, 1500 psi, 1.2 GPM. The want that came with it uses the 1/4" quick-connect system, and came with a 40° and 25° nozzle. Should take one of the turbo nozzles just fine.

I'll have to check, but I'm pretty sure the pressure hose that connects the machine to the wand is the M22 threaded you were talking about. That... I can't stand, it's too short and constantly curls up. I would love to get a longer hose without has much "cable memory". If you have a good one you like, let me know!

I do have a foam cannon with 1/4" quick-connect, which works fantastic, but agree on the wand length. I'm currently borrowing a Ryobi One+ EZ Clean from my dad to see how that works for car washes. Haven't tried it yet, but it's cordless, not super strong but more pressure than a garden hose to knock dirt off wheels etc, and has a rotating nozzle with several "modes" to quickly switch from pressure to rinsing. Has short and long extension for the wand. As fun as a foam cannon is, I feel like this might do the job for car washes and solve my cord/hose management woes.
Make sure you buy a turbo nozzle sized to your PW specs. Too big, and it makes lazy circles, like a spirograph.

Ryobi makes a foam cannon. It pops right on the 1/4 quick connect. I've got one. It's great. It sprays moss killer for the roof, and cleans pool filter cartridges, besides soaping the car.
 

Mr. Roboto

Well-known member
Joined
Dec 11, 2012
Messages
2,160
Location
New Hampshire
Nick, seeing your last few posts, maybe you've got a solution for me.

I know I kind of complained about it before, but I've be de-smart-ifying my home. All that's left are 3 Belkin wemo switches that control my outside lights. Main reason I've kept them is because they auto-adjust to whenever sunrise/sunset is, but I love the "dumb" timetable light switch you linked to.

I can use those in 2 locations (front door and garage sconces), but the 3rd location, I have THIS dimmer variant. the 3 recessed lights I installed in the soffit in front of my mudroom are just way too bright, so I dim them down. Here is an old photo from years ago when they were full brightness, and before I adjusted all my exterior lights to be color temp matched..... but you get the idea lol.

3212190b-d721-471c-94a0-748efb990149-jpg.828359


Do you know of anyone that offers a "dumb" timetable switch with an integrated dimmer? I suppose my only other choice is to get the non-dimming one you have, and install a dimmer switch downstream of it (I think this will work?) only problem is the switch is currently installed in a fully occupied 2-gang box with no space to expand in either direction if I wanted to add a 3rd switch.
 

Finallygotit

ALLIANCE MEMBER
Joined
Jul 6, 2013
Messages
4,090
Location
Tucson, AZ
OK, I'm not usually the most intelligent when it comes to smart home stuff BUT couldn't you install the same bulbs that you have in the garage and front door sconces in the three recessed lights in front of your mud room?

Just a thought.

:beer:
 
OP
N

nicholam77

Well-known member
Joined
Dec 18, 2016
Messages
2,673
Location
Minneapolis, MN
OK, I'm not usually the most intelligent when it comes to smart home stuff BUT couldn't you install the same bulbs that you have in the garage and front door sconces in the three recessed lights in front of your mud room?

That would be the ideal solution, but I'm guessing they are integrated LEDs and the "bulbs" are not swappable.

Nick, seeing your last few posts, maybe you've got a solution for me.

I know I kind of complained about it before, but I've be de-smart-ifying my home. All that's left are 3 Belkin wemo switches that control my outside lights. Main reason I've kept them is because they auto-adjust to whenever sunrise/sunset is, but I love the "dumb" timetable light switch you linked to.

The Honeywell switches are rock solid. I'd get the "Toolhome" knockoff I just bought with full confidence, I'm 99.9% sure it's the same switch, just without the Honeywell branding. Mine is working perfectly so far.

I do understand wanting to de-smart-ify, especially when things aren't working reliably. Trust me, I've been there. Is there a particular issue with that Wemo switch? Just not reliable or something?

The 3 recessed lights I installed in the soffit in front of my mudroom are just way too bright, so I dim them down. Here is an old photo from years ago when they were full brightness, and before I adjusted all my exterior lights to be color temp matched..... but you get the idea lol.

Like Dan ( @Finallygotit ) said, depending on how much the fixtures cost, you could consider replacing them with ones that have the appropriate light output and wouldn't require dimming. Not the most economical choice since you'd be wasting the existing fixtures, and still need to buy a solar timetable switch on top of that.

But this would be the "dumb" sunrise-sunset solution that comes to mind.

Do you know of anyone that offers a "dumb" timetable switch with an integrated dimmer? I suppose my only other choice is to get the non-dimming one you have, and install a dimmer switch downstream of it (I think this will work?) only problem is the switch is currently installed in a fully occupied 2-gang box with no space to expand in either direction if I wanted to add a 3rd switch.

I don't know of, and couldn't find, a "dumb" solar timetable dimmer switch.

A downstream dimmer would work just fine if you had the space for a larger box but it sounds like you don't.

So... I have a few suggestions, but none of them are fully "dumb".

1. Try a different smart switch, like the TP-Link Kasa Dimmer.

I don't have that exact model — I got the motion dimmer, and their standard 3-way switch — but both are working reliably, and have a nice mobile app.

The way I understand it, Kasa devices require their cloud services to onboard to the app (initial setup), and to adjust programming, and to control outside of the home. But... if the internet goes down, they will still work with local control on your home network. And continue to abide by their current programming. Not 100% sure how that works with a variable like sunset... but that's what I've been led to believe reading about it.

Either way, if Wemo is junk, you could try another smart switch and hope it performs better. The Kasa dimmer is like $18 on Amazon so not too bad to give it a shot.

2. Use a smart relay behind the Honeywell solar switch

Since I'm guessing you don't have a Z-Wave or Zigbee controller/hub, I'm going to recommend Shelly, which operates on local WiFi. You would have to get the Shelly Dimmer 2, which unfortunately is almost $40, but maybe if you're really committed to not using a smart switch this could be an option, even though it's sort of the same thing? Essentially it's a small relay that would wire behind the Honeywell switch and dim the load. Yes it's controlled over WiFi in an app. But you could probably "set-it-and-forget-it" and have it retain it's settings. Personally, I think the Kasa switch is probably reliable enough where this solution seems a bit overkill and not necessarily better.

3. Wire in some inline resistors?

I don't know much about electricity, or electrical code, but maybe someone else could chime in? Is there a way to knock down the load behind a switch?

4. If you don't care about the looks, could you install another box above or below the existing box?

And put a downstream dimmer there, plus an outlet or something? Could even put it all the way down by the baseboard so no one messes with it and install some sort of cover over the faceplate.

None of those are probably your ideal solution, but like Dan said... if it really bugs ya you might just bite the bullet and switch out the fixtures!

Lastly, calling in @Denwood in case he has any tricks up his sleeve.

🍻
 
OP
N

nicholam77

Well-known member
Joined
Dec 18, 2016
Messages
2,673
Location
Minneapolis, MN
A few more small updates.

Now that I have mediocre WiFi in the garage, I tried flashing my car with my phone and the Integrated Engineering Powerlink Mobile app. It needs internet to download the tune, and then uses bluetooth to communicate with the dongle. When I initially flashed the car at my parents' house with my mom's Windows laptop, I chose the very base 91 Octane file. I fill with 93 Octane gas, so I used the Powerlink Mobile app to flash to their 93 Octane Low Torque file. No obvious gains, but I figured... why not? Mostly wanted to try the mobile flashing, and all went well.


Secondly, I helped my dad make this doggy step stool:

IMG-1540.jpg

He designed it, I just helped make some of the cuts and concealed joinery with my tools. It will have an inset piece of low-pile carpet on the top for grip and wear.

My parents have two small, and old, dogs that need a stool to get onto the couch.


Third, I installed an add-on in Home Assistant called "AdGuard Home", which runs an ad-blocker in a container. That's another cool thing about Home Assistant — the OS is linux-based, and you can install "add-ons" of popular services in "containers" that are managed from the Home Assistant UI.

adguard-homeassistant.png

You can configure individual client devices, or implement a network-wide service, which is what I chose to do. Basically my Home Assistant computer becomes my primary DNS server, and applies filtering to any outgoing DNS queries.

You can see in the dashboard above, it's blocking approximately 20% of DNS queries so far. That's a lot of ads and tracking!!!

The best part is, there is no need to run a browser extension or app on any client device to slow it down... it's all just routed through my Home Assistant.

:geek:
 

Mr. Roboto

Well-known member
Joined
Dec 11, 2012
Messages
2,160
Location
New Hampshire
OK, I'm not usually the most intelligent when it comes to smart home stuff BUT couldn't you install the same bulbs that you have in the garage and front door sconces in the three recessed lights in front of your mud room?

Just a thought.

:beer:

Nick hit the nail on the head. They're not just bulbs unfortunately, but all-in-one integrated LED pucks. While they can be swapped, it's not as cheap/easy as just swapping bulbs.


@nicholam77 thanks for the detailed response. You've got me thinking about a few options. One that I had not thought of is installing the dimmer in another box, which would be tough to do in the wall along the current wire path, but there's nothing stopping me from just adding a box/switch in the "attic" above the mudroom. I'd really only have to access it once to set the desired brightness level, and then have the timetable switch just feed that!

As far as the Wemo.... get this. None of the switches are recognized in the wemo app any more. They all just say "device disconnected" or something along those lines. I've tried re-adding them without luck. I've even done a hard reset on the switches themselves and still cannot re-add them. Yet somehow, they're still operating on the original schedule I set up for them. I even called wemo/belkin for support, and they can't figure it out. And the warranty is up. So technically they're working without issue.... but who knows for how long. They've gone rogue on me!!

for $18 bucks, though, I may give that TP-link a shot first. I like the idea that I can just swap that switch in, set it up, and hopefully all is well from there on. It doesn't require any re-wiring of anything.

Thanks again for the help here!
 

Denwood

Well-known member
Joined
Sep 22, 2014
Messages
4,192
Location
Thunder Bay, Ontario, Canada
@nicholam77 , nice work on that ad blocker. That looks like a very slick setup. I use pfblocker on a pfsense router build but it is not trivial to set up…

@Mr. Roboto , I’m out of the loop on lighting controls that are not automated. The one thing I would say is that if you want bulletproof lighting that just works, use Phillips Hue. I don’t use integrated LEDs anywhere opting instead for GU10 fixtures so I can install either Ikea Tradfri or Hue bulbs.

I do have some 12 volt custom outside stair lighting that needed dimming so I added a dumb dimmer in an outside weatherproof box close to the outside mounted 12V transformer. The dimmer takes down 120V voltage feeding that transformer. I have an automated GE outside plug managing power to that setup via Hubitat and rules managing sunrise and sunset timers.
 
OP
N

nicholam77

Well-known member
Joined
Dec 18, 2016
Messages
2,673
Location
Minneapolis, MN
There's nothing stopping me from just adding a box/switch in the "attic" above the mudroom. I'd really only have to access it once to set the desired brightness level, and then have the timetable switch just feed that!

This is your "dumb", bulletproof solution. Plus, always important to leave little surprises like dimmer switches in the attic for the next guy (or gal) :ROFLMAO:

As far as the Wemo.... get this. None of the switches are recognized in the wemo app any more. They all just say "device disconnected" or something along those lines. I've tried re-adding them without luck. I've even done a hard reset on the switches themselves and still cannot re-add them. Yet somehow, they're still operating on the original schedule I set up for them. I even called wemo/belkin for support, and they can't figure it out. And the warranty is up. So technically they're working without issue.... but who knows for how long. They've gone rogue on me!!

That is odd. Shouldn't be necessary, but I always like to give my IoT LAN devices static IP addresses, or at least a DHCP address reservation in my router settings.

Interesting they are still operating successfully... this maybe suggests, like Kasa, the app/could is used for configuration, but since the switch has a neutral it uses some constant power to store some information in memory?

Honestly, the same thing could happen with Kasa in a few years. But as long as it's just one switch, and it behaves reliably, I don't see it as a huge investment if things go awry.

for $18 bucks, though, I may give that TP-link a shot first. I like the idea that I can just swap that switch in, set it up, and hopefully all is well from there on. It doesn't require any re-wiring of anything.

This is your solution if you don't feel like doing the wiring work 😁

And if you do ever get back in the smart home game, Kasa has a local API (for now), so hubs like my Hubitat or Home Assistant can control them completely locally.


@nicholam77 , nice work on that ad blocker. That looks like a very slick setup. I use pfblocker on a pfsense router build but it is not trivial to set up…

Thanks! It was super easy to set up. More of a curiosity since I haven't used an ad blocker previously, but I think I'm going to keep it. One mildly annoying thing is with certain embedded and banner ads in a browser, the sites don't reconfigure the blank space where the ad should have been, leaving a sort of awkward emptiness (most noticeable between paragraphs, or at the top of a page, for example). I can live with this, though.

Pfsense is above my pay grade :ROFLMAO:
 
OP
N

nicholam77

Well-known member
Joined
Dec 18, 2016
Messages
2,673
Location
Minneapolis, MN
GTI 8" MIB2 Display Upgrade... sort of

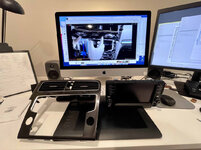
A few posts back, I mentioned upgrading the infotainment display in my GTI from the stock U.S. 6" screen to the European 8" screen. It's a straight swap, except you need a new surrounding trim piece, which also includes the center HVAC vents.

After waiting a few weeks, I got the screen delivered from Latvia, and the trim part delivered from Lithuania. Fun fact, my brother's wife is Lithuanian. Anyways.

IMG-1608.jpg

After reviewing some YouTube's, I dove in.

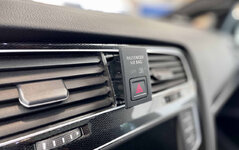
Pop the airbag warning light / hazards switch:

IMG-1610.jpg

Unplug the connnectors:

IMG-1612.jpg

Took me a minute to figure out how to get the top one off. It's amazing how many different harnesses and plugs VW uses... I swear every one is different.

Then carefully pry the trim surround off:

IMG-1615.jpg

It's not my first rodeo with VW trim pieces, and I won't lie I've broken my fair share of clips. But I managed this one without issues.

The vents are clipped to the trim, but need to be pulled out together or they may break.

IMG-1616.jpg

Below you can see how many freakin' clips there were:

IMG-1619-clips.jpg

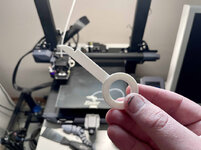
Then the radio comes out with radio removal keys, 4x of them. I knew I had some and after 45min of looking, I found them. Well, 3 of them. :mad: Of course the 4th was missing. I was almost about to order some on Amazon for next-day-delivery, but then had the bright idea to check Thingiverse. I'm sure you can tell where this is headed...

IMG-1621.jpg

A bit flimsy, but it did the job, and only took 15 minutes to print!

IMG-1622.jpg

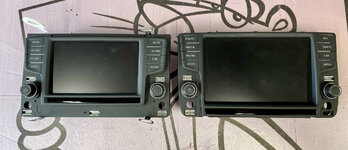
Next was just a matter of releasing the two cables on the old unit, and swapping in the new unit. Below you can see the size difference in the display:

IMG-1624.jpg

For some reason the European radio connector doesn't use one of the "nibs" on the U.S. connector. Otherwise it's identical. The solution is to just shave it off with a razor blade:

IMG-1625.jpg
radio-wire-trim.jpg

(credit for the connector pics to @cky3396 that I pulled from this Vortex how-to)

Before buttoning everything back up, I turned the ignition on to make sure it works.

IMG-1631.jpg

$@#! :mad:

Half the screen pixels are wonkydoodles. Colors not represented correctly. Fuzzy text. Flickering.

IMG-1630.jpg

I cycled the ignition a few times, unplugged, cleaned, and re-plugged the connectors. Even took a short drive to clear any codes. Same result.

IMG-1635.jpg
IMG-1636.jpg
IMG-1638.jpg

Obviously I can't live with it like this, so I contacted the eBay seller, and as soon as they authorize an RMA request it's going back to Latvia.

As for the screen itself, I have mixed feelings. The size looks good. But the display is the same resolution as the 6" one the car came with, so every UI element is much larger, and I can notice it's softer/fuzzier. Granted it was a bit hard to judge with half the screen messed up. And I knew this fact going in. But experiencing first hand, I do wish there was more resolution to accommodate the larger size.

It's not wrong, since this was the highest OEM configuration in Europe. But I'm just used to it smaller. I'm sure I would get used to it in time.

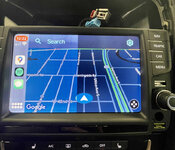
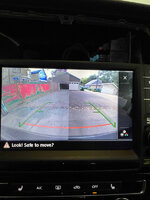
What I will say, is Google Maps on Carplay looks great at the bigger size, and probably the biggest revelation was the back up cam. Man does that look good and you can actually see it now.

I don't mean to be a complainer, but I don't really enjoy doing semi-tedious mods like this 3x for no reason. Still have a bad taste in my mouth from the Aerofabb spoiler.

I was considering just keeping the 6", but I special ordered the 8" trim piece (and it wasn't cheap). So, I'll probably see the return through, and hopefully source another display for a reasonable amount.
 
OP
N

nicholam77

Well-known member
Joined
Dec 18, 2016
Messages
2,673
Location
Minneapolis, MN
Still going back and forth with the eBay seller on a return. They are communicating, but not very responsive. I don't know if it's the time difference or what but it's slow. Cheapest shipping back to them is $44 which I'm trying to get them to pay for.

In the meantime I drove with the big screen and no center AC vents for a few days. I got used to it and now I have to make it happen :ROFLMAO:

IMG-1643.jpg

Then I pulled it to weigh it for shipping and put the original 6" back.

Didn't put the trim back... I'm hoping I can source a new one and just put the trim on once. But I'll probably be driving around without vents for 3-4 weeks. I think it's fine, haha.

Also, somehow I have an Airbag error after the install. My VAG coding tool, OBDeleven, no longer works on the older Android device I had for it, and they've since moved to a subscription model. I think I can clear codes with the IE PowerLink OBD dongle from my tune, but I'm weighing the idea of picking up a hex cable and VCDS Lite to have on hand in case I need it.


Other than that not much to note other than we had the worst air quality on record (since the '80's) in the Twin Cities from the Canadian wildfire smoke. Yesterday evening was so hazy and smokey, everything had an eerie light to it. Kinda neat and disturbing at the same time.
 

fourmotioneer

Well-known member
Joined
Mar 19, 2015
Messages
221
Location
Ann Arbor, MI
Took me a minute to figure out how to get the top one off. It's amazing how many different harnesses and plugs VW uses... I swear every one is different.
For some reason the European radio connector doesn't use one of the "nibs" on the U.S. connector. Otherwise it's identical. The solution is to just shave it off with a razor blade:

IMG-1625.jpg
radio-wire-trim.jpg

The display issues sound frustrating. I’d probably do the same as you - drive around half assembled until the fix arrives haha.

I’ve never had to do this myself, so I sadly am forgetting the details here, but in the connectors topic I think generally speaking electrical components will offer a standard connector, and if VW requests a “keyed” version with nibs or other keying features, the electrical component supplier might source an A or B or C key off the shelf, and if necessary, could tool up a unique key, which would result in VW eating the tooling cost. Not an EE so I’m sure someone here could clean up my statement. And the purpose is just to error proof the installation at either the dashboard sub assembly facility (where I would guess the display is installed), or at the vehicle assembly plant.

In general, if something on your car is tough to service, it probably saved assembly effort at the plant.
 
To avoid these ads, REGISTER NOW!
OP
N

nicholam77

Well-known member
Joined
Dec 18, 2016
Messages
2,673
Location
Minneapolis, MN
@fourmotioneer thanks for the insight on the electrical connectors.


Automotive question for those who are in the know... my wife's CX-5 needs brake pads. I guess it's been vibrating in the front when braking for probably a month now.

I've never done brakes, but it looks easy enough and I want to give it a go. Given that it wasn't addressed immediately, do you think it's worth replacing the rotors, too? Car has 113,000 miles on it and this is the first brake job.

Second question. I'm usually partial to OEM replacement parts, but those are harder to track down in a kit with everything needed. I'm still leaning that way, but anyone have a POV on using third party brake kits, and if so, any preferred brands?
 

zeug

Well-known member
Joined
Nov 29, 2009
Messages
191
Location
Colorado Springs
@fourmotioneer thanks for the insight on the electrical connectors.


Automotive question for those who are in the know... my wife's CX-5 needs brake pads. I guess it's been vibrating in the front when braking for probably a month now.

I've never done brakes, but it looks easy enough and I want to give it a go. Given that it wasn't addressed immediately, do you think it's worth replacing the rotors, too? Car has 113,000 miles on it and this is the first brake job.

Second question. I'm usually partial to OEM replacement parts, but those are harder to track down in a kit with everything needed. I'm still leaning that way, but anyone have a POV on using third party brake kits, and if so, any preferred brands?
Vibration is probably worn/grooved/warped rotors. You could have them turned if they are not beyond the wear limit, or just buy new ones.

I have been using the Akebono low dust brake pads on my wife's Volvo with excellent results. The Tundra has done well with the factory pads, BMW with the motorsport pads, my sons Volvo also gets Akebono. If you've been happy with the brake pad performance of the factory pads and can get them, not a bad think to stick with what works.

Tundra destroys rotors, so only the best there. Other cars get factory.

I'm not a big fan of the Advance Auto/Autozone lifetime pads. Seem to destroy rotors in my experience.
 
OP
N

nicholam77

Well-known member
Joined
Dec 18, 2016
Messages
2,673
Location
Minneapolis, MN
@zeug thank you, that’s exactly the kind of feedback I was looking for.

I am happy with the OEM pads, they lasted a long time and feel good to drive. Based on further reading I did they *might* even be made by Akebono.

I think I’ll just get new rotors, too, and start from a fresh place.
 

loganb

ALLIANCE MEMBER
Joined
Dec 29, 2011
Messages
5,579
Location
Omaha, NE
Never done pads on that, but shouldn't be bad. Biggest thing to look out for are fasteners with less common heads or as I learned on our Volvo...a parking brake mode that's designed to be turned off by a scan tool I don't own :). Finding a Youtube vid or service manual walk thru of it to verify the steps and any special fasteners should put you in a good position.

I'd also 2nd at least having the new rotors on hand....then if you don't use them just return. I haven't found many shops around me who still can turn brakes....1 shop has the lathe but nobody who knows how to run it. As for brand...I ordered the set that RockAuto claimed as the high volume one that was in stock in the OEM grade category....no idea if they were telling the truth but they at least bolted up!
 

zeug

Well-known member
Joined
Nov 29, 2009
Messages
191
Location
Colorado Springs
@zeug thank you, that’s exactly the kind of feedback I was looking for.

I am happy with the OEM pads, they lasted a long time and feel good to drive. Based on further reading I did they *might* even be made by Akebono.

I think I’ll just get new rotors, too, and start from a fresh place.
That would be my plan if I were in your shoes..
 
OP
N

nicholam77

Well-known member
Joined
Dec 18, 2016
Messages
2,673
Location
Minneapolis, MN
Never done pads on that, but shouldn't be bad. Biggest thing to look out for are fasteners with less common heads or as I learned on our Volvo...a parking brake mode that's designed to be turned off by a scan tool I don't own :). Finding a Youtube vid or service manual walk thru of it to verify the steps and any special fasteners should put you in a good position.

Thanks for calling attention to the electronic parking brake. I did watch a few CX-5 specific videos and it seems you can put it in “service mode” with a physical sequence (hold accelerator down and parking brake button up, and press the start button 3x while holding them). I’ll test before taking the rears apart, but hopefully no need for an OBDII tool.

Bolts are all just metric which I have sockets for. The only thing I haven’t come across yet are torque specs.

I’m just gonna get the new rotors. I have a feeling we let it go too long, and the car has been very low cost on maintenance so I think it deserves some love.

Thanks for the input!
 

bdbecker

ALLIANCE MEMBER
Joined
Nov 18, 2015
Messages
5,574
Location
Iowa
I'm sure you'll be able to figure out how to do the brakes. I'll offer a few things to consider that could throw you for a loop if you aren't expecting them. These may or may not apply to your wife's vehicle...

-Make sure you have a reliable way to bleed the brakes. Some ABS systems don't like the traditional pedal pump/crack the bleeder screw method. If working alone, the Motive Power Bleeder is a fantastic tool for the money. I used a vacuum bleeder for years before I gave the Motive a try - I will not be going back. Quick, easy, totally worth the money.

-Some vehicles have brakes that require the pistons to be rotated back into the caliper. You can usually rent/borrow a kit from a parts store. I ended up getting the Maddox kit from HF. Pretty decent for the price. Since I only do brakes every few years, I didn't see a need to spend more on a higher quality brand.

-Living in the midwest, I will be surprised if you don't run into a frozen guide pin or two. You can clean these up pretty well with a wire brush. Otherwise, replace them. Don't skimp on the grease - it's worth buying an extra few packets, or even a small tube. Replace any rubber boots that are compromised.

-At the end of the day, remember that your wife and children will be riding in this vehicle, and those brakes are what keeps them safe. If you run into something questionable, just replace it. It is not worth trying to save a few bucks if you suspect a component is compromised.
 
OP
N

nicholam77

Well-known member
Joined
Dec 18, 2016
Messages
2,673
Location
Minneapolis, MN
I have been using the Akebono low dust brake pads on my wife's Volvo with excellent results.

Are those the Akebono ProACT "Ultra Premium Ceramic"?

I priced out the Mazda OEM pads and they are for sure the most expensive option — $87 for the fronts and $61 or the rears. I assume they come with 4 pads (both sides) for 2x wheels? And to top it off, I'm not sure they come with the hardware clips, which are another $25-$30 per pair. I *think* the OEM pads are semi-metallic.

But then I look on RockAuto and the Akebono ProACTs are $50 for fronts, and $54 for rears, and come with hardware. That's a decent price difference. I like the sound of less dust with ceramic, but would be a bit disappointed if there was noticeably less stopping power than the OEMs. And those are only in their "daily driver" section, in the "premium" section on RockAuto there are other hybrid or ceramic options like Raybestos, Power Stop, etc, that are somehow even cheaper.

Mazda OEM rotors are practically double the cost, too. Doing all OEM pads and rotors and hardware is around $450-500 before tax/shipping which seems like a lot.

I was committed to do OEM, but now I'm kind of confused at what would be best. Maybe third party rotors with OEM pads? Or would I be happy with third party all around? Can I mix brands like the Akebono pads and Power Stop rotors? I don't see why not but just talking out loud here...


I'm sure you'll be able to figure out how to do the brakes. I'll offer a few things to consider that could throw you for a loop if you aren't expecting them. These may or may not apply to your wife's vehicle...

Thanks for your thoughts, Brad ( @bdbecker )

While I'm sure it could use a flush, I'm not planning to bleed the system on this adventure. But if/when I do, I think I will pick up one of those Motive power bleeders. I'm sure I would use it with the GTI, too.

Based on the videos I've watched, the pistons need to be compressed back into the cylinder with a tool like this, instead of rotated. I know the rears specifically shouldn't be rotated when they are compressed, something to do with damaging internal part of the caliper and possibly the electronic parking brake. The rear pistons do have a groove that needs to be aligned in a "north-south" orientation to index a pin on the rear pads.

I will definitely clean all contact parts and and pull and lube the guide pins.

In my usual style I've over-researched, so I feel like I have a pretty good handle on what to do. My biggest concern at this point is getting the rotors off. They haven't been touched since we've had the car (2016 model year), so after 7 yrs of salt I hope they aren't welded to the hubs. 😬
 

isonic

Well-known member
Joined
Aug 1, 2018
Messages
213
Location
Ham Lake, MN
That tool will work for pushing the piston back into the caliper. I have always used a 2x4 and a C-clamp. Anything will work as long as you are pushing the piston back in straight (orthogonal) to the piston housing. Make sure the boot doesn't get ripped.

As for rotors and pads..I like semi metallic personally. I just put ceramics on my truck and I think the stopping power isn't quite as good. As long as you are sticking to daily driver grade parts I don't see why you couldn't mix and match brands.

Also it is possible that you may not have to do the rears at the same time. There maybe lots of pad left back there. Take a wheel off and inspect the rear pad thickness before you order those parts. Unless you just want them all done at once, which I understand too.
 
OP
N

nicholam77

Well-known member
Joined
Dec 18, 2016
Messages
2,673
Location
Minneapolis, MN
That tool will work for pushing the piston back into the caliper. I have always used a 2x4 and a C-clamp. Anything will work as long as you are pushing the piston back in straight (orthogonal) to the piston housing. Make sure the boot doesn't get ripped.

As for rotors and pads..I like semi metallic personally. I just put ceramics on my truck and I think the stopping power isn't quite as good. As long as you are sticking to daily driver grade parts I don't see why you couldn't mix and match brands.

Also it is possible that you may not have to do the rears at the same time. There maybe lots of pad left back there. Take a wheel off and inspect the rear pad thickness before you order those parts. Unless you just want them all done at once, which I understand too.

Thanks! Yeah I figured since the tool is only $10 I'd just get it, and maybe use a small block of wood with it.

The trouble with the pads is you don't know until you try! I know I like the OEM pads, so I think it's safest to stick with them. I might do that + third party rotors to cut down the cost a bit.

I have an email out to an OEM parts site with no response... but do you think the OEM pads come with 4 pieces for 2x wheels? Like the front pads will cover both front wheels?

This is the part listing, and it doesn't really specific what comes with it, if it's one wheel, both wheels, hardware or no hardware.

As for the rears, I have a feeling it's time. Even if they aren't the cause of the vibration, they have gone for 113k miles, so I doubt they have lots of pad left.

One more question for you and/or the group — do I want coated rotors for corrosion prevention? The OEM rotors don't seem to have an aluminum colored coating... but obviously the roads are bad here...
 

bdbecker

ALLIANCE MEMBER
Joined
Nov 18, 2015
Messages
5,574
Location
Iowa
...My biggest concern at this point is getting the rotors off...

A big hammer and plenty of French words are often required. Since you are planning on replacing them, don't waste any time with a deadblow - just give them a full send with the heaviest steel hammer you can swing accurately while lying on the ground.

I'll never forget when I replaced the rotors on my F150. Woke up early that Saturday and got started on the brakes. The Iowa vs. Iowa State football game started late morning or early afternoon. I figured I'd have plenty of time to do the brakes before the game started. Nope. About halfway through the first half of the game, having removed exactly zero rotors, I decided to take a break, grab some lunch, and watch the game for a bit.

Iowa State (my alma mater) was playing halfway decent that day, but kept making dumb mistakes (as is tradition). I was getting fed up watching the game, so I went took my frustrations out on the truck. Finally got a rotor to break free. Success! Started on the next one, but wasn't having any luck. Now it was getting warm, so I sat down in the garage for a few minutes to cool off and started listening to the game on the radio. Good drive, might score, turnover. I head back outside and again, took out my anger on the truck. Got the other rotor free. I buttoned up the front end and dropped it down on the pavement.

I tear into the rear and run into the same issue. Sweaty now, I go back into the house to cool off, and turn the game back on. Fourth quarter, score was close. I don't remember exactly if ISU held the lead, or scored near the end of the game to take the lead, but we ended up winning. Go out to the truck, a couple of more whacks on one side, rotor off. Walk over to the other side, one hit, rotor off. It was as if letting it sit for that last 20 minutes while I was watching the game somehow loosened them up. Either way, my team won the football game and I won the battle of the brake rotors.

...While I'm sure it could use a flush, I'm not planning to bleed the system on this adventure...

113k... probably hasn't be done in awhile, if ever... you'll already have everything torn apart... just sayin...
 
OP
N

nicholam77

Well-known member
Joined
Dec 18, 2016
Messages
2,673
Location
Minneapolis, MN
I'll never forget when I replaced the rotors on my F150. Woke up early that Saturday and got started on the brakes. The Iowa vs. Iowa State football game started late morning or early afternoon. I figured I'd have plenty of time to do the brakes before the game started. Nope.

Well now I'm even more concerned :ROFLMAO:

113k... probably hasn't be done in awhile, if ever... you'll already have everything torn apart... just sayin...

Yeah, it's never been done. I just want to get the pads done asap and I don't know that I'll have all my ducks in a row for the fluid flush by then, plus, time is always an issue. I hear ya on efficiency, but if my rotors give me as much trouble as yours (day long fight!), the fluid might need to happen in a second session. It is something on my radar to do soon-ish, though.
 

Bob Heine

ALLIANCE MEMBER
Joined
Oct 24, 2009
Messages
10,707
Location
Boca Raton, Florida
While I'm sure it could use a flush, I'm not planning to bleed the system on this adventure. But if/when I do, I think I will pick up one of those Motive power bleeders. I'm sure I would use it with the GTI, too.
Nick, the brake fluid's age is probably as important as the rotors and pads. Brake fluid absorbs water, which can cause internal brake system parts to rust or corrode. That becomes an outrageously expensive problem when it affects the ABS system. When you press the caliper pucks back to their original position, you are pushing old fluid back in the system. It's best to crack the bleeder screws when you do the caliper squeeze. While you're investing in tools, get yourself a moisture tester as well. That will let you know how good or bad your brake fluid is. I replaced the entire brake system on the Corvette in 2013 (stainless brake lines, master cylinder, reservoirs, brake fluid, calipers, rotors and pads). In May 2022 I checked the fluid and it was bad. It didn't look bad but the meter indicated it contained at least 4% moisture. I used a vacuum system to **** the fluid out of the reservoirs and q-tips to get the last of it. The vacuum unit I used requires a compressor but it does a good job sucking the old fluid out from both the reservoirs and calipers.
Flush Step 2.jpg
The fluid I used is Bosch, which is compatible with DOT 3, DOT4 and DOT 5.1. Once the can is opened I give it a shot of Bloxygen, which displaces the air, including any humidity, from the container before I put the cap back on.
Flush Step 3.jpg
The tester is reasonably priced (https://www.amazon.com/gp/product/B076SC377J/?tag=atomicindus08-20) and it indicated the new brake fluid had 0% moisture.
Flush Step 5.jpg
 

isonic

Well-known member
Joined
Aug 1, 2018
Messages
213
Location
Ham Lake, MN
I have never bought brake pads from the dealer but if they don't sell you four pads to a "set" then they have a different definition of a set than I do. Front is a set and rear is a set. 4 pads each. If you go to O Really or Autozone and ask for front pads they will give you a box with 4 pads.

The link you posted does not look like it comes with hardware. That looks like item 17 on the diagram.
 

bj383ss

Well-known member
Joined
Sep 29, 2011
Messages
3,166
Location
TX
I'm not going to say much except the Raybestos pads are good. I run them all the time. Rotors I always use AC/Delco on my cars. I just put all new brakes on the front of my 95' Chevy yesterday. One of my calipers was stuck. At 180k+ I bought brand new calipers for both sides and hoses and let them gravity bleed until the master cylinder was getting low and refilled it twice with new fluid.

Truck stops so much better now that both calipers are working and new pads.

Bret
 
OP
N

nicholam77

Well-known member
Joined
Dec 18, 2016
Messages
2,673
Location
Minneapolis, MN
Nick, the brake fluid's age is probably as important as the rotors and pads. Brake fluid absorbs water, which can cause internal brake system parts to rust or corrode. That becomes an outrageously expensive problem when it affects the ABS system.

Yes, I will do it soon or have it done. Knowing I’ll probably have a half day or day at the most to work on this I was thinking to not put too much on my plate as a first timer, but the fluid flush is in the plan. I have a few little things to pick up so I’ll add that moisture meter to the cart.

When you press the caliper pucks back to their original position, you are pushing old fluid back in the system. It's best to crack the bleeder screws when you do the caliper squeeze.

Would cracking the reservoir cap do the same thing, or does it have to be the bleeder screws?

I have never bought brake pads from the dealer but if they don't sell you four pads to a "set" then they have a different definition of a set than I do. Front is a set and rear is a set. 4 pads each. If you go to O Really or Autozone and ask for front pads they will give you a box with 4 pads.

They responded to me and yeah, it’s 4 pads in the set. Didn’t answer about the hardware but I think it’s separate like you said.

I'm not going to say much except the Raybestos pads are good. I run them all the time. Rotors I always use AC/Delco on my cars.

Good to know. The Raybestos Element3’s are an option for me. Going to mull over my options for another day or two and hopefully get something ordered soon.


Thank you all for the advice and suggestions!

🍻
 

Bob Heine

ALLIANCE MEMBER
Joined
Oct 24, 2009
Messages
10,707
Location
Boca Raton, Florida
Would cracking the reservoir cap do the same thing, or does it have to be the bleeder screws?
Nick, cracking the reservoir cap will still let the seven-year-old brake fluid back up into the system and may cause an overflow. That stuff is an excellent paint remover so be careful. As your brake pads have worn over the past seven years, the fluid level in the reservoir had to drop and at some point fluid was added. If your fluid was less than two years old, it probably wouldn't matter but I would err on the side of caution and crack the bleeder screw. To prevent air getting into the caliper I would attach a length of hose to the bleeder and put the end of the hose in a bottle with brake fluid covering the end of the hose. I use a tall skinny olive jar so it isn't a lot of brake fluid. It's actually how I used to bleed the brakes when I was doing it alone.
 

Denwood

Well-known member
Joined
Sep 22, 2014
Messages
4,192
Location
Thunder Bay, Ontario, Canada
If you're planning on flushing the brake fluid, ya, use the Bosch 5.1 . Rockauto had great pricing on it. I did an exhaustive deep dive on brake fluid a while back and use the Bosch 5.1 on all the cars, regardless of OEM DOT 3, or 4 spec. I think @Bob Heine and I were rabbit holing on this topic at the same time a year back or so..ha.

Brake service is something I do on the cars once a year, flushing the fluid every 2-3 years. I have a couple pressure bleeder systems..Motive and Speedibleed which had a better cap collection to cover the three cars I service regularly. It's well worth doing given the cost of replacing ABS systems, particularly with the EV which has a $4000 electronic brake controller. If you're not flushing, remove as much fluid as you can with a vacuum bleeder or clean baster from the master cylinder before you retract the calipers, then top up after. Factory flush interval on most cars is every two years ... and very few actually follow it but water in the new systems is an expensive fix and brake fluid is cheap.

With regard to letting air into the VW ABS system... I let the reservoir run dry once during service on my A3 TDI. That took about 3 hours with the VAG software and at least 3 hoist sessions to get the pedal feel back...royal PITA. Rule number 1 .. don't let the reservoir run dry during a flush! Watch the fluid like a hawk as an air leak in a pressure bleeder system, or just not watching fluid in the flush tank, can empty the master cylinder reservoir. On anything newer, air in the ABS or brake controller system will not be fun to sort after.

Electronic emerg brakes will require a wind back on the rears if you're replacing pads. In some cases you (my EV, Dad's Subaru) you can purchase a tool to wind them back by engaging the caliper cup face...about $40 on amazon and handy to retract fronts too if they are stubborn. If the car has a rear brake service mode (some do, without a scan tool), even better.

Regardless, once you get familiar, and given that you see winter road sand/salt, I'd start servicing the brakes at least once a year when you put the winters on. It's basically pulling the pads and pins, clean, lube pins and pad contact points (Permatex Silicon Ceramic Brake Lube), reassemble. This heads off a lot of brake issue before they occur :) Once you get familiar, it's 10-15 minutes per wheel.
 
Last edited:

SamYoung

Well-known member
Joined
Jun 4, 2020
Messages
104
Location
Massillon, Ohio
I'll throw my $.02 in on the brake conversation.

If you live anywhere where you have salt on the road, do yourself a favor and get fully coated rotors. I've been running the Raybestos Element3 rotors on both mine and my wife's vehicles and have had great luck with them. It is so nice having no rust on the wheel/hub mounting surfaces causing sticking and no flaky rust falling out of the vents and OD. Also had no warping on any of them, which is more than I can say for many of the more expensive uncoated/partially coated rotors I've bought over the years. Can't believe I bought so many expensive uncoated/partially coated auto parts store rotors over the years and had them rust/warp and require beating off before making the switch.

I've tried various pads on various vehicles and I'm sold on ceramic pads personally. So much less dust, no squeak/squeal (not that all semi-metallic do, but some have been bad), and I've personally found that they tend to have a more uniform wear where as I've had many hard/soft spots in semi-metallic cause groove/ridges in my rotors. Ceramic can be less grabby which some may feel is a negative if you drive your car aggressively on a regular basis, but I find they have a more consistent feel and are more progressive which I prefer for a daily vehicle since they're easier to modulate under light braking. I've recently been running Bosch QueitCast with good results.
 
To avoid these ads, REGISTER NOW!
Top Bottom