To avoid these ads, REGISTER NOW!

Above 1200 Sq/FT No existing workshop... Another 40x60 shop

Wokspaces above 1200 squarefeet.
OP
J

julesthegreat

Well-known member
Joined
Dec 2, 2011
Messages
118
Location
MACOMB, OK
That is from condensation on the roof and poor ventilation. I have read that adding a metal roof over the container stops the condensation inside by moving the location of the dew point.I plan on cutting in 4 vents...2 upper and 2 lower for air flow. The underside is coated and the plywood is designed to withstand the ocean.

That does look pretty well sealed!
 
To avoid these ads, REGISTER NOW!
OP
J

julesthegreat

Well-known member
Joined
Dec 2, 2011
Messages
118
Location
MACOMB, OK
After pouring the concrete for the meter rack I called the power company about the next step. Sounds like they just need the rack and meter base installed to come inspect. Then maybe they plan/ schedule the new transformer and wire run to the rack?

Assuming they will be fairly quick I dug down at the pole to find the existing house feeder wiring. I started digging at the right where I figured the wires weren't and slowly scraped the dirt into the hole until I found the wiring. It wasn't 18" down, maybe it was when installed. The hole filled quickly with water and by Monday it was ice.

20250120_075420.jpg

Having been under the house I saw the wires pop out over near this window. So I figured the run was this way. The wiring at the pole also went that way.
20250120_075956.jpg

I chose a spot that would be tangent to the existing run and go straight to the new sub panel. This new part of the run will be in conduit but I am not sure what the NEC says about existing wiring. Can the existing wiring be left at 18" and only the new part of the run put in conduit? Does the whole run need to be in conduit because its been messed with?
20250120_080011.jpg

Dug down where I thought the wires were and found them on the assumed line. These ones were 18 inches down so I figured there may have been erosion at the pole.
20250120_075519.jpg

I was going to do more digging Sunday but the ground was frozen solid! So I worked on running the over door lights and their wiring.
20250119_171653.jpg

I also leaned my 24 foot extension ladder up on one of the top purlins to start hanging lights but I'm not sure I can do it lol. I might end up renting a lift!
 

VolksWomble

Well-known member
Joined
Jun 4, 2022
Messages
267
Location
UK
I coated the roof of my containers with a coating that increases the surface area and prevents condensation.

IMG_3429.jpeg

it doesn’t seem like it should work, but several close friends have had good results and so far so good both have been dry in side.
 
OP
J

julesthegreat

Well-known member
Joined
Dec 2, 2011
Messages
118
Location
MACOMB, OK
I coated the roof of my containers with a coating that increases the surface area and prevents condensation.

IMG_3429.jpeg

it doesn’t seem like it should work, but several close friends have had good results and so far so good both have been dry in side.
That seems pretty good, I have seen foam kits they sell that fit the contour of the panel corrugations
 
OP
J

julesthegreat

Well-known member
Joined
Dec 2, 2011
Messages
118
Location
MACOMB, OK
Is there a concrete sealer/sealing thread similar to the lighting one where different products are discussed?

I am currently planning to epoxy coat the 20x40 'machine shop' section.

Thinking of some other sealer or coating for the rest of the 40x40 section.
 
OP
J

julesthegreat

Well-known member
Joined
Dec 2, 2011
Messages
118
Location
MACOMB, OK
I was waiting for the 2-1/2 meter offset connecting the meter base on the left and the first subpanel in the center. I was also waiting for the POCO guy to call and schedule inspecting the rack, but he showed up I was installing the meter offset. He said I was supposed to have the meter base to panels wired for his inspection but that he could see I was doing good work and would push the paperwork through. Should be out here to connect the meter in 6 weeks or so!

20250123_154259.jpg

I braved the risk of getting the backhoe stuck again OR having it slide into the trench, backed it up over the existing trench and dug out to connect the meter rack trench. broke the surface off where the ground was still frozen about 4 inches thick!
20250124_174409.jpg

This trench has been open for 2 1/2 months and filled with water quickly so the pipes had floated up. All that water soaked into the clay and mud which flowed under the pipes. Luckily it was not frozen mud because the ice and water were insulating it. Now I got the fun task of shoveling mud out from under the pipes!
20250125_073240.jpg

Taking some measurements for cutting the conduit. That 3 on the right should have been a 7 lol
20250124_174419.jpg20250124_174425.jpg

Pulled the wires back into the shop by about one foot to fix a mistake I made in there trying to keep the breaker at the top which may change! Then measuring the "extra" at the meter rack end it seems like I will have enough to use 250kcmil cable to go from the meter base to the shop subpanel. Then likely 4/0 for the house input. Despite all the measuring I measured from the wrong side of the 3" - 2-1/2 adapter and cut the pipe 4" too long and had to glue that 4" section back in. You can see the two couplers right next to each other at the ground under the meter. would have been perfect if I had not messed up lol. Luckily I bought extra couplers knowing I was going to be the one cutting the pipe! Also put too much primer on so it is visible coming out of the bottom fitting.
20250126_172642.jpg

I have not decided what to do with the 3/0 that would be neutral for a 3 phase run but will be my ground so it is just coiled up in there.
20250126_172640.jpg

The next step is to get the ethernet and fiber lines pulled back out of the attic, out of the conduit and run the conduit over to two locations. Likely One pipe will pop up to the inside of the future garage and another popup in the center of the rack area for possible power upgrades? Maybe just popup in the future garage... I will likely have to make changes here in the future especially if I am moving the water treatment and stuff into this future space. The internet stuff needs to be dealt with because the rain is coming in a few days so I want to fill this trench back in some to keep the pipes down! will need to deal with the pex as well!
 
OP
J

julesthegreat

Well-known member
Joined
Dec 2, 2011
Messages
118
Location
MACOMB, OK
The electrician I talked to said it looked good, the 2-1/2 meter offset on the left was pretty full. NEC code allows up to 60% fill for runs under 18". A 3" meter offset would have been better but would not have fit in the external disconnect (I already had to cut the hole bigger just for the 2-1/2" one). I should have pulled this wire all the way through right away but I pulled the other two first and it was so tight I couldn't actually get it to move and had to pull it through with the truck. The wire lube on top of the house disconnect certainly helped for the other two I pushed through.

20250130_165140.jpg

With the wires in the way for the grounds on the center shop disconnect, so I decided to install the ground wires before wiring the house disconnect. I started by pushing the far ground rod in, then tried to use my brothers rotary hammer but it doesn't have much umph. I used the maul I found in the dirt at first until it was too low to be comfortable. Once it was lower I found the 16lb tamping bar worked amazingly well.
20250130_172646.jpg

Ran it over to a second ground rod.
20250130_180856.jpg
20250130_180905.jpg

With the ground installed this 13' wire I bought as scrap was just long enough to reach the shop disconnect and also reach over to the house disconnect. All wired up but you can't really see the ground wires. 20250130_180850.jpg

Panel is ready for when they come and wire it up.... in 6 weeks or so. This will give me time to dig the trenches for the existing wires and new wire runs to the pump house.
 
OP
J

julesthegreat

Well-known member
Joined
Dec 2, 2011
Messages
118
Location
MACOMB, OK
While working on pulling the wire I noticed the foam I sprayed in this vent had been chewed through. There are several of these vents around the house, all the others are crawl space vents. Being completely under the house it seems this shelter must have been built at the same time as the house. Assuming it was it seems odd this vent was not blocked off as it enters the area above the shelter? All the vents are basically open and it appears the mesh/hardware cloth have long rusted away.

Instead of sealing the crawl space first I decided to seal the shelter vents first lol

You can see the spray foam in this pic and the new little bit of spray foam I added in the upper left center to plug the latest hole.
Screenshot_20250217-095930_Gallery.jpg

Here is the inside the of shelter, it is quite large at 10x12.
20250202_182139.jpg

There are three of these vents in the top, these never had mesh as the crawl space is meant to be sealed! these are about 5" ID
20250202_182149.jpg

Original vent cap
20250202_181058.jpg

While looking for 5" vents I found these Charcoal filters they sell for people who "grow" in their house or apartment so no one can smell it. they are about $40. Then this odd adapter is about $7. It doesn't need to be a charcoal filter but its fun pretending to make an NBC shelter. I bought another of these and removed the charcoal as it will be the outlet with a fan and likely pull air from the planned diverting toilet. The third outlet will be used for electrical and sealed otherwise. While I was going to test fitting a piece of 4" PVC in the 5" vent hole I noticed more foam had been chewed and found a scared little mouse in the shelter. The door gaps are too tight for him to get into the house so I let him chew his way out and decided to seal the crawl space vents now so it doesn't happen again.
20250202_181225.jpg
 
OP
J

julesthegreat

Well-known member
Joined
Dec 2, 2011
Messages
118
Location
MACOMB, OK
It appears I missed a step and didn't even take final pictures as I did it. Back on the First of Feb, I had dug this trench 18 inches deep over to the pump house. This will be for the PEX line and the new power lines for the pump and pump house light/outlet. I then ran a 8/2 and a 12/2 underground romex down through one inch conduit from the right(house panel) over to the point where the trench crosses the existing house feeder and ran the wires under that as well as running the PEX under the house feeder. Dug under the pump house footer and poked the PEX line up there. The 8/2 got ran back towards the house and connected back to the house stove feeder wiring so I would have temp power again!

20250201_130338.jpg

Went to help a buddy install a fence corner post. He was planning to use his wheel barrow to mix the concrete which sounded fine until he told me he was planning to buy 5 bags! With the extra bag I had I decided it was easier to load up the concrete mixer instead. His soil is VERY sandy and dug like dream compared to any of the clay I try to dig at my place.
20250207_184100.jpg

On February 11th a guy with Pottawatomi Electric Company showed up to mark where the existing phone line was. I already knew because I ripped it in half with the backhoe lol. He had been called by my electric co-op through the 811 system I presume. Having not done much over the last week this spooked me that the electric company might come sooner and my last two trenches might not be ready!
I asked him how much to splice it and he said he could do it right then for nothing and that splicing the line is more fun than marking wire locations so who am I to judge! Modern wires are 6 twisted pairs minimum, mine were 2 pair so ancient. He spliced in about 3 feet of another 6 pair cable. peeled back about 6 inches of the insulation to reveal the wires but left 1 inch of the shielding exposed which is grabbed by this clamp. Then wires connected with little vampire splices. Then a sleeve that looks to be filled with silicone grease.
20250211_125522.jpg20250211_125652.jpg20250218_084040.jpg

After he left I emailed my co-op to ask when they would be there (Tuesday). Dug this other trench the same day, veering to the left this meets the existing house feeders at a tangent point with enough length so when the wires are pulled back from the existing meter there will be plenty of excess to reach the new house panel.
20250211_173227.jpg

Glued up and installed the 2" conduit drop for the house feeders.
20250211_173300.jpg

Conduits fighting for space but it all worked out after a little battle.
20250211_173322.jpg

By the end of the week on the 21st the power company had not replied to my email so I called them to ask when they were going to come install the new transformer and trench in the new power. They transferred me to the the fulfilment center or whatever its called and they told me it wouldn't be for 6 to 8 weeks due to the weather scheduling etc etc...
 

Mr onetwo

Well-known member
Joined
Apr 6, 2011
Messages
2,008
Location
Coastal Maine
By the end of the week on the 21st the power company had not replied to my email so I called them to ask when they were going to come install the new transformer and trench in the new power. They transferred me to the the fulfilment center or whatever its called and they told me it wouldn't be for 6 to 8 weeks due to the weather scheduling etc etc...
Well, that is unfortunate:sad:
 
OP
J

julesthegreat

Well-known member
Joined
Dec 2, 2011
Messages
118
Location
MACOMB, OK
Well I checked my phone and I actually called them Thursday evening the 13th when they told me it was going to be 6 weeks. So I didn't dig the last trench seeing as I had plenty of time.... Then Friday morning they showed up, the crew said they were contractors and everyone tells them they were told 8 weeks.

20250214_095848.jpg

I talked with them quickly and said I would start digging my last trench while they worked. I waited for them to disconnect the power before I started digging because why not. While waiting for the power to be shut off I used the vacuum to pull some mule tape through the conduit I had dug a few nights before.
20250214_104819.jpg

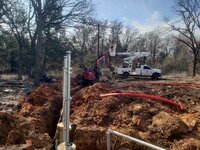
Their wire comes pre installed in conduit on this big spool.
20250214_104822.jpg

Plenty of water in the trench from all the melted ice the week before. This trench to the pole was dug right next to the house feeder and worked out perfect. After digging the house feeder was visible in a few places which made pulling it back easy.
20250214_112435.jpg

Tied a few half hitches on the house feeder.
20250214_113335.jpg

Pulled through no problem. No problem connecting the wires, they loaned me their ratcheting cutters to use instead of my sawzall.
20250214_113858.jpg

After connecting the house feeders I worked on connecting the pump house wiring. The PVC was already somewhat glued so only needed to drill the hole and install everything.
20250215_082520.jpg

Finished up my side about the same time they finished up their install. Instead of coming up in the middle of the panel they came up on the right side where my jumper wires were installed so they disconnected my wires, which I had just torqued) to fight theirs into place then reconnect mine. All that extra fighting because they dug their trench too close to the concrete and couldn't pull around the corner.

Then they took the old meter off the pole and popped it in the 320amp meter base. I asked if the 320a meter was coming later and they didn't know.

The following Tuesday I called the electric co-op and was told unequivocally that they don't have any 320a meters and this is all they do.
So I went from wanting 400 amps and being told this would be 320amp(400amp surge) to getting 200amps and being told its good for 320amps which is 320amp surge. I can't believe how much they lied and how it seems there is no recourse, absolutely infuriating, with them saying "its our equipment so its not your problem" "is there a problem with the service"
 

Attachments

  • 20250214_112425.jpg
    20250214_112425.jpg
    1.5 MB · Views: 22
OP
J

julesthegreat

Well-known member
Joined
Dec 2, 2011
Messages
118
Location
MACOMB, OK
F*#K Un...freekin'...believable! But not unexpected.:shocking:
It is quite insane on every level. They won't just give you a 400amp panel without a load analysis because they "want to make sure it is sized correctly" but put this undersized panel on here and say its fine! It almost makes me think it is their business model, make the 400amps an annoying hurdle, lie up front saying you will get 320amps, give you 200 so you do it again and pay them for the 400amps!

It seems like legally an electrician can't create a load sheet without the equipment being there either. So I am supposed to buy thousands of dollars of machine tools have them all wired up just sitting their before they will even consider it?..... It seems they need an overhaul on how they do business.
 
OP
J

julesthegreat

Well-known member
Joined
Dec 2, 2011
Messages
118
Location
MACOMB, OK
On to floor coating. For the 40x40 section with the roll up doors I went with TS210 as it seemed like a good choice. Then epoxy for the 20x40 machine shop side. I asked on the flooring forum about removing the red clay stains and white concrete stains from the control cuts. I was told etching wouldn't "clean" the the red stains but when I etched the 20x40 section it removed all the red stains and most of the other stuff. For the epoxy side I used 50/50 klean strip muriatic acid so one gallon per 10x10 pad. Then a quarter of a box of baking soda to 5 gallons of water to neutralize. 20250316_165818.jpg
20250316_142041-jpg.2306359


20250318_100739.jpg
 

Attachments

  • 20250316_142041.jpg
    20250316_142041.jpg
    388 KB · Views: 400
Last edited:
OP
J

julesthegreat

Well-known member
Joined
Dec 2, 2011
Messages
118
Location
MACOMB, OK
For the 40x40 section I had chosen TS210 partially because it didn't need etching or anything else but seeing how well the acid cleaned up all the red clay stains and other surface I acid etched the whole area with another 8 gallons of acid. This worked out to 1/2 a gallon per 10 foot square pad. I used the graduated 5 gallon bucket to measure out 1.5 gallons of water, then poured the acid in THEN poured it into the sprinkler, pour on pad and repeat. I worked across the floor treating the 4 pads closest to the big doors then treated the next row of pads before neutralizing the first ones. After all the acid was down I used my push brooms to push most of it out the doors, then pressure washed it out and used a combo of pressure washer and brooms the clear it all out.
20250320_154909.jpg

Also found some plastic embeded in the surface sadly, looks like it had been chewed up heavily so hard to say where it came from or what it was.
20250320_192147.jpg

All etched and ready for coating. I was planning to do the epoxy first but suddenly decided to also use epoxy primer and it didn't arrive in time.
20250329_104824.jpg

Having the whole floor cut up into 10 foot squares I figured I could split it up into equal amounts per pad. Bought the graduated one quart measuring cups for this, each pad got around one pint.
20250329_104830.jpg

Poured out into the cups.
20250329_115152.jpg

On the first pad I thought I would be able to push it around with the rubber squeegee THEN roll it out, but there was so little that was clearly not going to work. On the following pads I ended up just pouring an S shape out then rolling and cross rolling a few times. I had ordered extra rollers from armorpoxy with the epoxy stuff. I applied the same amount per pad for the second coat and it was all milky for quite a while.
20250329_113617.jpg

Contrast between the etched concrete that will be getting epoxy and the TS210
20250331_114134.jpg

All the TS210. There were only two little problems where I didn't notice it was going to rain that night and a big thunderstorm blew some water in the double doors and one of the roll up doors a few hours after I put the top coat on. there was a little pooling of thinned TS210 in two placed that I just dabbed up and rolled out again.
20250331_114150.jpg
 
OP
J

julesthegreat

Well-known member
Joined
Dec 2, 2011
Messages
118
Location
MACOMB, OK
Made a trip down to Dallas area to pick up some things I couldn't live without. Was trying to get a Rockwell 20" drill press as well but the seller was a flake and un-available!

This lift basket was 600 but it is pretty new apart from a few dents. The plan is to make up a frame that holds it about 10 feet in the air and has a skid steer quick attach so I can use it to lift up to 20 feet with the backhoe loader.
20250303_171557.jpg

Got this old Allis Chalmers forklift for 450. It has a blown Waukesha 4 cylinder. The "people" at the small engine shop that were using it ran it knocking unit it blew up. I already Got another parts engine from a guy in Wisconsin, all in should be at around 2000 for a running forklift.
Screenshot_20250408-123310_Facebook.jpg

Picked this up from my dads place in Denison, been hauling this old Racine power hacksaw around for years since I got it in CT 12 years ago for 50 bucks.
20250408_123645.jpg

I also picked up this huge Wellsaw bandsaw to cut up the steel for the mezzanine. Has a 16x8 cutting capacity, the wheels are 14inch diameter.
20250322_191033.jpg
 
OP
J

julesthegreat

Well-known member
Joined
Dec 2, 2011
Messages
118
Location
MACOMB, OK
It has been a few weeks since the acid etch was done but it's finally stopped raining for long enough to dry out and not risk water intrusion through the doors. I swept and blew out the area a few times to make sure there wasn't anything sitting around I didn't want.

More measuring cups were purchased to split the epoxy up evenly allowing each 10 foot square to have the same amount on it. Here you can also see my foam barrier to keep epoxy OUT of the bathroom area as I am not sure what I am going to do in there yet.
20250408_180413.jpg

The bucket that was initially going to be used for mixing the epoxy primer was all dirty and instead of cleaning it I made my first mistake of using the bucket I mixed the TS210 in.
20250408_181951.jpg

Next mistake was the epoxy part B being all separated and lumpy so I tried mixing it in the can it came in first. THEN mixing it more in the bucket with the part A.
The part B from the 1/2 gallon batch.
20250408_181232.jpg

After mixing it for a while and trying to pour it into the little cups it still seemed very lumpy. So I decided I would mix it for 5 minutes or so and make a video to show that I did in fact mix it up well. If it was still weird after that I would just toss it and talk to Armorpoxy the next day. This immediately went down hill when I knocked the bucket over spilling almost all the epoxy on the floor lol. If spilling it wasn't bad enough I also spilled it into the bathroom area as well ruining all my carefully laid plans!

After a moment of reflection it was clearly just time to spread it out. Then mix up the two gallon batch and spread it out too. I bought 3 gallons of the primer for this 800sqft section which works out to 48oz per pad. The spill basically caused panic and I just went through with all the mixing and spreading without taking pics of the the buckets around on the floor.

My process was to mix up all the juice then distribute into the cups evenly. Then place a cup into each pad to make sure I didn't mess up my count. Then I would pour the epoxy out in a big U shape on the pad, push it around a bit with the squeegee as best I could with such a small amount. Finally rolling it out and cross rolling it and move onto the next pad. Much smoother than spilling it while mixing.
20250408_194422.jpg

The final problem was from using the TS210 bucket where the epoxy dissolved, or the mixing paddle scraped off, dried TS210 and little pieces of it were everywhere on the floor but otherwise it looked fine.
20250408_194428.jpg
 
Last edited:
OP
J

julesthegreat

Well-known member
Joined
Dec 2, 2011
Messages
118
Location
MACOMB, OK
For the military grade epoxy top coat I did the same method of mixing then separating into graduated buckets so it each pad got the same amount of epoxy. I had two 3 gallon kits for the 20x40 section and 6lbs of chips.

First half.
20250409_163549.jpg

buckets laid out
20250409_173443.jpg

epoxy poured out because the internet told me it won't cure as fast as sitting in the bucket.
20250409_173611.jpg

the bathroom where I was planning no epoxy and didn't even acid etch I decided to just go full flake. Later I ordered some Poly 90 because I could buy 2 pints and put that down after scraping and vicinity up the extra chips.
20250409_193414.jpg

most awful uneven coverage but it should be fine once benches and stuff are laid out.
20250409_193423.jpg
 
To avoid these ads, REGISTER NOW!
OP
J

julesthegreat

Well-known member
Joined
Dec 2, 2011
Messages
118
Location
MACOMB, OK
Questions on addition outlets and Air drops. How many air drops do people normally do? I imagine one by each big door would make sense, then one at every machine, lathe/mill/ drill press etc.
 

zanyad

ALLIANCE MEMBER
Joined
Apr 26, 2018
Messages
2,763
Location
NE Ohio
I'm not sure about how many drops or where, but one thing I would consider is making a loop at ceiling level around the whole shop, with valves to isolate sections for repairs or additions. This loop would be best made of larger pipe than the drops, and can help by storing a decent volume of air depending on size of pipe & room. Maybe even run a feed line across the midline for more/better access.
 
OP
J

julesthegreat

Well-known member
Joined
Dec 2, 2011
Messages
118
Location
MACOMB, OK
That makes sense BUT the bigger the building the more close to home the amount of materials needed starts to burn the wallet. I was looking at those HDPE aluminum air line kits but just to do a loop around the building I would need 200 feet. Realistically I think a run around the 20x 40 machine shop would be good then an L in the car section but that still brings me to 200 feet lol. In all honestly at 300 bucks its not really that bad of a purchase anyways. I did not see valves for the HDPE lines but I am sure they make them, another great suggestion! Thank you
 
OP
J

julesthegreat

Well-known member
Joined
Dec 2, 2011
Messages
118
Location
MACOMB, OK
Picked up some pallet racking. Uprights are 9 feet tall and had already been cut shorter. Got two extra uprights to cut down into 3 benches. Realistically it would have made more sense to buy 16 foot tall racks and cut those down to make benches.

Got 9 foot long rails for the storage zone to fill up the 20 foot bay as much as possible and 8 foot rails for the workbenches as they were cheaper than the rails.
20250418_214824.jpg

Figured starting with 3 shelves would make sense, the 9 foot tall top will work fine for my forklift that will only go to 10 foot anyways.
20250421_144543.jpg

Two benches, one at 37" and the one with casters is at 43". They still need some angle bracing. There is enough material to make a third bench but I am not sure what height I will want it at yet.
20250421_144557.jpg

Moved the air compressor from the back porch to the shop.
20250423_101803.jpg20250423_102140.jpg
 
OP
J

julesthegreat

Well-known member
Joined
Dec 2, 2011
Messages
118
Location
MACOMB, OK
When the concrete guys showed up around 10 months ago I tried to sell him one of the enclosed trailers I used to move here. He said he wouldn't buy one but would trade for concrete work. So almost a year later he finally came over and built forms so I can't drive into the shop. Going to pour a 10 foot patio around the front and 20 x40 in front of the big doors.

Capture.PNG

Most of this fill has washed away with the heavy rains we had the week after they did all this work! They will be here in a week I hope to final fill and compact!
20250412_195746.jpg

My plan was to epoxy rebar into the existing shop pad with the Simpson SET-3G epoxy, the concrete guy says they just drill a 4" hole into the concrete and hammer a 6" stub of rebar into the pad. It wasn't hard to pull out this piece so I will just go around and drill the holes deeper for 10" of epoxy engagement , wanted 12" but didn't notice the bit is 12" long and only drills 10" deep lol. They also drilled around ten of them low and then drilled a second hole nearby. From testing reports I have read this makes both holes useless unless you fill one, SO for extra work I will be filling all those holes with epoxy first.
20250418_083916.jpg20250418_083924.jpg

Won't be hard to drill them all deeper with the drill I am borrowing from my brother.
20250508_101712.jpg

Figured it may also be easier to dig in the downspout drain before the concrete is poured AND eventually the retaining wall.
20250508_154145.jpg

3D printed end caps to keep all the debris out!
20250508_194105.jpg
 
OP
J

julesthegreat

Well-known member
Joined
Dec 2, 2011
Messages
118
Location
MACOMB, OK
On to the lighting for the 40x40 section, because I was too scared being up 20 feet on a ladder leaning on a flexy purlin the plan was to rent a lift. BUT they have the concrete forms in the way of me unloading anything into the shop through the big doors AND the rain would have prevented that with all the wet clay anyways. Then I saw a similar to this scaffolding on marketplace but someone else had already grabbed it. With my friends coming down from Michigan I figured this would be acceptable and had it delivered the day before he arrived. For less than a lift I can use it whenever I need it.

Double decker scaffolding

It was a pain to assemble and it quite wobbly/ sketchy it certainly feels safer than a ladder but there is a lot of flexing. Overall it was acceptable and we got the job done! Me and my buddy were both up there at times and with both of us over 250lbs it held up. They say you can put a third level on there too if you like (or if you are brave enough!)
20250503_165009.jpg

Initially the plan was to drill each purlin and run the wires over the crown in plastic bushings but laziness took over so we just pushed the romex over the purlins in the sheet metal ridges.
20250503_165005.jpg

Initial plan was to drill holes in the purlin and use these U-bolts into the purlin then a chain quick link, my buddy said it would be easier drill a big hole and put the chain link in there so that is what we did.
20250512_095210.jpg

Used this carbide cutter to make the holes, there were only some small concerns of the bit catching and launching us off the scaffolding. These holes saws are much nicer to use, the bit is stepped so when you punch through it doesn't ram the holesaw into the surface and snap your drill bit off. The step slows it down while it bores to that size then the spring almost acts like a third step so you can engage the surface gently.
Carbide hole saw
20250512_095254.jpg

These lights claimed to be 37,000 lumens somewhere. the e-conolight sight has a little calculator that estimates lumens and it said I would have 300 foot candles. Ordered a klein tools light meter which shows I have 300 foot-candles in the whole center area and 150 foot-candles 2 feet from the outer walls. Initially I was planning to run the dimmer wires and circuitry but figured the lights have a dimming switch internally that could be set lower if desired.
ASD UFO LED light
20250512_095259.jpg

All the lights installed!
20250505_203342.jpg
 
Last edited:

Nobody-named-Olli

Well-known member
Joined
Jan 9, 2025
Messages
1,591
Location
North Rhine-Westphalia; Germany
That is coming along great!

Can you share a bit of information on that metal strain relief that is fixed to the plug? Is that fixed to the socket/outlet as well to prevent accidental pull-out as it would be ‘a pain’ to get up there and plug it back in?

Or does it serve a totally different purpose?

Thank you very much!

Kind regards,
Olli
 
OP
J

julesthegreat

Well-known member
Joined
Dec 2, 2011
Messages
118
Location
MACOMB, OK
That is coming along great!

Can you share a bit of information on that metal strain relief that is fixed to the plug? Is that fixed to the socket/outlet as well to prevent accidental pull-out as it would be ‘a pain’ to get up there and plug it back in?

Or does it serve a totally different purpose?

Thank you very much!

Kind regards,
Olli

Thanks Olli,

I think you are referencing what are the cheapest 3 prong plugs I could find on the amazon.


Nobody-named-Olli

Well-known member
Joined
Jan 9, 2025
Messages
1,591
Location
North Rhine-Westphalia; Germany
Thanks Olli,

I think you are referencing what are the cheapest 3 prong plugs I could find on the amazon.


Thank you very much! Now I understand, it’s actually part of the plug itself. :)

Kind regards,
Olli
 
OP
J

julesthegreat

Well-known member
Joined
Dec 2, 2011
Messages
118
Location
MACOMB, OK
Picked up a 300ft roll of 3/4 HDPE aluminum lined air kit. Didn't buy a brand name one, just no name on amazon.

20250510_162330.jpg

Every time I buy tubing I look at a straightener then don't buy one so this was the time to get one! After running it through the straightener the tubing can be quite straight but seems to quickly return to a slightly curved state. Best to straighten and install quickly.
20250510_162337.jpg

The kit came with these little clamps and screws for wood, picked up these drill tip screws the same size for threading directly into the steel purlins. These little clamps are probably as thin as they possibly could be, if you look at them wrong they break lol. They are just holding static pipe so they are fine for their purpose!
20250510_162818.jpg

Put a drop on each side of the big doors and one at the back double doors. Following Zanyad's advice I bought some valves to isolate sections AND plan to do a loop in the 20x40 section once its built. None of the isolation valves got installed, maybe one day they will make it in. The plan is to mount the compressor up as high as possible in this area one day so some of the piping will likely change but that is a problem for the future me. Got the compressor sitting on a piece of stall mat so it doesn't chew up the concrete.
20250510_181129.jpg

Got this regulator back when I was an intern in VT, they were going to throw it away so I asked if I could have it, been using it ever since. Things are a little tight in here and the compressor is currently using the welder outlet, later it will be hard wired.
20250515_111106.jpg

First drop is horizontal for ease of routing.
20250515_111110.jpg

The other three drops are installed similar to this.
20250515_111120.jpg
 
OP
J

julesthegreat

Well-known member
Joined
Dec 2, 2011
Messages
118
Location
MACOMB, OK
The plan is to roll the smoker out on my patio, one day if it ever gets poured. However for now I just put a vent in the window thinking all or "most" of the smoke would go out the window but it fills the whole 40x60 shop with smoke while running over night. During the day I can just open the doors.
20250430_132134.jpg20250430_140111.jpg

Short ribs came out great!
20250517_182515.jpg
 

FLA918

Member
Joined
Oct 17, 2024
Messages
10
The plan is to roll the smoker out on my patio, one day if it ever gets poured. However for now I just put a vent in the window thinking all or "most" of the smoke would go out the window but it fills the whole 40x60 shop with smoke while running over night. During the day I can just open the doors.
20250430_132134.jpg20250430_140111.jpg

Short ribs came out great!
20250517_182515.jpg
that dryer vent is part of your smoke issue. Smoke does not like to go down. just run a single wall 90 there and put some 1/4x1/4 inch screen on it to keep the bugs out. A Tee fitting will work better as it wont catch the rain.
1751233839974.png
 
To avoid these ads, REGISTER NOW!
Top Bottom