To avoid these ads, REGISTER NOW!

Nutts Enclosed Trailer project

OP
N

NUTTSGT

Super Moderator
Staff member
Joined
Sep 14, 2009
Messages
50,855
Location
Northern Central Ohio
Re: Nutts Trailer project

Well, I started to lay out the new cabinets today. Here is one of the drawings I sent to the cabinet builder. What I was expecting and what I got weren't quite the same. I wanted basic sheet metal faces with the doors so I could build my own frames.


* a sharp eye will also catch my mistake that the builder caught, which was no big deal.


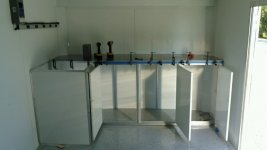
Here in mock up, you can see what I got. While I was ok with doors being a standard size, but they are way bigger than I expected. I told him the doors could be a standard size, as I had measured the cabinet in my buddy's trailer. I thought mine would be compareable in size, not "inches" bigger. I also planned to cut a "mouse hole" for the future winch cable. As you can see, I have an aluminum frame around the doors and won't be able to do a "mouse hole."
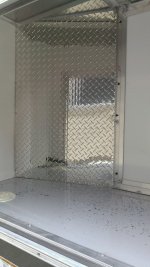
 

Attachments

  • trailer75.jpg
    trailer75.jpg
    113.7 KB · Views: 26
  • trailer76.jpg
    trailer76.jpg
    125.6 KB · Views: 31
Last edited:
To avoid these ads, REGISTER NOW!
OP
N

NUTTSGT

Super Moderator
Staff member
Joined
Sep 14, 2009
Messages
50,855
Location
Northern Central Ohio
Re: Nutts Trailer project

One other item, I missed when drawing up my plans and laying everything out is the front wall of my trailer is slightly round. When I measured my buddy's trailer, his was flat. So where I had measured everything and laid it out had to be corrected in order to make the generator door and cabinet work. I took several measurements and marked them on tape placed on the floor. I also played with the placement of the main base cabinets.
PART_1475531293817_KIMG0254.jpg

Looking in from the side door,

PART_1475531340625_KIMG0255.jpg

I had planned on using a 4x8 sheet of aluminum for the top. What I cut off for the "L" was going to go on the HF 44 box. Now it looks like I might have to get two separate pieces sheared and butted together as the main base cabinets and "L" are wider than 48"

I also found out today that the floor of my trailer has a bow in it too. :sad:
 

Attachments

  • trailer77.jpg
    trailer77.jpg
    145.8 KB · Views: 28
  • trailer78.jpg
    trailer78.jpg
    129 KB · Views: 29
Last edited:
OP
N

NUTTSGT

Super Moderator
Staff member
Joined
Sep 14, 2009
Messages
50,855
Location
Northern Central Ohio
Re: Nutts Trailer project

Been a few days since I updated this thread. Going has been a bit slow since I have had to reconfigure some things from my original plans. I've been working on it, but it's been slow going trying to work things out.

I came up with making some of these little pieces to fasten counter top supports to the door frames.


Even doing so, I still need to notch out the angle that runs from the wall to the cabinet frames.


Attachments

  • trailer80.jpg
    trailer80.jpg
    56.3 KB · Views: 25
  • trailer79.jpg
    trailer79.jpg
    67.3 KB · Views: 24
Last edited:
OP
N

NUTTSGT

Super Moderator
Staff member
Joined
Sep 14, 2009
Messages
50,855
Location
Northern Central Ohio
Re: Nutts Trailer project

The trailer has a curved front wall, which I didn't know till I got it. This requires each piece to be made specific to where it's going.


Also, not that I have done the placesment of the fronts, my plan to use a full sheet (4x8) cut as an "L" has gone by the wayside. So I had to add an extra brace where the two sheets will meet.


Attachments

  • trailer81.jpg
    trailer81.jpg
    80.3 KB · Views: 24
  • trailer82.jpg
    trailer82.jpg
    72.3 KB · Views: 21
Last edited:
OP
N

NUTTSGT

Super Moderator
Staff member
Joined
Sep 14, 2009
Messages
50,855
Location
Northern Central Ohio
Re: Nutts Trailer project

With all the braces in, it was time to mock up a template for the top. I was going to use a full sheet of cardboard but decided to go half and flip it end for end. Hopefully, this was going to work.

1475868686.jpg

Then I tranferred this to the sheet of 5052 aluminum that's .190 thick. Boy do I hope this is right, I didn't want to ruin this chunk of sheet aluminum.

1475869982.jpg
 

Attachments

  • trailer83.jpg
    trailer83.jpg
    78.4 KB · Views: 23
  • trailer84.jpg
    trailer84.jpg
    86 KB · Views: 22
Last edited:
OP
N

NUTTSGT

Super Moderator
Staff member
Joined
Sep 14, 2009
Messages
50,855
Location
Northern Central Ohio
Re: Nutts Trailer project

Well, luckily I measured correctly and it fit in place. Once I test fit it, I took it back off and cleaned the braces, cabinet frames and bottom of the aluminum.


The edges with get a strip of aluminum angle as trim pieces and to hide the edge. That will be screwed in place but the front won't be, although I did add screws into one brace as it will be in the "half closet". Off hand the only readily available adhesive that I thought would work is clear silicone RTV. So I ran a bead on every brace, angle along the front wall and ontop of the cabinet frames. I clamped the front and hopefully it will hold it in place. :dunno:


Next up is mounting the HF 44" box in the trailer. I'll be pulling the casters off and was going to mount it on top and through a 2x4 into the trailer frame. I've decide to try to go a little better and build a sq tube frame for it to sit on. This should do two things, one, it might yield a slight bit of storage underneath. The other will raise it up so I can extend the other piece of aluminum sheet across the cabinet onto the HF 44" box. I think having an aluminum top will also provide a better place to mount the vise too.
 

Attachments

  • trailer86.jpg
    trailer86.jpg
    79 KB · Views: 24
  • trailer85.jpg
    trailer85.jpg
    69.3 KB · Views: 25
Last edited:

drivesitfar

Well-known member
Joined
Oct 23, 2013
Messages
35,991
Location
Pacific Northwest
Re: Nutts Trailer project

Eric: how do you like it? from my chair it looks great, but wanted to hear what you think?

also on a learning note i have some new diamond plate i was going to take to a fab shop and have a one or two inch edge bent on it and noticed your aluminum angle iron that you attached to yours. another good option that i might end up doing.

last question what are you cutting the aluminum sheet with?

cheers and have a great weekend.
 
OP
N

NUTTSGT

Super Moderator
Staff member
Joined
Sep 14, 2009
Messages
50,855
Location
Northern Central Ohio
Re: Nutts Trailer project

I cut the 5052 aluminum sheet (.190) with a jig saw and I think it was a metal 18TPI blade. I just sprayed a little bit of WD40 on it as I went. I was surprised at how well it cut. I can check the teeth count if you want to know for sure.
 

drivesitfar

Well-known member
Joined
Oct 23, 2013
Messages
35,991
Location
Pacific Northwest
Re: Nutts Trailer project

Nutts: thanks and no need to count the teeth and thanks for the 411. how do you like your cabinets and top so far or too soon to ask?

also how is the flooring holding up?
 
OP
N

NUTTSGT

Super Moderator
Staff member
Joined
Sep 14, 2009
Messages
50,855
Location
Northern Central Ohio
Re: Nutts Trailer project

Nutts: thanks and no need to count the teeth and thanks for the 411. how do you like your cabinets and top so far or too soon to ask?

also how is the flooring holding up?

I snapped this picture this morning of the blade I used or the second one in the set. I've used a couple of these blades so far after picking a 18V Dewalt saw at a swap meet.


Floor is holding up so far, just with floor traffic. Since I added the bracing, the cabinets seem quite well constructed. I didn't check it after I siliconed it down.
 

Attachments

  • trailer87.jpg
    trailer87.jpg
    80.5 KB · Views: 34
Last edited:
OP
N

NUTTSGT

Super Moderator
Staff member
Joined
Sep 14, 2009
Messages
50,855
Location
Northern Central Ohio
Re: Nutts Trailer project

I started working on the frame to mount the HF 44" box yesterday. Since I'm done racing for the year after breaking the T5 in the car, I've decided to work a bit slower and make sure I do stuff correctly, double and triple checking measurements and fitment be fore I proceed.

The other piece of aluminum I have is goiong to finish cover the L cabinet and go across the top of the HF 44" box. Since teh box is shorter, I need to build it up for it to sit at the correct height.

I started by taking measurements and figuring how I needed to build the frame. After cutting some steel and welding the top and bottom section together. Here you can see I've test fit it to the bottom of the box.


I'll be using the holes from the casters or the holes already in the bottom of the box.


Attachments

  • trailer88.jpg
    trailer88.jpg
    78.1 KB · Views: 23
  • trailer89.jpg
    trailer89.jpg
    143.9 KB · Views: 20
Last edited:
OP
N

NUTTSGT

Super Moderator
Staff member
Joined
Sep 14, 2009
Messages
50,855
Location
Northern Central Ohio
Re: Nutts Trailer project

I can't remember if it was front or back that I had to use a third hole in the bottom of the box but I won't be using the factory bolts, I'm going to use some 3/8" bolts instead.


I left it bolted to the box to try to help make sure it didn't twist or warp when I welded it. I tacked the short upright vertical pieces and set the bottom of the frame. Once I had it inplace, it was tacked also. Once I was happy, I worked around welding trying not to create too much heat in one spot.


Attachments

  • trailer91.jpg
    trailer91.jpg
    131.8 KB · Views: 22
  • trailer90.jpg
    trailer90.jpg
    144.9 KB · Views: 23
Last edited:
OP
N

NUTTSGT

Super Moderator
Staff member
Joined
Sep 14, 2009
Messages
50,855
Location
Northern Central Ohio
Re: Nutts Trailer project

Once that was welded and cooled down, I went out to the trailer. I knew where it was going but still took some measurements, crawled underneath the trailer, took more measurements, back in the trailer for more measurements,repeating this process to make sure of the locations. I wanted to be sure that I was going to put the bolts through the frame members.


Once all the mounting tabs were in place and holes drilled, I cleaned the frame, primed it and shot a layer of Rustoleum Charcoal paint. So as not to get impaitent waiting for the primer dry, I did something productive, I went out and mowed the yard.

Next up, before the tool box goes into place, I need to decide on the lower wall covering.
 

Attachments

  • trailer93.jpg
    trailer93.jpg
    96.6 KB · Views: 20
  • trailer92.jpg
    trailer92.jpg
    133.6 KB · Views: 18
Last edited:
OP
N

NUTTSGT

Super Moderator
Staff member
Joined
Sep 14, 2009
Messages
50,855
Location
Northern Central Ohio
Re: Nutts Trailer project

Been about a week and nobody asked for any updates so I guess, I must be boring you guys.


I have the tool box mounted and the rest of the top is on it. The little Wilton vise hold down the aluminum top on the left. Apparently, I never took a picture of that.

1476212935.jpg

When I made the trip to pick up some materials, I bought three sheets of diamond plate. As you can see by the picture below, I'm covering the flap with a piece which will take a majority of one of those sheets.

PART_1476902533054_KIMG0283.jpg
You might notice the blue tape in the picture above. Since I didn't allow for a gap between the plywood and hinge, I need to trim the angle to make it fit.

Trim cut, fit and screwing it down.
PART_1476902535276_KIMG0285.jpg
 

Attachments

  • trailer96.jpg
    trailer96.jpg
    124.2 KB · Views: 22
  • trailer94.jpg
    trailer94.jpg
    115.1 KB · Views: 21
  • trailer95.jpg
    trailer95.jpg
    126.3 KB · Views: 21
Last edited:
OP
N

NUTTSGT

Super Moderator
Staff member
Joined
Sep 14, 2009
Messages
50,855
Location
Northern Central Ohio
Re: Nutts Trailer project

I'll be covering the tongue with some plywood and diamond plate. This is the future site to mount the 20lb LP tank.


I had previously cut the plywood and gave it a couple coats of black Rustoleum paint. I screwed it down to the tongue today. I countersunk the screws, put silicone on the threads and filled the countersink hole up after I ran the screws in.


Attachments

  • trailer97.jpg
    trailer97.jpg
    132.3 KB · Views: 18
  • trailer98.jpg
    trailer98.jpg
    131.1 KB · Views: 21
Last edited:
OP
N

NUTTSGT

Super Moderator
Staff member
Joined
Sep 14, 2009
Messages
50,855
Location
Northern Central Ohio
Re: Nutts Trailer project

Once that was done, I brought out the diamond plate and put it on and the prefitted (did that last night) aluminum angle. Before I put each piece of angle on, I put a bead of Seamer Mate on the bottom side. Hopefully, this will help with water intrusion. I also sealed the edges of the aluminum angle too.


Looking back from a few feet.


This is the product I used fromHome Deppot.
http://www.homedepot.com/p/Amerimax-Home-Products-10-oz-Gutter-Sealant-85148/100011940

I used it before on the kick plate of my garage. It's a nice silver color so it blends in nicely with the aluminum.
 

Attachments

  • trailer100.jpg
    trailer100.jpg
    126.3 KB · Views: 23
  • trailer99.jpg
    trailer99.jpg
    141.3 KB · Views: 25
Last edited:
OP
N

NUTTSGT

Super Moderator
Staff member
Joined
Sep 14, 2009
Messages
50,855
Location
Northern Central Ohio
Re: Nutts Trailer project

I had a generator door put in the trailer but I won't be using it for that but it's the size that I wanted rather than having a baggae door put in. It also has a sliding vent on it which I can open. The reason I wanted it will be for the fuel jugs. They will be accessed from outside the trailer. Since I built my own cabinets, I could size this as big as I wanted too but I needed to add a divider to close it off.

As you can see, it was open from the gen door across the base cabinets.


I chose to use a piece of diamond plate rather than white metal as I still need to build the closet and upper cabinets. I also picked up an extra sheet of the aluminum when I went. I figured I'd use it sometime and it was cheaper to buy it then rather to later.


As I have been working, i've put a drop of silicon RTV on the screws that I have put in. Hopefully, this will prevent them from trying to loosen up as the trailer goes down the road. Also anything that I think might vibrate gets a bead of it too.
 

Attachments

  • trailer102.jpg
    trailer102.jpg
    146.5 KB · Views: 22
  • trailer101.jpg
    trailer101.jpg
    94.2 KB · Views: 24
Last edited:
OP
N

NUTTSGT

Super Moderator
Staff member
Joined
Sep 14, 2009
Messages
50,855
Location
Northern Central Ohio
Re: Nutts Trailer project

A few last pictures for tonight. Yesterday I went to the UPS Frieght terminal in Shelby to pick up my sofa/bed. I could have had it shipped to the house but I figured the 11 mile drive at my convience as oppsosed to waiting on the driver to stop was worth it.


I know some of you guys may have seen these before in other trailes or toy haulers. basically what this thing does is mount to the wall. Flat against the wall in storage mode. Then it can be folded down into a couch to plant my *** on or anybody elses. When evening comes and I'm staying at the track, the back of the couch folds over to create a bed. It measures about 77" long and 40" wide in bed mode.
Trying to show some of the bracketry.
 

Attachments

  • trailer103.jpg
    trailer103.jpg
    129.5 KB · Views: 23
  • trailer104.jpg
    trailer104.jpg
    121.6 KB · Views: 24
Last edited:
To avoid these ads, REGISTER NOW!

beakie

Well-known member
Joined
Feb 21, 2014
Messages
492
Location
Ontario, Canada
Re: Nutts Trailer project

any reason you're only going with 20lbs propane, opposed to 30lbs?

our TT had dual 20's and I'll be swapping to dual 30's in spring.


different uses, but that extra bit is handy.
 
OP
N

NUTTSGT

Super Moderator
Staff member
Joined
Sep 14, 2009
Messages
50,855
Location
Northern Central Ohio
Re: Nutts Trailer project

any reason you're only going with 20lbs propane, opposed to 30lbs?

our TT had dual 20's and I'll be swapping to dual 30's in spring.


different uses, but that extra bit is handy.

I'll be using one 20lb tank. Originally I had considered buying a 30 lb tank. My buddy suggested just using a 20 lber as I could swap it out easily just about anywhere.

I think that made sense till I bought a new one and found that my idea for the mount won't work with the tank as is. I'll need to extend the bottom ring on the tank for my plans. Once I do that, I wont be able to swap it out.

The only thing I'll be using propane for is the grill and for some heat (Mr Buddy) in the fall at a race or two. I won't have a furnace, water heater, stove and the likes of a travel trailer.
 

krcoomer

Well-known member
Joined
Jul 22, 2016
Messages
379
Location
Bluegrass region
Trailer is looking great like your shop Eric. The neat thing about 20 lb tanks is you can swap them out for your grill or turkey fryer much easier. Makes a great backup for when you have the half done burgers.

I saw you mentioned using Seamermate so this is a little late, but if you have more seams to cover you might want to look at a product from BASF called Sonolastic. I get it from roofing supply houses or concrete product places. It used to be sold as NP-1, but they changed the name. Best sealant I have ever seen. Stays flexible even after a week in the freezer at about -10.
 

pmason0

Well-known member
Joined
Nov 12, 2011
Messages
251
Location
East Tennessee
Great project, interested in where you picked up the cabinet parts. Very cool idea on the generator door for the fuel jugs, while I have a place for them in my trailer I always end up having them in the back of the truck when filling them.
Right now I'm looking to sell/upgrade from my 24ft trailer, so thanks for the ideas, keep them coming.
 
OP
N

NUTTSGT

Super Moderator
Staff member
Joined
Sep 14, 2009
Messages
50,855
Location
Northern Central Ohio
Trailer is looking great like your shop Eric. The neat thing about 20 lb tanks is you can swap them out for your grill or turkey fryer much easier. Makes a great backup for when you have the half done burgers.

I saw you mentioned using Seamermate so this is a little late, but if you have more seams to cover you might want to look at a product from BASF called Sonolastic. I get it from roofing supply houses or concrete product places. It used to be sold as NP-1, but they changed the name. Best sealant I have ever seen. Stays flexible even after a week in the freezer at about -10.

I'll try to remember that product next time. LOL, I already bought three tubes of the Seamer Mate to make sure I would have enough.

We have an extra 20 lb tank at home so if I go somewhere and might need extra propane, I can take one of those tanks. I'll just have to carefully secure it in the bed of the truck.
 
OP
N

NUTTSGT

Super Moderator
Staff member
Joined
Sep 14, 2009
Messages
50,855
Location
Northern Central Ohio
Great project, interested in where you picked up the cabinet parts. Very cool idea on the generator door for the fuel jugs, while I have a place for them in my trailer I always end up having them in the back of the truck when filling them.
Right now I'm looking to sell/upgrade from my 24ft trailer, so thanks for the ideas, keep them coming.

I looked for days online for cabinets. Moduline was one of the few that I found but out of my price range.

I happened to find a place called CNL Cabinets near White Pigeon,Mi. His location was great because I was making a trip out there for some materials at the RV/trailer surplus stores. White Pigeon is about 20 minutes from Elkhart,In.
 

ambenz

Well-known member
Joined
Dec 12, 2010
Messages
4,236
Location
NW Chicago Suburbs
Nice Trailer for your pony, looks like a drag car so I am guessing you do not road race?
Guess I am kind of confused on what racing you do.
While going through your thread, I.... like a lot of others here, I bet, are dreaming of what we would do to this trailer and our garage...so......
I was also wondering if you figured out a way to park the trailer in a way where you might be able to line up the side door to a door in the garage to enhance your easement? Without blocking the front of the garage, you know, while the trailer is stowed?
How about a outside outlet for on the garage for at home hookup?
Have you considered a small Honda generator built-in just in case?
Maybe a Murphy bed?
A tinted window on each side for airflow?

Anyway, I am very excited for you!
It has to be a big step up to have an enclosed trailer and a little more comfort to know your not using the open trailer for racing anymore.
So, I imagine you will be keeping the open trailer for hauling landscaping and bulk homestead supplies?!?!
Well, thanks for sharing your trailer built-out, very cool and it must be nice not to be landlocked.
There's no way I could own a trailer bigger than 25 do to tight turning radius in my alley.....subscribed.
 
Last edited:

sberry

Banned
Joined
Jun 18, 2005
Messages
35,747
Location
Brethren, Michigan
I have done a lot of custom building and don't do it so much anymore. I am about free and off the shelf but super nice work. This will be sharp. 2 things, before I got real sophisticated with more wire am not above some cords to get a feel and change as well as the use of power strips for switching.
The other thing is take this to an insurance agent when done, it is no longer the base trailer by book value. I am not sure how much one would pay for it all but the investment is significant.
 

rmalkow2

Well-known member
Joined
Jun 26, 2009
Messages
4,087
Location
Brighton, MI
Awesome trailer build and I'm enjoying your thought process. It will make for a great mobile work place at the track next season.
 
OP
N

NUTTSGT

Super Moderator
Staff member
Joined
Sep 14, 2009
Messages
50,855
Location
Northern Central Ohio
Trailer looks too nice to use! Nice job!

Awesome trailer!

Awesome trailer build and I'm enjoying your thought process. It will make for a great mobile work place at the track next season.

Thanks guys.


rmalkow,
like I did on the garage refurb, I try to work everything through my measly little brain. I go over and over it till I find a problem and correct it. Sometimes when it all works out, my vision come to light with positive results.
 
OP
N

NUTTSGT

Super Moderator
Staff member
Joined
Sep 14, 2009
Messages
50,855
Location
Northern Central Ohio
Let me see if I can answer all your questions in one fell swoop.... in red.

Nice Trailer for your pony, looks like a drag car so I am guessing you do not road race? Yes, I drag race. I prefer to participate in Trus Street races, see NMRA or NMCA website for details
Guess I am kind of confused on what racing you do.
While going through your thread, I.... like a lot of others here, I bet, are dreaming of what we would do to this trailer and our garage...so......I've dreamed myself.
I was also wondering if you figured out a way to park the trailer in a way where you might be able to line up the side door to a door in the garage to enhance your easement? The wife and I have talked about pouring a concrete pad between teh house garage and my garage. The ramp door would face teh drive way and the curb door would open on to the sidewalk along the house garage. Yet, I would still have to back the truck up through the yard. Without blocking the front of the garage, you know, while the trailer is stowed?
How about a outside outlet for on the garage for at home hookup?yes, if you check out the Garage Refurb thread last page or two, I added an outlet just for the trailer.


Have you considered a small Honda generator built-in just in case? Yes, my plans are to buy a Honda EU3000i generator

Maybe a Murphy bed? The couch will fold out into a bed that is approxiamately 40" x 77"

A tinted window on each side for airflow?I'll pass on the windows but it does have two vents. The front is braced and prewired for a roof top AC unit

Anyway, I am very excited for you! Thanks

It has to be a big step up to have an enclosed trailer and a little more comfort to know your not using the open trailer for racing anymore. Yes, long time coming, just getting back into reacing has been a chore at times.

So, I imagine you will be keeping the open trailer for hauling landscaping and bulk homestead supplies?!?!Yes, I'll be keeping it. I realized if I sell it, I'll need it later on

Well, thanks for sharing your trailer built-out, very cool and it must be nice not to be landlocked.
There's no way I could own a trailer bigger than 25 do to tight turning radius in my alley.....subscribed.

Glad you're enjoying it and hope to see you stick around. :beer:
 
OP
N

NUTTSGT

Super Moderator
Staff member
Joined
Sep 14, 2009
Messages
50,855
Location
Northern Central Ohio
I have done a lot of custom building and don't do it so much anymore. I am about free and off the shelf but super nice work. This will be sharp. 2 things, before I got real sophisticated with more wire am not above some cords to get a feel and change as well as the use of power strips for switching.
The other thing is take this to an insurance agent when done, it is no longer the base trailer by book value. I am not sure how much one would pay for it all but the investment is significant.

Yes, I do need to take it to my agent after it's done.... he needs to make more money off me. :lol:

The power strip probably won't get alot of use but what will get plugged in should be fairly low power and not a big draw.
 

drivesitfar

Well-known member
Joined
Oct 23, 2013
Messages
35,991
Location
Pacific Northwest
NUTTS: so you've been busy?? i don't like to bump threads asking about progress since some of you guys put in 60 hours on your day job. that said it looks like you put in 60 hours or more working on your trailer since i last saw your thread. WELL DONE and keep up the work.

I'm wondering why you put plywood under the diamond plate on the tongue? it looks great especially with the trim, but since you seem to have some caulking skills you might run a bead of caulk around the edge of your aluminum angle iron trim cause water will creep in and get your plywood if you don't in time.

other than that things are really shaping up so i'll make another batch of popcorn and wait for more updates.

good luck
 
OP
N

NUTTSGT

Super Moderator
Staff member
Joined
Sep 14, 2009
Messages
50,855
Location
Northern Central Ohio
The plywood is CDX, it should be somewhat ok for awhile. The diamond plate is thin and more decorative than for strength.

Our work schedule is 24 on/48 off but a 53 hour work week. I had the first 9 hours off yesterday to burn up the last of my personal time. Although it was scheduled time off, I got literally nothing done with the rain. me and the dog just hung out in the house. Today is another rainy type of day, Probably won't get much done either....run some errands (payday) and maybe go clean the garage up a bit. Possibly break out the new chain (saw) sharpener and do a few chains.
 
To avoid these ads, REGISTER NOW!
Top Bottom