To avoid these ads, REGISTER NOW!

Overseas Jack Rebuild Help Tutorial.

Bandito1984

New member
Joined
Apr 7, 2013
Messages
3
hello folks! first timer on this board.

my jack is an Allied (Silmar, CA) 2 1/4 Ton, made in china. purchased new about 20 years ago.

well, i did what most have probably done fooling around with their jack. i had a great idea to service this jack, which never gave me any problems until now.

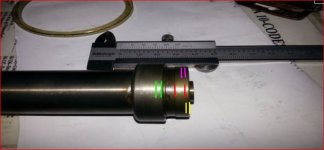
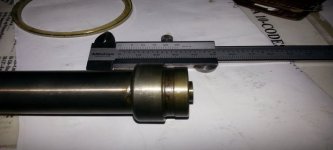
my plan was to replace the hydro oil. i only opened up the far left and center ports, not the far right port, as pictured. then i turned over the jack to drain the oil out but did not notice the check valve steel balls that dropped onto the grass. i then reassembled the jack best i could, not knowing at that time of course the check valve steel balls were missing. added oil and the jack would not function properly. oh, after all that i found the proper oil drain/fill hole on the master cylinder.

i researched this site and others trying to find out what i had done wrong. i recovered the check valve steel balls and installed them in the order as pictured below but the jack still does not function properly:

1. still not sure if i added enough oil or even added it correctly. i've come across different procedures on the web.

2. after closing the valve the jack will not pump up/raise normally. only raises about 1 inch. during troubleshooting it was also doing a see-saw action.

3. with the valve closed i can raise the jack by manually lifting the scissors mechanism that the car rests on. it does hold pressure and will not lower when standing on it. the jack will lower when the valve is opened. this part of the jack appears to be functioning properly.

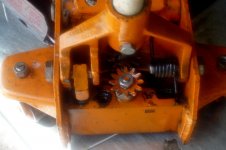
4. not sure if i have the spring and check valve steel balls in the correct order. there is also one steel ball (same size as the small one pictured) in the center port valve under the spider wheel gear.

anyway...hELp!

thank you!
 

Attachments

  • jack1.jpg
    jack1.jpg
    76.4 KB · Views: 83
  • jack2.jpg
    jack2.jpg
    146.4 KB · Views: 90
  • jack3.jpg
    jack3.jpg
    111.6 KB · Views: 87
To avoid these ads, REGISTER NOW!
OP
H

Hiball

Well-known member
Joined
Apr 30, 2009
Messages
14,026
Location
Missery
That spring needs to be on top of the big ball...

Correct order for the valve: Little ball, (might be missing a little spring), big ball then big spring, the jack should operate without springs, they only "crisp" up the valve action. If you want to use the spring you might need to replace it, account it was damaged from being in the wrong location, not sure if there is enough bend to interfere with the upper ball seating or not.

As far as the oil, add enough oil to where it rests just above inner cylinder when peering thru the fill hole. (Aprox 3/16" - 5/16 below the top of the reservoir).
 
Last edited:

Bandito1984

New member
Joined
Apr 7, 2013
Messages
3
That spring needs to be on top of the big ball...

Correct order for the valve: Little ball, (might be missing a little spring), big ball then big spring, the jack should operate without springs, they only "crisp" up the valve action. If you want to use the spring you might need to replace it, account it was damaged from being in the wrong location, not sure if there is enough bend to interfere with the upper ball seating or not.

As far as the oil, add enough oil to where it rests just above inner cylinder when peering thru the fill hole. (Aprox 3/16" - 5/16 below the top of the reservoir).

wow, thank you Hiball for going the extra mile on a Sunday to help me! after reading several of your posts i was hoping you would be the one replying to mine.

yes, installing the balls/spring in the order you suggested fixed it. although, the jack only raises between .5 to 1 inches with each 90 deg stroke of the pump handle. i don't exactly recall but i believe the jack operated similarly before messing around with it. is this normal or should the jack raise more with each stroke of the handle?

the spring did get tweeted. i straightened it out before reinstalling. i'll also try the jack without the spring just for curiosity.

also, seeing the jack is approx 20 yr's old, only normal household auto maintenance use, what should i expect to fail in the near future? do you stock common parts for these import jacks, recommend any preventive maintenance at this time?

thanks again Hiball and to all the other contributers here on http://garagejournal.com
 

Bandito1984

New member
Joined
Apr 7, 2013
Messages
3
That spring needs to be on top of the big ball...

Correct order for the valve: Little ball, (might be missing a little spring), big ball then big spring, the jack should operate without springs, they only "crisp" up the valve action. If you want to use the spring you might need to replace it, account it was damaged from being in the wrong location, not sure if there is enough bend to interfere with the upper ball seating or not.

As far as the oil, add enough oil to where it rests just above inner cylinder when peering thru the fill hole. (Aprox 3/16" - 5/16 below the top of the reservoir).

hello, i sent you a thank you reply earlier today with a few more questions, but apparently the suits need to check it first before going live, Lol! if it does not post i'll try again later. yes, it worked fine!
 

toddol1971

Active member
Joined
Apr 15, 2013
Messages
25
Hiball thanks for the thread and time taken to help. We need more people like you.

I have 2 china jacks. One bought at sams 12 yrs ago, the other (a blackjack) given to me by my cousin. It could be 15 to 25yrs old. Of course when I need them they both quit working at the same time, all though diff probs. Blackjack lifts then seems to bypass. It will lift so high (3/4 or so), then next pumps does nothing. I can feel it bleeding off. The sams jack just lifts so high then quits pumping. I have the sams jack torn apart and need seals. The ucup is good. How do I measure the orings? One of the sliding dohickeys that measures id and od. I think I have one, I'll look. The sams jack has a metal plate with numbers on it. Will those help? Is there a way to change the u-cup/oring to a better system? If I can call you pm me your number. Thank you so much. Todd.
 
OP
H

Hiball

Well-known member
Joined
Apr 30, 2009
Messages
14,026
Location
Missery
Hiball thanks for the thread and time taken to help. We need more people like you.

I have 2 china jacks. One bought at sams 12 yrs ago, the other (a blackjack) given to me by my cousin. It could be 15 to 25yrs old. Of course when I need them they both quit working at the same time, all though diff probs. Blackjack lifts then seems to bypass. It will lift so high (3/4 or so), then next pumps does nothing. I can feel it bleeding off. The sams jack just lifts so high then quits pumping. I have the sams jack torn apart and need seals. The ucup is good. How do I measure the orings? One of the sliding dohickeys that measures id and od. I think I have one, I'll look. The sams jack has a metal plate with numbers on it. Will those help? Is there a way to change the u-cup/oring to a better system? If I can call you pm me your number. Thank you so much. Todd.

Lets Start with the BlackJack, Which im assuming its a Blackhawk.. I would need a Model or at Min a Picture to identify the Model or Coo. Are you getting the 3/4 of Lift under Load? If so i would first lower the Lift arm and verify that there is enough oil in the Reservoir to allow full extension.

Oring Sizes? My Process is to Measure the actual Hard part that the Oring seals which will give me the Size necessary to determine what ID i will choose, then i Measure the Oring thickness (which is called the Cross Section) and those two measurements will get you where you need to be. If you have a Hydraulic Shop Locally, Take the actual Hard part with you along with the Old Oring and they should be able to assist you. Im Not sure what type of Seal your wanting to Upgrade, You can change from a Oring/Shell to a Ucup without to much trouble, There are Exceptions... A picture and some sizes of what your dealing with will allow me to assist further.

Steven
 

toddol1971

Active member
Joined
Apr 15, 2013
Messages
25
thanks for the reply. I was confused, blackhawk = gun in my mind, and I was to lazy to go look. I actually wrote blackhawk as that is what is stuck in my head. when I proof read my post I got cornfused and thought maybe its blackjack, cause its a jack? Then my brain went into stupid mode and said, well maybe they named it blackjack cause if you hit blackjack your a winner. Blackjack = winner? Not that google was a click away or anything. LOL Sometimes its amazing the **** your brain can come up with.

Steven, sorry about the vagueness of my post. I do better talking than typing. My ram seal is oring/shell and would like to go with a u cup. Of the last 30 yrs I've been using jacks, all I've ever had to do was to add oil. Its been 20 yrs since I've done that. This brings up a question I have. I read your directions about the proper amount to put in the jacks. I dont under stand this at all. In the past, all I've done is add a few ounces at thats it. Do you lay the jack down (thats how I did it before). Whats the inner thing that you just fill it above? The inner pipe? I'll try and get some pics and numbers. I live in the middle of nowhere. Paducah Ky is the only town close enough to get the parts, if their is a supplier there. I'm an hour away though and I never go there cause theres a smaller town 30 min from me that has everything I need. I would rather go thru you if thats ok. Again, thank you so much.
 
OP
H

Hiball

Well-known member
Joined
Apr 30, 2009
Messages
14,026
Location
Missery
thanks for the reply. I was confused, blackhawk = gun in my mind, and I was to lazy to go look. I actually wrote blackhawk as that is what is stuck in my head. when I proof read my post I got cornfused and thought maybe its blackjack, cause its a jack? Then my brain went into stupid mode and said, well maybe they named it blackjack cause if you hit blackjack your a winner. Blackjack = winner? Not that google was a click away or anything. LOL Sometimes its amazing the **** your brain can come up with.

Steven, sorry about the vagueness of my post. I do better talking than typing. My ram seal is oring/shell and would like to go with a u cup. Of the last 30 yrs I've been using jacks, all I've ever had to do was to add oil. Its been 20 yrs since I've done that. This brings up a question I have. I read your directions about the proper amount to put in the jacks. I dont under stand this at all. In the past, all I've done is add a few ounces at thats it. Do you lay the jack down (thats how I did it before). Whats the inner thing that you just fill it above? The inner pipe? I'll try and get some pics and numbers. I live in the middle of nowhere. Paducah Ky is the only town close enough to get the parts, if their is a supplier there. I'm an hour away though and I never go there cause theres a smaller town 30 min from me that has everything I need. I would rather go thru you if thats ok. Again, thank you so much.

I would need some sizes to determine "what" would need to be done to swap a shell/oring for a ucup, some are easier than others. As far as the oil level, what you are looking for is enough oil to cover the intake under maximum lift, this way air doesn't get ingested into the valve system. A general rule of thumb is to fill the jack till the oil rest just above the "inner" cylinder when peering through the fill hole or.. "Roughly" 5/16 below the top of the fill hole. The reason you don't want the jack completely nut full, is because there needs to be some headspace to accommodate the displaced oil when returning to the reservoir.

Oh.. And always add oil with the lift arm down, and all 4 wheels on the ground, not upright similar to filling a bottle jack.
 
Last edited:

recountryman

Well-known member
Joined
Apr 20, 2013
Messages
115
Hello, I have a Torin Blackjack Pro lift bought around 2007 and it no longer holds weight. Pulled apart and found the ram main seal which uses the hollow ring shell and a oring. The shell has a tore in it.

Upon measuring the shell "with" the oring installed I get measurements of 32 x 40 x 5 (shell is 4.5 tall but measuring bottom of shell to top oring get 5mm also I measured from lower side of shell not at top where it flares out). I'm assuming if I want to go with u cups if possible is this is how I would measure for size? Whats a good source for the seal...Hiball?

Also the seal where tank screws onto the main valve body (? may be calling it wrong but you know what I mean) That seal I would like to replace also its basically u shaped but squared off not rounded and has a measurement of 67 x 77 x 3.5 again a good source for this seal?

thank!
 
OP
H

Hiball

Well-known member
Joined
Apr 30, 2009
Messages
14,026
Location
Missery
Hello, I have a Torin Blackjack Pro lift bought around 2007 and it no longer holds weight. Pulled apart and found the ram main seal which uses the hollow ring shell and a oring. The shell has a tore in it.

Upon measuring the shell "with" the oring installed I get measurements of 32 x 40 x 5 (shell is 4.5 tall but measuring bottom of shell to top oring get 5mm also I measured from lower side of shell not at top where it flares out). I'm assuming if I want to go with u cups if possible is this is how I would measure for size? Whats a good source for the seal...Hiball?

Also the seal where tank screws onto the main valve body (? may be calling it wrong but you know what I mean) That seal I would like to replace also its basically u shaped but squared off not rounded and has a measurement of 67 x 77 x 3.5 again a good source for this seal?


thank!


Sit that shell/ oring off to the side for a minute, measure the cylinder bore (OD) along with the actual ram where the seal sits (ID). I also need you to let me know if there is a ridge at the base of where the shell/oring sits on the ram, Or is it Uniform from top to bottom.

I'm guessing you are referencing the reservoir seal, double check the measurements by measuring the actual hard part where the oring sits (ID) .
 

recountryman

Well-known member
Joined
Apr 20, 2013
Messages
115
Thanks cylinder bore is 40, where seal sits on ram is 34 but that area is about 1mm tall then has a ridge (groove where it drops in diameter to 33 x 3 tall then goes back to 34) I think the pic off the one on the tutorial you did was about the same design..if needed I can get a pic as I have a way of explaining stuff which seems to get other confused.

getting ready to leave for work (3rd shift) so any more info I'll provide later...thanks!

*edited* for wording wrong... the ram does have a ridge where seal sits (about 1mm in distance (wide) then has a groove with a diameter of 33 about 3 mm wide then goes back to 34 mm diameter. I included pic in my post farther down.
 
Last edited:

toddol1971

Active member
Joined
Apr 15, 2013
Messages
25
thanks Steven. I understand now. The 5/16 helped alot. I figured you were talking about the inner cylinder. The one that separates the ram from the tank. Thanks for clarifying that. I know to fill it laying down and that it cant be lippin full. Have to have room for expansion, just like on boilers I work on. I cant find my calipers so I'm going to buy one. I'll let you know. Its weird how your brain cant work sometimes. I was re reading my past posts and sound like an idiot. I couldnt think of the name caliper, so I called it a sliding doohickey. LOL LOL What was I doing here again? LOL I'll be back when I get my measurements. Thanks Steven.

Todd.
 

toddol1971

Active member
Joined
Apr 15, 2013
Messages
25
I dont think it matters, but as I tried to unscrew the tank nut the whole tank and nut came off as an assembly. The ram still comes out fine. This doesn't matter does it?
 
OP
H

Hiball

Well-known member
Joined
Apr 30, 2009
Messages
14,026
Location
Missery
I dont think it matters, but as I tried to unscrew the tank nut the whole tank and nut came off as an assembly. The ram still comes out fine. This doesn't matter does it?

The Reservoir and Nut are still separate pieces, Im assuming your jack utilizes Orings on the Reservoir and the Tank nut just stuck to the Reservoir, you should be able to separate them by pulling them apart. <-- Unless you see Welds on the top end of the nut where it meets the Reservoir. LOL
 

Jeeper

Well-known member
Joined
Dec 25, 2006
Messages
2,124
Location
Round Rock, TX
I dont think it matters, but as I tried to unscrew the tank nut the whole tank and nut came off as an assembly. The ram still comes out fine. This doesn't matter does it?

That Craftsman 2 ton that I just took apart did the same thing. There was a tiny rust spot on one part that stopped the tank nut from separating from the tank. I soaked it in a little liquid wrench, used a strap wrench to hold on to the tank and used the wrench to rotate the nut. Once that was loose, I used a piece of pipe inside the tank to push against the nut (where it wound't mess up any of the threads. Then slammed it down, pipe first, on a bench to push it out.

Hope that helps. Needless to say, I will probably be replacing the orings on the tank as they are worn now.
 

recountryman

Well-known member
Joined
Apr 20, 2013
Messages
115
Sit that shell/ oring off to the side for a minute, measure the cylinder bore (OD) along with the actual ram where the seal sits (ID). I also need you to let me know if there is a ridge at the base of where the shell/oring sits on the ram, Or is it Uniform from top to bottom.

I'm guessing you are referencing the reservoir seal, double check the measurements by measuring the actual hard part where the oring sits (ID) .


On the reservoir seal actually its not a oring but the plastic stuff same as the hollow cup shell on the ram. Measurements on the groove where it sits is 67 x 77. The old seal as I mentioned earlier is 3.5 mm tall also is tapered inward some toward the top. I 'm including a pic of the ram to give better idea on the style of it...just in case I confused you on describing the groove (valley) on it.
 

Attachments

  • rsz_ram_2.jpg
    rsz_ram_2.jpg
    35.6 KB · Views: 100
Last edited:
OP
H

Hiball

Well-known member
Joined
Apr 30, 2009
Messages
14,026
Location
Missery
On the reservoir seal actually its not a oring but the plastic stuff same as the hollow cup shell on the ram. Measurements on the groove where it sits is 67 x 77. The old seal as I mentioned earlier is 3.5 mm tall also is tapered inward some toward the top. I 'm including a pic of the ram to give better idea on the style of it...just in case I confused you on describing the groove (valley) on it.

Based off the Measurements you gave me, i figured that was what it was.. Im getting ready to head off to work later tonight, When i get back in town ill head out to the Shop and grab a Ucup and then ill let you know what you have to do to make it work.
 
To avoid these ads, REGISTER NOW!

recountryman

Well-known member
Joined
Apr 20, 2013
Messages
115
Based off the Measurements you gave me, i figured that was what it was.. Im getting ready to head off to work later tonight, When i get back in town ill head out to the Shop and grab a Ucup and then ill let you know what you have to do to make it work.

Ok thanks!
 

toddol1971

Active member
Joined
Apr 15, 2013
Messages
25
The Reservoir and Nut are still separate pieces, Im assuming your jack utilizes Orings on the Reservoir and the Tank nut just stuck to the Reservoir, you should be able to separate them by pulling them apart. <-- Unless you see Welds on the top end of the nut where it meets the Reservoir. LOL

That Craftsman 2 ton that I just took apart did the same thing. There was a tiny rust spot on one part that stopped the tank nut from separating from the tank. I soaked it in a little liquid wrench, used a strap wrench to hold on to the tank and used the wrench to rotate the nut. Once that was loose, I used a piece of pipe inside the tank to push against the nut (where it wound't mess up any of the threads. Then slammed it down, pipe first, on a bench to push it out.

Hope that helps. Needless to say, I will probably be replacing the orings on the tank as they are worn now.

Thanks for the reply. It seems to be the same answer, I think. So what you both are saying is the tank nut just sits in the reservoir, and all I need to do is pull/push it off somehow. Let me know if this is correct please.

I went to the local (15 miles away) hardware store and auto parts store and all the had was a 39 dollar dial vernier caliper. I'm on disability and cant afford that so I still need to find a cheaper alternative to measure the seals, shafts etc.

Thank you so much for the help. Youns are awesome:thumbup:
Todd Lauster.:Kodos:
 
OP
H

Hiball

Well-known member
Joined
Apr 30, 2009
Messages
14,026
Location
Missery
Thanks for the reply. It seems to be the same answer, I think. So what you both are saying is the tank nut just sits in the reservoir, and all I need to do is pull/push it off somehow. Let me know if this is correct please.

I went to the local (15 miles away) hardware store and auto parts store and all the had was a 39 dollar dial vernier caliper. I'm on disability and cant afford that so I still need to find a cheaper alternative to measure the seals, shafts etc.

Thank you so much for the help. Youns are awesome:thumbup:
Todd Lauster.:Kodos:

Yes.. They are separate pieces, just stuck together.Harbor freight is a viable option for cheap calipers, if you have one close.
 

toddol1971

Active member
Joined
Apr 15, 2013
Messages
25
close is a relative term. See its an 1hr 15 min to hf, but it is closer than St.Louis. LOL. I dont leave my house much. Cant afford the gas. I'm going to marion monday so I should get one then.

I'll try to pop them apart. Thanks.
 

toddol1971

Active member
Joined
Apr 15, 2013
Messages
25
Just to let you know Steven, I got a caliper at HF for 10bucks. I thought I bought the right seal kit, but there aint one seal that will work. Its a smaller metric seal kit, they didnt have any other metric kits there. While in paducah I found a hydro shop. the guy got me a blue u cup. Looks like it will be hard to install. It probably wont return right. we'll see. I have a ?. My ram has the same end on it as recountryman. The hydro guy says it should be ok with the groove under the ucup. Is he right, or do I have to mod this thing at all. Thanks

Todd.
 
OP
H

Hiball

Well-known member
Joined
Apr 30, 2009
Messages
14,026
Location
Missery
Just to let you know Steven, I got a caliper at HF for 10bucks. I thought I bought the right seal kit, but there aint one seal that will work. Its a smaller metric seal kit, they didnt have any other metric kits there. While in paducah I found a hydro shop. the guy got me a blue u cup. Looks like it will be hard to install. It probably wont return right. we'll see. I have a ?. My ram has the same end on it as recountryman. The hydro guy says it should be ok with the groove under the ucup. Is he right, or do I have to mod this thing at all. Thanks

Todd.

Those HF Oring Kits are Generic in regards to Size.. You might find the Right ID but the Cross Section is Wrong. If your Ram utilized the Cup w/Backup and there is a Groove on the Ram.. Your Hydro Guy is Incorrect.. It will cause Drag issues. You either need to Machine that Groove off OR.. Modify the Backup to where its simply a Washer, Which will give the Cup a Uniform ID to rest on.

There is Nothing Difficult about Installing a UCUP... Picture of what you bought?
 
Last edited:

toddol1971

Active member
Joined
Apr 15, 2013
Messages
25
I have another ? On the release valve mine is the square. When I pulled the square washer out there was another washer in there with it. Its like 2mm cross section with the od the same as the square washer. Does it go on top or bottom? Also on the pump, does the backer go on top or bottom of the o-ring? Thanks
 
OP
H

Hiball

Well-known member
Joined
Apr 30, 2009
Messages
14,026
Location
Missery
I have another ? On the release valve mine is the square. When I pulled the square washer out there was another washer in there with it. Its like 2mm cross section with the od the same as the square washer. Does it go on top or bottom? Also on the pump, does the backer go on top or bottom of the o-ring? Thanks

If im following you correctly, It should go below.. The Backup goes on Top of the Oring (If only 1 backup is used).
 

toddol1971

Active member
Joined
Apr 15, 2013
Messages
25
If im following you correctly, It should go below.. The Backup goes on Top of the Oring (If only 1 backup is used).


Yes, only one backup is used in the pump. So I'll put the backup on top of the oring. My other ? is on the release the square washer has another washer with it. They are both metal. one is the normal looking square washer. The other is the same od as the square one. The thickness is the same also. The only diff is the id. It is not square, it is round. Its dimensions are 25mm od 20mm id 2.5mm cross width. What I need to know is, does it go on top of the square washer or below, or does it really matter. I think its probably just a spacer? My kid pulled my paper towels covering the internals and messed up other stuff too. The working valve on mine has the screw, spring, then 2 ball bearings. I think the small ball bearing goes on bottom? What do you think. Thanks
 

toddol1971

Active member
Joined
Apr 15, 2013
Messages
25
[QUOTE If your Ram utilized the Cup w/Backup and there is a Groove on the Ram.. Your Hydro Guy is Incorrect.. It will cause Drag issues. You either need to Machine that Groove off OR.. Modify the Backup to where its simply a Washer, Which will give the Cup a Uniform ID to rest on.

There is Nothing Difficult about Installing a UCUP... Picture of what you bought?[/QUOTE]

The seal on my ram is the shell/oring style. There is the groove in the ram where the oring sits in. Can I just put the blue ucup on it? Thanks. I'll get pics in a few. If you need them now. I mean come on, I can see it in my mind so you should too!!!:shocking: LOL
 
OP
H

Hiball

Well-known member
Joined
Apr 30, 2009
Messages
14,026
Location
Missery
Yes, only one backup is used in the pump. So I'll put the backup on top of the oring. My other ? is on the release the square washer has another washer with it. They are both metal. one is the normal looking square washer. The other is the same od as the square one. The thickness is the same also. The only diff is the id. It is not square, it is round. Its dimensions are 25mm od 20mm id 2.5mm cross width. What I need to know is, does it go on top of the square washer or below, or does it really matter. I think its probably just a spacer? My kid pulled my paper towels covering the internals and messed up other stuff too. The working valve on mine has the screw, spring, then 2 ball bearings. I think the small ball bearing goes on bottom? What do you think. Thanks

Little Ball First, Depending on the Size of the Spring it goes either in between the little ball and the Bigger ball or on top of the Big ball then the Screw. If the Spring is the Same size as the Little ball, it mates to it.. If its the size of the Bigger ball it goes on top of the Big ball.

Without seeing a picture of the 2 the Washers, I Really cant Recall.. That Washer needs to be stationary when you tighten the Release down.. If its Not.. it wont operate correctly and rise/Fall when you turn the Gear. If i was guessing i would say it goes on top.. Its just Metal? There are Some that have a teflon type material that helps seal the outside.

Again.. to Replace a Shell/Oring type Seal with a UCUP you NEED to machine that groove OFF or Fabricate that Shell so its simply a Washer (Take the Flared Portion OFF). Otherwise it wont allow the Seal to sit properly, it will flare the Rear, Which will in turn draw the face Inward.
 

EDGAR

Well-known member
Joined
Aug 21, 2010
Messages
437
Not only you will need to machine the groove off, but unless your new u-cup is about 5 mm high, you will also need to machine more of the ram to accommodate the height of the u-cup, which could be 8mm or 10mm, etc. But you also need top provide a way of holding the u-cup in place. So you have either to leave a little material at the end of the ram so the u-cup snaps in place or you have to machine a groove to hold the u-cup in place with a snap ring.

It was better to find out what inside diameter u-cup sizes were available to you locally, plus the heights available also, and then, based on that, the machining would be done.

For example, I believe that the groove diameter was stated as 33mm (and the outside diameter maybe 40mm?). This could have been reduced to 32mm for in the Martin Fluid Catalog, for example, there are shown more 40mm x 32mm x (various heights) than there are 40mm x 33 mm u-cups. Now, of course, this does not mean that your local hydraulic shop has all these sizes, but at least you know that they exist and that you may be able to order them online ( but not from MFP as they sell in quantities). You can play with the inside diameter, if there is not a 32 mm available, check if there is a 30 mm available and machine accordingly.

Check the picture below so you see where to take material off. Machine between the red lines to get more height. Leave the metal intact between the yellow lines to snap the u-cup in place. If you need additional height, machine between the green lines whatever extra height you need. If you want to install a snap ring, you may also need to machine between the green lines to have enough space for the snap ring groove. The use of the snap ring requires removing the metal between the yellow lines. The snap ring groove should be located between the pink lines. The convenience of the snap ring is that it is easy to remove the u-cup if needed for whatever reason. Removing the "snap-on" u-cup is rather difficult without damaging the inside lips of the u-cup.
 

Attachments

  • MACHINE THE RAM.JPG
    MACHINE THE RAM.JPG
    30.5 KB · Views: 66
Last edited:
OP
H

Hiball

Well-known member
Joined
Apr 30, 2009
Messages
14,026
Location
Missery
IRC there are about 4 different variations of the Shell/oring floor jack variations used (sizes) I don't remember exactly, but I think direct replacements are available for 2 sizes that only require removing the groove. The other 2 have a common OD, but the ID is too big, and requires removing 2mm to find suitable replacements. (As Edgar stated, its best to find the replacement prior to macining the ram as availability can be a issue for some) I've got a old Napa import awaiting some machine time currently because it's a Oddball ID.. (For Todd) I'm assuming that since your hydro guy has supplied you with a replacement, you must have one of the direct replacements (still requires addressing the groove) A quick picture and some measurements will allow for more assistance on what exactly needs to be done.


Just for clarity.. Again.... Metal only has to removed when your replacement seal "doesn't" have a uniform sized place to ride Or.. Your style requires a groove for securing the seal.
 
Last edited:

EDGAR

Well-known member
Joined
Aug 21, 2010
Messages
437
It is more a problem of height of the u-cup. The usual o-ring and o-ring retainer combination may have a height of about 5mm to 5.5mm. Although there are u-cups with these low heights, most hydraulic shops may only carry the taller sizes. With a taller u-cup, there might not be enough space in the ram, as it is now, to accommodate the extra height. So, that is the reason I suggested the machining the way I stated in my previous post just to get the needed extra height.

Remember you still need to provide a way for securing the u-cup to the ram and this will require extra height. So machining for extra height is probably going to be needed apart from removing the groove.

The ram shown by Hiball in his post has a groove for a snap ring machined in it. The ram shown in RECOUNTRYMAN post does not have a snap ring groove machined in it so this one requires extra work.

Still, the ram in Hiball's post may require machining down the thick part if the u-cup available is , lets say, 8mm or 10mm tall. You can see in the picture that there is not enough height available to accommodated a taller u-cup below the snap ring groove already machined in it.

If you need extra height for a taller u-cup, machine between the red lines the amount needed. The arrow shows where the snap ring goes in the Hiball ram (although the snap ring is missing in the picture). This type of ram, with the groove for the snap ring is easier to work because it already has the groove machined . The rams without the snap ring grooves will require a little more work to provide a way to retain the u-cup in place.

In recountryman's ram, the o-ring is retained inside the shallow groove. In Hiball's ram, the o-ring is retained by the snap ring so there is not an o-ring groove per se, just the ridge at the bottom, where the retainer is, shown in Hiball's second picture. This ridge has to be removed, of course. And height added if needed, with the required inside diameter, of course. And you also need height to fit the back up below the u-cup.
 

Attachments

  • hiballs ram.JPG
    hiballs ram.JPG
    63.1 KB · Views: 44
Last edited:
OP
H

Hiball

Well-known member
Joined
Apr 30, 2009
Messages
14,026
Location
Missery
It is more a problem of height of the u-cup. The usual o-ring and o-ring retainer combination may have a height of about 5mm to 5.5mm. Although there are u-cups with these low heights, most hydraulic shops may only carry the taller sizes. With a taller u-cup, there might not be enough space in the ram, as it is now, to accommodate the extra height. So, that is the reason I suggested the machining the way I stated in my previous post just to get the needed extra height.

Remember you still need to provide a way for securing the u-cup to the ram and this will require extra height. So machining for extra height is probably going to be needed apart from removing the groove.

The ram shown by Hiball in his post has a groove for a snap ring machined in it. The ram shown in RECOUNTRYMAN post does not have a snap ring groove machined in it so this one requires extra work.

Still, the ram in Hiball's post may require machining down the thick part if the u-cup available is , lets say, 8mm or 10mm tall. You can see in the picture that there is not enough height available to accommodated taller u-cup below the snap ring groove already machined in it.

If you need extra height for a taller u-cup, machine between the red lines the amount needed. The arrow shows where the snap ring goes in the Hiball ram. This type of ram, with the groove for the snap ring is easier to work because it already has the groove machined . The rams without the snap ring grooves will require a little more work to provide a way to retain the u-cup in place.

In recountryman's ram, the o-ring is retained inside the shallow groove. In Hiball's ram, the o-ring is retained by the snap ring so there is not an o-ring groove per se, just the ridge at the bottom, where the retainer is, shown in Hiball's second picture. This ridge has to be removed, of course. And height added if needed.

Yes if you intend to use a taller Ucup, the space has to be there.. Or in laymans terms.

Just for clarity.. Again.... Metal only has to removed when your replacement seal "doesn't" have a uniform sized place to ride Or.. Your style requires a groove for securing the seal.

Edgar you don't think the upper groove is enough to prevent the Ucup from slipping off in recountrymans picture? I don't have it here in hand but I'm fairly certain there is more than enough metal there.. Considering the top side of the Ucup is gonna be roughly 1mm smaller than the "actual" ID of the ram.

This one?


EDGAR

Well-known member
Joined
Aug 21, 2010
Messages
437
Yes, the upper groove edge is enough to retain the u-cup. But my concern here was the use of a taller u-cup as u-cups of less height are not available everywhere. A taller u-cup will require machining to achieve the required height to fit the taller u-cup below that edge. In recountryman' case, his height below the edge seems to be around 5.5mm or so. In this case he would need to get an u-cup with a 5mm height if he does not want to machine more metal from the ram. If his u-cup is taller, like 8mm or 10mm, he has no choice but to machine down the thick part of the ram to get the extra height. If he finds a low height u-cup, he only has to remove the bottom ridge.
 
To avoid these ads, REGISTER NOW!
Top Bottom