To avoid these ads, REGISTER NOW!

Overseas Jack Rebuild Help Tutorial.

OP
H

Hiball

Well-known member
Joined
Apr 30, 2009
Messages
14,027
Location
Missery
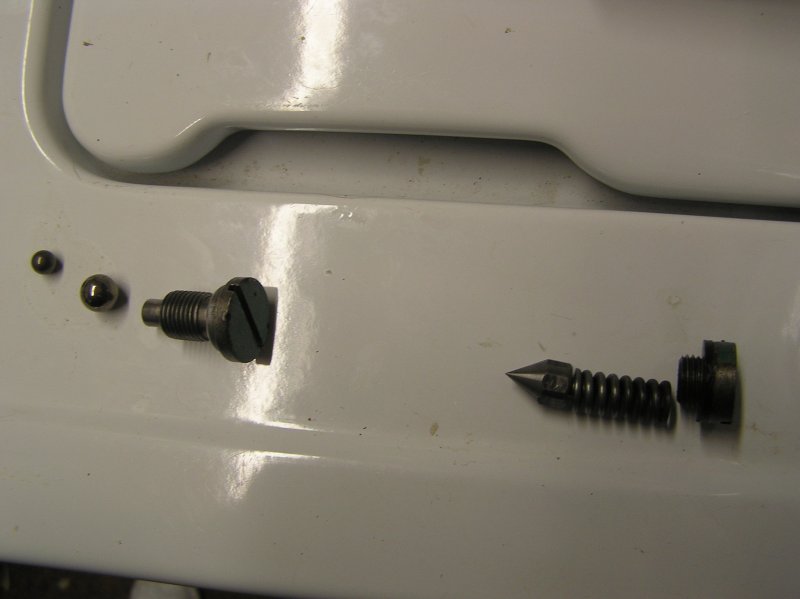
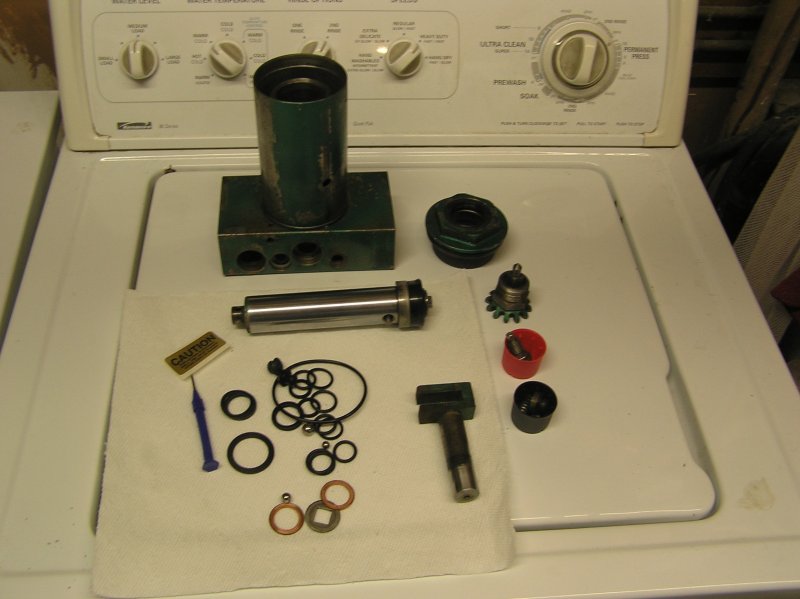
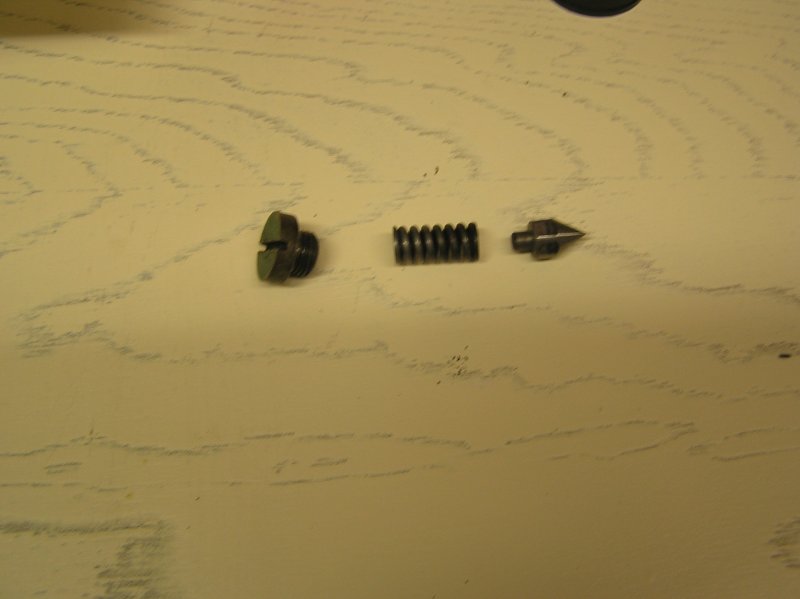
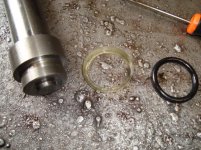
And I hope Hydraulic Parts Supply sent me extra o-rings, cause I don't know where all these go! Although one of the larger o-rings is the old one that sealed the big nut into the reservoir. But all the small ones are new.

162346838.jpg


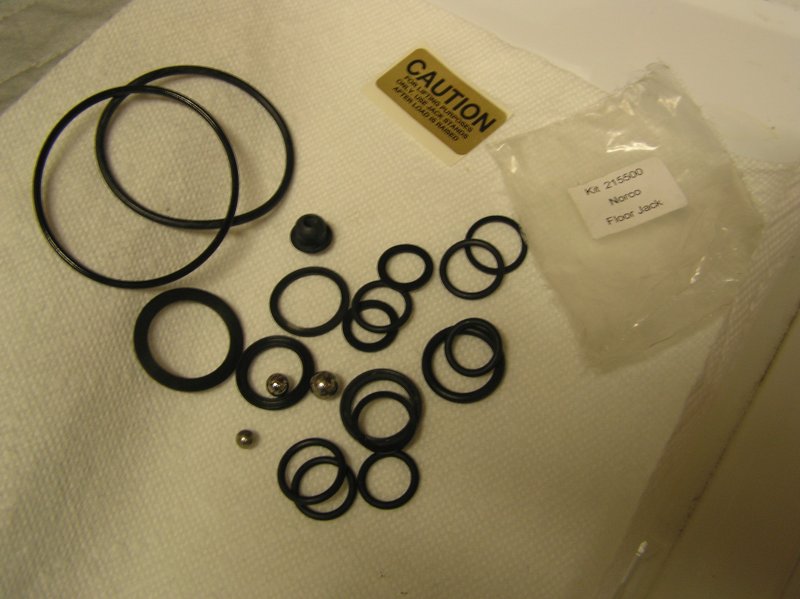
Lol.. Not sure why you have so many small orings. Lol.. My guess is that they are trying to cover some various series, and included some different pump piston dimensions. In reality Orings when Purchased hundreds at a time a pennies on the dollar, it's sometimes easier to just cover all your bases versus extra shipping charges. Also.. You should use both of those big orings, one on each side of the reservoir, sometimes the reservoir sticks to the tank nut during the removal process.
 
To avoid these ads, REGISTER NOW!

Roberts210

Well-known member
Joined
Dec 21, 2015
Messages
3,177
Location
Missouri
Thanks Hiball. What about this: The one on the right doesn't seem to have the *** that fits between the screw and the spring. It's possible the previous owner took this screw out and lost the ***.

The one on the left--does it look correct? Screw, big ball, little ball?

162346867.jpg
 
OP
H

Hiball

Well-known member
Joined
Apr 30, 2009
Messages
14,027
Location
Missery
Thanks Hiball. What about this: The one on the right doesn't seem to have the *** that fits between the screw and the spring. It's possible the previous owner took this screw out and lost the ***.

The one on the left--does it look correct? Screw, big ball, little ball?

162346867.jpg

Left looks good in regards to the ball orientation, the one on the right is missing the adjustment screw that threads down to compress the spring/set overload pressure, you will Need that piece for this Jack to function. Should also be some seals to seal the plug and valve cap for the overload.


Does the reservoir come loose from the valve body? If so I missed that part in reading this Thread.

Some utilize a seal and some don't, a quick look thru some PDFs show that yours might not, generally the reservoirs that use a oring at the base can be easily dislodged with a couple side to side whacks with a hammer.

Here are some links where a member did a write up for your model.

part 1
Part 2
Part 3
 
Last edited:

Roberts210

Well-known member
Joined
Dec 21, 2015
Messages
3,177
Location
Missouri
Thanks Hiball. What about this: The one on the right doesn't seem to have the *** that fits between the screw and the spring. It's possible the previous owner took this screw out and lost the ***.

162346867.jpg

Answering my own question here. It looks to me like the previous owner removed the overload screw and lost the second screw that tightens down the overload valve. Three things occur to me. Maybe someone here has a spare, or maybe a local hydraulic shop would have one, or just buy an allen-head set screw in metric size and use that.
 
Last edited:

Roberts210

Well-known member
Joined
Dec 21, 2015
Messages
3,177
Location
Missouri
Thanks Hiball. We posted at the same time. This was the way it came apart--nothing was lost--the previous owner must have screwed with it.

Edit: The jack was non-operational when I got it. And it was unbelievably dirty on the inside. It looked to me like all the rubber parts had degraded into rubber sawdust, and the fluid was dark and dirty. No rust inside though.
 
Last edited:

Roberts210

Well-known member
Joined
Dec 21, 2015
Messages
3,177
Location
Missouri
Thank you so much. That write up that you linked to is invaluable. I can clearly see the little part that's missing.

Edit: The thread size is 12 mm, 1.25 pitch, extra fine.
 
Last edited:

Roberts210

Well-known member
Joined
Dec 21, 2015
Messages
3,177
Location
Missouri
On the 2 seals that seal the pump--those seals are inside the valve body of the jack. When I pulled mine out of the valve body there was a white, nylon split washer and then an o-ring. In my rebuild kit, there was no nylon split washer, rather there was a black nylon flat washer that was flat on one side and concave on the other. I figured out the concave surface must face the o-ring, and now I just want to confirm the o-ring goes in first, then the flat/concave black washer sits on top of it. Correct?
 

Roberts210

Well-known member
Joined
Dec 21, 2015
Messages
3,177
Location
Missouri
So here's where I am with it. Got everything apart. Took the valve body/cylinder to the car wash and blasted all the gunk out of it--it was filthy inside, but no rust. I have it about half rebuilt. I have a buddy who is a machinist, and I may take him a 12 mm, 125 pitch bolt and have him cut it down for the spring activator on the overload valve.

162350419.jpg
 
OP
H

Hiball

Well-known member
Joined
Apr 30, 2009
Messages
14,027
Location
Missery
On the 2 seals that seal the pump--those seals are inside the valve body of the jack. When I pulled mine out of the valve body there was a white, nylon split washer and then an o-ring. In my rebuild kit, there was no nylon split washer, rather there was a black nylon flat washer that was flat on one side and concave on the other. I figured out the concave surface must face the o-ring, and now I just want to confirm the o-ring goes in first, then the flat/concave black washer sits on top of it. Correct?

If there is only 1 groove in the pump piston, put the backup on top of the Oring, mate the concave side to the Oring. If you have two grooves, I always install one backup on top, and one on the bottom. The backup should always be above to the pressure when applicable on single applications, as the backups job is to prevent distortion/extrusion under load. In some applications, they actually use a backup on each side of the oring within the same groove.
 
Last edited:

Roberts210

Well-known member
Joined
Dec 21, 2015
Messages
3,177
Location
Missouri
Thanks Hiball. There's one groove, and I just did it the way you suggested and it worked great.

But I am also having a hard time getting the pump to go into the cylinder. I've lubed it with ATF but it just doesn't want to go, and I'm away from my shop and don't have access to my press. Any ideas?
 
OP
H

Hiball

Well-known member
Joined
Apr 30, 2009
Messages
14,027
Location
Missery
Thanks Hiball. There's one groove, and I just did it the way you suggested and it worked great.

But I am also having a hard time getting the pump to go into the cylinder. I've lubed it with ATF but it just doesn't want to go, and I'm away from my shop and don't have access to my press. Any ideas?


If your thinking about a Press, just stop what you are doing, something is Wrong. If you are having problems with getting the pump installed, there is a good chance you might have installed the wrong orings in the groove? I say good chance as you have a wide variety to choose from... Lol if you look down into the pump cylinder, the orings should barely stick out from the groove, too much will prevent the pump piston from being installed, and forcing it will only ruin the oring.
 

Roberts210

Well-known member
Joined
Dec 21, 2015
Messages
3,177
Location
Missouri
I'm sorry, I meant the ram, not the pump. I got mixed up on terms. I'm having a hard time getting the ram to go into the cylinder. It's visible in the above photo.
 
OP
H

Hiball

Well-known member
Joined
Apr 30, 2009
Messages
14,027
Location
Missery
I'm sorry, I meant the ram, not the pump. I got mixed up on terms. I'm having a hard time getting the ram to go into the cylinder. It's visible in the above photo.

Deep down I figured that was what you meant, it's a fairly common issue when using loaded Ucups, there design is to increase cylinder wall pressure at rest, unfortunately some bore clearances just won't accept it. I would remove the energizer ring, that should fix your problem.
 

Roberts210

Well-known member
Joined
Dec 21, 2015
Messages
3,177
Location
Missouri
I ended up not removing the energizer ring. Instead, I set the ram into place on top the cylinder, and took my leather mallet and tap, tap, tapped it right into the cylinder. Wasn't hard at all.

The pic below shows what I had in the overload valve hole:
I just mic'd the nub on the needle valve end. It's 2/10ths of an inch in diameter and looks to be about 2/10ths long. I have a machinist buddy who is going to make me the missing part tomorrow. But how long is the threaded part on the missing piece? I am guessing it's 5/16ths long. Anybody know?

162359239.jpg
 
Last edited:
OP
H

Hiball

Well-known member
Joined
Apr 30, 2009
Messages
14,027
Location
Missery
The pic below shows what I had in the overload valve hole:
I just mic'd the nub on the needle valve end. It's 2/10ths of an inch in diameter and looks to be about 2/10ths long. I have a machinist buddy who is going to make me the missing part tomorrow. But how long is the threaded part on the missing piece? I am guessing it's 5/16ths long. Anybody know?

162359239.jpg

I don't know the exact thickness without getting to the shop, but it would be hard to make it too long, when your near the proper overload setting its below the lower threaded section.
 

skwerl

New member
Joined
Jul 11, 2012
Messages
2
Hey there Hiball
I've got an Alltrade 662-J-2
Took the easy route first, and did all the seals on the upper end, didn't help.
Then did the hard part. As it turns out, my cup is GONE.
it has a 40mm bore, and fits on a 22mm shaft. Any suggestions?
 
OP
H

Hiball

Well-known member
Joined
Apr 30, 2009
Messages
14,027
Location
Missery
Hey there Hiball
I've got an Alltrade 662-J-2
Took the easy route first, and did all the seals on the upper end, didn't help.
Then did the hard part. As it turns out, my cup is GONE.
it has a 40mm bore, and fits on a 22mm shaft. Any suggestions?

If you have a local hydraulic shop they can fix you up, otherwise all you are needing is the thickness, I've seen them in 10mm and 12mm, you can verify what you need off the ram. A quick Google of 40mm X 22mm X thickness mm piston Ucup should help you out. It can be found at HPS in my signature, or Lazzars Hydraulic online, Do your homework and Price shop. I don't even want to tell you what they cost in bulk, unfortunately you don't need a drawer full.

FYI About $8.13 + shipping from the "the oring store" online. Muul 22x40x12 that part number should allow you to shop around online.
 
Last edited:

skwerl

New member
Joined
Jul 11, 2012
Messages
2
Sweet! Thanks a bunch man!

btw, I did wade through all 43 pages trying to find the specific answer
the good news is, I probably learned something!
 
To avoid these ads, REGISTER NOW!

Roberts210

Well-known member
Joined
Dec 21, 2015
Messages
3,177
Location
Missouri
To summarize on my Craftsman green jack rebuild: A buddy of mine offered to make the screw that my overload valve was missing. I had bought the jack as a non-working project, and the previous owner had evidently pulled out the overload valve and then reinstalled it without the small screw that tightens the spring and pushes down on the valve itself. So I took the spring, the top screw and the beveled valve to my buddy's shop and he promptly made me a small screw and the next day mailed all 4 parts back to me. That was 9 days ago and the friggin Post Office has yet to deliver them to me. :mad:

So I told my buddy, and he offered to make me a set of all four pieces--he said he had a spring that would work, and here is what me made me. I picked the parts up today.

162433637.jpg


162433965.jpg


The theads fit perfectly, but the beveled valve is a little too fat to go all the way down to the valve seat. And take a look at the spring--it's a weaker spring than the original. Does anyone have a spring that is equal to the original found in these green Craftsman jacks?
 
Last edited:
OP
H

Hiball

Well-known member
Joined
Apr 30, 2009
Messages
14,027
Location
Missery
Yeah, That spring isn't near heavy enough, might work at full compression, but your defeating the purpose. Did you call HPS in my signature, I'm sure I have some springs/components at the shop, but it won't be till Friday till I can get out there.
 

Roberts210

Well-known member
Joined
Dec 21, 2015
Messages
3,177
Location
Missouri
Thanks Hiball. I'll try HPS tomorrow. Should I just ask them for the overload valve spring for a Craftsman jack, circa 1980?
 

Roberts210

Well-known member
Joined
Dec 21, 2015
Messages
3,177
Location
Missouri
The envelope finally showed up in my mailbox today. It took the Post Office 11 days to move the envelope 16 miles. Pathetic! But at least I have the spring.
 

Roberts210

Well-known member
Joined
Dec 21, 2015
Messages
3,177
Location
Missouri
So I put the overload valve, spring and retaining screw in. Screwed it all the way down and then back up 1.5 turns. Is it 1.5 turns up from fully screwed down, or 2 turns up?
 
OP
H

Hiball

Well-known member
Joined
Apr 30, 2009
Messages
14,027
Location
Missery
So I put the overload valve, spring and retaining screw in. Screwed it all the way down and then back up 1.5 turns. Is it 1.5 turns up from fully screwed down, or 2 turns up?

Without a test station it's impossible to set it 100% correct to the jacks rating, lots of factors go into that setting, including seat wear along with spring rate differences. The 1 1/2 to 2 up from completely seated is a close reference, just know that hydraulic jacks are only intended to lift the load, Jack stands are a must after its elevated.
 

Roberts210

Well-known member
Joined
Dec 21, 2015
Messages
3,177
Location
Missouri
It held up the right front end of a Ford Escape for 3.5 hours and didn't slip a fraction of an inch. Thanks to the O.P. and thanks HiBall!!
 

tytower

Member
Joined
Feb 2, 2016
Messages
5
I just did one .
Anderson M800 -Has a MVP Casting base
Drove me crazy for years slowly dropping eventualy could barely get it up without it going down . Got into the body eventually and found the main seal washer on the central shaft had broken up and I had all these broken chunks of plastic on the bottom.

Did any of you notice the cuts in the top of the inside main pipe barrel at the top , 2 off in mine . Thought I might have to weld or braze them up .

In fact they are there intentionally to let oil bypass at the top of the stroke. Also mine had a fine mesh filter in the oil drawing hole

Glad I found this post Thanks to all
 
Last edited:

simaski

New member
Joined
Mar 18, 2016
Messages
1
Location
PA
I have jack that looks like yours. Who makes this one ,what is model I don't know.Where canI found any lables on body. I need rebuilt plunger seeal but I don't know NAME for order parts.
 
OP
H

Hiball

Well-known member
Joined
Apr 30, 2009
Messages
14,027
Location
Missery
I have jack that looks like yours. Who makes this one ,what is model I don't know.Where canI found any lables on body. I need rebuilt plunger seeal but I don't know NAME for order parts.

These Yasui based jacks are manufactured and sold under a multitude of brands, you will better off just sizing the parts out individually, If you aren't comfortable running caliper, take the old parts to a local hydraulic shop and have them match them up.
 

HCRCnow

Well-known member
Joined
Oct 1, 2011
Messages
130
Location
Long Beach, CA
I have jack that looks like yours. Who makes this one ,what is model I don't know.Where canI found any lables on body. I need rebuilt plunger seeal but I don't know NAME for order parts.

This style jack came with two size pump (plungers). Measure yours and most any hydraulic shop in your area should have the parts. You will need an O-Ring and ether a snap in wiper or oil seal. If you let me know the diameter of your pump. I can let you know if you need an oils seal or wiper.
 

fr442

New member
Joined
Apr 4, 2016
Messages
2
Hello All. Great information on repairing / rebuilding jacks. Decided to attack my Rallye( Pep Boys ) circa 1980 2-1/2 ton ( I think ). It wouldn't lift completely, and was leaking a bit, but I couldn't pinpoint the leak. Cleaned everything, took it apart down to the ram / piston, but couldn't take that apart. Put it back together, added oil, and she works great, but it's leaking from the working valve when it's brought down with a load. Is there a seal, or some way to seal the 3/8 allen head cap screw that is covering 2 steel balls in that valve? The valve body is similar to the one at the beginning of HiBalls tutorial. Thanx in advance for any help.
 
OP
H

Hiball

Well-known member
Joined
Apr 30, 2009
Messages
14,027
Location
Missery
Hello All. Great information on repairing / rebuilding jacks. Decided to attack my Rallye( Pep Boys ) circa 1980 2-1/2 ton ( I think ). It wouldn't lift completely, and was leaking a bit, but I couldn't pinpoint the leak. Cleaned everything, took it apart down to the ram / piston, but couldn't take that apart. Put it back together, added oil, and she works great, but it's leaking from the working valve when it's brought down with a load. Is there a seal, or some way to seal the 3/8 allen head cap screw that is covering 2 steel balls in that valve? The valve body is similar to the one at the beginning of HiBalls tutorial. Thanx in advance for any help.

Did the copper washer by chance fall off? Outside of that it needs to have that washer and be torqued down a bit.
 

fr442

New member
Joined
Apr 4, 2016
Messages
2
Hiball, Thanks for the quick reply. Your diagnosis was spot on. The copper washer must have fell out while draining the valve body. It was so thin, and probably useless, I put a fresh one in from a H/F kit. All is well. Thanks again, I really appreciate it !!!
 

cdsloop

Well-known member
Joined
Jul 28, 2015
Messages
88
Location
Central North Carolina
Hiball, thank you so much for all you do for folks in helping them to repair their jacks. I am working on my second floor jack that had been cast aside on our farm for not working. The first one is back in service. I tore the second one down last night, and it is nearly identical to the one you started this thread tutorial with. Mine is an Allied 45426. The only difference I have found is that my pump piston has a wiper seal for the upper instead of a regular oring and split backup for the upper(outer). On the first page you stated that you replace the main ram oring and outer shell with a quality ucup. Can this be done on this jack without machine work to remove the "shoulder" on the end of the ram? My measurements on the ram are 33mmx42mm. It is between 4.5-5.5mm height. I didn't find a ucup with these measurements in a quick google search. What size ucup do you use in this application? Thank you again.
 
OP
H

Hiball

Well-known member
Joined
Apr 30, 2009
Messages
14,027
Location
Missery
Hiball, thank you so much for all you do for folks in helping them to repair their jacks. I am working on my second floor jack that had been cast aside on our farm for not working. The first one is back in service. I tore the second one down last night, and it is nearly identical to the one you started this thread tutorial with. Mine is an Allied 45426. The only difference I have found is that my pump piston has a wiper seal for the upper instead of a regular oring and split backup for the upper(outer). On the first page you stated that you replace the main ram oring and outer shell with a quality ucup. Can this be done on this jack without machine work to remove the "shoulder" on the end of the ram? My measurements on the ram are 33mmx42mm. It is between 4.5-5.5mm height. I didn't find a ucup with these measurements in a quick google search. What size ucup do you use in this application? Thank you again.

Maybe a picture of your Ram? if it has the groove to accept the shell, it will either need to be machined off, or the shell base modified to accept a Ucup.
 

cdsloop

Well-known member
Joined
Jul 28, 2015
Messages
88
Location
Central North Carolina
Man, you are quick to respond! My ram does have the groove to accept the shell. I've been reading deeper into the thread, and have resolved that it would need to be machined to accept a ucup. I'm pretty sure that the main ram seal wasn't my problem anyway. I found a mangled o-ring in the pump piston housing, and I'm pretty sure that was my problem. It's been years since this jack has been used, and I don't remember what the problem was on this particular jack. I was just going to replace the ram oring/shell with a ucup while I had it apart, if it was possible without machining. I stole your photo from the first page to post here, I hope it works. My ram is identical... I'm going to put it back together with the oring/shell and see if it works. Thanks again for your devotion to GJ, and helping the DIY'er.
 

Attachments

  • ram.jpg
    ram.jpg
    105.3 KB · Views: 71

Toyo72

Well-known member
Joined
Nov 27, 2009
Messages
281
I have a floor jack that was purchased from Sam's about 16-18 or so years ago. Brand is Allied, model Indy 5, 47-HJCI. It lifts fine, and doesn't seem to drop, however it does leak externally from the pump piston. No external leak from the ram. Wondering if it is repairable with seals sourced locally or from suggested sellers here, or if it has anything that would make it obsolete? Photos attached.

[I have two others leaking as well, one a 1.5 ton aluminum, and another a 3 ton "Michelin" brand.....I'll tackle those later, the "Michelin" appears to be leaking externally from the ram].

Thanks - this is a great thread. I'll start at the top with teardown if the internet prognosis is that it is worth the effort.
 

Attachments

  • IMG_7164.jpg
    IMG_7164.jpg
    87.4 KB · Views: 68
  • IMG_7163.jpg
    IMG_7163.jpg
    94.4 KB · Views: 56
To avoid these ads, REGISTER NOW!
Top Bottom