I got the Harley back together this weekend after a few weeks of slow progress. With the right tools on hand removing everything from the primary wasn't too bad.

Removing the starter ring gear from the clutch required drilling out the rivets and knocking them out with a punch. I taped up and covered the clutch to reduce the risk of metal getting into the hub bearing. I know some people like to grind the head off the rivets, but I think that makes the risk of contaminating the bearings even worse.
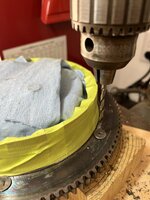
I cut a few scraps of wood to the right height to support the aluminum hub as I hammered out all 6 rivets.
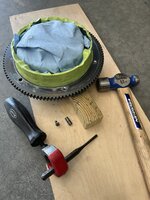
With the old ring off I drilled out the holes to 5/16" to accept the new bolts. The bearings felt smooth, and the basket and hub are in great shape.
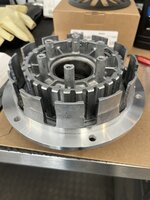
There was a slight interference fit with the new ring gear. Rather than grind away material, I threw the steel ring in the oven at 200* and froze the clutch hub. A few light taps with a brass punch and it came together well.
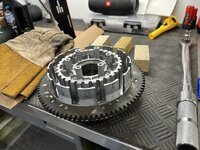
Here you can see the bolts in place of the rivets and ready to install.

Everything went back together smoothly. Before torquing everything down, I set the chain slack, adjusted the clutch and checked the starter pinion air gap. I also verified the transmission was shifting smooth and the clutch was engaging and releasing before reinstalling the primary cover.

I am glad I checked the air gap on the pinion to ring gear, I did have to add one shim to get the gap within the .075-.125" range. I had not done this previously when I replaced 10+ years ago and suspect it may have contributed to the gear damage. The ring gear teeth are visually beefier with lower tooth count.

There is just something about working on a machine with this much chrome. I can't help but polish it every time I put the bike on the lift.
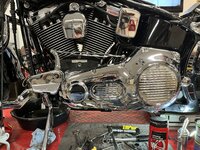
My last check before finishing assembly was the battery cables. The positive cable looked great with no corrosion at the starter or battery end. I was happy to see that it's not easy to replace with the oil tank still in the bike. The negative cable was looking a little rough, so it was replaced. It was still doing its job, but insulation and a few wire strands were broken.

I took it out for a quick 1hr test ride last night and it ran great. The clutch felt smoother with a more consistent engagement. It really hooks up too. The old clutch must have been slipping slightly and got worse over time, and it was not as obvious until I rode with the new one. It locks right up and goes.
Thanks for following along
Removing the starter ring gear from the clutch required drilling out the rivets and knocking them out with a punch. I taped up and covered the clutch to reduce the risk of metal getting into the hub bearing. I know some people like to grind the head off the rivets, but I think that makes the risk of contaminating the bearings even worse.
I cut a few scraps of wood to the right height to support the aluminum hub as I hammered out all 6 rivets.
With the old ring off I drilled out the holes to 5/16" to accept the new bolts. The bearings felt smooth, and the basket and hub are in great shape.
There was a slight interference fit with the new ring gear. Rather than grind away material, I threw the steel ring in the oven at 200* and froze the clutch hub. A few light taps with a brass punch and it came together well.
Here you can see the bolts in place of the rivets and ready to install.
Everything went back together smoothly. Before torquing everything down, I set the chain slack, adjusted the clutch and checked the starter pinion air gap. I also verified the transmission was shifting smooth and the clutch was engaging and releasing before reinstalling the primary cover.
I am glad I checked the air gap on the pinion to ring gear, I did have to add one shim to get the gap within the .075-.125" range. I had not done this previously when I replaced 10+ years ago and suspect it may have contributed to the gear damage. The ring gear teeth are visually beefier with lower tooth count.
There is just something about working on a machine with this much chrome. I can't help but polish it every time I put the bike on the lift.
My last check before finishing assembly was the battery cables. The positive cable looked great with no corrosion at the starter or battery end. I was happy to see that it's not easy to replace with the oil tank still in the bike. The negative cable was looking a little rough, so it was replaced. It was still doing its job, but insulation and a few wire strands were broken.
I took it out for a quick 1hr test ride last night and it ran great. The clutch felt smoother with a more consistent engagement. It really hooks up too. The old clutch must have been slipping slightly and got worse over time, and it was not as obvious until I rode with the new one. It locks right up and goes.
Thanks for following along
Last edited:
 . The goal was to increase precision while also making setup and storage of the tools easier as my garage is so multi use. I can't really dedicate the space for a cabinet saw and full miter station so we must remain portable.



 wow
wow