To avoid these ads, REGISTER NOW!

quadrcr87's garage projects

OP
Q

quadrcr87

Well-known member
Joined
Jul 5, 2013
Messages
1,036
Location
Travelers Rest, SC
I got the Harley back together this weekend after a few weeks of slow progress. With the right tools on hand removing everything from the primary wasn't too bad.

IMG_8078.jpeg

Removing the starter ring gear from the clutch required drilling out the rivets and knocking them out with a punch. I taped up and covered the clutch to reduce the risk of metal getting into the hub bearing. I know some people like to grind the head off the rivets, but I think that makes the risk of contaminating the bearings even worse.
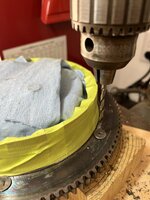
IMG_8104.jpeg

I cut a few scraps of wood to the right height to support the aluminum hub as I hammered out all 6 rivets.
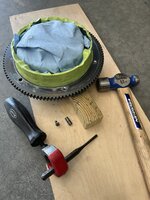
IMG_8107.jpeg

With the old ring off I drilled out the holes to 5/16" to accept the new bolts. The bearings felt smooth, and the basket and hub are in great shape.
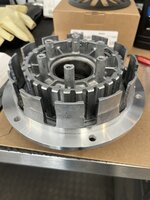
IMG_8108.jpeg

There was a slight interference fit with the new ring gear. Rather than grind away material, I threw the steel ring in the oven at 200* and froze the clutch hub. A few light taps with a brass punch and it came together well.
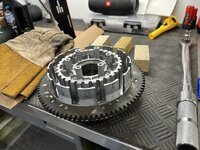
IMG_8109.jpeg

Here you can see the bolts in place of the rivets and ready to install.

IMG_8110.jpeg

Everything went back together smoothly. Before torquing everything down, I set the chain slack, adjusted the clutch and checked the starter pinion air gap. I also verified the transmission was shifting smooth and the clutch was engaging and releasing before reinstalling the primary cover.

IMG_8111.jpeg

I am glad I checked the air gap on the pinion to ring gear, I did have to add one shim to get the gap within the .075-.125" range. I had not done this previously when I replaced 10+ years ago and suspect it may have contributed to the gear damage. The ring gear teeth are visually beefier with lower tooth count.

IMG_8112.jpeg

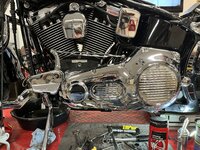
There is just something about working on a machine with this much chrome. I can't help but polish it every time I put the bike on the lift.
IMG_8186.jpeg

My last check before finishing assembly was the battery cables. The positive cable looked great with no corrosion at the starter or battery end. I was happy to see that it's not easy to replace with the oil tank still in the bike. The negative cable was looking a little rough, so it was replaced. It was still doing its job, but insulation and a few wire strands were broken.

IMG_8187.jpeg

I took it out for a quick 1hr test ride last night and it ran great. The clutch felt smoother with a more consistent engagement. It really hooks up too. The old clutch must have been slipping slightly and got worse over time, and it was not as obvious until I rode with the new one. It locks right up and goes.

Thanks for following along
 
Last edited:
To avoid these ads, REGISTER NOW!

swsman

Well-known member
Joined
May 5, 2021
Messages
600
Location
Earthbound
Read through it all.
Great variety of projects, and you have given me some ideas as well.

Carry on, and thanks for sharing.
 
OP
Q

quadrcr87

Well-known member
Joined
Jul 5, 2013
Messages
1,036
Location
Travelers Rest, SC
The weather in SC is starting to get very nice. I seem to have spent more time in April out on the trails than in the garage. No major projects but lots of small ones as time allows.

I had a few tools on the wish list that I decided to buy in April before import prices jump up. I may have gone a little overboard.... Domino, sander, track saw and miter saw o_O. The goal was to increase precision while also making setup and storage of the tools easier as my garage is so multi use. I can't really dedicate the space for a cabinet saw and full miter station so we must remain portable.

So far, the 10" Makita miter saw has seen the most use. A big upgrade from my evolution saw and very compact for its capability. I still like the evolution for its ability to cut metal, but it was not a great wood saw. The Bosch gravity rise stand has been great so far. Very fast to setup and easy to store out of the way.

IMG_8327.jpeg

I had to test is out, so I build another dog step as the BOSS requested. This one is cedar with an outdoor stain and carpet. It will live on the back deck, so she does not carry the living room step in and out of the house daily.

IMG_8407.jpeg

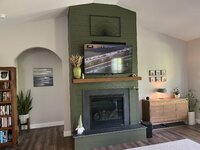
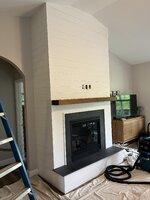
After the extravagant tool order, I decided it was best to continue on the BOSS' project list to stay in her good graces. We have been talking about adding some color/ style to our living room but choosing a color was quite an ordeal. It took 5 samples to arrive at this color with input from friends and family. The color contest winner was my mom, which makes sense considering her career in designing houses as a custom home builder.

Before: Basic white
IMG_8465.jpeg

After: A bit of a shock but we are getting used to it
IMG_8468.jpeg

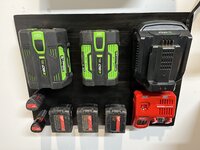
I have been working on some garage improvements as well. One of the first things I 3D printed was a battery holder. I finally got around to installing them in the garage. It definitely freed up some counter space.

IMG_8485.jpeg

The charging station for the BOSS' garage is still a work in process. Trying to determine the best layout because these EGO batteries are huge and need a lot of space to slide out of the charger and mounts. Now that I have the overall size, I can cut the wood and mount it up.

IMG_8486.jpeg

Thanks for following along!
 
Last edited:

fouckhest

Well-known member
Joined
Jul 24, 2013
Messages
1,866
Location
Greer, SC
Fire place looks great, love that color!

....I too have to keep the "boss" in good graces and understand at times those, "color shocks" lol
 

nicholam77

Well-known member
Joined
Dec 18, 2016
Messages
2,675
Location
Minneapolis, MN
I had a few tools on the wish list that I decided to buy in April before import prices jump up. I may have gone a little overboard.... Domino, sander, track saw and miter saw o_O.

🤯 wow
Imo a track saw doesn't fully replace a table saw (some say it can, but I find there are still things that are tricky). BUT, I am a huge track saw advocate! I'm sure all of those things will serve you well.

I need to make one of those battery organizer thingies. Adding it to 'The List'.

🍻
 
OP
Q

quadrcr87

Well-known member
Joined
Jul 5, 2013
Messages
1,036
Location
Travelers Rest, SC
🤯 wow
Imo a track saw doesn't fully replace a table saw (some say it can, but I find there are still things that are tricky). BUT, I am a huge track saw advocate! I'm sure all of those things will serve you well.

I need to make one of those battery organizer thingies. Adding it to 'The List'.

🍻
I agree 100% that a track saw won't fully replace a table saw. I am still keeping my Dewalt jobsite saw but I will no longer be wrestling a 4x8 sheet of plywood through it. Not having infeed/outfeed tables with the small saw was my issue.
 
Last edited:

nicholam77

Well-known member
Joined
Dec 18, 2016
Messages
2,675
Location
Minneapolis, MN
I agree 100% that a track saw won't fully replace a table saw. I am still keeping my Dewalt jobsite saw but I will no longer be wrestling a 4x8 sheet of plywood through it. Not having infeed/outfeed tables with the small saw was my issue.

That's my setup, Dewalt jobsite + tracksaw. Still wish I had a full size table saw, but it does the job!
 
OP
Q

quadrcr87

Well-known member
Joined
Jul 5, 2013
Messages
1,036
Location
Travelers Rest, SC
Another small project crossed off the list. My main battery charging station is finished. Pretty simple 3/4” pine construction with two boards glued up. This gave me a chance to practice with the Festool Domino & Milwaukee track saw, and I was pretty impressed with both. I was less impressed with the warped/ cupped wood from Home Depot.

IMG_8516.jpeg

I finished it with Minwax Ebony stain and 2 coats of satin polyurethane. Deciding on a layout and waiting for coats of finish to dry caused this to project to stretch out over a few days.

IMG_8523.jpeg

It turned out a little darker than the shelf above it but it's a close enough match for the garage. It's nice to have all the loose batteries off the toolbox.

IMG_8524.jpeg

Thanks for following along!
 
Last edited:
OP
Q

quadrcr87

Well-known member
Joined
Jul 5, 2013
Messages
1,036
Location
Travelers Rest, SC
I went with Milwaukee cordless to match my existing batteries. I didn't want to get into Festool batteries. Reviews on both saws were good, so I consider them pretty comparable.

I found a package from Acme that came with a packout case, 2 rails, clamps, bag, 6.0 battery and rapid charger making it a complete system. I was planning to buy a rapid charger and another battery already, so it worked out.

Price has gone up some, but I paid $945 back in April.
 
OP
Q

quadrcr87

Well-known member
Joined
Jul 5, 2013
Messages
1,036
Location
Travelers Rest, SC
I have been a little quiet on here lately, but I have been busy. The weather stayed cooler longer than expected in SC and we have been spending a lot of time on the trails.

The BOSS went to visit her parents for a few days last weekend, so I decided to take on an ambitious flagstone project. Several areas of our backyard were struggling to grow grass causing washout that has been getting worse. These before pictures were taken last fall and have only gotten worse through the winter/spring. The areas just don't get enough sun to keep the bermuda happy.

IMG_6107.jpeg
IMG_6106.jpeg
IMG_6108.jpeg

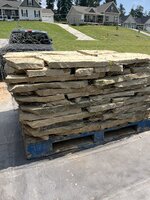
My solution is 1.5 tons of flagstone and hours and hours of hard labor.
IMG_8683.jpeg

I rented a dump trailer for the weekend and took 6 trips to the local rock yard. The worst part was unloading all the flagstone by hand.

IMG_8684.jpeg

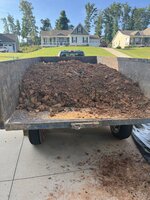
I was able to use the dump trailer to haul 2 tons of dirt to the dump. Pulling one wagon load at a time up the hill was exhausting but I got the first 2 areas cleared by Monday morning.
IMG_8722.jpeg

Have you ever seen a more beautiful view from the top of this landfill? The view from the top is overlooking Paris Mt. to the south and the NC mountains to the north. I sent this picture to my brother who is a home builder in MI, and he said he would feel guilty dumping trash here. The scenery and the trash just don't feel right together.

IMG_8726.jpeg

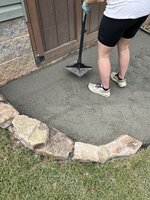
After the dirt and sod were clear I could start making some real progress. I installed 4" plastic bender board edging to help lock the stone and gravel in place and backfilled with road base. Still have more compacting and prep to do before I start laying flagstone but I stopped here and moved on.

IMG_8711.jpeg

This area took the most time as I had to build a dry stack retaining wall and more edging for a river rock run off area. I am worried about laying the flag stone at this much slope (10%+), but my only alternative is to regrade the yard and tear up the grass. I may have to make a change if this doesn't hold up.

IMG_8736.jpeg

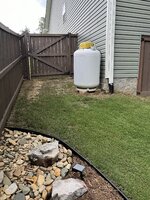
I also took the opportunity to re level the propane tank before I add stone to the area in front of the big gate. About a year ago a crew I hired to sand my lawn knocked the tank over and it was never reset correctly.

IMG_8720.jpeg

Thanks for following along, I am off to haul some more rock.
 
Last edited:
OP
Q

quadrcr87

Well-known member
Joined
Jul 5, 2013
Messages
1,036
Location
Travelers Rest, SC
Another weekend of progress on the flagstone and I am exhausted. With a couple hours of help from the BOSS, we finished hauling in the fines and compacting. It was then up to me to fill in the 40-piece puzzle of flagstone.

IMG_8756.jpeg

It took me way longer than expected to get to this point. After attending an hour of YouTube university, I had this expectation that with the right technique the stones would crack, split and bend to my will. This expectation was shattered literally on the first stone. I was tapping away at the chisel and the stone just split in the complete opposite direction. I soon learned that you have to study and understand the stone and plan more carefully.

IMG_8758.jpeg

I also learned that using hand tools exclusively would take longer than I was willing to spend. I changed my technique to scoring the stone with a diamond disk on a 4-1/2 angle grinder. This still required a careful & patient technique with a chisel and hammer, but the process was much faster. Every cut required some shaping and chipping to maintain the natural look. By the end of this section, I was becoming more efficient and wasting less energy. The remaining areas feel less daunting.

IMG_8761.jpeg

After another couple of hours of fine tuning, leveling and pounding each stone with a mallet I was ready for sand. The BOSS once again returned to help spread the polymeric sand and wetting it in place. I am really hoping this does not wash away during the first big storm. I learned last September that my landscaping needs to be hurricane rated.

IMG_8763.jpeg

I may need some replacement sod along the edge. I couldn't help but stomp all over it.

IMG_8762.jpeg

Thanks for following along. Many hours ahead on this project!
 
Last edited:
OP
Q

quadrcr87

Well-known member
Joined
Jul 5, 2013
Messages
1,036
Location
Travelers Rest, SC
I spent a few nights after work fitting the flagstone for the small fence gate. This area went a lot faster because it was so small and I am getting more experience. I do find it hard to get in a flow working only a couple hours at a time. By the time I got all the tools out and started making progress the sun was going down.

At the end of day one I had the main perimeter fit.


IMG_8771.jpeg

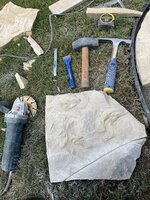
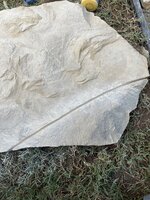
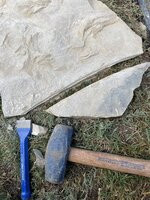
The main tools I am working with are a 4-1/2 diamond blade to score a 1/4” groove and then various mason chisels and a sledge to carefully crack the stone.

IMG_8778.jpeg

Straight lines are easier to crack but if you’re careful you can add some shape without splitting in the wrong direction.

IMG_8779.jpeg

This one was a very clean split. A little too clean to look natural. I use a mason hammer to chip up the edge after I get the main shape I need.

IMG_8780.jpeg

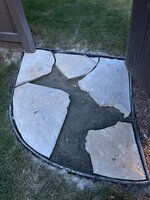
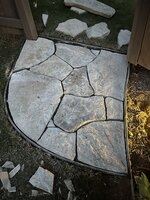
This was the last stone to be fitted at the end of day 2. There were too many angles and odd shapes to find a perfect stone to fit.

IMG_8781.jpeg

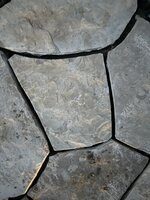
After several cuts to the surrounding stones, I was able to fit the final piece of the puzzle. I worried about getting the joint spacing even during the final leveling.
IMG_8784.jpeg

This was the end of the second night.
IMG_8783.jpeg

Thanks for following along.
 
Last edited:
OP
Q

quadrcr87

Well-known member
Joined
Jul 5, 2013
Messages
1,036
Location
Travelers Rest, SC
I started Saturday morning leveling all of the flagstone and tamping it in place with a rubber mallet. That was tough with the weight of the largest pieces as I had to lift and adjust them multiple times.

Once they all felt solid and stable, I began to fill in the polymeric sand. I brushed it into each joint tamping the stones again to allow it to settle. The last step was a light pass with a leaf blower on low to clean it off.

IMG_8793.jpeg

After a few minutes of misting water, this area was complete. I think I will be taking a break from flagstone for a little while as the temps are in the 90s already in SC.

IMG_8794.jpeg

I have also been working on adding some interest to our rock beds with varying sized stones. The goal is to make them look a little more natural. Hopefully the first big rain doesn’t wash out the small stones. Eventually the boss will be adding some shade tolerant plants which will also help hold them in place.

IMG_8795.jpeg

IMG_8796.jpeg

Thanks for following along!
 
Last edited:
OP
Q

quadrcr87

Well-known member
Joined
Jul 5, 2013
Messages
1,036
Location
Travelers Rest, SC
After a short break from the rocks, I'm back at. This was the area that needed it the most with the majority of the water run off coming down this side of the house. The digging took a while, but the BOSS and I managed to clear it over the span of a weekend. We tried to work mostly in the cooler parts of the day, but suffering is inevitable in July.

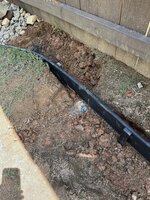
Digging down 6" we ran into drain lines from the front of the house & gutter, sprinklers and the internet cable. The internet cable has run through the center of all three areas I am doing stone. It is running in the worst possible area for this project, but thankfully we didn't damage it.

IMG_8813.jpeg

Along the fence, I was able to tie into the existing edging to continue the rock bed along the fence. I used my router to trim the end of the old edging to create the overlapping seam to match the factory end.

IMG_8815.jpeg

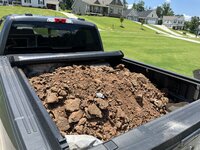
This load squatted the F-150 a bit, but it handled it well. It wasn't enough dirt to justify the dump trailer rental, but having to unload it by hand at the dump was a bummer. I crossed the scale at 8,800lbs. so about 1.5 tons of dirt.

IMG_8819.jpeg

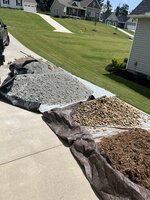
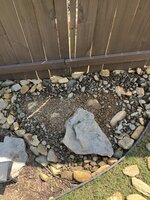
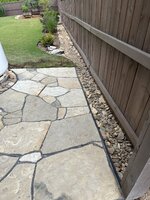
With the dirt cleared, we finished installing all the bender board edging before hauling in 3" of crusher run followed by 1" of fines. Lots of hand compacting between layers and it feels solid. Finally, the rocks were filled in along the fence and house. With this step complete, almost all of the materials are cleared off the driveway. I actually had to make a run to Lowes for a few extra bags of paver base when I ran short.

IMG_8844.jpeg

IMG_8841.jpeg

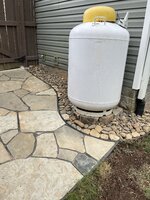
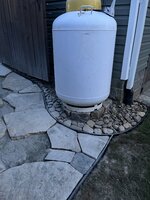
This area around the propane tank is a little odd as I did not have a safe way to move it and run flagstone to the house. We were able to tip it enough to level it with some rock and get rid of the broken scraps of block they used during install. I am still worried it will wash out and start tipping again. I plan to add another layer of large rock along the edge after the flagstone is finished. My 48" mower deck clears the tank by a few inches, so I need the path as wide as possible here.

IMG_8842.jpeg

I started on the flagstone Sunday afternoon and still have a few hours to go before its time for polymeric sand. I find it much easier to fit these odd corners with smaller pieces. The goal is to use the large pieces as much as possible on the rest to reduce the risk of joints washing out.

IMG_8848.jpeg

Most of the outer border was finished Monday after work and I am hoping to complete the rest this weekend. As I make the turn with the zero turn, most of the weight will be on that large stone in the corner. Being dry set, I am hopeful that it will remain stable and won't shift.

Nearing the finish line and I am ready for a break from the 90*+ heat. Maybe I will even have time to ride the Harley when this mess is finished. The neighbors think I am crazy and that's probably true.

IMG_8847.jpeg

Thanks for following along!
 
Last edited:
To avoid these ads, REGISTER NOW!
OP
Q

quadrcr87

Well-known member
Joined
Jul 5, 2013
Messages
1,036
Location
Travelers Rest, SC
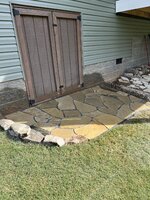
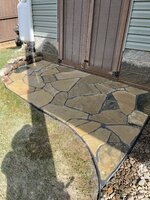
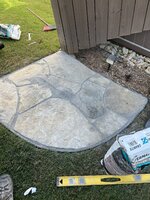
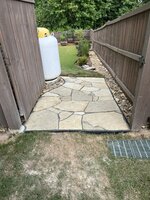
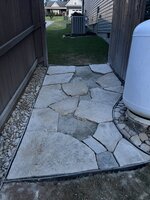
It was another hot weekend with 90*+ heat index both days. It did not matter because I was very determined to finish this project. I fit the last few pieces on Saturday and started leveling the path. Sunday morning started out with a short Harley ride and by mid-day I was filling the joints with sand.

IMG_8895.jpeg

I still have some more work to do leveling out the lawn and it will be a while for the grass to recover. If it's still struggling late summer/fall I may have to lay down some sod. This Bermuda can spread pretty fast when it wants to.

IMG_8893.jpeg

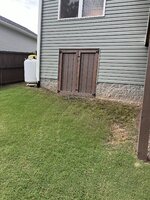
I don't know what I want to do with this ugly propane tank, but I feel like I need to hide it or make in blend in. It is leased tank so I doubt the company will let me paint it, but it's worth asking. I considered building some type of wood around it, but I don't have much space to work with.

IMG_8896.jpeg

IMG_8894.jpeg

IMG_8897.jpeg

I don't know what project I'll start next, but I don't think it will be stonework! Thanks for following along.
 
Last edited:

fouckhest

Well-known member
Joined
Jul 24, 2013
Messages
1,866
Location
Greer, SC
I don't know what I want to do with this ugly propane tank, but I feel like I need to hide it or make in blend in. It is leased tank so I doubt the company will let me paint it, but it's worth asking. I considered building some type of wood around it, but I don't have much space to work with.
Maybe you could wrap it with some wood and make it look like a whiskey barrel?

Stone work looks great!
 
OP
Q

quadrcr87

Well-known member
Joined
Jul 5, 2013
Messages
1,036
Location
Travelers Rest, SC
Great ideas guys. I thought of the magnetic wrap, but I haven't found any products yet. If I go wood, I need to keep it minimal without bulky framing. What if I attached wood strips to some type of wire or fencing material that would wrap around the tank and secure in the back?

Something like this but using strips of stained cedar instead?


1752598921240.png
 
OP
Q

quadrcr87

Well-known member
Joined
Jul 5, 2013
Messages
1,036
Location
Travelers Rest, SC
Propane Tank Update- I called Blossman Gas to ask about painting a rental tank and they agreed as long as it stays a light color, grey, tan, blue, etc. I mentioned that the tank was bigger than I need for just a fireplace and they gave me the option of a 60-gallon tank which was not available when I moved in 4 years ago.

They are taking the old tank away in a few days and agreed to wait for me schedule the replacement. That will give me a few days to rework the area and install a solid & level pad for it. The real bonus is the smaller diameter will gain me 6" of clearance for mower! They are also going to quote plumbing a line to the deck for my BBQ. We hardly ever run the fireplace, so I think 60lbs will still be plenty.

120lb tank = 54" Tall, 30" Diameter
60lb tank = 43" Tall, 24" Diameter
 

WoodsTruck

Well-known member
Joined
Jan 12, 2013
Messages
1,025
Could you use some coated mesh as the base wrap and staple the cedar boards to it?
Might be easier to keep the boards positioned where you want them and have less shift over time.
Any idea how much thermal movement the tank would have when it goes through the temperature range?

 
OP
Q

quadrcr87

Well-known member
Joined
Jul 5, 2013
Messages
1,036
Location
Travelers Rest, SC
I have no idea on the amount of expansion but that is a good point. I would not want to wrap it tight. Changing to a smaller tank I may just add a privacy wall to block the view from the backyard. It won't bother me having it visible next to the house since the gate is always closed.

Something like this crude sketch extending from the corner of the house.

1752674151544.png
 
Last edited:
OP
Q

quadrcr87

Well-known member
Joined
Jul 5, 2013
Messages
1,036
Location
Travelers Rest, SC
It has been a while GJ, life has been busy. Things have been hectic at work lately as we prepare the 2026 budget. I recently changed roles as well adding to the pressure. I have been maintaining some mental sanity by working on small projects at home.

We are coming into some of the best weather of the year here, so I am getting the deck ready.

New fans as the originals were already sagging and barely put out any air. Outdoor rated Kilcher 54" with a 12" drop and they really move some air. I also finished installing the pull-down shades which help cool the space a lot.

IMG_9048.jpeg

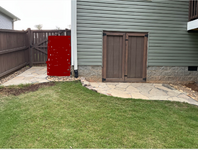
The propane company hauled away the 120lb tank over a month ago and I finally got around to leveling the area. They should be installing the new 60lb tank in the next week and adding a propane line to the deck.
IMG_9050.jpeg

I never fancied myself a shoe cobbler but there are not many repairs that I won't try my hand at. The BOSS wore through her Birkenstocks, and it looked like a pretty simple fix. A quick youtube tutorial and $60 on Amazon and I was in the shoe repair business.

IMG_9231.jpeg

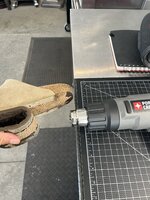
Separating the old sole was the worst part. The heat gun helped but I still had to use a knife where the glue wouldn't release. Nest time I need to either let them sit in the hot sun or even put them in the oven around 200* according to youtube.

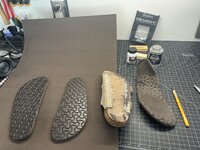
Once separated I cleaned up the base on the belt sander to remove any remaining rubber.
IMG_9233.jpeg

I picked up a large sheet of sole material that can do at least 5 pairs of sandals along with clear cement and cork sealer. Once the new sole was cut out, I cleaned it up on the belt sander to shape to final size. Turned out better than expected.
IMG_9228.jpeg

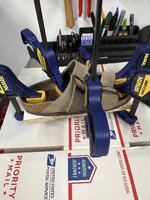
The glue up was a bit of a challenge. I wasn't sure the best way to clamp but I settled on clamping to a piece of wood without smashing the cork too bad. This was last night so I will check results after work.
IMG_9234.jpeg

to be continued..
 
Last edited:
OP
Q

quadrcr87

Well-known member
Joined
Jul 5, 2013
Messages
1,036
Location
Travelers Rest, SC
Wow, 4 months since my last update and I left in the middle of a project. That’s a pretty good indicator of life keeping me busy. I did in fact complete the sandal repair and returned them to my wife. The soles have not fallen off so we will call that a success!

With a little break from work and staying home for the holidays this year I was able to spend some quality time in the garage. We picked up a new Samsung Frame TV for our bedroom on Black Friday and it needed a frame.

I didn’t take many photos of the build, I just enjoyed the time making it.

This way my first time working with African Teak. I found it exploring the wood selection at Rockler and it had the color my wife was looking for. I used my track saw to start with a straight edge before moving to the table saw.

IMG_9788.jpeg

It felt good setting the garage wood shop up again. The truck has been parked outside for several weeks now.

IMG_9805.jpeg

The next step was rabbiting the profile with the table saw to conceal the TVs edge. I finished the profile with the router table to add an 1/8” round over.
IMG_9787.jpeg


One of the challenges was figuring out how Samsung’s magnet retention system works. There were specific spots around the frame with reversing polarity. I stuck the magnets to the tv first, marked the frame, bored the holes with a forstner bit and placed each magnet with CA glue paying attention to polarity. Be very careful to keep the magnets away from each other once covered in glue, it gets out of control very quickly.

IMG_9807.jpeg

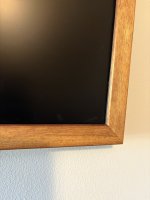
I am very happy with the end result especially being my first picture frame and the added complexity with the magnets. I finished it with Rubio Monocoat Pure which only darkened it slightly and looks very natural.

IMG_9821.jpeg

IMG_9823.jpeg

I ended up with a nice snug fit and the magnets retain it in place very well. Someday I might remake this in Walnut as I don't think it goes that well with the dresser and nightstands. The BOSS is happy so maybe it will grow on me.

IMG_9822.jpeg

Thanks for following along….
 
Last edited:
OP
Q

quadrcr87

Well-known member
Joined
Jul 5, 2013
Messages
1,036
Location
Travelers Rest, SC
With the wood shop already setup, I decided now was a good time to build some organizers for our bathroom vanity. Or should I say my wife decided it was a good time, haha.

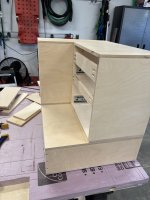
When our house was built they installed a small double vanity with no shelves or drawers. The plumbing was not laid out well for storage. I took some measurements and scratched my head to come up with a plan. The solution was a 3 piece cabinet box that was easily removable to access the plumbing. Despite what the BOSS thinks, you can't just order this on Amazon.

After an expensive trip to Rockler I had 1/2" & 1/4" birch ply and a pile of drawer slides to get started.

IMG_9831.jpeg

10” slides in the top left and 16” in the remaining boxes. I went with overtravel slides for the bottom drawer to make it a little easier to access.

IMG_9850.jpeg


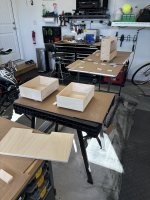
The drawer boxes went together after hours of cutting, machining, drilling and sanding. I pre finished the inside of the drawers with 2 coats of water-based poly sanding between coats. At this point I had to take over the other garage and kick the Jeep out for a weekend. The finish ended up smooth and went on clear. This was my first time using water based and I really liked it for plywood. I find oil-based poly tends to yellow the birch.

IMG_9848.jpeg

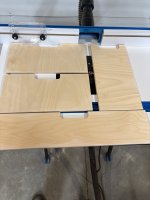
The drawer faces received the same finish after template cutting the hand pulls and running an 1/8” round over on all edges. If I was a rich man I would have grain matched all of these but I didnt want to waste any material at over $50 for a 30x60" sheet. In reality I never even considered it until I set them next to each other.

IMG_9843.jpeg

Here you can see the notch I had to do to clear the plumbing. It was so tight I had to use strategically placed stretchers on the 10” deep section. I can take out the drawers to shut off the water in an emergency.

IMG_9855.jpegIMG_9851.jpeg

A very snug fit. And the top offers a little more storage. I may need to add a lip or tray if she starts losing make up off the back.

IMG_9856.jpeg

The BOSS was very quick to move in. Literally seconds after I installed the last drawer at 10pm last night. I didn't even have a chance to take a picture of it empty.

If I had to pick a favorite drawer, this is it. I used a scrap of the TV frame molding and 1/4” ply to create a 2nd level for nail polish.

IMG_9857.jpeg

Now I guess it’s time to build out my side of the vanity. Her side is already at max capacity so I will need to plan for her overflow.....

Thanks for following along!
 
Last edited:

nicholam77

Well-known member
Joined
Dec 18, 2016
Messages
2,675
Location
Minneapolis, MN
Nice woodworking, both projects look awesome!

How do you like the Frame TV? Does it look convincing enough when it's displaying art?

The round over is a nice touch on the TV frame.

The teak looks nice. It might grow on you over time, it might not. IMO unless it's a matching set of furniture in the same style (bed + nightstands + dresser), not all wood in the same room needs to be the same species or even same tone. Sometimes it's even preferable when not matchy-matchy. Subjective of course, but just my opinion.


The vanity drawers look great, too — I love birch ply with exposed edges. Last time I checked my local Rockler, it didn't look nearly that nice, but that was some time ago.

The drawers look good inset, and I wouldn't beat yourself up about the grain matching.

If you wanted to take the 1/8" radius all the way on the inside corners of the casework, you could use a sharp chisel and some hand sanding.

Another unsolicited suggestion, going back to the TV :) — if it doesn't interfere with viewing angles, you could mount it a tad lower even. Again this is somewhat personal preference, but the more anchored it is to the piece of furniture below (dresser), the more it will visually act as one unit.

In any case, both projects look great!

🍻
 
OP
Q

quadrcr87

Well-known member
Joined
Jul 5, 2013
Messages
1,036
Location
Travelers Rest, SC
I appreciate the comments. The TV is pretty impressive and does look pretty convincing with art displayed. The matte finish on the screen has zero glare which I like a lot. I still need to play with it but I was a little discouraged that you need a Samsung art subscription to access anything good.

I think the frame color will grow on me. Our house has a mix of several woods and tones so it doesn’t really stand out. The TV height was set for the best viewing angle in bed vs. aesthetics, but I agree a few inches lower would be ideal.

Keen eye catching the corners where I cheated. Haha I considered chiseling them but I already had enough hours into this and took the lazy route. If this wasn’t hidden inside a cabinet or had it been hardwood I would have forced myself to do it.
 
Last edited:
OP
Q

quadrcr87

Well-known member
Joined
Jul 5, 2013
Messages
1,036
Location
Travelers Rest, SC
Once the BOSS started settling into her new drawer, we quickly realized she needed some better organization. She had a lot of fun deciding what and how she wanted things stored in her main makeup drawer. Once we had a rough plan I fired up "her" Bambu printer.

Day 1 was a disaster with the poorly fitting old trays. They did give me a pretty good idea of how she wanted it setup.

IMG_9858.jpeg

The 12x8.75" drawers box gave us a 5x7 Gridfinity base to build on. In retrospect, I should have designed the drawers with the 42mm grid spacing in mind. I got very lucky and only had to add a 5mm border to fit the drawer. It's always good to avoid 1/2 grids as they are pretty unstable.


IMG_9876.jpeg

She was very happy with the end result. We left a lot of the bins pretty generic, so she has flexibility to change products. I was impressed with how much additional space we gained storing a lot of items vertical and double stacking the brush trays.

IMG_9877.jpeg

Thanks for following along!
 
Last edited:
OP
Q

quadrcr87

Well-known member
Joined
Jul 5, 2013
Messages
1,036
Location
Travelers Rest, SC
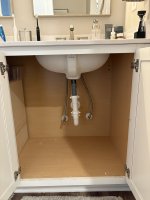
Back at it again for vanity #2. The plumbing obstacles were a little different this time. At first it looked easier but to optimize space it actually made more sense to notch the corner of the right cabinet box.

The plumbing layout was a lot neater on my side of the vanity.

IMG_9889.jpeg

I made sure to maintain access to the water shutoffs with a quick drawer removal.
IMG_9892.jpeg

Very odd, shaped profile on the back of the boxes. I went with stretchers vs. solid backs this time. It wasted less of that precious Baltic birch and I don't think the strength was needed.

IMG_9895.jpeg

I got the boxes sanded and a coat of finish yesterday. Still cutting and milling all the drawer pieces. The drawer layout will be 2 deep on the left side and 3 almost equal drawers on the right. The two on the top right will have about a 3"x3" corner notch to clear. I am also waiting for some 10" drawer slides to come in. Apparently, they are a rarity. The only local supplier that carries them is Rockler and they were sold out. The jungle store should deliver today.

I have been really happy with the ETS sander and Rockler quick connect hose combo. I bought the hose to adapt easier with my portable HF dust collector. With a small garage and no dedicated dust collection, I am swapping this hose tool to tool constantly. I don't know if the Festool is really worth the premium price for my use, but it has way less vibration than my old Dewalt 5" had.

IMG_9894.jpeg

Thanks for following along!
 
Last edited:
OP
Q

quadrcr87

Well-known member
Joined
Jul 5, 2013
Messages
1,036
Location
Travelers Rest, SC
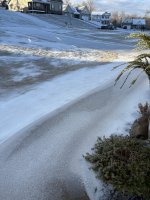
Things have gotten a little slippery in SC. Temps dropped and freezing rain over the past couple of days. I stocked up a little bit and had the generator ready to go but fortunately we have not needed it. My biggest concern was a power outage since our heat pump is electric and it's going down to 10* tonight. My plan is to use the propane fireplace and move an electric space heater around the house as needed but let's hope it doesn't come to that.

Conditions this morning 1/4" ice:
IMG_9930.jpeg

IMG_9931.jpeg

The incoming weather put a short deadline on finishing the bathroom vanity. At a minimum I needed to finish all the cutting and sanding in order to clear a path to park our cars inside. I was able to accomplish that around 4pm Saturday and moved operations into our guest room/ the BOSS' office. I was also surprised how well the water-based poly applied and cured in 45* temps.

IMG_9921.jpeg

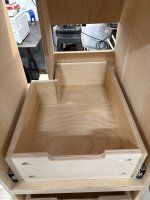
A closeup of the odd shaped drawers. Due to the shape, I was only able to use 10" slides making it hard to take full advantage of the 16" depth.

IMG_9920.jpeg

It was kind of nice installing the slides and drawer faces in the comfort of the home. I usually use the playing card trick for spacing but I decided to try some handi-shims. They worked pretty well and I was very happy to find that I had an even 3/32" spacing all around. I thought the 1/8" gap on the BOSS' cabinet looked a little too wide so I made some adjustments on mine.

IMG_9924.jpeg

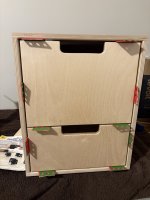
A matching pair. I also remembered to grain match the draw faces from a single sheet of plywood this time.

IMG_9926.jpeg

Here you can see the limitations of the 10" slide. I'll put some less used items in the back to forget about later.
IMG_9928.jpeg

The 10" deep drawers on the left will solve a lot of storage issues for us.

IMG_9929.jpeg

Stay warm my friends and Thanks for following along!
 
Last edited:

fouckhest

Well-known member
Joined
Jul 24, 2013
Messages
1,866
Location
Greer, SC
Those look great!

Hope you guys are staying warm and safe over there, plenty of ice in Greer, going to be slick the next couple days.
 
To avoid these ads, REGISTER NOW!
Top Bottom