To avoid these ads, REGISTER NOW!

Sawmill

OP
R

RivennHewn

Well-known member
Joined
Jun 4, 2011
Messages
10,357
Location
PNW
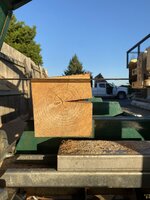
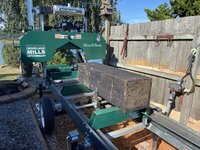
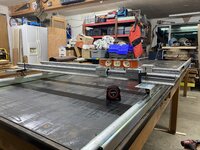
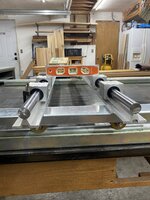
Cutting up that last floater I pulled in.

Looks/smells like Cedar.

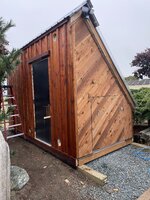
Going to go board and batten on the backside of the kiln.

Cut these 1” x 10”. Should have enough to complete it.


Finishing up the kiln was on my summer to-do list. Now that summer is pretty much over, I guess I’ll get started ☹️
 

Attachments

  • IMG_8237.jpeg
    IMG_8237.jpeg
    1.4 MB · Views: 191
  • IMG_8242.jpeg
    IMG_8242.jpeg
    1.3 MB · Views: 125
To avoid these ads, REGISTER NOW!
OP
R

RivennHewn

Well-known member
Joined
Jun 4, 2011
Messages
10,357
Location
PNW
Made a new contact with a cabinet maker/finisher/boat builder today.

Had just taken down a Holly tree. Brought it home, and I’m excited to see what’s inside🤑

Also spent some time trueing up some dried cants that would have made Chubby Checker blush
 

Attachments

  • IMG_8342.jpeg
    IMG_8342.jpeg
    1.2 MB · Views: 66
  • IMG_8339.jpeg
    IMG_8339.jpeg
    779.2 KB · Views: 55
  • IMG_8338.jpeg
    IMG_8338.jpeg
    852.2 KB · Views: 99

PugetDude

ALLIANCE MEMBER
Joined
Mar 13, 2013
Messages
22,271
Location
Superstition Mountains, AZ
Made a new contact with a cabinet maker/finisher/boat builder today.

Had just taken down a Holly tree. Brought it home, and I’m excited to see what’s inside🤑

Also spent some time trueing up some dried cants that would have made Chubby Checker blush
That holly could be worth some serious money.
Wooden boat and custom furniture builders use it for stringing and inlays. It's about the whitest wood there is and it doesn't darken under most finished.

Might check with the Northwest School of Wooden Boat building over in Port Hadlock or the boatbuilding cooperative in Port Townsend.
 
OP
R

RivennHewn

Well-known member
Joined
Jun 4, 2011
Messages
10,357
Location
PNW
That holly could be worth some serious money.
Wooden boat and custom furniture builders use it for stringing and inlays. It's about the whitest wood there is and it doesn't darken under most finished.

Might check with the Northwest School of Wooden Boat building over in Port Hadlock or the boatbuilding cooperative in Port Townsend.
Holly is great to work with, and turns beautifully on a lathe. Not sure how it is to dry, but I’m about to find out 😜
 
OP
R

RivennHewn

Well-known member
Joined
Jun 4, 2011
Messages
10,357
Location
PNW
Told myself I wouldn’t cut anymore treated Material.

Now, I’m telling myself that again. Oh well🤔


Nice little gift from the channel gods, wrapped up in nastiness.

Should make for an interesting project, somehow/somewhere.

Time for a thorough cleaning of the mill and site😵‍💫
 

Attachments

  • IMG_8545.jpeg
    IMG_8545.jpeg
    1.3 MB · Views: 87
  • IMG_8546.jpeg
    IMG_8546.jpeg
    1.2 MB · Views: 87
  • IMG_8547.jpeg
    IMG_8547.jpeg
    1.5 MB · Views: 103

LXCam

ALLIANCE MEMBER
Joined
Apr 23, 2013
Messages
19,081
Location
AZ
That’s one cool chunk of nastiness that’ll sure make for something unique. How big is that piece?
 

LXCam

ALLIANCE MEMBER
Joined
Apr 23, 2013
Messages
19,081
Location
AZ
That’s one cool chunk of nastiness that’ll sure make for something unique. How big is that piece?
 
OP
R

RivennHewn

Well-known member
Joined
Jun 4, 2011
Messages
10,357
Location
PNW
That’s one cool chunk of nastiness that’ll sure make for something unique. How big is that piece?
10” x 10”x 4’

I’m trying to decide what kind of finish to put on it, that will cure over the coating that’s left on/in it.
 

RTM

Well-known member
Joined
May 13, 2019
Messages
13,071
Location
SF Bay Area
If used as a bench, maybe use that as the base, or bases by cutting it, and put a pants friendly top board on it. Rumor is you have a few options.
 
OP
R

RivennHewn

Well-known member
Joined
Jun 4, 2011
Messages
10,357
Location
PNW
Kick’d some **** on siding the the backside of the kiln today. The only challenge was getting the vents centered between the battens.

Only a few more battens to install.
 

Attachments

  • IMG_8569.jpeg
    IMG_8569.jpeg
    1,013.5 KB · Views: 56
  • IMG_8568.jpeg
    IMG_8568.jpeg
    970 KB · Views: 48
  • IMG_8570.jpeg
    IMG_8570.jpeg
    1.3 MB · Views: 48
OP
R

RivennHewn

Well-known member
Joined
Jun 4, 2011
Messages
10,357
Location
PNW
Forecast looked favorable, but forecasters lie.

Still, I got my siding stained this afternoon, fighting the rain and wind.

On another note, I took the temp/RH sensors into the garage while I was siding. Been in there a couple days.

While the temps read the same, the RH is 20+ percent off. I guess I know I can’t trust these units. Time to research for better quality sensors 😕
 

Attachments

  • IMG_8590.jpeg
    IMG_8590.jpeg
    1.2 MB · Views: 33
  • IMG_8589.jpeg
    IMG_8589.jpeg
    1.1 MB · Views: 64
OP
R

RivennHewn

Well-known member
Joined
Jun 4, 2011
Messages
10,357
Location
PNW
Step one: obtain free marine biology lab tables.

Step two: clean, prep, level tables.

Step three: secure tables together.
 

Attachments

  • IMG_8627.jpeg
    IMG_8627.jpeg
    1 MB · Views: 62
To avoid these ads, REGISTER NOW!
OP
R

RivennHewn

Well-known member
Joined
Jun 4, 2011
Messages
10,357
Location
PNW
Got my new temp sensors for the kiln.

The display unit stays in the garage, and remote sensors inside and outside the kiln.
 

Attachments

  • IMG_8631.jpeg
    IMG_8631.jpeg
    744.1 KB · Views: 40
  • IMG_8632.jpeg
    IMG_8632.jpeg
    1.1 MB · Views: 23
  • IMG_8633.jpeg
    IMG_8633.jpeg
    718.8 KB · Views: 44
OP
R

RivennHewn

Well-known member
Joined
Jun 4, 2011
Messages
10,357
Location
PNW
More toys from the mailman.

After assessing the tables a bit more, they needed some work. A few failing joints, a bit out of square, and signs that the biology students do know how to table dance😜

Nothing some clamps and screws can’t fix.
 

Attachments

  • IMG_8637.jpeg
    IMG_8637.jpeg
    798.8 KB · Views: 45
  • IMG_8638.jpeg
    IMG_8638.jpeg
    816.1 KB · Views: 47
  • IMG_8639.jpeg
    IMG_8639.jpeg
    984.2 KB · Views: 61

glennm

Well-known member
Joined
Jul 29, 2009
Messages
207
I like the look of those rails. I have been thinking about a router sled for a while now. I have been getting by with my planer and drum sander for most tasks. Btw, thermoworks rocks!

This is a small table I made from a downed ash that we milled. I like using the rough stuff
 

Attachments

  • IMG_0620.jpeg
    IMG_0620.jpeg
    857.4 KB · Views: 48

Toolfool

Well-known member
Joined
Aug 22, 2011
Messages
4,980
Location
Tallahassee, FL
Might need to buy a bigger router🤔
Look on ebay for one of these US Made #75182 Porter Cables. 3-1/4HP, 5 speed, 1/2" chuck beast. It's what I use in my router table. I had a NIB backup unit which I, unfortunately , sold when I was leaving WA. I got double what I paid for it.
I also sold a set of extruded rails with a router sled mounted on ball bearing guides. :dunno:

20231014_154514.jpg20231014_154535.jpg20231014_154522.jpg
 
OP
R

RivennHewn

Well-known member
Joined
Jun 4, 2011
Messages
10,357
Location
PNW
I like the look of those rails. I have been thinking about a router sled for a while now. I have been getting by with my planer and drum sander for most tasks. Btw, thermoworks rocks!

This is a small table I made from a downed ash that we milled. I like using the rough stuff
Great looking table!

I pilfered some unistrut. 3/4” EMT drops nicely into it, yet stays high enough for the rollers to run. I’ll do threaded inserts to hold the strut down, and just lay the conduit in.

This will make for easy removal, for using the table for other task.

Next task is the carriage for the router/dust collection.
 

Attachments

  • IMG_8646.jpeg
    IMG_8646.jpeg
    571.6 KB · Views: 30
  • IMG_8642.jpeg
    IMG_8642.jpeg
    772.4 KB · Views: 34
OP
R

RivennHewn

Well-known member
Joined
Jun 4, 2011
Messages
10,357
Location
PNW
Look on ebay for one of these US Made #75182 Porter Cables. 3-1/4HP, 5 speed, 1/2" chuck beast. It's what I use in my router table. I had a NIB backup unit which I, unfortunately , sold when I was leaving WA. I got double what I paid for it.
I also sold a set of extruded rails with a router sled mounted on ball bearing guides. :dunno:

20231014_154514.jpg20231014_154535.jpg20231014_154522.jpg
I’m going to drag my 3-1/4 horse Bosch out of retirement.
 
OP
R

RivennHewn

Well-known member
Joined
Jun 4, 2011
Messages
10,357
Location
PNW
Lee Valley makes a router gantry setup, uses conduit for the rails, a low budget entry into the game.

I love Lee Valley/Veritas stuff, and considered it.

But I’m cheap, and trying to use extra materials off job sites.

So far I’m into it just over $200 for the rails, rollers, and 3” carbide insert bit.
 

RTM

Well-known member
Joined
May 13, 2019
Messages
13,071
Location
SF Bay Area
But I’m cheap, and trying to use extra materials off job sites.

So far I’m into it just over $200 for the rails, rollers, and 3” carbide insert bit.
Those linear slide things are usually stupid expensive, nice get if $200 includes them.
 
OP
R

RivennHewn

Well-known member
Joined
Jun 4, 2011
Messages
10,357
Location
PNW
Still figuring it out.

Looking for that sweet spot for bit height.

Router only has about 3” of trave vertically, so setting the carriage at the right height to maximize versatility it crucial.
 

Attachments

  • IMG_8658.jpeg
    IMG_8658.jpeg
    883.8 KB · Views: 34
  • IMG_8660.jpeg
    IMG_8660.jpeg
    896.8 KB · Views: 35
  • IMG_8661.jpeg
    IMG_8661.jpeg
    758.3 KB · Views: 43

Toolfool

Well-known member
Joined
Aug 22, 2011
Messages
4,980
Location
Tallahassee, FL
Still figuring it out.

Looking for that sweet spot for bit height.

Router only has about 3” of trave vertically, so setting the carriage at the right height to maximize versatility it crucial.
You'll most likely be shimming the 'wobble' out of your first side, so you can shim the whole slab up as needed.
 
To avoid these ads, REGISTER NOW!
Top Bottom