wrigh003
Well-known member
Still enjoying this. Your attention to detail is fantastic.

Your very thorough in you documentation it's neat to follow as you build. Congratulations on the progress, I bet your excited that it's looking so great.


This build is awesome!
Are you an experienced welder or did you learn welding for this task?
If you want to finish before winter you may consider (and I am not suggesting that you actually do it) taking a vacation week to dedicate to the build. I did this at the start of my garage and it was one of the most memorable vacations I've had.
Lupinsea,
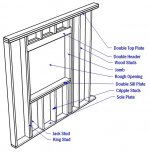
While I like the design of your shed, your framing technique could use a little help.
Your door & window framing is not done correctly. Look at the picture below to follow my advice.
Your jack studs are not located at the ends of the sill. Adding more jacks studs will fix this.
The door jambs do not support the widow sill above the door. To fix this, you will cut the door jamb where the top of the door frame is. Replace the top of the door frame with a 2x4 that is 3 inches longer, add a short block to support a new window sill that is also 3 inches longer. Note: the existing king stud should not be modified by this procedure.
Good Luck


This is really nice! Having recent experience with bitumen infused felt paper and window flashing I had to smile at your description. You should be very proud of this project. You've done a wonderful job and everyone here is anxious to see your updates.
What are you planning for an encore? Is there a new garage in your future?


I don't know if I've ever lived in any structure as well thought-out or constructed as those two sheds.
Just read all 8 pages. Thank God for photos! Super awesome job on planning, pre-planning, details, drawings and for doing 99.9% of it yourself! Wow!
Did the $9k~ include the patio slab? Curious about the costs. Kind of shocked that you did not choose architecturals rather than 3 tabs. At least it wasn't copper.
Do you plan any gutters, rain barrels, wind mills or solar panels? I'm fairly embarassed of my homebuilt shed now. I think I'm going to start drinking. Thanks for the imspiration though, really.
I don't know if I've ever lived in any structure as well thought-out or constructed as those two sheds.