Old Man Roger
Well-known member
Dammit Bob, you wait till I leave south Florida, then you decide to donate tools?


Great idea. The two arms give access. Bike is only probably around 400#. The clip on casters are the cherry on top. Good job. Wonder if this would work for my elephant (Valkyrie Interstate)As stated, with it bolted it's very stable. It will pick fine without the bolts, in fact, I tend to pick it up to working height so I don't have to bend over to tighten the bolts. The machinist at work made me donuts out of solid bar stock that are welded to the underside, machined for the bolt diameter and the OD is the same as my lift adapters. These would essentially have to roll out of the lift arms for this to tip over and that's not happening. I have used pipe stands under the non-supported corner which keeps the access I want and relieves any strain on the hoist arm if I'm doing work that may cause it.


How did this project end up? I need a new Y pipe for my GMT 900 3/4 suburban and I’m not having luck finding one. If I’m being honest I’d like to think I could tackle making it but it’s most likely way outside of my ability!Not bad for the first try haha. It's not as steep or squared as the original but it'll do.
This is the beginning of a 07/14 GMT900 platform y-pipe.
It's weird because the driver's flange is a fixed flange, and the passenger is not. This is the passenger side.
It's also odd to have two different kinds of flanges with different bolt patterns.
It'll be fun to make though.
In short, it ended up in the scrap bin.How did this project end up? I need a new Y pipe for my GMT 900 3/4 suburban and I’m not having luck finding one. If I’m being honest I’d like to think I could tackle making it but it’s most likely way outside of my ability!
@sqznby, I don't use the handles on most of my grinders but I can't bring myself to throw them away. Threaded holes in a piece of steel strap and screwed the handles in so they don't roll around in the drawer. Of course the day I finished making the strap, found another handle.

@mark-NJ, you're not being a jerk or troll and you shouldn't get it. I was going to throw them all away when I remembered I did use one every once in a while when grinding on something important. The extra four handles are for the buffers in the garage. My sane brain hemisphere should spend a minute picking the best one or two and tossing the rest. The easily distracted insane brain hemisphere focused long enough to gather all the handles together in one place. If the squirrels sleep for a few minutes I may actually thin the herd.Honest question...not trying to be a jerk or troll:
Why keep the all of the handles? The storage idea is cool, but why? Like you, I rarely need the handle (I have 4 grinders)...but on the INfrequent times that I do use a (single) handle, I do so. Which is to say "I need one". The day will never come that all my grinders all need handles all at once. Since they're all the same size & thread, I really figure I only need one handle. So I kept two (just in case one breaker) and pitched the other 2.
In the photo I count 9 handles & 5 grinders. I don't' "get it".

I've saved my cheapaband case, too. I keep all the hardware you swap on n off to switch from portable, to vertical, to chop, inside it.I'm guilty of it also. I even have the belt clips I removed from my Milwaukee drills/impacts. The one I'd love to get rid of, but I can't come to terms with, is the big blow molded case my port-a-band came in. One day, I'll find a use for it.
Same!I've saved my cheapaband case, too. I keep all the hardware you swap on n off to switch from portable, to vertical, to chop, inside it.


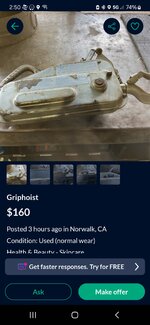
I've wanted one for a long time, but they're crazy expensive. Even used and beat up they show up on ebay for between 500 and 1,000. This one popped up on OfferUp for $160 so I figured I would roll the dice. It was used by a pipeline contractor, and you could tell it had been down in a trench. When I opened it up, it definitely has some mud in it where it had sucked a muddy cable in the inlet, but when I got it all cleaned up, it was still in amazingly good shape with almost no wear. I regreased everything and reassembled and it's as smooth as butter.Used those griphoists one summer when I worked construction, moving a floating dredge around.
Very useful once you get the hang of it.
I have no use for that big of a step reamer, but I want one..lolThe worst part of this project actually turned out to be the welding but I figured I'd throw it on here anyway. I picked up a Tirfor/Griphoist cheap on Craigslist but it didn't come with a handle. Tractel sells them new for $300 but that's way more than I paid for the hoist, so I decided to cobble something together.
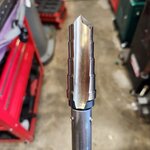
A quick test fit with some 1-in black iron pipe I had showed the ID was perfect to fit over the power lever. I could have just picked up a 48 inch stick and been good but I decided to see if I could make it collapsible/telescoping like the factory handle. I knew from past projects that three quarter inch pipe would fit inside of the 1 in if I could get rid of the weld seam. I have a step reamer that was perfect to take out the weld but I had no way to stick it into the pipe. So, like many projects, this began a sub-project to fab an extender.
I started with a piece of 3/4" inch bar from my scrap bin . I drilled a 3/8" hole on the end and then drilled and tapped it for three set screws 120 degrees from one another since the reamer has three Flats on the arbor. I then turned the end down to 1/2" to fit my drill chuck. With plenty of thread cutting oil, removing the weld seam was almost uneventful once the tool was made.
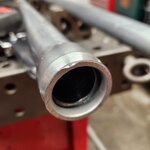
I toyed with several ideas for how to lock the extendable piece of the handle in place and it finally dawned on me to use a compression fitting. I cut it in half on the bandsaw and it just so happened that the ID of the middle part of the compression fitting was a perfect slip fit over the OD of the 1-in pipe. So now it was time to weld. Unfortunately I apparently did not remove all of the galvanizing because it spit and spattered something fierce. In addition to making for some ugly welds, I probably inhaled some less than savory fumes.
I tested the fit of the sliding handle after welding the compression fitting on and the rubber insert was so grippy it was very difficult to slide the handle in and out. After noodling on how to remove some of the little rubber piece, I decided to make another one out of something not quite so grippy. I had some 1" PVC handy so I replicated the size and shape of the little rubber grommet (including the chamfer) and then cut through one side so it could shrink when compressed. It worked like a charm and the handle slides easily but locks down solid when the nut is tightened.
The handle is retained on the power lever by a little pin. There's supposed to be a flange with a notch in it so the handle can slide on in only one orientation but otherwise won't come off. I cut the threads off the piece of the compression fitting I had welded on but left the little flange there. I notched it to match the pin and it holds perfectly.
I still need to touch up the welded spots with some galvanizing spray but it's otherwise done and I'm very happy with it. It collapses down to the same length as the Hoist if I want to put them both in a small bag or box but it extends long enough to provide plenty of leverage.


Time to make a thing for the lawnmower !!
Om non nom munch munch munch. Sure do like this bandsaw.
Measure, cut, measure, cuss, cut a new piece and repeat until it looked like this.
Lower chunk tacked together. Now to attach to the top point ….
That’d be neat but it’s too short and too long …..
Cut and ground pieces until they were just right. Figured I’d try out my new Irwin welding clamps.
Tacked together. I honestly thought I’d hate this round bar loop more but I sort of like it. It was simple and I had it laying around so I figured I’d start with it. Enough for Easter Sunday, time to go do family things.
It sure could. Mostly I wanted to play with some angle cuts after messing with a new fence on my bandsaw. I also figured having the pivot point closer to the tractor wouldn’t be a bad thing, even if it is only a little closer. I’ll be building at least one more for my Pops and he wants his straight as “that looks goofy” lol.Why can't the lower tube be straight?
I also figured having the pivot point closer to the tractor wouldn’t be a bad thing, even if it is only a little closer.
Big trailers and little tractors is a theme here as wellI've gotten real lazy and figured out how to move trailers without taking the 3pt blade off my 430 Case. Yesterday I was moving a bigger trailer, let the clutch out and did a little wheelie. I was like, yeah the attachment point is a long ways back there.


Did you sleeve the top of the hoop to be thicker or what is the reasoning for the cuts/welds ?The weldering part is finished, mostly. Gotta go after it with a grinder and some green paint now to make it pop. May also put another tube above the other two to have another place to stick something weather it’s for storage or to use it there.
That’s a solid chunk of round bar all the way around. If you can follow the mental picture train …….Did you sleeve the top of the hoop to be thicker or what is the reasoning for the cuts/welds ?
As promised after getting delayed with painting. As far as splits there are none LOL. This is wood that has followed me for 3 years from previous house as we never run the firepit.Pics don't count until it's in place and loaded. We will critique the size and uniformity of your splits.

.JPG")
looks great! It's extremely satisfying to make things that you can look at and use every dayI'm not a great welder but this came out ok.
")


Livestock shelters attempting to sell locally. Right now I got 10 bacon seeds in that particular one. Thought about pulling a PR move and parking my ATV on top to show strength of them. Might still do that, BTW the ATV weighs 1100 plus lbs.
Heck yeah buddy, nice.
Livestock shelters attempting to sell locally. Right now I got 10 bacon seeds in that particular one. Thought about pulling a PR move and parking my ATV on top to show strength of them. Might still do that, BTW the ATV weighs 1100 plus lbs.
Probably a rollerHow are you bending the hoops?
Nice license plate.
Thanks, not many read the license plate through and when they do you can see it sink in for a minute before catching it, fun to watch. Yeah I got a Hulk roller here which is what built the ribs on the pole barndominium behind it.How are you bending the hoops?
Nice license plate.
Thanks!Heck yeah buddy, nice.
Probably a roller
Hah noticed to

.JPG")
.JPG")
.JPG")