55shoebox, do you have a pic of yours and the cart? Sounds good, the plans are very well drawn out, hoping I can get to it this winter, then make some stuff for my Jeep. What size dies have you used? I would probably never use any larger than 1 3/4"

You are using an out of date browser. It may not display this or other websites correctly.
You should upgrade or use an alternative browser.
You should upgrade or use an alternative browser.
Show us your welding projects
- Thread starter neonnblack
- Start date
A**holes Garage
Banned
My dad and I were bored a few years back and decided to make a bbq grill. It went from a simple deal to an indirect heat rotissery style deal that needed a trailer built for it aswell. There are 4 stainless steel racks that are 4' wide by 1' deep. Everything was built except for the wheels/tires, axle, fenders and motor.


Great fabrication! And perfect size!
ezover
Well-known member
I'm looking for two projects that i thought were posted in this thread but i did not see them after looking at all the pages.
one was a grinder stand made from a truck rim and the other was a stand for holding 10 +- sections of steel stock.
anyone remember the name of that thread?
one was a grinder stand made from a truck rim and the other was a stand for holding 10 +- sections of steel stock.
anyone remember the name of that thread?
I'm looking for two projects that i thought were posted in this thread but i did not see them after looking at all the pages.
one was a grinder stand made from a truck rim and the other was a stand for holding 10 +- sections of steel stock.
anyone remember the name of that thread?
http://www.garagejournal.com/forum/showpost.php?p=1084818&postcount=155
This is in the ''built it myself tool'' thread.
ezover
Well-known member
thank you omr
NASTYZEN
Well-known member
Now that's a serious grill. You did a fabulous job on it.
The mobile inside is pretty clever too.
The mobile inside is pretty clever too.
55shoebox
Member
I will get some pics of the bender tomorrow - i have 1.25" 1.5" and 1.625" dies. I built the bender and a buddy bought the dies worked out good for both of us.
IONH
Well-known member
Did you guys buy the plans on got trikes for the tubing bender?
Thanks guys, it was a fun little project. Drew it up on a coaster at the bar one night. We have done 48 pork steaks at one time, and I did over 100 hamburgers and about 6 pack of hot dogs as well.
It is for the 1 rpm motor that turns the rotissery. The box has an on/off switch and a plug in to run a radio or light.
That looks great b dub. What is the cord for in the 2nd to last picture?
It is for the 1 rpm motor that turns the rotissery. The box has an on/off switch and a plug in to run a radio or light.
1984Datsun
Well-known member
I finished it a long time ago (it was a two day project, given I had to get other stuff done around the house as well) Just took me a while before I remembered that I needed to post it here...
Here is the completed cart... legal size file cabinet holds all of the **** that has to do with welding...

It's fun building stuff...
She rolls around a hell of a lot easier than that old coffee cart did with the Hobart and welding stuff on it, even though this new cart with everything on it weighs much more...
Have yet to paint it... I have a minor issue to solve first with the rear caster mounting points, and then figure out where to put a MIG gun holder and other accessories.
My cable holders are rebar stuck into the square tubes... works very well, and you can push the rebar into the tube when you're using the welder so you or someone else don't get impaled/shredded by some hook if they trip or fall over that pile of metal for the project on the floor...
Watch for my next project... hopefully I'll be able to locate some metal for it soon.
Here is the completed cart... legal size file cabinet holds all of the **** that has to do with welding...
It's fun building stuff...
She rolls around a hell of a lot easier than that old coffee cart did with the Hobart and welding stuff on it, even though this new cart with everything on it weighs much more...
Have yet to paint it... I have a minor issue to solve first with the rear caster mounting points, and then figure out where to put a MIG gun holder and other accessories.
My cable holders are rebar stuck into the square tubes... works very well, and you can push the rebar into the tube when you're using the welder so you or someone else don't get impaled/shredded by some hook if they trip or fall over that pile of metal for the project on the floor...
Watch for my next project... hopefully I'll be able to locate some metal for it soon.
Attachments

Last edited:
hunter1151
Well-known member
**** dude it took me like 15 minutes to read your post..........I kept losing my place!!!
ZTFab
Well-known member
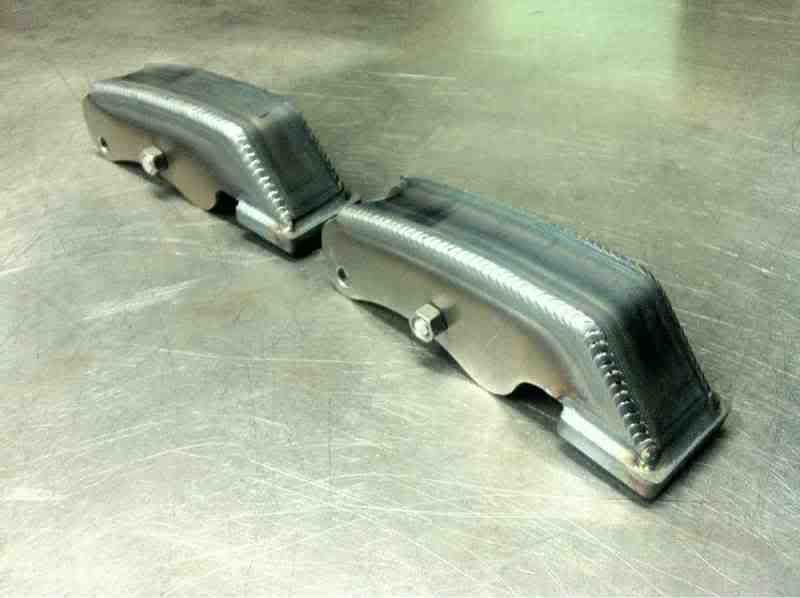
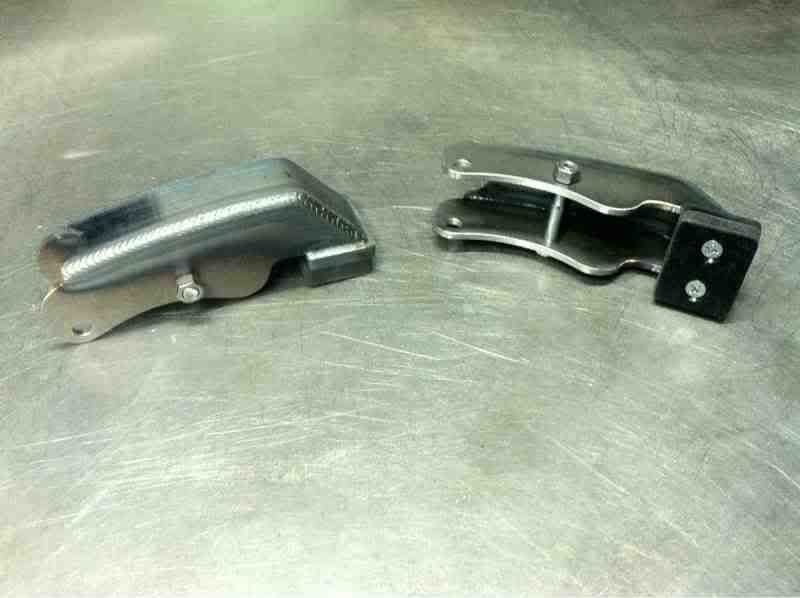
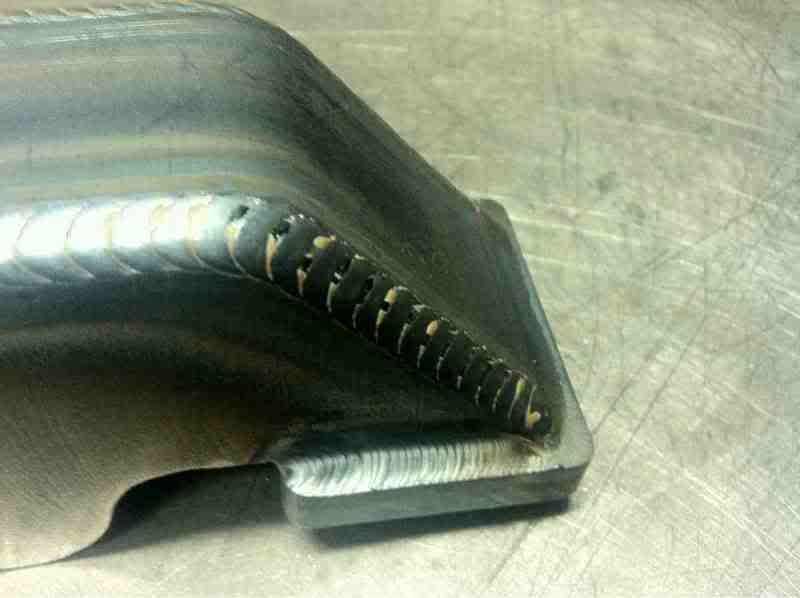
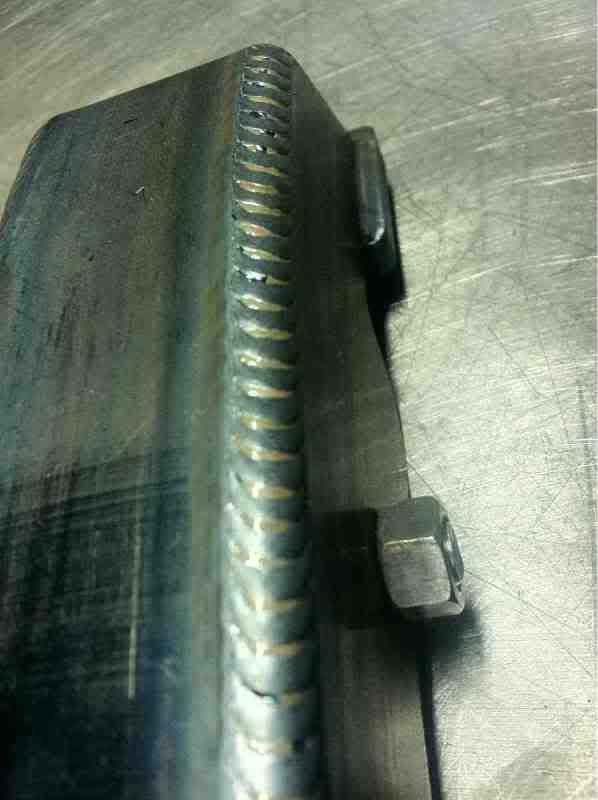
I built these today for an older style VW sand car that needed bump stops.
3/16" cold rolled steel cut on my bandsaw with a 3/8" cold rolled bump stop pad and 1/2" UHMW bump stop.
I TIG welded the pad to the 3/16" and MIG welded the rest.

3/16" cold rolled steel cut on my bandsaw with a 3/8" cold rolled bump stop pad and 1/2" UHMW bump stop.
I TIG welded the pad to the 3/16" and MIG welded the rest.
muibubbles
Well-known member
robot......
coolant overflow tank i made.

disregard **** welds. material was dirty as **** and just did not care.


then we turned it down

then a ghetto mount on the motor, was gonna re do this. but im not even running it anymore.

also made an oil catch can similar

disregard **** welds. material was dirty as **** and just did not care.
then we turned it down
then a ghetto mount on the motor, was gonna re do this. but im not even running it anymore.
also made an oil catch can similar
Last edited:
decided to make a rear jack point also for the track car. with low kits and constantly changing tires in drifting it gets to be a pain backing the car up on boards and what not.
cut out a section on the factory rear bumper support to mount it at

quick simple 2 minute job

welded on

clearance, cant even see it when car is on on ground


ancient floor jack is ancient and weighs a ton
cut out a section on the factory rear bumper support to mount it at
quick simple 2 minute job
welded on
clearance, cant even see it when car is on on ground
ancient floor jack is ancient and weighs a ton
IONH
Well-known member
decided to make a rear jack point also for the track car. with low kits and constantly changing tires in drifting it gets to be a pain backing the car up on boards and what not.
I love that idea and may have to steal it for myself! The only change I'd consider is having larger square channel on the body to accept the jack point as a receiver. This way, you don't have to leave anything exposed and it would be simply to just slide the part in when you wanted it.
ZTFab
Well-known member
robot......
Domo arigato...

as always ZT, awesome work!! Thanks for providing yet more incentive for guys like me to strive for
No problem, thanks.

i noticed there is not even a spec of buck shot on ztfabs's short arc work, and it seems there is no grinding marks. using d-spat? or just have your machine setup that perfect?
Buck shot? Am I hunting?

Nope, no post weld grinding or anti-spatter spray. Having the machine set correctly eliminates the spatter.
hunter1151
Well-known member
How the heck do you keep the spatter out of the equation with machine settings??
ZTFab
Well-known member
How the heck do you keep the spatter out of the equation with machine settings??
Proper voltage to wire speed settings/ratios.... along with stick-out length, shielding gas coverage, and hand speed.
It also helps to weld on clean materials and use a high silicon content wire (I use ER70S-6...the -6 indicating a higher silicon content than -2 or -3).
I've said it before and I'll say it again....90% of a good weld is all in the prep. You wouldn't paint a dirty car so why try to weld a dirty piece of metal?
ZTFab
Well-known member
...and I despise anti-spatter sprays or using things wd-40 on my welds. I know a lot of people do it but I don't see the need to use that goop on a weldment when learning how to tune the machine can eliminate the problem.
hmmm, is there any "set" approach for machine settings that you could give us as a guide, somewhere to start. Now that you mention it, i do remember getting less spatter at times, now i understand why......again, thanks for sharing your knowledge
hunter1151
Well-known member
What is the best prep for welding? Sanding or scotch brite pads on a die grinder, like a Dotco??
glsmaverick
Well-known member
I TIG welded the pad to the 3/16" and MIG welded the rest.
So I just reread this and you TIG welded the base plate to the bend and then MIG welded the bend all together? I consider myself a decent MIG welder and I have never laid down a bead that looks TIG'd with a MIG welder. Row of nickels with a MIG? I need to look at your welder parameters.
Nice!
NASTYZEN
Well-known member
Dam it ZT! You must be lacking somewhere else in life, because God gave you way to much welding skills all in one place.
")
I'm a .035'' guy, but looking at what you can do with your mig inspired me.
I converted one of my migs over to .023'' wire this week. New rollers,guide tube , contact tip and gas nozzle. $$$ all your fault..
I plan on practicing with it a bit over the holidays. If I can get to at least half of what you can do ,I'll be satisfied.

ZTFab
Well-known member
hmmm, is there any "set" approach for machine settings that you could give us as a guide, somewhere to start. Now that you mention it, i do remember getting less spatter at times, now i understand why......again, thanks for sharing your knowledge
This just takes practice.
Start with clean material, good wire, and good (or new) contact tips.
Typically too much voltage and not enough wire speed will cause spatter but a lot also has to do with your hand speed. For example, if you have the machine "set" for a given voltage and inches-per-minute of wire but your hand speed is too fast or slow for the given settings, you'll have problems.
Welding is a lot like learning how to swing a baseball bat or a golf club. It takes muscle memory, concentration, and knowing where to look to get consistent results.
I believe that every person has a "signature" to their welding...just as athletes have a certain swing or musicians have a certain tone. Some people may like to weld fast, some slow. You'll have to practice with your machine to learn the setting that you are naturally comfortable with and adjust them to suit you.
Learning to watch the puddle and listening to the arc while welding is the best thing you can do to help. Once you see what the puddle is doing, listen to the arc for consistency. Adjust your machine to get the best results and over time you'll start to automatically make fine adjustments to your hand speed and position to keep the puddle where you want it and the arc consistent.
ZTFab
Well-known member
What is the best prep for welding? Sanding or scotch brite pads on a die grinder, like a Dotco??
I clean all of my material with acetone at the least...and I typically only work with cold rolled steels or P&O steels (Pickled and Oiled to remove the mill scale)
When making tabs or brackets I will usually face them on my disc sander and run the edges on my Burr King to clean them up.
Scotchbrite would work and I even have some belts for my sanders that I've used but most of the time I save those for graining stainless parts or deburring machined parts.
Get the oils, dirt, and grime off of the steel and if it has a mill scale layer...get rid of it completely anywhere you will be welding.
ZTFab
Well-known member
So I just reread this and you TIG welded the base plate to the bend and then MIG welded the bend all together? I consider myself a decent MIG welder and I have never laid down a bead that looks TIG'd with a MIG welder. Row of nickels with a MIG? I need to look at your welder parameters.
Nice!
Thanks!
The MIG portion was 3/16" material, open corner joint, no root gap, .030" ER70S-6, 20cfh of C25, Voltage tap "B" and 180 ipm wfs on my Lincoln Power MIG 200.
ZTFab
Well-known member
Dam it ZT! You must be lacking somewhere else in life, because God gave you way to much welding skills all in one place.
I'm a .035'' guy, but looking at what you can do with your mig inspired me.
I converted one of my migs over to .023'' wire this week. New rollers,guide tube , contact tip and gas nozzle. $$$ all your fault..
I plan on practicing with it a bit over the holidays. If I can get to at least half of what you can do ,I'll be satisfied.
Well...the wife has never complained.
Let me know if you have any questions.
...I see in the "tubular thread that you're hiring!


IMCA38
Well-known member
Here are some of my creations.
A 3 point hitch trailer mover.
A 3 point dethatcher, this was the first test run, it is now painted red like the trailer mover.
And a parking stand for an IHC rear blade for a co-worker of mine.
A 3 point hitch trailer mover.
A 3 point dethatcher, this was the first test run, it is now painted red like the trailer mover.
And a parking stand for an IHC rear blade for a co-worker of mine.
Attachments


hunter1151
Well-known member
Thanks you ZT you are very helpful.................
ZTFab
Well-known member
CecilTheTurtle
Well-known member
Here's some of my latest projects. Finally broke out the Lincoln WeldPak 140HD I bought a while ago. Made a couple of log racks out of old bed frames for my Dad for Christmas. After this pic I rounded all the sharp edges with the grinder and hit it with some Rustoleum Hammertone black. He loved 'em.

Then I picked up a bunch of 1" square tubing to make some more sturdy racks for my own firewood. I got started today and hopefully should finish up the first one after Christmas. Here's a pic of the two end pieces. I'll weld two six foot lengths of tube in between and then paint it all with POR-15 to keep it rust free.

And here's a few pics of my ugly welds so you guys can bust on me. Certainly not a ZTFab weld I'm just using flux core wire (no gas) so tons of spatter, but it seems to be getting plenty of penetration. This is my first foray back into welding in about ten years, so I need some more practice.


Then I picked up a bunch of 1" square tubing to make some more sturdy racks for my own firewood. I got started today and hopefully should finish up the first one after Christmas. Here's a pic of the two end pieces. I'll weld two six foot lengths of tube in between and then paint it all with POR-15 to keep it rust free.
And here's a few pics of my ugly welds so you guys can bust on me. Certainly not a ZTFab weld
I'm just using flux core wire (no gas) so tons of spatter, but it seems to be getting plenty of penetration. This is my first foray back into welding in about ten years, so I need some more practice.
KMinAF
Well-known member
I made the cart from some old bunk bed rails and the tool chest from left over bits of lumber.

ZT, as always, awesome work. Best of all, you're more than willing to help others and give advice. I'd say you are truly are an asset to this site.
davidB382
Well-known member
I'll play. There is some crazy talent on here! Here are a few projects I've made and snapped pictures of. I don't have any close ups of the welds, probably a good thing!
First one is a deer hoist that slides in a receiver hitch. 2" tubing frame, 1" tubing for the kickers. MIG with .030 wire on an ESAB, can't think of the model. The top piece is removable. It slides in the bottom and pivots to let you lift your deer and then swing it into your truck bed. I made two of these. The hitch on the truck is not level, I swear the hoist is all square!


And then this was a little giraffe I made for my wife from scrap 1/2" tube and 2" pipe. It was something just for fun and she loved it so that's a plus. I used 1/4" bolts for the horns and nuts for the eyes. It ended up about 11" tall.


First one is a deer hoist that slides in a receiver hitch. 2" tubing frame, 1" tubing for the kickers. MIG with .030 wire on an ESAB, can't think of the model. The top piece is removable. It slides in the bottom and pivots to let you lift your deer and then swing it into your truck bed. I made two of these. The hitch on the truck is not level, I swear the hoist is all square!
And then this was a little giraffe I made for my wife from scrap 1/2" tube and 2" pipe. It was something just for fun and she loved it so that's a plus. I used 1/4" bolts for the horns and nuts for the eyes. It ended up about 11" tall.
A lot of inspiring work in here. Researching a beginner TIG right now and thinking the Miller Diversion 180 will fit the bill because it gives me the flexibility of using a standard outlet when I move every three years (military). Hope I have some work to post in a month or so.