To avoid these ads, REGISTER NOW!

Show us your welding projects

ndr1968

Well-known member
Joined
Apr 18, 2012
Messages
207
Location
Oklahoma
I just posted this over at Welding Web and I thought you guys might like to see it too.

I have been fighting those dam "government disigned" gas cans for a long time now and I think this just may be a workable solution.

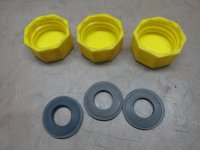
Problem: Cheap plastic gaskets that came with gas can caps shrink and harden after one season and will not reseal.

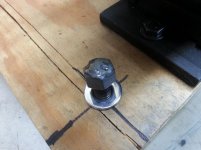
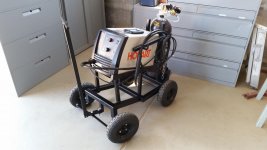
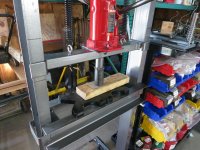
I had some .125” wall tubing of just the right size on hand so I sharpened the end and welded a big old washer onto the other. Then I got some cork-rubber Felpro gasket material at the auto parts store. I cut off some strips of it and took it with the new tool over to my new shop press to see what would happen. It worked great! Problem solved.

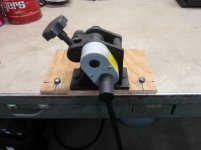
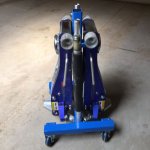
I really like the fast lift bottle jack I used on the HF press. It makes the press much easier to use. I got the jack at Northern Tool for $60.
 

Attachments

  • IMG_1940.jpg
    IMG_1940.jpg
    137.7 KB · Views: 183
  • IMG_1941.jpg
    IMG_1941.jpg
    139.9 KB · Views: 243
  • IMG_1943.jpg
    IMG_1943.jpg
    136.7 KB · Views: 247
  • IMG_1945.jpg
    IMG_1945.jpg
    147.2 KB · Views: 177
To avoid these ads, REGISTER NOW!

ndr1968

Well-known member
Joined
Apr 18, 2012
Messages
207
Location
Oklahoma
Here's the rest of the photos.
 

Attachments

  • IMG_1952.jpg
    IMG_1952.jpg
    144.3 KB · Views: 255
  • IMG_1950.jpg
    IMG_1950.jpg
    140.2 KB · Views: 272
  • IMG_1949.jpg
    IMG_1949.jpg
    136.2 KB · Views: 286
  • IMG_1947.jpg
    IMG_1947.jpg
    146.4 KB · Views: 303

Robert Hall

Well-known member
Joined
Jan 17, 2011
Messages
414
Location
Utah
How did you do the copper plating?
I grabbed some copper chloride from the darkroom and rubbed it on the heads of the spikes. CuCl is pretty active so I knew from experience it would leave a fair amount of copper on the steel.
 
Last edited:

zmotorsports

ALLIANCE MEMBER
Joined
Oct 20, 2009
Messages
21,312
Location
Northern Utah
Last night's welding task. Tail light boxes for my utility trailer project.
2hyjh5k.jpg


Backside.
vzwsjo.jpg


A few of the welds on the tail light boxes.
21nmm9v.jpg


2zp2wp0.jpg


xpwutx.jpg


Mike.
 

zmotorsports

ALLIANCE MEMBER
Joined
Oct 20, 2009
Messages
21,312
Location
Northern Utah
So overkill, I love it!:thumbup:
Those sure look sweet Mike. Better have a good anti theft system on that desirable trailer.

Thanks Claude. Ya, I should probably invest in a good tongue lock.

My wife came out to the shop and asked why it was taking so long to complete. I showed her some of the small details that I was adding and she told me it wasn't a "show trailer" and I wasn't going to want to haul anything on it, or once I did and scratch it I would be heart broken.

I figured it is hopefully going to be the last utility trailer I build/own so it may as well be what I want.

Mike.
 

sanddan

Well-known member
Joined
Jul 7, 2005
Messages
708
Location
Oregon
Thanks Claude. Ya, I should probably invest in a good tongue lock.

My wife came out to the shop and asked why it was taking so long to complete. I showed her some of the small details that I was adding and she told me it wasn't a "show trailer" and I wasn't going to want to haul anything on it, or once I did and scratch it I would be heart broken.

I figured it is hopefully going to be the last utility trailer I build/own so it may as well be what I want.

Mike.

Mike,

I built a 6x10 trailer similar to yours 20 years ago and only had to rebuild it last summer. You will be glad you are putting such care into the build as you will enjoy it for many years to come. Mine is also 2x3 tube construction and I also hung the fenders like you did (I did cope the tube to the fender before welding), it's a very sturdy mount and also good looking. I really like the tail light mount box's, a great project to practice the tig welds on. Thanks for sharing.

Dan
 

Attachments

  • fender1.jpg
    fender1.jpg
    41.8 KB · Views: 220

mat_GTI-R

Well-known member
Joined
Apr 8, 2010
Messages
58
My very first welding project was fabricating a seat bracket for my car, from design:
https://www.facebook.com/photo.php?fbid=10153758933970472&l=0a78e71279

to the finish product (I did paint it black before installing):
https://www.facebook.com/photo.php?fbid=10155377756365472&l=251c481f84

Then I did the typical welding cart:
https://www.facebook.com/photo.php?fbid=10155377756375472&l=c5720ecd1e

A few custom brackets for the car:
https://www.facebook.com/photo.php?fbid=10155377756460472&l=ced636538c

Small coffee table project with custom hairpin legs:
https://www.facebook.com/photo.php?fbid=10154784803780472&l=2cbff6f268

Custom bench for the dining room table, I can't take credit for the wood work and the bending of the flat bar, done by others... I just welded the legs together and a whole lot of grinding:
https://www.facebook.com/photo.php?fbid=10154695440335472&l=a40199e8d1
 

zmotorsports

ALLIANCE MEMBER
Joined
Oct 20, 2009
Messages
21,312
Location
Northern Utah
Mike,

I built a 6x10 trailer similar to yours 20 years ago and only had to rebuild it last summer. You will be glad you are putting such care into the build as you will enjoy it for many years to come. Mine is also 2x3 tube construction and I also hung the fenders like you did (I did cope the tube to the fender before welding), it's a very sturdy mount and also good looking. I really like the tail light mount box's, a great project to practice the tig welds on. Thanks for sharing.

Dan

Thanks. That is a nice looking trailer, I would love to see some more pics of it.

Mike.
 

ndr1968

Well-known member
Joined
Apr 18, 2012
Messages
207
Location
Oklahoma
OK, this isn’t really a “tool” or welding project. It’s just a method I’ve come up with to save peg board space. I keep a set of metric and S.A.E. box end wrenches on two pegs on the board. In the photos I try to show how I use this system. It takes a little practice. I’m right handed so south paws may want to change this accordingly. First I figure out what size I want, then reach with my left hand and grab all the smaller wrenches that are “in front of” it and pull them all off the peg. With the left hand still holding the stack of wrenches use the right hand and remove the wanted wrench and lay it down on a handy surface. Then use both hands if necessary to align and replace the stack of wrenches back on the single peg. Use your selected wrench and when you are ready to replace it just reverse the above steps. The hardest part of this is to remember to replace the unused wrenches RIGHT THEN, don't lay them down! or you will have to put them all back one by one and that's what this method tries to avoid.
 

Attachments

  • IMG_1979.jpg
    IMG_1979.jpg
    141.7 KB · Views: 182
  • IMG_1978.jpg
    IMG_1978.jpg
    143.3 KB · Views: 187
  • IMG_1977.jpg
    IMG_1977.jpg
    143.3 KB · Views: 199
  • IMG_1975.jpg
    IMG_1975.jpg
    144.8 KB · Views: 214

ndr1968

Well-known member
Joined
Apr 18, 2012
Messages
207
Location
Oklahoma
Rest of the "Peg board space saver" photos:
 

Attachments

  • IMG_1980.jpg
    IMG_1980.jpg
    141.8 KB · Views: 101
  • IMG_1982.jpg
    IMG_1982.jpg
    141 KB · Views: 102
  • IMG_1983.jpg
    IMG_1983.jpg
    142.3 KB · Views: 101
  • IMG_1984.jpg
    IMG_1984.jpg
    145.9 KB · Views: 143

64Trvlr

Well-known member
Joined
Sep 7, 2012
Messages
420
Location
Northern AZ
I needed a place for a generator and spare tire for my camper.
 

Attachments

  • 11-camper bumper pass side 9:13.jpg
    11-camper bumper pass side 9:13.jpg
    146.6 KB · Views: 175
  • 10-camper bumper dr side 9:13.jpg
    10-camper bumper dr side 9:13.jpg
    137.6 KB · Views: 163
  • 12-camper rear bumper 9:13.jpg
    12-camper rear bumper 9:13.jpg
    139.7 KB · Views: 186
  • 8-camper bumper coming along ok 8:13.jpg
    8-camper bumper coming along ok 8:13.jpg
    143.6 KB · Views: 173
  • 7-camper bumper progress 8:13.jpg
    7-camper bumper progress 8:13.jpg
    141.7 KB · Views: 156
  • 5-camper bumper begining to commence to begin 8:13.jpg
    5-camper bumper begining to commence to begin 8:13.jpg
    151.1 KB · Views: 156
  • 4-start of camper bumper 8:13.jpg
    4-start of camper bumper 8:13.jpg
    148.4 KB · Views: 168

classicJackets

Well-known member
Joined
Sep 26, 2014
Messages
448
Location
SE Michigan
Did a few small things as Christmas presents and an excuse to use my new (first) welder. None are that impressive or hard to do, but i had all the material for free so why not :)
Tea Light candle holder and rebar letters for my sisters' initials. Ignore the vise..


ndr1968

Well-known member
Joined
Apr 18, 2012
Messages
207
Location
Oklahoma
Fast and dirty mounting bolts out of all thread.
 

Attachments

  • home made bolts001a.jpg
    home made bolts001a.jpg
    136.8 KB · Views: 186
  • home made bolts002a.jpg
    home made bolts002a.jpg
    138.3 KB · Views: 183
  • home made bolts003a.jpg
    home made bolts003a.jpg
    125 KB · Views: 218

great white tj

Well-known member
Joined
Apr 12, 2009
Messages
545
Location
Ocala Fl.
I am trying to fab up a small rake, all I need to do now is put on the tines. The last pict. is what I should end up with the tines.
 

Attachments

  • P3260019.JPG
    P3260019.JPG
    142.5 KB · Views: 253
  • P3260016.jpg
    P3260016.jpg
    48 KB · Views: 248
  • P3260014.JPG
    P3260014.JPG
    144.4 KB · Views: 247
  • Tines.JPG
    Tines.JPG
    101.1 KB · Views: 318
To avoid these ads, REGISTER NOW!

great white tj

Well-known member
Joined
Apr 12, 2009
Messages
545
Location
Ocala Fl.
Not bad for the first lift... It did not move at all.
 

Attachments

  • P3270021.JPG
    P3270021.JPG
    140.5 KB · Views: 344
  • P3270022.JPG
    P3270022.JPG
    131 KB · Views: 318
  • P3270023.jpg
    P3270023.jpg
    48.6 KB · Views: 341
  • P3270024.jpg
    P3270024.jpg
    46.6 KB · Views: 319

gymbo39

Well-known member
Joined
Dec 27, 2009
Messages
153
Location
So Calif
Welding cart I built to move new 115v mig around in the yard to weld up fence panels
 

Attachments

  • Cart!!!.jpg
    Cart!!!.jpg
    136.3 KB · Views: 281
  • Cart!!.jpg
    Cart!!.jpg
    147.3 KB · Views: 237

Broadie

Well-known member
Joined
Feb 23, 2010
Messages
47
Location
SE Alaska
I built this boat last winter in my garage with a Hobart Ironman 230.

I just got around to turning the cradle into a trailer. Took me about a week of after work hours and weekends. Happy with how both turned out as they were my first big welding projects. The Hobart worked great, although the spool gun has some issues.
 

Attachments

  • IMG_6351.jpg
    IMG_6351.jpg
    153.5 KB · Views: 595
  • IMG_2044.jpg
    IMG_2044.jpg
    146.7 KB · Views: 610
  • IMG_2475.jpg
    IMG_2475.jpg
    143.3 KB · Views: 516

RivennHewn

Well-known member
Joined
Jun 4, 2011
Messages
10,358
Location
PNW
I built this boat last winter in my garage with a Hobart Ironman 230.

I just got around to turning the cradle into a trailer. Took me about a week of after work hours and weekends. Happy with how both turned out as they were my first big welding projects. The Hobart worked great, although the spool gun has some issues.

Great looking boat!

Would love to see more pics of the build.

What's your intended purpose for the boat?

Running rivers, fishing, or just out playing in the rain?
 

akdiesel

Well-known member
Joined
Aug 8, 2008
Messages
2,617
Location
Wasilla, AK
I built this boat last winter in my garage with a Hobart Ironman 230.

I just got around to turning the cradle into a trailer. Took me about a week of after work hours and weekends. Happy with how both turned out as they were my first big welding projects. The Hobart worked great, although the spool gun has some issues.

Nice project. A co-worker in Fairbanks is finishing up his 12' with a Skidoo 155 hp jet motor. We plan to take a run up Montana Creek or Little Su this May to try it out.
 

Hot Chop shop

Well-known member
Joined
Apr 12, 2013
Messages
628
Location
Las Vegas
I built this boat last winter in my garage with a Hobart Ironman 230.


I just got around to turning the cradle into a trailer. Took me about a week of after work hours and weekends. Happy with how both turned out as they were my first big welding projects. The Hobart worked great, although the spool gun has some issues.


Very cool project and design.
 

ndr1968

Well-known member
Joined
Apr 18, 2012
Messages
207
Location
Oklahoma
I built this boat last winter in my garage with a Hobart Ironman 230.

I just got around to turning the cradle into a trailer. Took me about a week of after work hours and weekends. Happy with how both turned out as they were my first big welding projects. The Hobart worked great, although the spool gun has some issues.

I'm in awe of you guys that just jump in there with both feet and "git er done". No matter what size the project.
 

Boosted1

Well-known member
Joined
Nov 25, 2007
Messages
1,676
Location
Georgetown, KY
Broadside,
Wow! Really! Only 1 week of after hours work to build that?
More details please. Looks very interesting.
It could have its own build thread.
Did you get plans somewhere or make your own?
 

spent21

Well-known member
Joined
Apr 9, 2013
Messages
168
Location
Franklin, Tn
I built this boat last winter in my garage with a Hobart Ironman 230.

I just got around to turning the cradle into a trailer. Took me about a week of after work hours and weekends. Happy with how both turned out as they were my first big welding projects. The Hobart worked great, although the spool gun has some issues.

I'm diggin the bear trap. that's cool.
 

bamf

Active member
Joined
Mar 5, 2015
Messages
35
Location
Wake Forest, NC
I built this boat last winter in my garage with a Hobart Ironman 230.

I just got around to turning the cradle into a trailer. Took me about a week of after work hours and weekends. Happy with how both turned out as they were my first big welding projects. The Hobart worked great, although the spool gun has some issues.

What issues did you have with that spool gun?
 

zmotorsports

ALLIANCE MEMBER
Joined
Oct 20, 2009
Messages
21,312
Location
Northern Utah
I built this boat last winter in my garage with a Hobart Ironman 230.

I just got around to turning the cradle into a trailer. Took me about a week of after work hours and weekends. Happy with how both turned out as they were my first big welding projects. The Hobart worked great, although the spool gun has some issues.

Nice. Very impressive work. I am not a boat fan, but I can tell hard work, determination and drive when I see it. :thumbup:

Mike.
 

sanddan

Well-known member
Joined
Jul 7, 2005
Messages
708
Location
Oregon
broadie,

Could you share some more details on your boat? Did you get a set of plans somewhere for it? I really like the lines, very nice.
 

KMinAF

Well-known member
Joined
Mar 5, 2011
Messages
698
Location
Fairview Utah
I don't see many of these in the parks or schools anymore, so with a bit of scrap angle a
2x6, some paint and a couple of bolts and a couple hours work my grand kids can experience a bit of the "good old days"
 

Attachments

  • DSCF6755.jpg
    DSCF6755.jpg
    149.8 KB · Views: 236
  • DSCF6754.jpg
    DSCF6754.jpg
    150.6 KB · Views: 206

RivennHewn

Well-known member
Joined
Jun 4, 2011
Messages
10,358
Location
PNW
I don't see many of these in the parks or schools anymore, so with a bit of scrap angle a
2x6, some paint and a couple of bolts and a couple hours work my grand kids can experience a bit of the "good old days"


I don't see any USB ports.

Where do you plug the screen into?
 

Broadie

Well-known member
Joined
Feb 23, 2010
Messages
47
Location
SE Alaska
broadie,

Could you share some more details on your boat? Did you get a set of plans somewhere for it? I really like the lines, very nice.

Thanks, No plans really, but I copied a few other boats in town that were a similar design built by a local boat builder. I think I'll get a thread going with pics of the build.
 
To avoid these ads, REGISTER NOW!
Top Bottom