To avoid these ads, REGISTER NOW!

Show us your welding projects

strength_and_power

Well-known member
Joined
Apr 26, 2015
Messages
1,393
Got the ramp frame mostly built. Need to flip it over and weld out the bottom side. I dislike using angle and C-channel unless absolutely necessary due to the waviness it can have. This job solidified my dislike further.
Decent progress for 8 hours.
f4bce02dd4ff75a150ae5717f1832c4d.jpg
61eeb892322e2e04d5db1ab3f132e258.jpg
3120ae37e4c88a683e981a5f9b80f404.jpg


Sent from my iPhone using Tapatalk
 

Attachments

  • f4bce02dd4ff75a150ae5717f1832c4d.jpg
    f4bce02dd4ff75a150ae5717f1832c4d.jpg
    158.6 KB · Views: 14
  • 61eeb892322e2e04d5db1ab3f132e258.jpg
    61eeb892322e2e04d5db1ab3f132e258.jpg
    144.5 KB · Views: 8
  • 3120ae37e4c88a683e981a5f9b80f404.jpg
    3120ae37e4c88a683e981a5f9b80f404.jpg
    151.5 KB · Views: 5
To avoid these ads, REGISTER NOW!

Old Man Roger

Well-known member
Joined
Apr 6, 2017
Messages
17,400
Location
Palm Coast Florida
Starting tomorrow on a 20’ long 30” wide ramp for an upcoming job. It will need to support around 6,000#s. Got a fresh bottle of 90/10, a 44# spool of .045. Going to be getting after it with the Miller 350p set for pulsed spray transfer. Should be a good time.


Sent from my iPhone using Tapatalk
What is the ramp for? Pretty narrow considering it has to hold 6000 pounds.
 

strength_and_power

Well-known member
Joined
Apr 26, 2015
Messages
1,393
What is the ramp for? Pretty narrow considering it has to hold 6000 pounds.


We have 3 safes, each weighing 4,200#s plus an electric pallet jack that will be going up this ramp. Our pallet jacks are special order and are 21” wide with 30-36” long forks. A conventional pallet jack is 28” wide with 48” forks. The 2” x 1/4” wall square tubes are spaced for my load and drive wheels.


Sent from my iPhone using Tapatalk
 

metal1313

Well-known member
Joined
Apr 28, 2009
Messages
3,416
Location
clinton NJ
How high is this ramp going? Think the electric pallet jack will have enough traction? It seems like a pretty eloquent solution to the problem of elevating 4K
 

Old Man Roger

Well-known member
Joined
Apr 6, 2017
Messages
17,400
Location
Palm Coast Florida
We have 3 safes, each weighing 4,200#s plus an electric pallet jack that will be going up this ramp. Our pallet jacks are special order and are 21” wide with 30-36” long forks. A conventional pallet jack is 28” wide with 48” forks. The 2” x 1/4” wall square tubes are spaced for my load and drive wheels.


Sent from my iPhone using Tapatalk
Nice! I suspected a pallet jack was involved.:thumbup:
 

strength_and_power

Well-known member
Joined
Apr 26, 2015
Messages
1,393
How high is this ramp going? Think the electric pallet jack will have enough traction? It seems like a pretty eloquent solution to the problem of elevating 4K


The rise is 49”. I will have three coworkers with me and will assist the pallet jack. If it was a single safe, I would use cribbing and take it up step by step. With three, the ramp was a better option. Originally the plan was to bring in a 40 ton crane, remove a glass roof panel and bypass the steps but the building owner’s glass guy quoted around 10 grand for just the removal and was fairly certain the panel wouldn’t come out without breaking. Removing a window was discussed but shot down by the building owner as well. So here we are lol.
This was a 2,000# safe we took up 20 steps. Pucker factor was pretty high.
7838a55398904227cef5139ec4805bda.jpg
ebad21d9a943dcc5fae6a81f4ccc5096.jpg
 

Attachments

  • 7838a55398904227cef5139ec4805bda.jpg
    7838a55398904227cef5139ec4805bda.jpg
    95.6 KB · Views: 5
  • ebad21d9a943dcc5fae6a81f4ccc5096.jpg
    ebad21d9a943dcc5fae6a81f4ccc5096.jpg
    45.3 KB · Views: 4

BD1

Well-known member
Joined
Mar 18, 2007
Messages
4,602
Location
north side
I'd be concerned about the existing stairs.
Did you shore or crib those from below ?
That's a pretty concentrated load. Hope it went well.


Sent from my iPhone using Tapatalk
 

Strouty

Well-known member
Joined
Mar 21, 2010
Messages
38,209
Location
Southern Maine
I would have so much custom made special material handling equipment if I moved safes for a living. We always built funky equipment for mountain top tower sites. Great setup for the safe in that first picture, pretty ingenious and a simple yet elegant solution to a serious obstacle. My long term goal is to be able to move about anything anywhere up to 10k pounds, then later move up to heavier things, right now I feel comfortable moving things about 5k pounds without much worry.
 

strength_and_power

Well-known member
Joined
Apr 26, 2015
Messages
1,393
Were these safes are being placed, have the floors been engineered for them.


Yes. When I was out looking at the job I saw where they had cut holes in the ceiling below to access the metal joists and weld what looked to be angle iron to the existing diagonal braces between the top and bottom chords. Floor still had a good bit of bounce when I lowered the pallet jack (my pallet jack is a Bishamon Blue Label which has the smoothest and most controlled valving of any of the probably 30+ different brands of pallet jacks I’ve used). Took a decent amount of shimming under the safes to eliminate any rocking or door swing. I’m fully expecting to go back within the next 3 months to level them out again.


Sent from my iPhone using Tapatalk
 

strength_and_power

Well-known member
Joined
Apr 26, 2015
Messages
1,393
I would have so much custom made special material handling equipment if I moved safes for a living. We always built funky equipment for mountain top tower sites. Great setup for the safe in that first picture, pretty ingenious and a simple yet elegant solution to a serious obstacle. My long term goal is to be able to move about anything anywhere up to 10k pounds, then later move up to heavier things, right now I feel comfortable moving things about 5k pounds without much worry.


An 8,800# Swedish made mini-vault has been my largest solo install. Very few safes that are bigger, it becomes impractical to require an entire storefront to be removed to install the safes and most jeweler’s insurance will only cover up to a certain amount per safe so they will get multiple smaller safes or a modular vault.


Sent from my iPhone using Tapatalk
 

strength_and_power

Well-known member
Joined
Apr 26, 2015
Messages
1,393
Ramp worked great. Elevated the bottom on some cribbing to slacken the angle a bit more and built a temp lead in ramp. Future plan is to cut the ramp into a 8’&12’ section, I can always glue it back together if need be.
1d233fa6376ed2e79547634d6954b6fe.jpg
9f4b837dbd50b69e173da001c90ebef6.jpg


Sent from my iPhone using Tapatalk
 

Attachments

  • 1d233fa6376ed2e79547634d6954b6fe.jpg
    1d233fa6376ed2e79547634d6954b6fe.jpg
    81.1 KB · Views: 10
  • 9f4b837dbd50b69e173da001c90ebef6.jpg
    9f4b837dbd50b69e173da001c90ebef6.jpg
    75.5 KB · Views: 16

loganb

ALLIANCE MEMBER
Joined
Dec 29, 2011
Messages
5,497
Location
Omaha, NE
I thought the ramp was to move a safe??? Funny looking "safe" at thr bottom lol

That ramp as a modular, bolt/glue together sections seems like a pretty handy thing to have available for you

Sent from The Garage Journal mobile app
 

Strouty

Well-known member
Joined
Mar 21, 2010
Messages
38,209
Location
Southern Maine
Push pull is the way to go, I started with a spool gun, bought a push pull, but haven’t set it up yet. I talked at length with a guy that builds aluminum boats for a living and that was all he used in his business.
 
To avoid these ads, REGISTER NOW!

fartymarty

Well-known member
Joined
Nov 9, 2012
Messages
1,348
Location
Fort Worth
I thought the ramp was to move a safe??? Funny looking "safe" at thr bottom lol

Agreed. :lol:

I was going to say "I didn't know Victor made safes too." ..but it turns out there was a Victor safe company, so.. I guess some were disguised as tool room lathes.:lol_hitti
 

strength_and_power

Well-known member
Joined
Apr 26, 2015
Messages
1,393
Agreed. :lol:

I was going to say "I didn't know Victor made safes too." ..but it turns out there was a Victor safe company, so.. I guess some were disguised as tool room lathes.:lol_hitti


It looked to be very well maintained. I typically stay away from moving non-safe items but this was a long time customer and as unfriendly as the building was for deliveries, I made an exception.


Sent from my iPhone using Tapatalk
 

strength_and_power

Well-known member
Joined
Apr 26, 2015
Messages
1,393
Push pull is the way to go, I started with a spool gun, bought a push pull, but haven’t set it up yet. I talked at length with a guy that builds aluminum boats for a living and that was all he used in his business.


This reminded me a friend actually has a Miller push/pull gun but no machine so I might be able to get it on the cheap.


Sent from my iPhone using Tapatalk
 

bradpac

Well-known member
Joined
Sep 8, 2013
Messages
721
Location
Central TX
I've only moved a couple of heavy safes and only up a couple of steps or over a threshold. Getting those things up stairs like that is very impressive. Nice job.
 

gmcgeo

Well-known member
Joined
Mar 11, 2019
Messages
3,701
8.8 install with truss kit on the wrangler
 

Attachments

  • 20191207_110049.jpg
    20191207_110049.jpg
    150.5 KB · Views: 258
  • 20191123_210250.jpg
    20191123_210250.jpg
    151.1 KB · Views: 247
  • 20191208_193247.jpg
    20191208_193247.jpg
    113.8 KB · Views: 229
  • 20191207_103007.jpg
    20191207_103007.jpg
    148.1 KB · Views: 253
  • 20210114_165416.jpg
    20210114_165416.jpg
    79.6 KB · Views: 215

GTA Matt

Well-known member
Joined
Aug 30, 2010
Messages
3,148
Location
Zebulon, NC
Watched some youtube videos and taught myself how to weld stainless. Built down pipes, y-pipe and mid pipe on my twin turbo iroc. Down pipes are all 3", with 4" from the merge collector back. Multiple v-bands and brackets as well. I noticed a marked improvement from beginning to end, but I'm not going to redo the early welds.


4", 41 minutes to weld this section


F-66

Active member
Joined
May 20, 2012
Messages
35
I have been working on completing an engine run stand. I have also been learning how to weld stainless exhaust. Here are exhaust pipes and mufflers tacked together.
 

Attachments

  • IMG_2786.jpg
    IMG_2786.jpg
    148.5 KB · Views: 192
  • IMG_2799.jpg
    IMG_2799.jpg
    154.3 KB · Views: 212

sqznby

Well-known member
Joined
Oct 26, 2013
Messages
981
Location
Coastal NC
Watched some youtube videos and taught myself how to weld stainless. Built down pipes, y-pipe and mid pipe on my twin turbo iroc. Down pipes are all 3", with 4" from the merge collector back. Multiple v-bands and brackets as well. I noticed a marked improvement from beginning to end, but I'm not going to redo the early welds.


Nicely done, especially being self taught learning on YouTube.
I've worked with some who've claimed to have been welding for years who cant weld as well as you've thrown down.
Nice car too, do you have a build thread anywhere?
 

greenlizard

Well-known member
Joined
Dec 4, 2012
Messages
186
Location
Chapin, SC
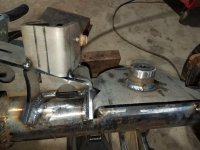
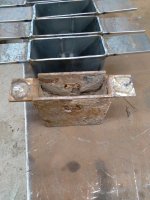
At the scrap yard this week I picked up a much abused set of 48 inch pallet forks for the 46 cents per pound current price. One tine had a ragged hole near the tip, while the other was mostly severed. Maybe trying to make a shorter set? Waste of a good resource.

Anyway, I filled the ragged hole and cut a new hole for a trailer ball, then cleaned up and welded the partially severed tip on the other. The pic with the tips painted is a bit distorted making it appear one tine is crooked. It isn’t, although they do look like a bit of dental work is in order.

I used my stick machine with 7018, not the wire welder in the background. Took about 10 passes as I had only 1/8 inch rod available.

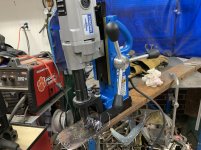
Oh, if there’s anyone left besides me who doesn’t have a mag drill, you should put one on your list. It was seriously awesome, cutting a 13/16 inch hole through the 3/4 inch fork tine like it was hardwood. This Hougen belongs to my son, but I’m not going to press him about getting it out of my garage.
 

Attachments

  • 29B9C96F-C19D-4EB6-8774-EFBE10D363C3.jpg
    29B9C96F-C19D-4EB6-8774-EFBE10D363C3.jpg
    152.4 KB · Views: 178
  • D7CE77B4-1024-408D-A55A-35DB17CD0B7A.jpg
    D7CE77B4-1024-408D-A55A-35DB17CD0B7A.jpg
    152.9 KB · Views: 173
  • F12278D4-545A-40A8-8976-6FEB0669650B.jpg
    F12278D4-545A-40A8-8976-6FEB0669650B.jpg
    147.5 KB · Views: 172
  • F3139409-72CB-49E5-AD0E-C1F93078528C.jpg
    F3139409-72CB-49E5-AD0E-C1F93078528C.jpg
    91 KB · Views: 166
  • 21F20732-5705-4C93-8DE2-50B96E5277F3.jpg
    21F20732-5705-4C93-8DE2-50B96E5277F3.jpg
    128.5 KB · Views: 165
  • 1F1BF6A4-A72D-413F-B50F-5940B5D4F0A3.jpg
    1F1BF6A4-A72D-413F-B50F-5940B5D4F0A3.jpg
    155.4 KB · Views: 188
  • 7D669785-F00F-4BB0-AA7D-017B4A47F8B7.jpg
    7D669785-F00F-4BB0-AA7D-017B4A47F8B7.jpg
    150.8 KB · Views: 170

GTA Matt

Well-known member
Joined
Aug 30, 2010
Messages
3,148
Location
Zebulon, NC
Nicely done, especially being self taught learning on YouTube.
I've worked with some who've claimed to have been welding for years who cant weld as well as you've thrown down.
Nice car too, do you have a build thread anywhere?

Thanks. I really don't consider it terribly difficult, luckily we live in an age with information at our fingertips. If I noticed a problem with what I was doing, and trust me, there was plenty of those, I would research/watch videos on how to improve it. I have limited dexterity on some of my fingers on my left hand, which makes feeding filler consistently the most challenging part for me.

I have a rather abbreviated build thread here, on one of my local boards: https://www.horsepowerjunkies.com/forums/showthread.php?t=152863
 

king nero

Well-known member
Joined
Dec 27, 2010
Messages
1,469
Location
Belgium
Did you weld the cut fork as well?
I suppose without knowing the exact base material, you used "normal" wire (SG2/3) and a bit of preheat?
If you had a dedicated welding procedure, do you mind sharing it with us?
 

greenlizard

Well-known member
Joined
Dec 4, 2012
Messages
186
Location
Chapin, SC
Did you weld the cut fork as well?
I suppose without knowing the exact base material, you used "normal" wire (SG2/3) and a bit of preheat?
If you had a dedicated welding procedure, do you mind sharing it with us?

Yes, I repaired both forks. Nothing special about the procedure. I cleaned up the cut with a grinder and a die grinder. The welds were done with 1/8 inch 7018 at 135 amps.
No preheat was used as the forks are a ductile steel and definitely not brittle. The cut damaged fork required around ten to twelve passes, so I ran several, then turned it over and ran a couple of beads on the back side to reduce warping.
 

king nero

Well-known member
Joined
Dec 27, 2010
Messages
1,469
Location
Belgium
Thx for the feedback! I'm not sure that the forks are a ductile steel, but I haven't had them in my hands of course. Most I've seen are a high strength, high carbon steel, that require special precautions when welding, that's why I asked.
 

greenlizard

Well-known member
Joined
Dec 4, 2012
Messages
186
Location
Chapin, SC
Thx for the feedback! I'm not sure that the forks are a ductile steel, but I haven't had them in my hands of course. Most I've seen are a high strength, high carbon steel, that require special precautions when welding, that's why I asked.

Oh. Well, I’ll report back if they fail in use. It wouldn’t be the first time I’ve been wrong...
 

sweetk30

Well-known member
Joined
Jan 2, 2011
Messages
2,305
Location
finger lakes area upstate ,ny
Friend has these roll up doors to add deadbolt claw locks to . He needed mounting tabs on them since there going in aluminum and not steel . And here is 1 old box rusted out / full of dirt / lock pins gone .

Was a easy job for the little hobart 140 mig off 110volt . Used my port-a-band on swagoff road table to cut tabs from some 3/16 plate . About 2hr time start to finish .
 

Attachments

  • 20210215_223936.jpg
    20210215_223936.jpg
    95.7 KB · Views: 158
  • 20210215_223954.jpg
    20210215_223954.jpg
    96.1 KB · Views: 141

zmotorsports

ALLIANCE MEMBER
Joined
Oct 20, 2009
Messages
21,312
Location
Northern Utah
Watched some youtube videos and taught myself how to weld stainless. Built down pipes, y-pipe and mid pipe on my twin turbo iroc. Down pipes are all 3", with 4" from the merge collector back. Multiple v-bands and brackets as well. I noticed a marked improvement from beginning to end, but I'm not going to redo the early welds.

Very nice work on the exhaust system.
 
To avoid these ads, REGISTER NOW!
Top Bottom