To avoid these ads, REGISTER NOW!

Snap on YA642 Jack Rebuild

Hiball

Well-known member
Joined
Apr 30, 2009
Messages
14,027
Location
Missery
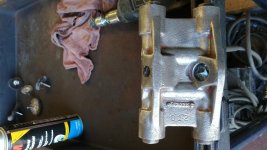
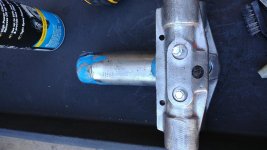
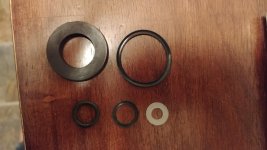
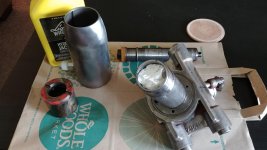
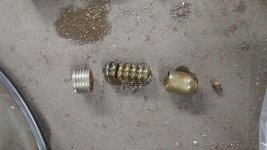
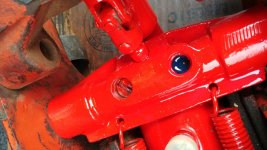
The ram was really stuck in the cylinder but I got it out. The seal was completely destroyed and the white back up ring is swollen a bit. Unfortunately, the new white back up ring that I have is different than the one that is in there. Also, I ran across rust in one spot inside the cylinder. I don't know why it's just the one spot but any suggestions on what I can do about the rust? Would fine steel wool be bad to use in there? I also need to find a new white back up ring and dont know if I can buy this individually?

The rust is obviously where water sat, more than likely due to the Angle. On the plus side... It's appears High on the cylinder so shouldn't interfere in the sealing zone, it will have to be cleaned up/rough edges removed to prevent damaging the New seal during installation. It's possible to buy the heel plate as a individual item, for the reasons stated... I always reccomend that you tear the Jack down prior to purchasing parts, this way you can order all necessary parts in one shot or worst case scenario end up with a unusable kit due to internal damage that isn't worth fixing.
 
To avoid these ads, REGISTER NOW!
OP
S

Snapon1

Well-known member
Joined
Feb 19, 2016
Messages
52
Location
Minneapolis, MN
Okay, what would you recommend using to clean the rust? Thank you for the advice, I definitely should of taken it apart first before ordering parts. Lesson learned. It looks like I should have everything else except for the heel plate and release valve. Is the release valve something that typically needs to be replaced or can I reuse my old one if it looks okay? I'll get a new heel plate ordered Monday.

Also, for cleaning up the old fluid and grime inside of the cylinder and passages would brake cleaner be okay to use or would something else be better to clean it with?
 
Last edited:

Hiball

Well-known member
Joined
Apr 30, 2009
Messages
14,027
Location
Missery
Okay, what would you recommend using to clean the rust? Thank you for the advice, I definitely should of taken it apart first before ordering parts. Lesson learned. It looks like I should have everything else except for the heel plate and release valve. Is the release valve something that typically needs to be replaced or can I reuse my old one if it looks okay? I'll get a new heel plate ordered Monday.

Also, for cleaning up the old fluid and grime inside of the cylinder and passages would brake cleaner be okay to use or would something else be better to clean it with?

"If" the rust/pitting is above the sealing zone, you don't need to be cautious with your method, wire brush etc.. The release valve's do occasionally get worn, thus need replaced. When the tip starts getting round, any grooves on the cone would indicate that a replacement should be on the order list. I don't have a issue with brake cleaner, obviously it shouldn't be near any of the New seals, so when done simply flush the valve system/passages with water and finish up with some Air. If the Jack is gonna sit prior to installing the New seals, maybe a light coat of clean hydraulic oil in the valve seats/cylinder bore to prevent any flash rusting.
 
OP
S

Snapon1

Well-known member
Joined
Feb 19, 2016
Messages
52
Location
Minneapolis, MN
Had some time today to work on it more. I'm having a hard time getting the screw out on the left. I tried using an impact screwdriver but I don't have the right tip that is big enough. Any tips to get it loose? Also, I noticed that the safety overload hole was completely filled with fluid. Is that normal?
 

Attachments

  • 1008171305.jpg
    1008171305.jpg
    147.9 KB · Views: 71
  • 1008171305a.jpg
    1008171305a.jpg
    148.6 KB · Views: 67
  • 1008171330.jpg
    1008171330.jpg
    147 KB · Views: 61
  • 1008171334a.jpg
    1008171334a.jpg
    154.5 KB · Views: 69
  • 1008171339.jpg
    1008171339.jpg
    146.9 KB · Views: 55

cgaengineer

Member
Joined
Sep 21, 2017
Messages
16
I just rebuilt a similar SO jack...I pride myself on being able to fix just about anything, this jack didn’t work at all when I finished.


Sent from my iPad using Tapatalk
 

larry_g

Well-known member
Joined
Apr 28, 2007
Messages
16,879
Location
oregon
Read post #7. I used a drag link socket and a breaker bar. Clamp the socket into the screw with a C clamp so it will not cam out.

lg
no neat sig line
 

Hiball

Well-known member
Joined
Apr 30, 2009
Messages
14,027
Location
Missery
Had some time today to work on it more. I'm having a hard time getting the screw out on the left. I tried using an impact screwdriver but I don't have the right tip that is big enough. Any tips to get it loose? Also, I noticed that the safety overload hole was completely filled with fluid. Is that normal?

Without a impact bit that fits the slot pretty good/hand impact driver or Larry's suggestion of preventing cam-out, your pretty much limited. It needs to be tight, because when the Jack is under load, the pressure backfeeds between the top of the upper ball and that plug. It's not uncommon to see some oil on top of the overload, there is a reason that freeze plug is there.

Here is a Vim set that has a size that fits that head fairly close, it's not as close as a ground down drag link (my go to for over 20 years) but works pretty good.
 

drg007

Active member
Joined
Aug 1, 2010
Messages
35
I cleaned and repainted a working YA642 a few years ago. I recreated the Snap On stickers so it looked almost like new. Here is what it looks like now. Let me know if you are interested in the sticker PDFs.

Can I get the sticker pdf pls
 

paulsomlo

Well-known member
Joined
Jul 16, 2013
Messages
3,878
Location
Northern Colorado
Would it work for a black hawk sj2 it's not a standard 6pt nut it's special.
This should help: https://www.garagejournal.com/forum/showthread.php?t=232242&highlight=blackhawk Two 1/4" dowel pins, two rare earth magnets to hold them, one 2' to 4' pipe wrench w/pipe over handle.

There's an improved version in this thread: https://www.garagejournal.com/forum/showthread.php?t=243577

Your leaky tank nut may or may not be cured with a new o ring, read the 2nd thread.
 
OP
S

Snapon1

Well-known member
Joined
Feb 19, 2016
Messages
52
Location
Minneapolis, MN
Just wanted to do an update on my progress. I did not have a drag link socket to remove the check valve screw, so I tried the bolt method from the link Larry posted in post #7. Used a 5/8" grade 8 bolt grinded, cut and filed to fit the screw head perfect. It worked great! To also help in removing the old copper washer for the check valve I used a good sharp chisel to put a couple light notches into the washer and used a skinny flat head to pry and remove the old one. As for the safety overload, mine was set to 1 3/4 turns from being all the way screwed in for future reference.
 

Attachments

  • 1014171100b.jpg
    1014171100b.jpg
    146 KB · Views: 26
  • 1014171100a.jpg
    1014171100a.jpg
    140.8 KB · Views: 26
Last edited:
OP
S

Snapon1

Well-known member
Joined
Feb 19, 2016
Messages
52
Location
Minneapolis, MN
Can anyone tell me what the rest of these seals are for? The u cup pictured is the one I didnt use as it came with two but I don't know what the rest are for.

Also, when rebuilding the pump am I suppose to put jack oil on the three vee's or do anything special? I wasn't sure and put a light coat of jack oil on them and along with the seal before installing. How tight is the washer and nut suppose to be?
 

Attachments

  • 1014171540.jpg
    1014171540.jpg
    139.7 KB · Views: 29
Last edited:
OP
S

Snapon1

Well-known member
Joined
Feb 19, 2016
Messages
52
Location
Minneapolis, MN
Still waiting on my new heel plate to arrive. Otherwise, everything else is ready to go. Once I get the heel plate then I'm going to paint it.
 

Attachments

  • 1015171058.jpg
    1015171058.jpg
    140.8 KB · Views: 36

larry_g

Well-known member
Joined
Apr 28, 2007
Messages
16,879
Location
oregon
Can anyone tell me what the rest of these seals are for? The u cup pictured is the one I didnt use as it came with two but I don't know what the rest are for.

Also, when rebuilding the pump am I suppose to put jack oil on the three vee's or do anything special? I wasn't sure and put a light coat of jack oil on them and along with the seal before installing. How tight is the washer and nut suppose to be?

If you bought the kit I used then yes there are left over parts as it is a universal kit for a few different jacks. That looks about like the pile I had left over.

lg
no neat sig line
 
OP
S

Snapon1

Well-known member
Joined
Feb 19, 2016
Messages
52
Location
Minneapolis, MN
If you bought the kit I used then yes there are left over parts as it is a universal kit for a few different jacks. That looks about like the pile I had left over.

lg
no neat sig line

Did you do anything special before installing the vees when rebuilding the pump?
 
Last edited:

Hiball

Well-known member
Joined
Apr 30, 2009
Messages
14,027
Location
Missery
Did you do anything special before installing the vees when rebuilding the pump?

I always make sure that all burs have been removed on the piston head and around the slots on the cylinder prior to installing the seals. Lube up the Vees with clean hydraulic fluid, assemble them on the piston, install spreader/washer and Nut, Not too tight, insert the pump piston into the cylinder from the bottom up. Doing it this way pulls the seals into the cylinder versus damaging the face of the seal trying to clear slot grooves. I'm assuming your unit is old enough to use the splined cross pin, versus the newer Pistons that have the ledge on them. Once you get piston back in the cylinder, install all the caging/springs/C clip. Install the pump piston assembly into a vice on the hex portion, pump facing up where you can get nut driver/socket on the nut, push down on the caging, it should return on its own, tighten the nut down a little, repeat. The trick is to not overtighten the nut as it will wear the seals prematurely, you want very little resistance, too much and the seals hang in the cylinder wall.
 

larry_g

Well-known member
Joined
Apr 28, 2007
Messages
16,879
Location
oregon
I always make sure that all burs have been removed on the piston head and around the slots on the cylinder prior to installing the seals. Lube up the Vees with clean hydraulic fluid, assemble them on the piston, install spreader/washer and Nut, Not too tight, insert the pump piston into the cylinder from the bottom up. Doing it this way pulls the seals into the cylinder versus damaging the face of the seal trying to clear slot grooves. I'm assuming your unit is old enough to use the splined cross pin, versus the newer Pistons that have the ledge on them. Once you get piston back in the cylinder, install all the caging/springs/C clip. Install the pump piston assembly into a vice on the hex portion, pump facing up where you can get nut driver/socket on the nut, push down on the caging, it should return on its own, tighten the nut down a little, repeat. The trick is to not overtighten the nut as it will wear the seals prematurely, you want very little resistance, too much and the seals hang in the cylinder wall.

I have nothing to add to that.

lg
no neat sig line
 
To avoid these ads, REGISTER NOW!
OP
S

Snapon1

Well-known member
Joined
Feb 19, 2016
Messages
52
Location
Minneapolis, MN
Well I was able to find some time to paint it today. Nothing fancy, just spray painted it.
 

Attachments

  • 1017171647e.jpg
    1017171647e.jpg
    149.3 KB · Views: 28
  • 1017171648a.jpg
    1017171648a.jpg
    141 KB · Views: 33
  • 1017171648.jpg
    1017171648.jpg
    151.3 KB · Views: 38

Ranch

Member
Joined
Jun 29, 2012
Messages
23
Location
Northern Illinois
Do you plan on repainting the entire jack or just the hydraulic unit? Also, how difficult was it rebuilding the pump assembly? Any advice? I plan on beginning the rebuild process on mine this weekend.
 
Last edited:
OP
S

Snapon1

Well-known member
Joined
Feb 19, 2016
Messages
52
Location
Minneapolis, MN
Well I got time to put everything back together tonight at work and test the jack out for the first time after rebuilding it and it doesn't work. For some reason when I'm trying to jack up a car it seems to pump up great but right when the tire seems like it's just ready to lift up and off the ground the jack stops half way like its reached its maximum height and won't go up any further no matter how many times I pump the handle. It holds there but won't lift up anymore. It retracts down just fine when I open the release valve.

Did I miss something? I was very careful when rebuilding and made sure to put everything back together the same way I removed. For parts, I replaced the heel plate/white back up ring, new u cup seal, new tank nut seal, new release valve o ring, the 3 vees and spreader in pump, new balls and washer in check valve and overload valve. Tank nut was tightened down tight with impact, check valve screw on really tight, overload screw set at 1 3/4 turns out from being screwed all the way in. Filled with hydraulic oil to just above the top of the cylinder inside and bled by pumping up with release valve open.

I'm stumped at the moment. Any suggestions on what I can check or do?
 

Attachments

  • 1019171638.jpg
    1019171638.jpg
    146.4 KB · Views: 42
  • 1019171806a.jpg
    1019171806a.jpg
    147.1 KB · Views: 43
  • 1019172102.jpg
    1019172102.jpg
    144.3 KB · Views: 41
Last edited:

Hiball

Well-known member
Joined
Apr 30, 2009
Messages
14,027
Location
Missery
Check the overload ball to make sure it is centered on the valve seat, on occasion when dropping it down the hole it gets off centered, or the cap knocks it off when it follows. If that looks good, give it a a half of turn and see if that helps, Next area of concern would be the lower ball seat, it’s possible that it’s not seating enough under load, but works light. Since it’s holding light cylinder pressure, you can probably rule out the release, but if all else fails maybe make sure it’s oriented correctly in the hole, they sometimes tumble in sideways when installing them.
 

larry_g

Well-known member
Joined
Apr 28, 2007
Messages
16,879
Location
oregon
In addition to what Hiball gave you, You had a rusty spot in the bore that you cleaned up. Is there a chance your ram has hit this spot and fluid is leaking around? Try putting a 4x4 on the lift pad and then load the jack. If it stops when it starts to load then it is probably not the bore, if it rises to ~ the same spot and stops then it may be the rust spot, or not enough oil in the reservoir.

lg
no neat sig line
 
OP
S

Snapon1

Well-known member
Joined
Feb 19, 2016
Messages
52
Location
Minneapolis, MN
Check the overload ball to make sure it is centered on the valve seat, on occasion when dropping it down the hole it gets off centered, or the cap knocks it off when it follows. If that looks good, give it a a half of turn and see if that helps, Next area of concern would be the lower ball seat, it’s possible that it’s not seating enough under load, but works light. Since it’s holding light cylinder pressure, you can probably rule out the release, but if all else fails maybe make sure it’s oriented correctly in the hole, they sometimes tumble in sideways when installing them.

I will check the overload ball tomorrow and make sure that its centered on the valve seat. Is this the cap that your referring to that knocks the ball when dropping it down in the hole? Does the fluid need to be drained before removing the overload screw? Also, should I turn the screw a 1/2 turn out from the 1 3/4 turns?

Ill check the release valve too and make sure that its orientented correctly. I did not replace the release valve on this. If the release valve was bad is it possible that it holds light cylinder pressure but not hold with more pressure? Seemed okay when I checked it.

I should also add that I noticed when it stopped lifting and I kept on pumping the handle I could hear like a slight air noise? Ill have to recheck again tomorrow and observe where its coming from but it sounded like it might of been from inside the tank? If that sounds right.
 

Attachments

  • 1012172017.jpg
    1012172017.jpg
    146.9 KB · Views: 31
Last edited:
OP
S

Snapon1

Well-known member
Joined
Feb 19, 2016
Messages
52
Location
Minneapolis, MN
In addition to what Hiball gave you, You had a rusty spot in the bore that you cleaned up. Is there a chance your ram has hit this spot and fluid is leaking around? Try putting a 4x4 on the lift pad and then load the jack. If it stops when it starts to load then it is probably not the bore, if it rises to ~ the same spot and stops then it may be the rust spot, or not enough oil in the reservoir.

lg
no neat sig line

Ill try this tomorrow. As far as I can tell the oil level looks to be filled just above the cylinder and bled by pumping the handle with release valve open.
 

Hiball

Well-known member
Joined
Apr 30, 2009
Messages
14,027
Location
Missery
I will check the overload ball tomorrow and make sure that its centered on the valve seat. Is this the cap that your referring to that knocks the ball when dropping it down in the hole? Does the fluid need to be drained before removing the overload screw? Also, should I turn the screw a 1/2 turn out?

Ill check the release valve too and make sure that its orientented correctly. I did not replace the release valve on this. If the release valve was bad is it possible that it holds light cylinder pressure but not hold with more pressure? Seemed okay when I checked it.

Yes, the cap is the part right above the ball. I always use a dab of bearing grease on the spring to keep the 2 together when installing, this reduces th possibility of knocking the ball off center. Turn the overload 1/2 turn “In” meaning that you are increasing seat pressure. If the release was oriented correctly, but bad/grooved I would think the jack would lift and then fall With some delay, not immediate. Probably gonna need to at min elevate the back of th jack to sway the oil so you can see what’s going on with the overload/valve components.
 
OP
S

Snapon1

Well-known member
Joined
Feb 19, 2016
Messages
52
Location
Minneapolis, MN
I tried a 2x4 between the lift pad and a car with the same results. It wouldn't lift any further with a load but it does lift all the way up with out any load though so I'm guessing its not a sealing issue inside the cylinder. I did notice that there was some oil on top of the overload screw this morning. Is that normal?

Also, I haven't taken the overload screw out yet to check inside but I tried turning it a 1/2 turn in just to see and now it will actually lift the car. So is there something wrong with the ball seat where its not sealing enough and I'm compensating by increasing seat pressure? Prior to rebuilding, it was set to 1 3/4 turns out from being screwed in all the way so that's where I initially had set it to.
 

Attachments

  • 1020171445b.jpg
    1020171445b.jpg
    151.3 KB · Views: 27
  • 1020171402b.jpg
    1020171402b.jpg
    147.3 KB · Views: 29
  • 1020171402a.jpg
    1020171402a.jpg
    150 KB · Views: 30
  • 1020171445d.jpg
    1020171445d.jpg
    148.2 KB · Views: 22
Last edited:

Hiball

Well-known member
Joined
Apr 30, 2009
Messages
14,027
Location
Missery
Also, I haven't taken the overload screw out yet to check inside but I tried turning it a 1/2 turn in just to see and now it will actually lift the car. So is there something wrong with the ball seat where its not sealing enough and I'm compensating by increasing seat pressure? Prior to rebuilding, it was set to 1 3/4 turns out from being screwed in all the way so that's where I initially had set it to.

First off it's impossible to set or re-set a overload without a test station, when you mentioned 1 3/4 out, I thought that was a little light. With that said... Spring tension does change over time, so while checking a the original setting is good idea, it's not 100% fool proof as in some cases, especially second hand used equipment, where other hands could have been inside. It definitely doesn't mean something is wrong with the seat, although possible of course. If the Jack is operating, and not dropping under load it's not bypassing (lifting the ball).
 
OP
S

Snapon1

Well-known member
Joined
Feb 19, 2016
Messages
52
Location
Minneapolis, MN
Good to know. Would you recommend having the overload screw set? So if I understand this correctly the looser or lighter the screw is turned in the valve will open up easier with a bigger load vs if it was tightened more, the valve will stay closed and handle more of a load before it will open up? If that makes sense.

Also, would to thank you Hiball for all the information and advice. It definitely helped me out. Also, want to thank Larry and everybody else who helped. It is all new stuff to me and I'm still trying to understand how everything works.
 

Hiball

Well-known member
Joined
Apr 30, 2009
Messages
14,027
Location
Missery
Good to know. Would you recommend having the overload screw set? So if I understand this correctly the looser or lighter the screw is turned in the valve will open up easier with a bigger load vs if it was tightened more, the valve will stay closed and handle more of a load before it will open up? If that makes sense.

Also, would to thank you Hiball for all the information and advice. It definitely helped me out. Also, want to thank Larry and everybody else who helped. It is all new stuff to me and I'm still trying to understand how everything works.

It's impossible to say based of the above reasons, but 1 1/4 out isn't out of the norm. The main thing is to just be concentious to what your lifting, you could literally weld the overload closed and as long as you don't exceed the seals rating, everything will be fine. Unfortunately, people aren't too bright on occasion or misjudge loads or knowingly exceed the rating and bad things sometimes happen, you can also get cylinder spikes by dropping loads and then closing the release before the load falls to line up Jack stands etc and this is a instance where the safety overload kicks in. My advice... Be safe, always use Jack stands and keep yourself out of harms way when possible, this goes New jacks along with Used equipment. Hydraulic jacks are only for lifting, not maintaining loads in a elevated state.
 

larry_g

Well-known member
Joined
Apr 28, 2007
Messages
16,879
Location
oregon
It's impossible to say based of the above reasons, but 1 1/4 out isn't out of the norm. The main thing is to just be concentious to what your lifting, you could literally weld the overload closed and as long as you don't exceed the seals rating, everything will be fine. Unfortunately, people aren't too bright on occasion or misjudge loads or knowingly exceed the rating and bad things sometimes happen, you can also get cylinder spikes by dropping loads and then closing the release before the load falls to line up Jack stands etc and this is a instance where the safety overload kicks in. My advice... Be safe, always use Jack stands and keep yourself out of harms way when possible, this goes New jacks along with Used equipment. Hydraulic jacks are only for lifting, not maintaining loads in a elevated state.

I'm curious if when setting the overload, is it done at a certain percentage of lift, like the arm is 50% up, OR is it done directly on the cylinder? The reason I ask would it be reasonable to find a load of ~4000 lbs and adjust so that load is just unable to lift? Say the front end of a large pickup. The load the cylinder see is a function of the lift arm angle so that is why I ask what lift angle.

lg
no neat sig line
 
OP
S

Snapon1

Well-known member
Joined
Feb 19, 2016
Messages
52
Location
Minneapolis, MN
Well I found that my overload valve hole was completely filled with fluid this morning and it looks like it overflowed as there is signs of oil on the rest of the pump. It must of happened overnight as I didnt see any yesterday. Is it normal or okay to get this much oil coming out of it overnight?
 

Attachments

  • 1021171322a.jpg
    1021171322a.jpg
    146.8 KB · Views: 39
Last edited:

Hiball

Well-known member
Joined
Apr 30, 2009
Messages
14,027
Location
Missery
I'm curious if when setting the overload, is it done at a certain percentage of lift, like the arm is 50% up, OR is it done directly on the cylinder? The reason I ask would it be reasonable to find a load of ~4000 lbs and adjust so that load is just unable to lift? Say the front end of a large pickup. The load the cylinder see is a function of the lift arm angle so that is why I ask what lift angle.

lg
no neat sig line

It varies from jack to jack, and probably from shop to shop as far as that goes. If you look at most jacks (not all designs) you will see that as the lift arm rises, it gets to a point where it stops going up and starts moving back towards the unit. I always set mine right before it breaks over, probably 60-80% of the power lift range (depending on jack design), account when it reaches that break over point, it takes less PSI to get to full extension. If you had a measurable load, sure you could use that has a reference. I would question the front end of a pickup, because your still not lifting the entire load. I run into that all the time.. I drive 1 Ton pickup, I need at least a 3 ton jack to change a tire... Uh, No you don’t.


Well I found that my overload valve hole was completely filled with fluid this morning and it looks like it overflowed as there is signs of oil on the rest of the pump. It must of happened overnight as I didnt see any yesterday. Is it normal or okay to get this much oil coming out of it overnight?

I’m assuming you left the jack under load overnight? If so I would definitely verify the ball position, probably give it a few taps with a punch to reseat and reinstall the components and install the freeze plug. It’s not uncommon to have some oil on top of the overload adjustment, the freeze plug is there for a reason.
 
Last edited:
OP
S

Snapon1

Well-known member
Joined
Feb 19, 2016
Messages
52
Location
Minneapolis, MN
I’m assuming you left the jack under load overnight? If so I would definitely verify the ball position, probably give it a few taps with a punch to reseat and reinstall the components and install the freeze plug. It’s not uncommon to have some oil on top of the overload adjustment, the freeze plug is there for a reason.

No load on the jack. It was all the way down in resting position. Used it once yesterday and then I released it all the way down and left it but did not see any oil in the hole yesterday until this morning it was completely full of oil.
 

Hiball

Well-known member
Joined
Apr 30, 2009
Messages
14,027
Location
Missery
No load on the jack. It was all the way down in resting position. Used it once yesterday and then I released it all the way down and left it but did not see any oil in the hole yesterday until this morning it was completely full of oil.

Check your overload ball/seat orientation.
 
OP
S

Snapon1

Well-known member
Joined
Feb 19, 2016
Messages
52
Location
Minneapolis, MN
Okay I'll check that out tomorrow. So the ball inside the overload is suppose to seal and not allow any fluid to pass at rest or when using unless it is overloaded correct? Once the jack is overloaded though the oil will go pass the ball and does it go back into the tank? Just trying to understand how it works.
 
Last edited:

Hiball

Well-known member
Joined
Apr 30, 2009
Messages
14,027
Location
Missery
Okay I'll check that out tomorrow. So the ball inside the overload is suppose to seal and not allow any fluid to pass at rest or when using unless it is overloaded correct? Once the jack is overloaded though the oil will go pass the ball and does it go back into the tank? Just trying to understand how it works.

The ball is only part of it, the spring, in particular the seat pressure determined by how many turns in or out the adjusting cap determines how much cylinder pressure is allowed before the ball lifts. Once pressure is restored, the ball re-seats and seals the cylinder back up.
 

elav

Well-known member
Joined
Nov 12, 2008
Messages
122
I was given a Snap On YA642 that works but could use a rebuild. I noticed that the ram has some heavy pitting - guessing it was stored for a long period of time in the up position. Is the ram being pitted going to cause issues?
 
To avoid these ads, REGISTER NOW!
Top Bottom