To avoid these ads, REGISTER NOW!

SoCal Sawdust

OP
S

sfanale

Well-known member
Joined
Sep 13, 2013
Messages
203
Location
California
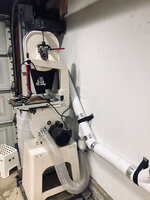
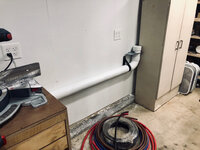
This are getting exciting! After two days and as many hours wandering the aisles of HD and Lowe’s... I finally figured out a way to connect the cyclone to the HF dust collector:

ea5a951323f87734ff062af4a8ad378d.jpg

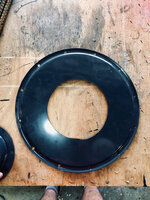
I had to make a custom lid for the collection barrel but I was eventually able to get it all lined up. I also started the first line of ducting and drops:
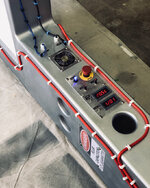
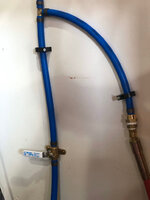
8c4918868c2642e543db81aab0fd2678.jpg

Blast-gates:

f14636168ccea6b15b021e2272dd54cc.jpg

I’ll be running 4” flex line from the bottom of the blast to each tool, so I’m thinking I will move the gates down a few feet to use up the cheap PVC and shorten the lengths of expensive hose required.


Sent from my iPhone using The Garage Journal mobile app
 

Attachments

  • 8c4918868c2642e543db81aab0fd2678.jpg
    8c4918868c2642e543db81aab0fd2678.jpg
    722.7 KB · Views: 0
  • f14636168ccea6b15b021e2272dd54cc.jpg
    f14636168ccea6b15b021e2272dd54cc.jpg
    553.7 KB · Views: 0
  • ea5a951323f87734ff062af4a8ad378d.jpg
    ea5a951323f87734ff062af4a8ad378d.jpg
    102.4 KB · Views: 0
To avoid these ads, REGISTER NOW!

Growlertdi

Well-known member
Joined
May 17, 2016
Messages
410
Location
Millersport, Ohio
looking good. Is static buildup an issue with the PVC lines? I recall that it might be an issue, but not 100% sure if it was with PVC or not.
 

bdbecker

ALLIANCE MEMBER
Joined
Nov 18, 2015
Messages
5,543
Location
Iowa
Shop is looking good!

I know it was awhile ago, but if you haven't applied some other finish already, try rubbing some Howards Feed-n-Wax on that vinegar stained wood - it'll add some depth and shine, and it will protect the wood. Not all wood turns black when you use rusty vinegar to stain them, only wood that has a naturally high level of tannic acid will do that. I've had it happen a few times in the past. If black is not the intended finish, it can be frustrating.

looking good. Is static buildup an issue with the PVC lines? I recall that it might be an issue, but not 100% sure if it was with PVC or not.

Static does build up on PVC lines, but it's not as big of a risk as the internet would have you believe.
http://www.woodcentral.com/articles/shop/articles_221.shtml
 

elguappo

Well-known member
Joined
Dec 15, 2008
Messages
247
Location
SACRAMENTO, CA
Just read the whole thread, love what you did with the flip top cabinet.
I think you'll come to regret using the particle board on the walls long term, but burn that bridge when you come to it.
The outside fencing is fantastic, love the horizontal slat and steel post design.
I look forward to more updates.
 
OP
S

sfanale

Well-known member
Joined
Sep 13, 2013
Messages
203
Location
California
Shop is looking good!

I know it was awhile ago, but if you haven't applied some other finish already, try rubbing some Howards Feed-n-Wax on that vinegar stained wood - it'll add some depth and shine, and it will protect the wood. Not all wood turns black when you use rusty vinegar to stain them, only wood that has a naturally high level of tannic acid will do that. I've had it happen a few times in the past. If black is not the intended finish, it can be frustrating.


Static does build up on PVC lines, but it's not as big of a risk as the internet would have you believe.
http://www.woodcentral.com/articles/shop/articles_221.shtml

This is my understanding as well. Might shock me, but that is about as far as it would go. The dust pile fire is a different issue...
 
OP
S

sfanale

Well-known member
Joined
Sep 13, 2013
Messages
203
Location
California
Just read the whole thread, love what you did with the flip top cabinet.
I think you'll come to regret using the particle board on the walls long term, but burn that bridge when you come to it.
The outside fencing is fantastic, love the horizontal slat and steel post design.
I look forward to more updates.

the wall I just hung/painted will see a lot more use, so I bet I'll learn that lesson pretty quick! Hopefully, I don't regret it too much!
 

remote

Member
Joined
May 19, 2015
Messages
10
Love this thread. I appreciate your work. You have done a lot of things that I would like to do to my house, built from the same era.

Are you close to Clairemont/bay ho area?
 
OP
S

sfanale

Well-known member
Joined
Sep 13, 2013
Messages
203
Location
California
Love this thread. I appreciate your work. You have done a lot of things that I would like to do to my house, built from the same era.

Are you close to Clairemont/bay ho area?

Thanks! I'm looking forward to reading your build thread when it starts. Yep, right in that area. I routinely shop at the Moreno Costco.
 
OP
S

sfanale

Well-known member
Joined
Sep 13, 2013
Messages
203
Location
California
Little more progress! I finished running just about all the duct and started finalizing some of the joints with screws/foil tape. I managed to keep the trunk that crosses the garage up in the rafter section so it’s never going to get in the way:

1c3cf7608d4b70b3f13ceb6b02db7f6b.jpg

Then I drops down the wall behind the lumber rack:

3d69f2ce3d5c62ed0a017f82b80d9b57.jpg

And finally it sweeps around the back of the drill press, terminating the branch by reducing it down to 2” Loc-line for hand free suction:

c2007b4e7af0cda0fe8066f2ef813871.jpg

Right now, that little section of loc-line is the most amazing thing! I can’t wait to cut some holes with something. I have one other little trick planned for this system—just waiting for amazon to deliver.


Sent from my iPhone using The Garage Journal mobile app
 

Attachments

  • c2007b4e7af0cda0fe8066f2ef813871.jpg
    c2007b4e7af0cda0fe8066f2ef813871.jpg
    790.9 KB · Views: 0
  • 3d69f2ce3d5c62ed0a017f82b80d9b57.jpg
    3d69f2ce3d5c62ed0a017f82b80d9b57.jpg
    818.4 KB · Views: 0
  • 1c3cf7608d4b70b3f13ceb6b02db7f6b.jpg
    1c3cf7608d4b70b3f13ceb6b02db7f6b.jpg
    961.2 KB · Views: 0

Bob275

Well-known member
Joined
Nov 20, 2011
Messages
319
Location
RI
I can't wait to see how this setup works out for you, it's looking good! Currently have a shop vac and dust deputy I'd like to upgrade. Really didn't want to pay 2-3k for a new Oneida dust collector minus all the piping and fittings...
 
OP
S

sfanale

Well-known member
Joined
Sep 13, 2013
Messages
203
Location
California
Another night of progress! Finalized this one wall of drops:

e813cb0d7d1c2629839c127e2c78756f.jpg

I pushed the bandsaw over there and hooked it up with 4” flex hose. I’m not in love with this first drops placement, but I was feeling stuck with analysis paralysis... something is in and it’s very functional.

I also wrapped up one drop with a reducer for 2.5” flex hose. I’ll use with with small hand tools—mostly hand sander and rarely the biscuit jointer:

883d28c28b1c519125cffc0cd9f292b5.jpg

There are two more drops to finalize the duct work on, and I need to doctor something up to connect the Bosch miter saw. The OEM dust collection on it is total ****, so I’ll need to make some modifications.

I also did some basic measurements for CFM and LFM...

~ the 2.5” hose after 10’ was pulling about 120 CFM and just over 3,500 LFM
~ at the face of the 4” blast gates, my anemometer peaked out at 30m/s, so that’s over 500 CFM and over 5,900 LFM.
~ the very furthest run, the LocLine at the drill press (also 2.5”) measured 175 CFM and 5,100 LFM.

Keep in mind the 4” measurement was maxed out, but I need to take another measurement once I have a length of 4” flex hose. ALSO, this is all before the exhaust is finalized and the larger impeller installed. I’m still on the stock HF 10” impeller. Point is... there is only room for improvement, but it’s likely I’ll max out the capacity of 4” ducting—and that’s exactly where I was hoping to be!


Sent from my iPhone using The Garage Journal mobile app
 

Attachments

  • 883d28c28b1c519125cffc0cd9f292b5.jpg
    883d28c28b1c519125cffc0cd9f292b5.jpg
    846.7 KB · Views: 0
  • e813cb0d7d1c2629839c127e2c78756f.jpg
    e813cb0d7d1c2629839c127e2c78756f.jpg
    694.6 KB · Views: 0

paredown

Well-known member
Joined
Jan 12, 2012
Messages
544
Location
Pomona, NY
Made very little progress this weekend--only really got the door hung and did a slight bit of reorganization.

The way I learned to hang a door comes from Bob Villa's carpenter and is the easiest way I have ever found to accomplish getting a door installed. I even used it on my double french glass doors and it was done in just a few minutes. SO EASY:

...

Thanks for the link on the door technique--I'll be using that!

Nice work on the garage, the reno of the playroom and the rest of the projects!
 
Last edited:
OP
S

sfanale

Well-known member
Joined
Sep 13, 2013
Messages
203
Location
California
I have been out in the garage the last couple nights trying to figure out the final details of ducting. Unfortunately, I realized changes had to be made...

07ed7806c7e5ea9a71b00d3c44b7c795.jpg

Pain in the *** to re-route, but the new layout had barely an effect on the downstream CFM and is way easier to make the connections I needed. Also, it preserves highly valuable wall space for upper cabinets. Some of the connections:

019c6e064a61c4add13296b827b29c35.jpg

85bc047b12977d93344d757f43723cea.jpg

4f0ced63d5e7f387453980fd4f520792.jpg

Making the hose connection for the miter saw makes much more sense this way. The built in Bosch dust collection is ****, so I attempted a couple additional configurations:

c20ec4523e89e604b989da282470f4a1.jpg

5bdbe7cf5910ecf744388931f49bc879.jpg

Neither option worked too well. Problem is the 4” duct is too far back (about 12”) from the saw blade even at its most compact, so the air draw is just not effective. My thinking is to setup another lock line configuration like the drillpress so I can duct the pipe right next to the back of the blade when compact.

I also need to figure out the table saw situation because my contractor saw isn’t really built for dust collection. Making progress!


Sent from my iPhone using The Garage Journal mobile app
 

Attachments

  • 019c6e064a61c4add13296b827b29c35.jpg
    019c6e064a61c4add13296b827b29c35.jpg
    688.3 KB · Views: 0
  • 07ed7806c7e5ea9a71b00d3c44b7c795.jpg
    07ed7806c7e5ea9a71b00d3c44b7c795.jpg
    693.4 KB · Views: 0
  • 85bc047b12977d93344d757f43723cea.jpg
    85bc047b12977d93344d757f43723cea.jpg
    706.9 KB · Views: 0
  • 4f0ced63d5e7f387453980fd4f520792.jpg
    4f0ced63d5e7f387453980fd4f520792.jpg
    705.8 KB · Views: 0
  • c20ec4523e89e604b989da282470f4a1.jpg
    c20ec4523e89e604b989da282470f4a1.jpg
    872 KB · Views: 0
  • 5bdbe7cf5910ecf744388931f49bc879.jpg
    5bdbe7cf5910ecf744388931f49bc879.jpg
    870.9 KB · Views: 0

bj383ss

Well-known member
Joined
Sep 29, 2011
Messages
3,166
Location
TX
Looking Good. I think the Miter Saw is one of the hardest to contain dust on.

Bret
 

Growlertdi

Well-known member
Joined
May 17, 2016
Messages
410
Location
Millersport, Ohio
theres a guy I watch on youtube named Frank Howarth who did dust collection on his radial arm saws by ducting to oval holes in the tabletop and making plywood walls with smaller slotted holes in them that were up close to the blade. the slotted holes looked like a grille and were close to the blade area but behind them was a big open area or the dust to collect in the big tubes.

perhaps you could make something like that in a V shape around your miter saw there. He uses his as the Fence for his Radial arm saw.
 
OP
S

sfanale

Well-known member
Joined
Sep 13, 2013
Messages
203
Location
California
perhaps you could make something like that in a V shape around your miter saw there. He uses his as the Fence for his Radial arm saw.


Oh yea, I forgot about that! I follow him too— I know exactly what you’re talking about. I didn’t consider that as an option. I’m going to rewatch that video and consider if I could make that work. Thanks!


Sent from my iPhone using The Garage Journal mobile app
 
OP
S

sfanale

Well-known member
Joined
Sep 13, 2013
Messages
203
Location
California
I’m just going to call this the nearly final option for the miter saw. 2x 2.5” loc-line on each side and the stock DC from the saw. It’s not perfect—I still wind up with some dust lying around, but it’s better than stock:

d11f710564a52ce96e0903b6c249ffeb.jpg

c03c313a703dfef504e25bab52df7c4b.jpg

ad0351c96492a48a22abac1ec04f7f3d.jpg

I’m hoping when I install the upgraded impeller in the HF dust collector those extra CFM will actually help out here. The three ports winds up at roughly the same face surface area as a single 4” port, but I think I lose all the velocity at the mouth of each port. It won’t get worse than this and it’s shown me the light on the loc-line front. I discovered they make a 3” pvc adapter piece for $5 so the connection to sewer pipe is seamless!

On to the table saw...


Sent from my iPhone using The Garage Journal mobile app
 

Attachments

  • c03c313a703dfef504e25bab52df7c4b.jpg
    c03c313a703dfef504e25bab52df7c4b.jpg
    800 KB · Views: 0
  • ad0351c96492a48a22abac1ec04f7f3d.jpg
    ad0351c96492a48a22abac1ec04f7f3d.jpg
    816.7 KB · Views: 0
  • d11f710564a52ce96e0903b6c249ffeb.jpg
    d11f710564a52ce96e0903b6c249ffeb.jpg
    878.5 KB · Views: 0
OP
S

sfanale

Well-known member
Joined
Sep 13, 2013
Messages
203
Location
California
I finally wrapped up the major project I’ve been working on for the last month. My work had a 20th anniversary party with a Back to the Future theme. I volunteered to help with decor and modeled this little baby in sketch-up:

9c9b81001092fcf2f323115d8fa32597.jpg

The plan was to integrate some LEDs in/on the box itself, a 40ft string of addressable LEDs, a control panel, and sound effects. The goal was to pay homage to the lightening bolt clock tower scene in BTTF1. The entire box was MDF so I started with the face plates:

35cf02ed8c28a7181ac56474c102ec7d.jpg

Then I worked on some of the accessories and cutouts:

b174390ceeb11aedbf17d74a124d575b.jpg

237fee9311d5abab9b59b40c5ae6ee81.jpg

05b73fae02f77bce22f311d9bc40d782.jpg

Then I did some live testing:

34179ba87a50c99239f14e2d25102bb9.jpg

Before finally closing it up (Aka, never enough clamps):

17e0b933ae431bf45008c853d1127f37.jpg

Then I got my dexter on for paint:

3d3b308a60ba8a5f97f5e4e8656689a8.jpg

And some final glamour shots:

851ec14452463b4289b93edacf4ee5f8.jpg

db95291e21a374598a3807741dc309b8.jpg

611f1e3917decdae875f003f47275c21.jpg

bbe41ff906719be408efa624e75bb267.jpg

27dc1398cfc24a53b74bf547e7f06eda.jpg

The cool thing is the switch panel really controlled everything and the gauges read the real voltage from the power supply and temperature inside the box. The addressable string of neopixels ran 40ft and was controlled by an arduino like so:

1) a thunder sound effect would play
2) a group of 20 LEDs would fire down the string
3) when the LEDs hit the sign, another electrical crackle sound effect would play and some lights inside the box would flash like electrical arcs
Bonus) at random intervals different movie sound clips would play. GREAT SCOTT!!!

Now back to shop projects.


Sent from my iPhone using The Garage Journal mobile app
 

Attachments

  • 27dc1398cfc24a53b74bf547e7f06eda.jpg
    27dc1398cfc24a53b74bf547e7f06eda.jpg
    699.5 KB · Views: 0
  • 611f1e3917decdae875f003f47275c21.jpg
    611f1e3917decdae875f003f47275c21.jpg
    864 KB · Views: 0
  • db95291e21a374598a3807741dc309b8.jpg
    db95291e21a374598a3807741dc309b8.jpg
    765.6 KB · Views: 0
  • 851ec14452463b4289b93edacf4ee5f8.jpg
    851ec14452463b4289b93edacf4ee5f8.jpg
    656.8 KB · Views: 0
  • 3d3b308a60ba8a5f97f5e4e8656689a8.jpg
    3d3b308a60ba8a5f97f5e4e8656689a8.jpg
    932.4 KB · Views: 0
  • 17e0b933ae431bf45008c853d1127f37.jpg
    17e0b933ae431bf45008c853d1127f37.jpg
    974.9 KB · Views: 0
  • 34179ba87a50c99239f14e2d25102bb9.jpg
    34179ba87a50c99239f14e2d25102bb9.jpg
    804.3 KB · Views: 0
  • 05b73fae02f77bce22f311d9bc40d782.jpg
    05b73fae02f77bce22f311d9bc40d782.jpg
    926.9 KB · Views: 0
  • 237fee9311d5abab9b59b40c5ae6ee81.jpg
    237fee9311d5abab9b59b40c5ae6ee81.jpg
    771.8 KB · Views: 0
  • b174390ceeb11aedbf17d74a124d575b.jpg
    b174390ceeb11aedbf17d74a124d575b.jpg
    720.7 KB · Views: 0
  • 35cf02ed8c28a7181ac56474c102ec7d.jpg
    35cf02ed8c28a7181ac56474c102ec7d.jpg
    769.8 KB · Views: 0
  • 9c9b81001092fcf2f323115d8fa32597.jpg
    9c9b81001092fcf2f323115d8fa32597.jpg
    24.9 KB · Views: 0
  • bbe41ff906719be408efa624e75bb267.jpg
    bbe41ff906719be408efa624e75bb267.jpg
    882 KB · Views: 0
Last edited:
To avoid these ads, REGISTER NOW!
OP
S

sfanale

Well-known member
Joined
Sep 13, 2013
Messages
203
Location
California
Without delay, I went right into the shop and upgraded my HF dust collector with a larger impeller. The first step was to cut the top mounting plate open to take the 5” port up to 6”:

d362ce561dd17375a305b333408f07cc.jpg

c80e78b7940d8eeaafd7f9155a2d5c66.jpg

Then I added a 6” starting flange and riveted it into place:

fef812bd504595e228d0087d39c012dc.jpg

Sealed it all up with foil tape:

8d2d28c0f154e9e6b2a535d21f036835.jpg

b4e55cdf4f97df8a9b9622ea1a9cde60.jpg

Opening up the flange let’s me match the 6” opening of the super dust deputy all the way through the impeller housing and out the exhaust. Since I’m blowing the exhaust out the side of the garage outdoors, there is basically zero restriction—it’s theoretically as good as it could get given the input is restricted to 4” because of the PVC. Too bad they don’t make 5” PVC... then this think would really howl!

The stock HF impeller is 10”, compared to the new Rikon 12” impeller. The blades on the Rikon also run in the opposite direction, which YouTube tells me is actually ideal (thanks Matthias!):

5ec699286398a198931d930cf3b92835.jpg

Before doing the swap, I tested air flow at all the locations so I could directly compare before and after. Looks like generally speaking there was a good improvement:

0712aad54665f3a9ed3a94f180e65a7e.jpg

One caveat is that my anemometer only goes up to 30m/s, so the larger diameter runs max it out. That means there wasn’t a measurable improvement at the bandsaw, which had the shortest run and is fully 4” piping to the tool port. The sanding drop, which has 10ft of 2.5” flex hose, got a good bump so now it matches a shopvac. Most importantly, the miter saw got the best improvement. Since that seemed to have the worst collection efficiency, I am pleased to see such a good gain. Not measured directly is the improvement in static pressure that the reverse impellers are supposed to give... hopefully I see that with continued use over time.

Definitely happy to see a pretty easy $130 upgrade for such a measured improvement across the board. Pretty stoked on this 4” PVC system.


Sent from my iPhone using The Garage Journal mobile app
 

Attachments

  • 0712aad54665f3a9ed3a94f180e65a7e.jpg
    0712aad54665f3a9ed3a94f180e65a7e.jpg
    71.2 KB · Views: 1
  • 5ec699286398a198931d930cf3b92835.jpg
    5ec699286398a198931d930cf3b92835.jpg
    963.7 KB · Views: 1
  • b4e55cdf4f97df8a9b9622ea1a9cde60.jpg
    b4e55cdf4f97df8a9b9622ea1a9cde60.jpg
    1.1 MB · Views: 1
  • 8d2d28c0f154e9e6b2a535d21f036835.jpg
    8d2d28c0f154e9e6b2a535d21f036835.jpg
    1,017.6 KB · Views: 1
  • fef812bd504595e228d0087d39c012dc.jpg
    fef812bd504595e228d0087d39c012dc.jpg
    838.9 KB · Views: 0
  • c80e78b7940d8eeaafd7f9155a2d5c66.jpg
    c80e78b7940d8eeaafd7f9155a2d5c66.jpg
    1 MB · Views: 0
  • d362ce561dd17375a305b333408f07cc.jpg
    d362ce561dd17375a305b333408f07cc.jpg
    1,022.6 KB · Views: 0
Last edited:

bj383ss

Well-known member
Joined
Sep 29, 2011
Messages
3,166
Location
TX
Man that is great. Love the back to the future sign. The wires on the outside are perfect!

You now have the hot rodded HF DC.

Bret
 

kalopsia

Active member
Joined
Jul 2, 2017
Messages
37
Really nice work. You’re clearly talented!

How do you like the HF dust collector? I’ve been on the fence, and was thinking of spending a bit more for a Grizley or Jet. It looks like decent quality for the money and a couple aftermarket upgrades on the impeller and filter.


Sent from my iPhone using Tapatalk Pro
 
OP
S

sfanale

Well-known member
Joined
Sep 13, 2013
Messages
203
Location
California
Really nice work. You’re clearly talented!

How do you like the HF dust collector? I’ve been on the fence, and was thinking of spending a bit more for a Grizley or Jet. It looks like decent quality for the money and a couple aftermarket upgrades on the impeller and filter.


Sent from my iPhone using Tapatalk Pro


I’m not 100% familiar with all the specs on the Grizzly nor Jet, but there are a few true gems from HF and this DC is one of them (the other I think is the 12” disc sander). Using the 20% off super coupon made it the cheapest 2hp name in the game.

Looking at the equivalent 2HP options from grizzly and jet... they cost $500 and they are only single stage! The stock HF is only $160 with a super coupon. It’s a solid 2hp machine with basically IDENTICAL parts as both the JET and Grizzly. You could save quite a bit while still getting the same performance from the HF. To me that’s a really easy decision if you just want something turn key.

BUT! Then if you want to go crazy like I did, for the same cost you can “hot rod” it... I had the white collection barrel from work trash so that was free. (I actually have 4 more if anyone wants to pick one up in San Diego. Great for lots of things beyond dust bins!). I added the SDD cyclone ($175) and the impeller ($118), plus the starter fitting and 6” hose makes it right about $500. For the same money, I got a killer 2stage system and because I am able to vent outside, it’s even more efficient. Even if you had to vent inside, you could recycle the bag system from the HF for just the cost of some fittings, or spend the extra $150 on a filter unit. Either way, I think the extra effort to get a two stage is worth it.

I like tinkering anyway and it was fun to design things, test, rebuild, rethink, etc... so my money is on the HF anyway you spin it. For the same money, my setup will crust a stock Jet or Grizzly.


Sent from my iPhone using The Garage Journal mobile app
 

kalopsia

Active member
Joined
Jul 2, 2017
Messages
37
I’m not 100% familiar with all the specs on the Grizzly nor Jet, but there are a few true gems from HF and this DC is one of them (the other I think is the 12” disc sander). Using the 20% off super coupon made it the cheapest 2hp name in the game.

Looking at the equivalent 2HP options from grizzly and jet... they cost $500 and they are only single stage! The stock HF is only $160 with a super coupon. It’s a solid 2hp machine with basically IDENTICAL parts as both the JET and Grizzly. You could save quite a bit while still getting the same performance from the HF. To me that’s a really easy decision if you just want something turn key.

BUT! Then if you want to go crazy like I did, for the same cost you can “hot rod” it... I had the white collection barrel from work trash so that was free. (I actually have 4 more if anyone wants to pick one up in San Diego. Great for lots of things beyond dust bins!). I added the SDD cyclone ($175) and the impeller ($118), plus the starter fitting and 6” hose makes it right about $500. For the same money, I got a killer 2stage system and because I am able to vent outside, it’s even more efficient. Even if you had to vent inside, you could recycle the bag system from the HF for just the cost of some fittings, or spend the extra $150 on a filter unit. Either way, I think the extra effort to get a two stage is worth it.

I like tinkering anyway and it was fun to design things, test, rebuild, rethink, etc... so my money is on the HF anyway you spin it. For the same money, my setup will crust a stock Jet or Grizzly.


Sent from my iPhone using The Garage Journal mobile app


Thanks for the thoughtful reply. I’m fairly new to all this, so I appreciate you sharing your experience and rationale.


Sent from my iPhone using Tapatalk Pro
 
OP
S

sfanale

Well-known member
Joined
Sep 13, 2013
Messages
203
Location
California
Thanks for the thoughtful reply. I’m fairly new to all this, so I appreciate you sharing your experience and rationale.


Sent from my iPhone using Tapatalk Pro


Yea no problem.

More important than the collector, is how you design the ducts. You can choke just about any system if you aren’t thoughtful about your layout. Spend the time to map it in advance and consider your tool arraignment—then go get fittings you need and buy extra so you can switch things around as you build. I found I had to change the layout twice because you really can’t tell how things fit until you’re in the space trying to make it work. Good luck! Lots of people with experience to share on GJ.


Sent from my iPhone using The Garage Journal mobile app
 
Last edited:

Turnster

New member
Joined
Sep 27, 2019
Messages
1
Location
Florida
I found the rikon impeller on their website, it's in stock right now.
rikonparts.com/product/impeller-c-5-4-2
 
OP
S

sfanale

Well-known member
Joined
Sep 13, 2013
Messages
203
Location
California
Been ******* working on projects I didn’t expect many people on GJ would be interested in. This weekend I finally returned to the garage for a little mini project. Eventually I’d like to integrate a well planned compressed air system, but for now I just wanted to make things a bit easier to use than a coiled hose tangled up on the floor.

I already had a 50ft hose reel, I just needed to remount it from when I took it down to panel the walls/build my lumber rack. I also had a big coil of 1/2” PEX left over from a remodel. A few copper fittings and the project was done!

I mounted the hose reel just below my garage door track near the front of the garage so the hose can reach when filling car tires:

f850fdd504b403735c9f1f354b20f700.jpg

Then I drilled holes through the joists until I got to the bay that aligned with my compressor all the way on the other side of the garage:

df8b08b4eb73c76e44760af867088630.jpg
(I know! I need to put the little plastic pipe guards here, but I ran out so a trip to HD tomorrow will solve that.)

c4848205463d8d997ec28ee57da66500.jpg

Then I made a little goofy water trap:
79882822a043b348cf5e0bbd2c540404.jpg

I realize if I was doing it right, I should have copper for the first 10ft, a water separator, blah blah blah. I’ll get there someday—for now this uses up supplies cluttering up the garage and puts air where I need it.


Sent from my iPhone using The Garage Journal mobile app
 

Attachments

  • f850fdd504b403735c9f1f354b20f700.jpg
    f850fdd504b403735c9f1f354b20f700.jpg
    800.7 KB · Views: 0
  • df8b08b4eb73c76e44760af867088630.jpg
    df8b08b4eb73c76e44760af867088630.jpg
    716.9 KB · Views: 0
  • c4848205463d8d997ec28ee57da66500.jpg
    c4848205463d8d997ec28ee57da66500.jpg
    842.2 KB · Views: 0
  • 79882822a043b348cf5e0bbd2c540404.jpg
    79882822a043b348cf5e0bbd2c540404.jpg
    564.9 KB · Views: 0

Growlertdi

Well-known member
Joined
May 17, 2016
Messages
410
Location
Millersport, Ohio
I try to stay out of those debate threads, you can do what you like. :bowdown::bounce:

I was just surprised :shocking: to see it for the first time and I hope you get many years of service out of it. it looks pretty simple to use.:thumbup:
 
OP
S

sfanale

Well-known member
Joined
Sep 13, 2013
Messages
203
Location
California
2020 has actually been off to a good start in the shop! I just finished up this little project for the kiddo:

6eddd79711dd1aa6597c431d7fd8b4c0.jpg

2299653d0c551cbe68406e987e3967cb.jpg

eb0dacef2185fcb4c54e02554736f3e3.jpg

Attaches to his triangle I made last year. One side is a slide and the other a little ramp with climbing holds. Doesn’t seem like much of a project, but I made it from all scrap, per the usual. Had to laminate two sheet of ply to make it sturdy enough ~1” thick and full all the knots/voids so I could same it buttery smooth for little hands. Obligatory “never enough clamps” photo:

6aadc31ad59528181343387f02499445.jpg

Also, this year I have plans to spend more time in the shop and knock off more projects from my growing list. The first one is to upgrade my table saw setup so if you know anyone in San Diego/SoCal looking to get started in woodworking this is a good package. TS with diy dust collection shrouding, as well as woodpeckers router lift and porter cable 3 1/4 HP router. Also Incra positioner and wonderfence for the router.

Some photos in case anyone wants to share:

4f4e872530ed8176b20f36db39547833.jpg

fcf91f04842f655a691d1b0c528b6717.jpg

abf471ce33c3369d23bfbc755445c85d.jpg

564f3aaf1cc54a260282364fd879941a.jpg

I have all the manual, templates, figures... pretty much everything it all came with. Used but all in good working condition. Message me if you’re interested or know someone.

Once I get that all sold, time to purchase the new tools and kick 2020 into high gear. I’ll keep that setup a surprise until I’m ready to show it off!


Sent from my iPhone using The Garage Journal mobile app
 

Attachments

  • abf471ce33c3369d23bfbc755445c85d.jpg
    abf471ce33c3369d23bfbc755445c85d.jpg
    46.1 KB · Views: 0
  • 564f3aaf1cc54a260282364fd879941a.jpg
    564f3aaf1cc54a260282364fd879941a.jpg
    127.4 KB · Views: 0
  • fcf91f04842f655a691d1b0c528b6717.jpg
    fcf91f04842f655a691d1b0c528b6717.jpg
    108.5 KB · Views: 0
  • 4f4e872530ed8176b20f36db39547833.jpg
    4f4e872530ed8176b20f36db39547833.jpg
    75.9 KB · Views: 0
  • 6aadc31ad59528181343387f02499445.jpg
    6aadc31ad59528181343387f02499445.jpg
    106.3 KB · Views: 0
  • 6eddd79711dd1aa6597c431d7fd8b4c0.jpg
    6eddd79711dd1aa6597c431d7fd8b4c0.jpg
    106 KB · Views: 0
  • 2299653d0c551cbe68406e987e3967cb.jpg
    2299653d0c551cbe68406e987e3967cb.jpg
    112.3 KB · Views: 0
  • eb0dacef2185fcb4c54e02554736f3e3.jpg
    eb0dacef2185fcb4c54e02554736f3e3.jpg
    95.1 KB · Views: 0
Last edited:

nicholam77

Well-known member
Joined
Dec 18, 2016
Messages
2,655
Location
Minneapolis, MN
Love it! All the kid/baby stuff you've made is really awesome. I wish I was doing that for my daughter (1.5 yrs) but it can be tricky to find the time, especially since I'm still trying to cobble a "shop" together. Have been following since the beginning and your shop and house has really come a long way!

New gear is always exciting, looking forward to that update and your 2020 projects.

:beer:
 
OP
S

sfanale

Well-known member
Joined
Sep 13, 2013
Messages
203
Location
California
What’s this??? something’s missing...

1806971d5339fbeb685b77008b10bee1.jpg

Amazing that the setup I bought 9 years ago (for $1,200), used hard for nearly a decade, invested basically zero dollars in, could still fetch $1,000 on Craigslist. I guess that’s testimate to the quality of the older, American made tools. I doubt new saws hold their value like this old Ridgid.

On to the new setup... unfortunately COVID-19 means the new saw is backordered until July! However a few of the parts have started to land on my doorstep:

22ae6105b0ebd48c2acb9422970d8ac3.jpg

Really looking forward to spending much more time in the shop the rest of this year!


Sent from my iPhone using The Garage Journal mobile app
 

Attachments

  • 22ae6105b0ebd48c2acb9422970d8ac3.jpg
    22ae6105b0ebd48c2acb9422970d8ac3.jpg
    92.6 KB · Views: 0
  • 1806971d5339fbeb685b77008b10bee1.jpg
    1806971d5339fbeb685b77008b10bee1.jpg
    122.1 KB · Views: 0
OP
S

sfanale

Well-known member
Joined
Sep 13, 2013
Messages
203
Location
California
My table saw is back ordered until late July, maybe even August, so I’m tackling other projects until then. Tiny one today- grounding my dust collection. I have read the 14billion threads on the “fire hazard” of ungrounded PVC dust collection pipes. The reality is the fire hazard probably doesn’t exist, but the random static shocks while vacuuming dust, do present an issue. The is seemingly worse with finer dust. While working some MDF months back, I’d receive a strong, random shock from the sander hose every 30ish seconds. No bueno...

So I put in some screws that pierce into the airflow path inside and wrapped bare copper wire down the length:

ef5b269a3728fc14221fb4f98134ccb3.jpg

4596b1428b57b99312c3732af6db6f49.jpg

Then finally, I tapped the wire into the ground on an overhead light:

f92ad58605ad0eaa9813848c49cd4458.jpg

I haven’t had a chance to test, but I’m guessing this has to be better than nothing.


Sent from my iPhone using The Garage Journal mobile app
 

Attachments

  • f92ad58605ad0eaa9813848c49cd4458.jpg
    f92ad58605ad0eaa9813848c49cd4458.jpg
    66.8 KB · Views: 0
  • ef5b269a3728fc14221fb4f98134ccb3.jpg
    ef5b269a3728fc14221fb4f98134ccb3.jpg
    46.5 KB · Views: 0
  • 4596b1428b57b99312c3732af6db6f49.jpg
    4596b1428b57b99312c3732af6db6f49.jpg
    73.2 KB · Views: 0
To avoid these ads, REGISTER NOW!
Top Bottom