moab11
Well-known member
I'm not following how you did the letters. Did you laser cut vinyl that was applied over the all black print?

I'm not following how you did the letters. Did you laser cut vinyl that was applied over the all black print?
Tell us more about the desktop fiber laser? Sounds interesting- although, I imagine expensive unless you buy a used one? Also, what about laser safety? Always concerned about eyesafe operation...On dark color prints you can laser etch/engraved directly to the surface to permanently mark the printed part. I've got a desktop fiber laser and was able to use it to make the letters/arrows etc. You can vary the resulting color by changing the power/speed etc, I haven't done enough tests yet to get that part dialed in but do have the basic settings figured out
I don't know the exact details as to why, but this only works on darker color printed parts....light colors don't have enough pigments or something so the engraving is very faint


This is one of the most satisfying types of 3D printer applications. When you are using it as a tool to fix something else.In a moment of overzealous shop cleaning, I broke the little plastic tabs off the push-button of my garage door opener. Parts no longer available, so I designed and printed new tabs. Made it to overlay the old base structure so there's lots of surface area for epoxy to grab.
They got quite a bit of cash from me today. I bought another H2D. This one with dual AMS and the AMS-HT, and a lot of filament. Ordered this morning and I have tracking info for everything already. I've been really happy with the H2D.Black Friday sale started on the Bambu site until 12/5. They also have four rounds of "flash sales".
Has anyone seen a leak on the future flash sale items?
Did you get the new unit or a refurb? I've been considering a refurb but I'm a bit nervous about the quality of the "refurb".I ended up buying another 3D printer from Creality's eBay store with 20% off, this time I bought the K1Max and the CFS upgrade kit. So far I'm happy with the set up, probably not as user friendly as the Bambu stuff, but it's working.
Refurb, which was in my case sure seems like it's actually new- I took a chance that it might be a defective return, but honestly, it sure seems brand new to me. Plus it has the full warranty so if it did turn out to be a problem, I'm sure I'd get it resolved. The money savings is worth the slight risk ( YMMV) The only thing I noticed was that the box was pretty dirty, not damaged, just very dusty like it was lost in a warehouse for some timeDid you get the new unit or a refurb? I've been considering a refurb but I'm a bit nervous about the quality of the "refurb".
") Otherwise, it was in the original packaging, nothing had been messed with- still had the protective wrap on the glass, Had the packing screws in place, etc. I installed the door handle, took out the packing screws and turned it on. It did have older firmware and it updated that automatically. It wasn't the latest version of the K1Max, but it did have the full metal extruder update- so it's a "hybrid" of the latest hardware. ( the build plate doesn't have the K1Max label on it) It had the original hot end, not the updated Unicorn hot end. It printed the included 16min benchy just fine.
Otherwise, it was in the original packaging, nothing had been messed with- still had the protective wrap on the glass, Had the packing screws in place, etc. I installed the door handle, took out the packing screws and turned it on. It did have older firmware and it updated that automatically. It wasn't the latest version of the K1Max, but it did have the full metal extruder update- so it's a "hybrid" of the latest hardware. ( the build plate doesn't have the K1Max label on it) It had the original hot end, not the updated Unicorn hot end. It printed the included 16min benchy just fine. 
What is CMS? The only definitions I have for that acronym are way outdated and not 3D printing related.Refurb, which was in my case sure seems like it's actually new- I took a chance that it might be a defective return, but honestly, it sure seems brand new to me. Plus it has the full warranty so if it did turn out to be a problem, I'm sure I'd get it resolved. The money savings is worth the slight risk ( YMMV) The only thing I noticed was that the box was pretty dirty, not damaged, just very dusty like it was lost in a warehouse for some time
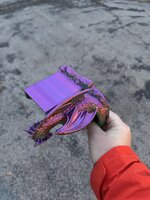
once I confirmed that was working I proceeded to replace the hot end with the updated unicorn hot end that I bought on Amazon- I wouldn't have done that but I was also adding the CMS which requires the Unicorn hot end. Anyway, I got the CMS installed and it all is working great. Here's an example of a multicolor print : it's about 8" wide for reference
Pretty sure was in reference to Creality's multi color system the CFS https://store.creality.com/products/cfs-creality-filament-system. Looks pretty similar to Bambu's AMS.What is CMS? The only definitions I have for that acronym are way outdated and not 3D printing related.
It's Creality's multicolor system - Similar to the Bambu AMS. Edit, I see Soloz2 answered the question. sorry for the duplicate answerWhat is CMS? The only definitions I have for that acronym are way outdated and not 3D printing related.
Thanks for the info. From one of the listings it seems like you need to purchase additional parts to get the multi color system working even if you buy the K1m + CFS unit. Is that correct?Refurb, which was in my case sure seems like it's actually new- I took a chance that it might be a defective return, but honestly, it sure seems brand new to me. Plus it has the full warranty so if it did turn out to be a problem, I'm sure I'd get it resolved. The money savings is worth the slight risk ( YMMV) The only thing I noticed was that the box was pretty dirty, not damaged, just very dusty like it was lost in a warehouse for some time
once I confirmed that was working I proceeded to replace the hot end with the updated unicorn hot end that I bought on Amazon- I wouldn't have done that but I was also adding the CMS which requires the Unicorn hot end. Anyway, I got the CMS installed and it all is working great. Here's an example of a multicolor print : it's about 8" wide for reference


.jpeg")

I've had a 5M since June 2024. Great printer. Now that they are sub $200 it's my go to suggestion for a starter printer.Been away from 3d printing for a few years... About to pull the trigger on a FlashForge 5M Pro. Weighed multicolor but chose to stay single color.
Anybody else a Flasher?
Edit... I pulled the trigger... it will be here Saturday
- Items (3): Printer, Spare print plate, 2 Spool de-hydrator
$482.99- Shipping & handling:
$0.00- Estimated tax to be collected:
$32.00- Total:
$514.99- Reward Points:
-$457.96- Order total:
$57.03 <--- total outlay.

Yes, there is an installation kit that has the parts needed to install the CFS on the K1 series printers, it's about a dozen parts, including a new extruder that has the integrated cutter in it. It's another $40-50 (I can't recall what I paid for it) It has all the parts to instal the CFS on any of the K1 series printers.Thanks for the info. From one of the listings it seems like you need to purchase additional parts to get the multi color system working even if you buy the K1m + CFS unit. Is that correct?

Giving up for the evening, but I've got a rough draft of the lid that will fix the screens in:
I need to make sure the screens will fit (I won't get them until week of Thanksgiving, but I do have one on hand), and then I want to clearance everything so I don't have to cut up the inside of the gauge cluster (or at least minimize it), then I need to figure out where the screw bosses will go to fix the top and the bottom together.
I also cringe at the idea of a '95 vintage, as it's my daily driver, and the newest car that I drive with any regularity.I am following along, completely intrigued. I love the idea of fitting hi tech gauges into your vintage car. And 3d printing the bits to make things fit like factory is just another reason why 3d printers are awesome. Trying to figure out what you're up to, I went to the site for your gauges.. and got confused. Let's pretend I'm a complete idiot. Can you explain the whole setup with the aftermarket ECU and CANBUS? If this isn't the right spot to dive into the non-3d printed elements of your gauge panel project, do you have a thread for the build? I looked and you don't have one here, but maybe elsewhere?
I cringe that a '95 car is "vintage" mainly because that means I am as well.

I am following along, completely intrigued. I love the idea of fitting hi tech gauges into your vintage car. And 3d printing the bits to make things fit like factory is just another reason why 3d printers are awesome. Trying to figure out what you're up to, I went to the site for your gauges.. and got confused. Let's pretend I'm a complete idiot. Can you explain the whole setup with the aftermarket ECU and CANBUS? If this isn't the right spot to dive into the non-3d printed elements of your gauge panel project, do you have a thread for the build? I looked and you don't have one here, but maybe elsewhere?
I cringe that a '95 car is "vintage" mainly because that means I am as well.
25 years or older IIRC. My Burgman's a classic. And my PT is, too.My neighbor told me she has a vintage Volvo. It's a 2001....
Have to ask... what does that make you?25 years or older IIRC. My Burgman's a classic. And my PT is, too.
I'm considering "horseless carriage" plates for my '92 300ZX and '71 240Z. The newer Z almost meets NM's criteria (35+ years old), and the older one certainly does.I saw a late 90s Honda accord with expanded use antique plates the other week. This seems so wrong.