next shipment of filament???
indeed. 2 of these and 1 behind it with only 2 on that top layer.
2x 5kg spools in each box.

already onto the next quote... which is insane to think about.


next shipment of filament???

I'd think you'd want something more like rubber, to take the vibration, with big ribs on the outside to keep it from collapsing.Need some advice from the more experienced printer people here. What material would you recommend I print this piece out of? I just used some PLA I had on hand to test fitment...drove around a bit to check function as well. As the engine bay heat started getting hot, it started to really soften and warp (not surprised). Would ABS be a good material? PA-CF maybe? This will be subject to heat (probably around 200ish F) as well as significant vibration. Printer is a Bambu X1 so I can print just about any material. Anybody here have good experience with engine bay printed items?
Edit, it's the bright red thing in the pic...lol
This guy does a nice video of his experiences. I haven't followed up on it but he might have some more recent videos of his results:Need some advice from the more experienced printer people here. What material would you recommend I print this piece out of? I just used some PLA I had on hand to test fitment...drove around a bit to check function as well. As the engine bay heat started getting hot, it started to really soften and warp (not surprised). Would ABS be a good material? PA-CF maybe? This will be subject to heat (probably around 200ish F) as well as significant vibration. Printer is a Bambu X1 so I can print just about any material. Anybody here have good experience with engine bay printed items?
Edit, it's the bright red thing in the pic...lol
Is your primary 3D printing business the tractor cupholders? How long have you been at it? Seems things have really taken off for you.anndd major shift. buying at these quantities I can shift over to ABS and get made in USA 5kg spools for under 6 a kg to the MN facility. gona burn thru this and going 100% made in USA ABS for all products.
edit: assuming this supplier has UV stabilizers in it.
Just bumping this up again.Somebody who has a Prusa XL with the multi toolheads please chime in.
I have a need for multicolor TPU printing. I need the object to be flexible as it is worn as a hat, however I also need the lettering on said object to be semi-transparent. I have already picked my filaments but due to the bambu ams and the way it's configured theres no way I'm getting anywhere with that.
I'm curious if the multi toolheads on the prusa xl can handle this task. I'm currently working on getting my e3d toolchanger back up and running but trying to decide if it's worth it to buy the XL.
Yes you can, to an extent. The feature is called Print Sequence "By Object" as opposed to the default "By Layer". The caveat here is note how large of an unoccupied area you need to print By Object, for clearance of the printhead:Hi, need some advice on working with my Bambu P1S. I'm making a bunch of game pieces, they're little pegs to move around a board. I need five pegs in each of six different colours. If I build five pegs on one plate, it takes about 20 minutes to print. Then I change the colour and print five more.
I have an AMS so could print multiple colour pegs at once. The problem is changing colour every layer is wasteful and time consuming.
Is there some way I can print each colour group consecutively, in one print process? ie. do five red, home the printer and do five green, etc. Do I put them on separate plates in distinct, non-overlapping locations and then print all plates?
I tried to Google this but don't even know what to call it.
Thanks.


While your statement is correct concerning the printhead, the slicer is aware of this and prints objects in a certain order, in this case starting at the back of the bed and working it's way forwardShort answer is no.
The reason is that it needs the room to swing the print head in both X and Y, and if there is something on the bed, it will interfere. I guess it would theoretically be possible if the print is shorter (Z-axis) than the print head so it would fit under the rods, but probably not worth the effort to implement (have to check for collisions when homing, finishing, etc).
What is wrong with starting a new print 20min later?
Actually I would argue against that. I am running a print right this very second that is printing in order of object rather than by layer. Theres a checkbox in the settings for print sequence. Take a look.Short answer is no.
The reason is that it needs the room to swing the print head in both X and Y, and if there is something on the bed, it will interfere. I guess it would theoretically be possible if the print is shorter (Z-axis) than the print head so it would fit under the rods, but probably not worth the effort to implement (have to check for collisions when homing, finishing, etc).
What is wrong with starting a new print 20min later?
Cool, did not know about this feature!While your statement is correct concerning the printhead, the slicer is aware of this and prints objects in a certain order, in this case starting at the back of the bed and working it's way forward
Yes you can, to an extent. The feature is called Print Sequence "By Object" as opposed to the default "By Layer". The caveat here is note how large of an unoccupied area you need to print By Object, for clearance of the printhead:
The above will not even slice. If you use the Arrange feature, you will notice you can now do what you want, but in much smaller quantities:
Just the 1 filament change now for the 2 different colors, but there is actually a better way to accomplish this. As you can see, treating each piece as its own object requires a lot of open area for movements. However, if you treat each color set as an assembly, it requires much less area, like this:
What I did was make clones of the pieces, then change the colors, highlight them, and click "Assemble". You will then see a shaded area for the required area needed for printhead movements of the entire assembly instead of each single piece. You may have to arrange/rotate your pieces in a specific manner to get them to fit on the bed, but this should be all you need to do. Hope that helps and let us know how it goes

Is your primary 3D printing business the tractor cupholders? How long have you been at it? Seems things have really taken off for you.
If you have the print height you can stack your prints one on top of the other with some material you can cut away between each print. You'd have to do this in CAD. You may have to create supports in CAD depending on what the game pieces look like.Hi, need some advice on working with my Bambu P1S. I'm making a bunch of game pieces, they're little pegs to move around a board. I need five pegs in each of six different colours. If I build five pegs on one plate, it takes about 20 minutes to print. Then I change the colour and print five more.
I have an AMS so could print multiple colour pegs at once. The problem is changing colour every layer is wasteful and time consuming.
Is there some way I can print each colour group consecutively, in one print process? ie. do five red, home the printer and do five green, etc. Do I put them on separate plates in distinct, non-overlapping locations and then print all plates?
I tried to Google this but don't even know what to call it.
Thanks.
Hi, need some advice on working with my Bambu P1S. I'm making a bunch of game pieces, they're little pegs to move around a board. I need five pegs in each of six different colours. If I build five pegs on one plate, it takes about 20 minutes to print. Then I change the colour and print five more.
I have an AMS so could print multiple colour pegs at once. The problem is changing colour every layer is wasteful and time consuming.
Is there some way I can print each colour group consecutively, in one print process? ie. do five red, home the printer and do five green, etc. Do I put them on separate plates in distinct, non-overlapping locations and then print all plates?
I tried to Google this but don't even know what to call it.
Thanks.
Finally had some success printing ASA on my X1C, I had been fighting warping and bed adhesion issues, even with good chamber temps (45c or so) and the textured PEI plate.
Found a tip to use the smooth PEI plate and glue stick and it worked like a charm! Prints were stuck on the plate extremely well!
That seems to be all most are having to do, but for some reason it wasn't enough for my printer. I had been doing the preheat at both 100 and 90(printing temp) mostly to get the chamber temp up. Putting a small blanket over the opt and sides of the printer makes a big difference in getting to and maintaining temp.i preheat for 30-40 minutes at 100c then start the job.
that helped a lot for me
Love the high-detail. Really smart you remembered to leave the sharp edges where their scrap pipe would have em. Don't forget to print in fuzzy skin for that rusty pitted texture."I dont see why anyone needs something more than a piece of pipe welded to some flat iron"
Behold. the troll cup.

your welds are too good. needs a few blobs and blow outs"I dont see why anyone needs something more than a piece of pipe welded to some flat iron"
behold. the troll cup.
its really hard to make organic shapes in fusion with my skill level. but i agree.your welds are too good. needs a few blobs and blow outs

Yeah. It is.its really hard to make organic shapes in fusion with my skill level. but i agree.


I've never set the bed above 120°C. I printed standoffs in PETG that lock the bed to the carriage on my CR10, and they've worked for 3 years.Probably need that plastic part to be ASA, Nylon or something else high temp to withstand the heat of the bed.

![20240711_015334[1].jpg](/forum/data/attachments/1991/1991503-5868706b3536e8eba5891ffbfdf8319b.jpg)

![20240711_013406[1].jpg](/forum/data/attachments/1991/1991505-ea175c629727d809eb97e4fc96cc3d82.jpg)
![20240711_015404[1].jpg](/forum/data/attachments/1991/1991506-c9258a3b969db326e446db8db18d5629.jpg)
![20240711_020255[1].jpg](/forum/data/attachments/1991/1991507-ab079db397bb19ff16920637c4009ce7.jpg)
![20240711_020333[1].jpg](/forum/data/attachments/1991/1991509-a160a54256b43c8ad4d532f9bfa235e5.jpg)
![20240711_021209[1].jpg](/forum/data/attachments/1991/1991510-d16c2121447aebea87491e95d2a0b5e1.jpg)
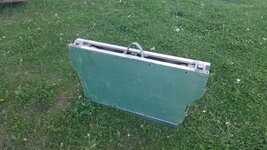
I can't seem to find a good video of it folding but basically the wheels pivot to the center and the two bed halves fold together. So to open it up and use it you lay it on the ground with the front half up. Open it up to around 90 degrees, slide the locking pins forward to the front and then pivot the wheels up like wings. Slide the locking pins back to keep the wheels unfolded and then open the trailer completely flat. Slide the hitch into position and lock it. Then flip the trailer over by lifting the tongue in an arc.@rslaback great job on the plug! That is one cool trailer. Please more pictures and show us how it works. How much weight can it tote?


Anyone have experience with the Flashforge Adventurer 5M? A friend is looking at getting one and asked me about it. I don't know but thought some here might know more than just want the YT videos show.