mike93lx
ALLIANCE MEMBER
I just ordered a 0.6 hot endat the print farm we run only .6 nozzles in production. every machine when bought it swapped over. I probably have 75 .4mm nozzles in a bin somewhere.

I just ordered a 0.6 hot endat the print farm we run only .6 nozzles in production. every machine when bought it swapped over. I probably have 75 .4mm nozzles in a bin somewhere.
Have you ever used a 0.6 nozzle to print Multiboard or Gridfinity grids? If so, what kind of speed improvement have you seen? What do you plan to do with your 0.4 nozzles?at the print farm we run only .6 nozzles in production. every machine when bought it swapped over. I probably have 75 .4mm nozzles in a bin somewhere.

Have you ever used a 0.6 nozzle to print Multiboard or Gridfinity grids? If so, what kind of speed improvement have you seen? What do you plan to do with your 0.4 nozzles?
Have you ever used a 0.6 nozzle to print Multiboard or Gridfinity grids? If so, what kind of speed improvement have you seen? What do you plan to do with your 0.4 nozzles?

 www.facebook.com
I saw that recently too. Neat use of magnets3D-printed glasses case with magnetic catch/opening
1.2M views · 29K reactions | Here's why I designed a 3d printed glasses case! The files to print this are in my bio! #3dprinting #3dprinter #3dprinted | Gazzaladra
Here's why I designed a 3d printed glasses case! The files to print this are in my bio! #3dprinting #3dprinter #3dprinted
Model: https://thangs.com/designer/Gazzaladra/3d-model/Glasses case-1511373
I'm assuming that because the 0.4 nozzle lays down 0.2 layers, the 0.6 nozzle will do the 0.36 without any adjustment required on my part? I may buy one for the sake of an experiment and see how well I like the results. Gridfinity and Multiboard are slow at the 0.2 rate. To print ONE 8x8 panel of Multiboard it is 2hr 26min. I don't dare do it on "Sport" mode for fear of the stringing and potential messups from the printer.I print almost everything with a .6
If I want better resolution I move to thinner layers, but I run my gridfinity bins and grid plates all at .36 layer lines and it's dramatically faster than a .4. Especially on taller parts with lots of layers, 3 passes with a .36 layer height is roughly the same total height as 4 passes on a .24 out of a .4 nozzle. If I switch it's often to a .2 nozzle for detail work like fine text or coasters.
Just tell the slicer the machine has a .6 in it, adjust the layer thickness reslice and see what your print savings would be
I'm assuming that because the 0.4 nozzle lays down 0.2 layers, the 0.6 nozzle will do the 0.36 without any adjustment required on my part? I may buy one for the sake of an experiment and see how well I like the results. Gridfinity and Multiboard are slow at the 0.2 rate. To print ONE 8x8 panel of Multiboard it is 2hr 26min. I don't dare do it on "Sport" mode for fear of the stringing and potential messups from the printer.

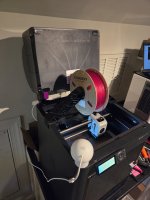

Can you share a link to what you are using?I did one as well. I highly recommend the additional "Flipper knobs" and the side-mount spool holder (sits inside the "swoop" so no additional hardware needed). There is enough slack to put a Bambu 4-in-1 PFTE adapter at the top back inlet and clear the flipper bracket, so you don't have to unhook the tube.
What print files did you use for the arms above and the flipper?I printed an "AMS Flipper" to be able to tip the AMS out of the way and a filament holder for top feeding TPU. My first TPU print is running now... Hope it goes well as there are a couple plates that are nearly 2 days each

What print files did you use for the arms above and the flipper?
Also, what are you printing that takes two days? I'd hate for a failure part way through

 makerworld.com

 us.store.bambulab.com
Yeah, I know it is different in some way, just don't know if it's enough to matter or if it's just marketing.To be clear, Bambu sells a specific TPU for AMS, which is not the same as the 85/90 or 95A that they also sell. Not sure exactly what the differences are (possibly closer to 68A?).
TPU for AMS
I'd give her a shot at doing it. None of those parts look complicatedAnyone here 3D print stuff for a fee? Or recommend someone to do it?
I also have a 3D printer but my 12 y/o daughter is the only one who uses it. I guess I could see if she could figure out how to print this stuff.
Here's what I need; it's a fixture for rebuilding a Hurst Competition Plus shifter. https://www.printables.com/model/1090633-hurst-competition-plus-shift-carrier-assembly-fixt
I'd give her a shot at doing it. None of those parts look complicated
If you get stuck, pm me, I'd be happy to run them for you for the cost of shipping
I have not tried to run TPU through the AMS and probable won't. That's probably where the problems will arise with all of the carrying on that the AMS does. I keep my TPU in a Sovol dryer permanently connected to the tight nozzle for the time being since I'm doing a lot of TPU parts for a project.That's all helpful. If I could get this to run through the AMS, it would be great. I'll try tomorrow
I put it on sport mode for the second half of a Multiboard print using PETG. It did fine, no stringing or any other real issues. I don't know if I want to print the whole thing on Sport but I may try it when I'm home for a full day. Two blobs in two days leaves me gunshy.For me and mostly functional based parts, I've found that generally max layer thickness is Nozzle Diameter x 60%
The .2 layer on a .4 nozzle is 50% of diameter, so the equivalent on a .6 nozzle is .3 and is one of the default options in Bambu Studio. I've run as big as .45 for fast stuff and just seeing how it looks and for many things it would be viable. Eventually you hit a volumetric limit where the machine can't heat filament fast enough, in those cases to go faster/thicker you need higher temps, bigger heater, special nozzles etc
How do you get orcaslicer to do that all at once?you can download the models and run through your slicer to check. Looks like a couple parts won't work
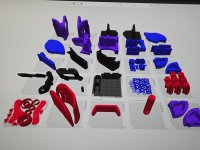
I don't know, that's Bambu StudioHow do you get orcaslicer to do that all at once?
In bambu, it displays all plates in a given file by default. You can download the file from a link at 3dmobility.org if you want to try itoh, it looks just like orcaslicer at least the one i use.
Bambu and Orca are very related. If the 3FM file is saved with multiple plates that is how it will look when you load it into Orca. If you are creating it in Orca you can add plates by clicking the "add plate" icon (top of display window, second from left on my screen, looks like a grid).How do you get orcaslicer to do that all at once?
Basically yes. Consider how you might share a complex 3D print design. If you save it as STL files the recipient has the 3D shape but no information on how to orient, support or slice the parts much less material or color information. Thus you are relying on their ability to use the slicer software. If they are clueless they may make a mess of things. The other extreme would be to distribute the G-code itself. That is OK if the printers and setups are identical but even something small like changing from one type of PLA to another, not to mention different printer types, need g-code specific to the combination of printer, material, nozzle etc. The 3FM file attempts to bridge that. When done correctly it would have the orientation, support, infill type, etc all pre-selected. The user might select a different (but similar) material or, if you have a material changer, different colors for various parts.Ah i see. What advantage for multiple plates? Architect the whole project at a glance then just send a plate to the printer as needed?
In Orca you can designate a material per plate which is helpful when doing a multi-material/color print on a single material printer.
I print TPU from my drier (Sunlu S4), feeding into the back. I have a splitter, and a fairly long PTFE tube from the drier box into the splitter. I don't have to disconnect or move my AMS. I haven't had any feed issues so far. I've been using 95A from Overture. Prints great once things are slowed down and retraction is dialed in.I wonder if the "Print from Above" is really required, since any external is designed to be fed in from the side originally. I don't print with TPU 95, so if it needs "the absolute shortest path without any possible obstructions", that makes sense. But I would think a bit of feeding thru a short length of tube wouldn't be enough to bother it...