Kevin54
MEMBER EMERITUS
Brian...you never answered my PM

Interesting about your experience with Baileigh. The Uni where I taught as adjunct had a lot of Baileigh equipment and it all worked very well.
https://www.mosaicmfg.com/products/palette-2
I'm definitely keeping an eye on the Palette 2 Pro. The extra $200 gets you the extended warranty included so that's a $99 adder on the regular P2, but the all metal fuser and faster speed is the main reason I would go Pro.
Are you regulating your air at the tank or at the input? Some tools recommend running full pressure down the line and regulating pressure at the tool input... or you will have a drop in CFM / pressure.
That's pretty slick, I'll have to keep an eye out as well.. Not interested in being an early adopter, but if it works well I would definitely be interested in one
I re-leveled about 4 more times today and I think I finally got it dialed in... I leveled the outside corners, then came inward on the bed about 50% of the way and leveled each corer again. I repeated this process until it was damn near the same no matter where the nozzle was on the bed.. My current schaller style bin print is looking pretty good, the bottom of the bin has a weird pattern in it, but the walls look great.. I also pulled the trigger on the bondtech extruder and micro swiss hot end... Sold some stuff on craigslist yesterday, so I didn't feel too bad about spending the $$$.
View media item 89855
Here's my all in one print test from yesterday.. It still had a lot of stringing but the overhangs and bridging were quite good up to 70 degrees. Later I used a small stringing test to minimize the printing time (lower right corner).. Finally diled it in with 6mm of retraction and 170mm travel speed for non print moves seemed to get rid of almost all of it.
View media item 89857
View media item 89856
The Micro swiss arrives Saturday and the Bondtech will be here monday.. (I'm impressed that both manufacturers have shipped this quickly... especially bondtech since its coming from across the pond).


I wanted to ask about how to select a printer and this thread was huge. It would take a long time to search for it. So I am starting one for that purpose.
https://www.garagejournal.com/forum/showpost.php?p=7673452&postcount=1
 n
nCan I add a spool of MIG wire to that listUnless you're crazy and enjoy untangling Christmas lights, in that case you might enjoy dumping filament in a bag until you have an empty spool.

")
I have a spare, actually more than one, Pi board. Sounds like it makes interfacing with the printer easier. You can load g-code via wifi? Stop and start the printer? Look at g-code (for whatever that is worth)?I'll use a second Pi board and web cams to monitor the garage too, not just individual printers.


I have a spare, actually more than one, Pi board. Sounds like it makes interfacing with the printer easier. You can load g-code via wifi? Stop and start the printer? Look at g-code (for whatever that is worth)?
Is OctoPrint worth time since I have the parts?
BT has a slicer/firmware setting card in the box. IIRC it's like 417... you should be able to access the setting from the E5 under settings or tuning.
Yeah, I know the e steps I need to change it too. But I would like to load a firmware onto the ender that will accept and store those changes permanently. Otherwise I have to put it in the start of the Gcode when I go to print, and that doesn’t help me when I’m changing/loading filament because it will have the old E-steps in the printer firmware.
Now that I pulled the trigger on getting a printer. Ender 3-Pro.
I know what I want to do for my first project.
I know first I need to get the printer, that should be early next week.
I need to assemble and configure the printer.
I need to print a hello world, which in the 3D printer world looks like Benchy?
https://www.thingiverse.com/thing:763622
Or I found this one, they said it will test the calibrations of the printer?
https://www.thingiverse.com/thing:1363023
https://thingiverse-production-new.s3.amazonaws.com/assets/51/3c/59/5d/2b/testIII.png
Assuming the printer it up and I have my hello world stl file. The next thing is to slice it?
For the beginner any recommendations for 3D modeling software? Slicer? I am still googling, but is there any steps that I am missing?
<snip>
So for the question, how do you start something like this?
Any thoughts on making it better?
Does anyone have experience with Clara.io?


Thanks, everyone and especially you @BoilermakerFan for the detail instructions. I know it takes a lot of time. It is great that all this wisdom gets documented.
Once I get the printer assembled, I will come back for the suggestions.
A couple of notes, my preference is to snip quotes down to the context of the answer. If doing that is bad etiquette then I learned something. @BoilermakerFan snipe away.
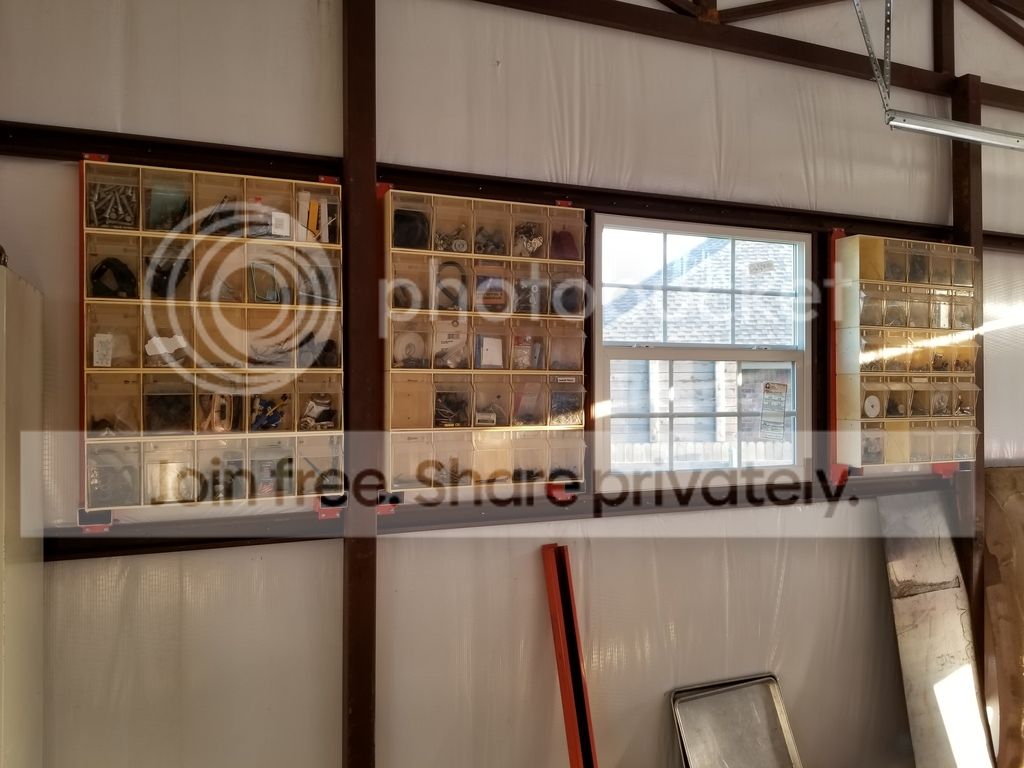
And now I will comment on your first planned project. Can the E3Pro print dividers like that? Maybe 2 or 3 at a time; or 2 to 3 rows at 2 or 3 wide (4 to 9 at a time). You'll be printing for days and using a lot of filament. Even at $15 a Kg spool, that's a lot of material cost. Personally, as simple as that divider is, I'd just buy 1/4" ply or hardboard and use that to make the dividers for spray can storage. 3D printing really shines in making things that are difficult to make with traditional tools or materials.
As I said, I was not planning on printing the whole piece, but to your point, there may be other options.
https://www.garagejournal.com/forum/showpost.php?p=7687461&postcount=699
I bet there is something like those wireframe things in Walmart. Right now the focus on finishing the shop is on organization. I am still building shelves, so I am a long way from such detailed. On the other hand, I do look for those nooks and crannies.
Back to your point, you might climb a mountain "just because it's there" what I hear you saying, you don't have to print a part "just because you can".
Why? Why walk? Why walk 2 cities over carrying your clubs? Why waste that much time for... golf? Especially when you can drive to the local Putt-Putt and have more fun. 
Wow, some of that stuff Magic Mike has made is pretty awesome! I need to see if he'll share some of his 1UZFE files for a project I have too.
No way, I was laughing.penrightI hope I didn't offend you...

