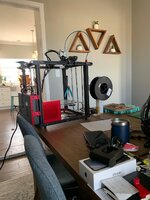
This is my Ender 5. There are many like it but this one is mine.
I am working through some printer upgrade parts right now after switching to linear rails and adding a raspberry pi. I think I am going to drive into Klipper and Fluid for it.
I have been printing a lot with PETG lately and I have been really happy with the quality of my prints. Does anyone know where I could find some hi-viz yellow PETG? I found a PLA that is the color I want, X3D Fluro Yellow, but I would really prefer PETG if it is out there.


.jpeg")