To avoid these ads, REGISTER NOW!

The Machine Work Thread

macgyver37

Well-known member
Joined
Mar 7, 2013
Messages
608
Location
Pittsburg, Kansas
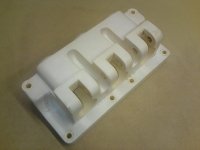
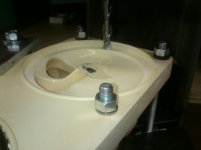
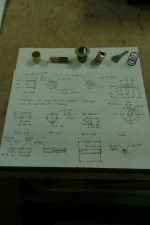
This was a cool repair job I did awhile back. A local ice cream/burger joint has been in business for 50+ years and their soft serve machine is out of production and no parts are available anymore. The problem he had was the plastic manifold that the ice cream comes out of broke out in a certain spot and it made the machine unusable. The part has Orings to seal the manifold to the machine and the edge that held the Oring broke. So I decided the only way to fix it was to machine out the bad part and make a new ring to hold an Oring on both sides of it.

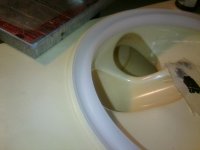
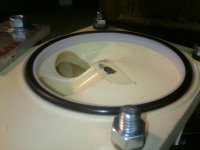
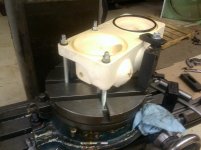
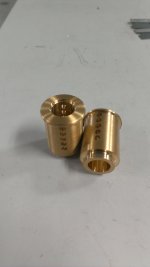
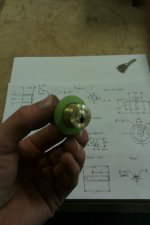
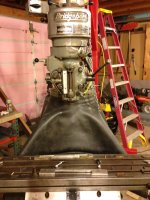
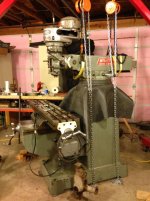
I rigged up a way to clamp it on my rotary table on my mill and cut the bad spot out and I machined a new Delrin ring with the Oring groove on both sides and made it a slip fit so it could come out for cleaning but not fall out. It uses the same Oring on both sides and is a stock item at NAPA in case he needs new ones.

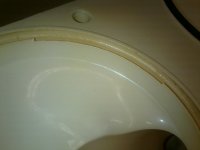
It was nerve racking to machine on the old part when there were not any others to be found. In the next to last pic you can see where the edge was chipped out in the original part.

Got it going that day and it allowed him to open back up for the season, still works good over a year later.
 

Attachments

  • 0607131706.jpg
    0607131706.jpg
    140 KB · Views: 318
  • 0607131707a.jpg
    0607131707a.jpg
    142.3 KB · Views: 262
  • 0607131706b.jpg
    0607131706b.jpg
    154 KB · Views: 286
  • 0610131232a.jpg
    0610131232a.jpg
    146.7 KB · Views: 278
  • 0610131232.jpg
    0610131232.jpg
    144 KB · Views: 286
  • 0607131935.jpg
    0607131935.jpg
    146.6 KB · Views: 286
  • 0607131828.jpg
    0607131828.jpg
    144.5 KB · Views: 294
To avoid these ads, REGISTER NOW!

sanddan

Well-known member
Joined
Jul 7, 2005
Messages
708
Location
Oregon
Very nice Mike! Great job!


Yup, I love every single one of my Nogas! Can't ever have too many, still a couple more on my wish list.


Img_0625-1.jpg

You sir are a Tool Alcoholic.

I mean that in the best sense of the word.

Also, your posts have cost me a BUNCH of money. Keep up the good work.
 

yaidunno

Well-known member
Joined
Feb 10, 2011
Messages
1,336
Location
WI
There was a time when i made locks from some chunks of brass...
 

Attachments

  • IMAG0203.jpg
    IMAG0203.jpg
    162.3 KB · Views: 343
  • IMAG0016.jpg
    IMAG0016.jpg
    127.1 KB · Views: 315
  • IMAG0015.jpg
    IMAG0015.jpg
    127.1 KB · Views: 292

sanddan

Well-known member
Joined
Jul 7, 2005
Messages
708
Location
Oregon
Im interested in your power draw bar too. It looks a lot beefier than most of the internet designs. Can you show how you activate it?

I have a p-trak that is just dying for one of these.

Kaz, I saw your gimbal on IG, I didn't know that was you. Pretty cool.

If you don't mind, but what's "IG"?
 

davewo

Well-known member
Joined
Oct 12, 2011
Messages
823
Location
USA
In reference to what are good machinist message boards: I like the Hobby Machinist. It's a great place for regular dudes to be introduced to machining and machines. The Pratical Machinist is horrible for regular decent people. I go on it often, but only to keep up with the business side of manufacturing, and I probably haven't posted anything in the past 10 years or so.

As for myself, I have many glamour shots of past work. I used to work for a small outfit making non-destructive testing (NDT) equipment. I loved everything but the pay. I was one of two "manual" guys doing the short runs, 2nd ops (finishing stuff off a cnc), and prototyping. Probably the best perk was working on my own stuff in my own time. Unfortunately this is a no-go where I work now. Although I have a couple tackle boxes full of "sample" parts from my current job, I have no pictures... yet. But here's a few pictures of stuff from my NDT days. Each part was completely made by me. I didn't bother taking pictures of all the other stuff I didn't 100% machine. Main equipment: Sharp vertical mill with Prototrack retrofit and Monarch 10ee lathe.
 

Attachments

  • 4.jpg
    4.jpg
    20.8 KB · Views: 228
  • 3.jpg
    3.jpg
    25.2 KB · Views: 243
  • 2.jpg
    2.jpg
    21.4 KB · Views: 239
  • 1.jpg
    1.jpg
    20.9 KB · Views: 252

DocsMachine

Well-known member
Joined
Sep 16, 2006
Messages
1,844
How about parts for a double-barreled paintball gun? :D

vee3.jpg


I made every piece shown, on manual machines.

Doc.
 

zmotorsports

ALLIANCE MEMBER
Joined
Oct 20, 2009
Messages
21,308
Location
Northern Utah
In reference to what are good machinist message boards: I like the Hobby Machinist. It's a great place for regular dudes to be introduced to machining and machines. The Pratical Machinist is horrible for regular decent people. I go on it often, but only to keep up with the business side of manufacturing, and I probably haven't posted anything in the past 10 years or so.

As for myself, I have many glamour shots of past work. I used to work for a small outfit making non-destructive testing (NDT) equipment. I loved everything but the pay. I was one of two "manual" guys doing the short runs, 2nd ops (finishing stuff off a cnc), and prototyping. Probably the best perk was working on my own stuff in my own time. Unfortunately this is a no-go where I work now. Although I have a couple tackle boxes full of "sample" parts from my current job, I have no pictures... yet. But here's a few pictures of stuff from my NDT days. Each part was completely made by me. I didn't bother taking pictures of all the other stuff I didn't 100% machine. Main equipment: Sharp vertical mill with Prototrack retrofit and Monarch 10ee lathe.

Damn, that is some amazing, small work.

I like Hobby-Machinist as well. Pretty good people over there.

Mike.
 

NASTYZEN

Well-known member
Joined
Jun 11, 2010
Messages
2,823
Location
St-Colomban,Que. Canada
Some very professional accomplished work there guys.:thumbup: Thanks for posting.

Maybe should of put this in the sheet metal projects but it's more machine related I guess.

Inspiration.


Where I'm at. In enclosing my Mighty Comet.


Looks like I'll have to be making myself one of those auto drawbar tools soon. I'll be leaning on Mike, aka zmotorsports when I get there.Still lots more to do, but the worst is over.
 

zmotorsports

ALLIANCE MEMBER
Joined
Oct 20, 2009
Messages
21,308
Location
Northern Utah
Some very professional accomplished work there guys.:thumbup: Thanks for posting.

Maybe should of put this in the sheet metal projects but it's more machine related I guess.

Inspiration.


Where I'm at. In enclosing my Mighty Comet.


Looks like I'll have to be making myself one of those auto drawbar tools soon. I'll be leaning on Mike, aka zmotorsports when I get there.Still lots more to do, but the worst is over.

That looks awesome Claude.

Mike.
 

wyo george

Well-known member
Joined
Jul 24, 2014
Messages
933
Location
Wyoming, USA
Today's task is a little hairy. I'm machining the internals on a valve that's just a tick over six feet tall. Needless to say, small cuts and slow speeds!


Sent from my iPhone using Tapatalk
 

NASTYZEN

Well-known member
Joined
Jun 11, 2010
Messages
2,823
Location
St-Colomban,Que. Canada
Hoa! That's big machine work. It must be interesting to look at that large mass revolving.

Guys, I need a little help with feeds and speeds. I was going to PM Kevin but thought it might help others if I asked here instead.

I need to machine some Type 2 Titanium on the mill.

I am using a 4 flute 1/2'' dia. Carbide end mill.
The chart tells me I need to have a speed of 323 fpm and feed .003'' ips

How the heck do I calculate this?:headscrat
All this time I've been playing by it ear like someone who's illiterate.:eek:
I'm sorta math dyslectic.
Can someone explain this formula in a way I can understand it once and for all.

Thank's
 

Kevin54

MEMBER EMERITUS
Joined
Jan 12, 2005
Messages
29,341
Location
Urbana, Ohio
Hoa! That's big machine work. It must be interesting to look at that large mass revolving.

Guys, I need a little help with feeds and speeds. I was going to PM Kevin but thought it might help others if I asked here instead.

I need to machine some Type 2 Titanium on the mill.

I am using a 4 flute 1/2'' dia. Carbide end mill.
The chart tells me I need to have a speed of 323 fpm and feed .003'' ips

How the heck do I calculate this?:headscrat
All this time I've been playing by it ear like someone who's illiterate.:eek:
I'm sorta math dyslectic.
Can someone explain this formula in a way I can understand it once and for all.

Thank's

Slow and lots of lube. Also if you have to drill it, be very careful as titanium will swell shut on a drill or reamer, and snap them off in a split second.

What are you going to run it on? A CNC or a hand mill, and what type?
 

A_Pmech

Well-known member
Joined
May 8, 2007
Messages
8,002
Location
IL
I need to machine some Type 2 Titanium on the mill.

I am using a 4 flute 1/2'' dia. Carbide end mill.
The chart tells me I need to have a speed of 323 fpm and feed .003'' ips

How the heck do I calculate this?

325 FPM is the peripheral speed. The end mill circumference will be 3.14 * 1/2 = 1.57" there are 12 * 325 = 3900 inches in 325 feet.

3900 / 1.57 = 2485 RPM.

Each revolution the tool should take 4 chips .003" thick. So, .003 * 4 * 2485 RPM = 29.8 inches per minute feed.
 

NASTYZEN

Well-known member
Joined
Jun 11, 2010
Messages
2,823
Location
St-Colomban,Que. Canada
325 FPM is the peripheral speed. The end mill circumference will be 3.14 * 1/2 = 1.57" there are 12 * 325 = 3900 inches in 325 feet.

3900 / 1.57 = 2485 RPM.

Each revolution the tool should take 4 chips .003" thick. So, .003 * 4 * 2485 RPM = 29.8 inches per minute feed.

That seems so fast!

I roughed the part already with an indexable end mill, if thats the proper term for it. I now need to make a finish pass on the outside contour with this 1/2'' mill. I left .015" And the hight of the part is .850".
All this on the Cnc mill.
 

A_Pmech

Well-known member
Joined
May 8, 2007
Messages
8,002
Location
IL
That seems so fast!

I roughed the part already with an indexable end mill, if thats the proper term for it. I now need to make a finish pass on the outside contour with this 1/2'' mill. I left .015" And the hight of the part is .850".
All this on the Cnc mill.

I would normally expect a speed in the 150 - 200 FPM range for general milling of Ti, but with a light finish pass you can normally increase the speed. I'd start out around 150 FPM and speed override from there.
 
To avoid these ads, REGISTER NOW!

A_Pmech

Well-known member
Joined
May 8, 2007
Messages
8,002
Location
IL
Thank you much A Pmech!
I shall try it with a rpm of 2400 and feed of 12ipm if I got the calculation right.
I'll post up the results as soon as I get some

I would start out slower than that and speed override up if it's cutting OK. There's never any harm starting out a little slow, there's always harm starting out too fast. :D TI and many stainless alloys generally finish great no matter how low the speed, unlike mild steel or aluminum.

I would start at 150 FPM which is 1150 RPM and 13.8 IPM at .003 / tooth.

Remember that in tough to machine materials taking a chip becomes more important. The window between a feed rate too heavy to keep the end mill in one piece and a feed rate too light to allow the end mill to cut narrows substantially.
 

NASTYZEN

Well-known member
Joined
Jun 11, 2010
Messages
2,823
Location
St-Colomban,Que. Canada
Yes!:thumbup:
1150 and ended up at 12 feed. Cut like butter.
Thanks a bunch again. I shoulda posted when I was struggling with 44W stainless a while back.


After I make another of the above. I have to make 4 of these.

 
OP
H

Hephaestus29

Well-known member
Joined
Mar 13, 2011
Messages
2,969
Location
Indianapolis
I've been cleaning up my new to me Mill and I'm wondering, do you think I should buy way covers made more specific to my machine or should I just make them using rubber sheet ? I can't seem to find any for my machine specifically.

It's a Comet, and it has dovetail ways on the column, and square ways where the table/saddle sits on the knee.

After spending several days cleaning it up, I'd like to keep most of the chips out of the places I just got them out of.
 

zmotorsports

ALLIANCE MEMBER
Joined
Oct 20, 2009
Messages
21,308
Location
Northern Utah
I've been cleaning up my new to me Mill and I'm wondering, do you think I should buy way covers made more specific to my machine or should I just make them using rubber sheet ? I can't seem to find any for my machine specifically.

It's a Comet, and it has dovetail ways on the column, and square ways where the table/saddle sits on the knee.

After spending several days cleaning it up, I'd like to keep most of the chips out of the places I just got them out of.

I have generally used the ones more specific to the equipment and have been quite satisfied with their fit and function. I know there are many that make their own but at work time was always a factor so we just bought the ones specific to our equipment.

On my previous little machine at my home shop I just used some felt for the wipers on the lathe carriage and that worked well.

Mike.
 

longlivepunk

Well-known member
Joined
Feb 22, 2013
Messages
377
Location
Edmonton, AB, Canada
Made this today in some free-time at work. This bearing-puller is made for bicycle suspension bearings, and the end is destroyed so the bike shop where I occasionally work asked me to make a new one. Bought $3 worth of hex-stock (and have half left over)

c0fdf5ea5ad89ada9bd68b4805f871c6.jpg

What threads into it:

acf87bf3a830a944c9ed157304cce9bb.jpg

The tool together, with the old part. Still have to cut the slots, that'll happen tomorrow.

bf16e853b0f8dce058afbff49289c9b8.jpg
 

Matt Irvine

Well-known member
Joined
Nov 4, 2013
Messages
248
Location
Aussieland!
This one I didn't machine, but helped bore the hole for the shear pin.

ImageUploadedByTapatalk1430040198.426819.jpg


Finished these nice little shafts.
ImageUploadedByTapatalk1430040252.545396.jpg

Rebored this scraper gizmo
ImageUploadedByTapatalk1430040326.551842.jpg

Target rifle sight extensions
ImageUploadedByTapatalk1430040363.738743.jpg


Sent from my iPhone using Tapatalk
 
OP
H

Hephaestus29

Well-known member
Joined
Mar 13, 2011
Messages
2,969
Location
Indianapolis
Finally got my mill off the pallet today. I had to take the harbor freight electric winch off since it wasn't up to the task and install two 1 ton chain hoists. Most of the weight was on the front chain hoist though.

Prior to today I have been cleaning it thoroughly.
I also installed my own design of way covers made from EPDM, it's not quite finished but here's what I did:
I found a local commercial roofer that sold me some rubber for 20.00 that was waaay bigger than what I needed.
I cut out a piece about 4'x6' & used the bottom of a sheetrock bucket for a pattern to cut out a hole in it. Then I pulled it over the head, moved the ram all the way forward, then stretched it over the back of the ram & pulled it down over the column it's a very nice tight fit. I cut out the rubber way bigger than what I needed on purpose since this is my design and I have never seen anyone else do it like this, so it's a trial & error kind of fit.
This main piece that's stretched over the column will connect to the saddle, Then I'll have a separate piece connected to the table that will run the full width of the table. So as you run X back & forth the knee ways will always be protected.
I still have to fix a piece to go on the front side of the table/saddle but that's another day or weekend.
 

Attachments

  • IMG_7933.jpg
    IMG_7933.jpg
    141.7 KB · Views: 263
  • IMG_7072.jpg
    IMG_7072.jpg
    141.3 KB · Views: 298

zach540

Active member
Joined
Nov 9, 2010
Messages
37
Location
CO Springs
Still working on learning metal working, been using my converted G0704. Some of the first parts I've made on it for the power drawbar and belt drive.

21321_1630416590525176_3983997739062560959_n.jpg

11018588_1636837533216415_163496817243904292_n.jpg

11143534_1636837866549715_4286310689347987824_n.jpg

10500296_1636837963216372_5320545245285536184_n.jpg

11179997_1642197859347049_1160020305_n.jpg
 

kazlx

Well-known member
Joined
Oct 30, 2012
Messages
2,851
Location
Tustin, CA
https://scontent-sea.**.fbcdn.net/hphotos-xfp1/v/t1.0-9/11011083_10153272514084168_6635213154549072988_n.jpg?oh=9f44f51bebbd4cf79670046164a61749&oe=55DF00B9
 

longlivepunk

Well-known member
Joined
Feb 22, 2013
Messages
377
Location
Edmonton, AB, Canada
I have a question for you knowledgeable gents: I've been building my bike-repair stand, it's almost ready, but needs a slot cut. Here's an idea of what's going on...

After the slot is cut the portion on the left will be welded on as well, the cylinder in the middle will slide up and down a post for height adjustment and rotation, and so I need a slot through the half-circle on the right to allow it to clamp to said post:

13890424228b51eff255db3905ae9c21.jpg

So for now it sits like this, and the slot will go where the red line is, and will have to go right through that side of the cylinder.

706905b1c0e47a05d6520e0ce6fc7006.jpg

Ideally I'd use a slitting saw (hoping for a 1/8" - 3/16" slot) but I'd have to buy a brand-new cutter that I'd probably never use again, and money is tight right now. Any other ideas for getting a slot that width with a decent finish? I'd like it to be straight and square. Throw out any ideas regardless of equipment required, I have potential access to quite a range of equipment.

Thanks guys!
 

kazlx

Well-known member
Joined
Oct 30, 2012
Messages
2,851
Location
Tustin, CA
I think I might have a slitting saw you can have if you want to make an arbor.

But yes, that's a slitting saw job.
 

ez-duzit

Well-known member
Joined
Jun 24, 2013
Messages
5,094
Location
Marina del Rey
Most professional looking job would be the slitting saw. But a well tuned metal cutting bandsaw could do it, using a fixture to hold it and a shallow, centered groove to get it started dead center.

An abrasive disc might do a fair job if fixtured properly.
 

zmotorsports

ALLIANCE MEMBER
Joined
Oct 20, 2009
Messages
21,308
Location
Northern Utah
Above posters are right, a slitting saw would be ideal and I understand the though that you may never use it again. However, I think you would be incorrect, I use them alot and once you have one I would imagine you would find more uses.

The next two choices I have actually used as well in a pinch where I have not had access to my mill: vertical bandsaw and a pneumatic die grinder with a .035" abrasive disk (cutoff disk). Then just deburr and your done, providing the tube is close enough in size to the one it will slide on then you will have enough clamping clearance. If there is too much variation in tubing sizes it may not give enough clamping force.

Mike.
 

longlivepunk

Well-known member
Joined
Feb 22, 2013
Messages
377
Location
Edmonton, AB, Canada
Thanks for the responses, guys! Kazlx, thanks for the offer! I'll just go buy one, though. Shipping it to Canada would be a pain. [emoji14]

The only reason I haven't already bought one is that right now the only horizontal mill I have access to is at school, that's why I said I'll only get 1 use. I guess it will just be another reason to get a mill! "I have this $60 saw that never gets used! Better go get a $5,000 mill" seems justified.

Mike, there's 0.005" clearance right now between the post and the clamp, so 1/16" band saw blade would probably work, but I wanted the extra in case the material springs in a bit when it's cut. (Can always shave the post down a bit more) Thanks again, guys!
 
Last edited:

zmotorsports

ALLIANCE MEMBER
Joined
Oct 20, 2009
Messages
21,308
Location
Northern Utah
I posted this in my Shop Projects thread but thought I would throw it on this thread as well.

I purchased an inexpensive 3-jaw 6" chuck and a blank backing plate last summer for putting on my 8" rotary table and it has been sitting on my workbench ever since because I haven' t had time to mess with it. I have a couple of handlebar clamps that I need to machine for a customer/friend and I need the rotary table chuck setup so now is as good a time as any to machine my adapter backing plate.

Here is the mess after the lathe work is completed and just prior to removing the backing plate from the 4-jaw chuck.
25yu9h3.jpg


Turning and facing processes completed and ready to drill the mounting holes. The step is .001" smaller than the backside of the chuck so it will self center onto the plate.
292oi7o.jpg


Chuck test fit onto the plate to ensure self-centering. I got a little cocky here but I should have test fit it prior to removing it from the lathe. Had my measurements been off I could have been chucking it back up in the lathe to make a skim cut. Luckily everything fell together perfectly. Another reason I probably shouldn't work this late at night.:willy_nil
2150epc.jpg


Vise removed from mill table and the backing plate clamped down locating the center. I have it spaced off the table so I can drill through without hitting the table. Using my handy, dandy modified Noga/IndiCol DTI holder. Works awesome. You can also see the DRO that I have zero'd after locating center.
30iuk5c.jpg


Three chuck mounting holes drilled. The bolt hole circle function in the DRO flat ROCKS!!!
28wkklk.jpg


I used a .375" end mill and countersunk for the socket head capscrews to sit just below flush.
v3q9so.jpg


Next I flipped the adapter over and plugged the dimensions into the DRO for the four bolt hole pattern to match the slots in the rotary table.
dvouug.jpg


Four bolt pattern drilled and countersunk with a .625" end mill.
if4vox.jpg


Completed sitting on the rotary table.
b6zn5s.jpg


Now that my 3-jaw chuck is mounted on my rotary table I can move on to the actual paying job that I needed this for.:dunno: Oh well, at least it is off my bench and crossed off my list of things to do and is readily available when I have the next job come in requiring the chuck and rotary table.

Mike.
 

kazlx

Well-known member
Joined
Oct 30, 2012
Messages
2,851
Location
Tustin, CA
Thanks for the responses, guys! Kazlx, thanks for the offer! I'll just go buy one, though. Shipping it to Canada would be a pain. [emoji14]

The only reason I haven't already bought one is that right now the only horizontal mill I have access to is at school, that's why I said I'll only get 1 use. I guess it will just be another reason to get a mill! "I have this $60 saw that never gets used! Better go get a $5,000 mill" seems justified.

Mike, there's 0.005" clearance right now between the post and the clamp, so 1/16" band saw blade would probably work, but I wanted the extra in case the material springs in a bit when it's cut. (Can always shave the post down a bit more) Thanks again, guys!

You don't need a horizontal mill, you can use a slitting saw in any mill. IMO you can easily slit that with a 0.040 cutoff saw. Just go slow so it doesn't wander. Band saw would be good too if setup correctly.
 
To avoid these ads, REGISTER NOW!
Top Bottom