
You are using an out of date browser. It may not display this or other websites correctly.
You should upgrade or use an alternative browser.
You should upgrade or use an alternative browser.
The Machine Work Thread
- Thread starter Hephaestus29
- Start date
Kevin54
MEMBER EMERITUS
What Kevin said. Call it a wiggler. Fast and easy.
Not a wiggler. Most wigglers are revolving until they hit center. With a round rod and a point into your center point of your part that is in the chuck, you rotate the chuck around by hand, but can leave your indicator on the round rod, then adjust your jaws. It does take a little bit of time to adjust each and every jaw, but you don't have to move your compound at all to adjust your center.
Basically like a wiggler, but not a wiggler

longlivepunk
Well-known member
I'm new to machining, just curious what you'll put in your tailstock that will have your new tool rotating to dial in on it? Other than rotating centers aren't most things held static?
zmotorsports
ALLIANCE MEMBER
I'm new to machining, just curious what you'll put in your tailstock that will have your new tool rotating to dial in on it? Other than rotating centers aren't most things held static?
I just use a drill chuck. The rod doesn't rotate, the point just goes into the punch mark and that is what you are referencing for center. Think of it as a long skinny dead center.
Mike.
I made a tool like that years ago. 3/8" drill rod placed in a collet center drilled on one end and machined to a point on the other. It's used with a center in the tailstock. i think that using the center may be more accurate than using a drill chuck.
zmotorsports
ALLIANCE MEMBER
I made a tool like that years ago. 3/8" drill rod placed in a collet center drilled on one end and machined to a point on the other. It's used with a center in the tailstock. i think that using the center may be more accurate than using a drill chuck.
I don't see how it would be any more accurate. The rod doesn't need to turn, the end you are concerned with is the one that is in the dimple/punch mark in the chuck on the headstock end. That's the one you are trying to center, the tailstock end is merely holding the rod.
Mike.
longlivepunk
Well-known member
Oh, I thought you were dialing in on the flats.
zmotorsports
ALLIANCE MEMBER
Oh, I thought you were dialing in on the flats.
Yes, but only one flat as the rod/flats are not turning. The pointed center is in the punch/***** mark and the tailstock is holding the rod. The dial indicator is on a flat on the square portion. As the chuck is turned in 90-degree increments to adjust the four jaws the flat will move the test indicator.
You simply then loosen the lows and tighten the highs according to the dial indicator to center the work in the jaws.
I hope that makes sense and I explained it well enough. Let me know if not.
Mike.
On edit, picture the rod with the flats as a "fixed" component and the dial indicator is reading off of that fixed component. The part in the 4-jaw chuck is what is rotating and what you are shifting to adjust on center.
longlivepunk
Well-known member
That makes perfect sense. Thanks for explaining!
zmotorsports
ALLIANCE MEMBER
That makes perfect sense. Thanks for explaining!
No problem. I will try to remember to snap a few pictures or even a video next time I perform this procedure so you can see first hand.
Mike.
OP
Hephaestus29
Well-known member
Maybe this would help or be faster, but I
Don't have any problem dialing in 4 jaw independent chucks.
I have a .001 indicator and have no trouble
dialing in my work to a half a thousandth
or .0005 and this is on my smithy. I could
probably get it dead nuts but for what I
usually do thats plenty close.
Don't have any problem dialing in 4 jaw independent chucks.
I have a .001 indicator and have no trouble
dialing in my work to a half a thousandth
or .0005 and this is on my smithy. I could
probably get it dead nuts but for what I
usually do thats plenty close.
macgyver37
Well-known member
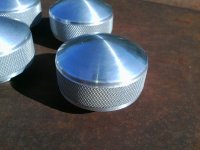
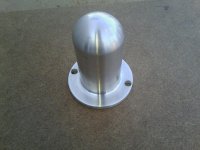
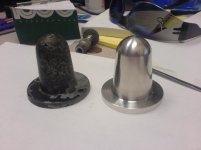
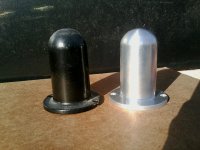
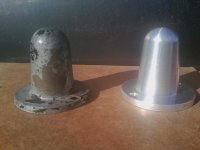
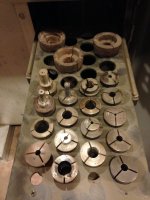
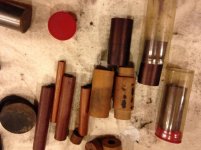
Here are a few parts I made on my old South Bends when I still had them. The knurled knobs were done on my 1914 18" and the tapered caps were done on my 14.5" with a ball turner and drilled on the mill. The caps are motor shaft covers sometimes called motor condoms, used on a double shaft motor when one shaft is not needed.
The steel bushings are for a mortising machine to hold the different size bits.
The steel bushings are for a mortising machine to hold the different size bits.
Attachments

macgyver37
Well-known member
Some acetal parts I make for some local companies, chain guides, poultry grabber arms, apple slicer head. Done mostly on my cnc router.


macgyver37
Well-known member
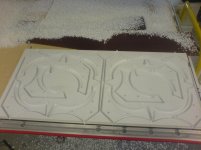
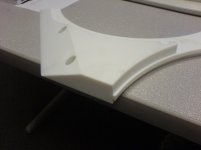
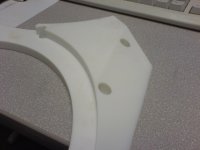
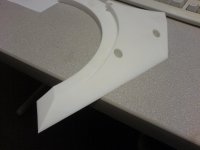
I make these out of 1" thick PET, pretty expensive stuff. App $600 for a 24x48" piece. I can get 12 out of a blank. There are left and rights. The knife edge is the hardest part because it can chip and blow out if you are not doing it right and of course the part is scrap if it is chipped on that edge.
I drill all the holes and cut the counterbores, then set the full 24x48 blank on dowels in my vacuum fixture. Then I machine the other features except for the angled knife edge. I made an angle plate to hold the parts on my mill to fly cut the knife edges with it. Done them for a few years as they are a wear part for a local company.
I drill all the holes and cut the counterbores, then set the full 24x48 blank on dowels in my vacuum fixture. Then I machine the other features except for the angled knife edge. I made an angle plate to hold the parts on my mill to fly cut the knife edges with it. Done them for a few years as they are a wear part for a local company.
Attachments


zmotorsports
ALLIANCE MEMBER
Nice work Macgyver. Those look awesome.
Mike.
Mike.
macgyver37
Well-known member
I mostly work in wood and plastic and I was asked to put up some work pics over on PM, here is the thread there if anyone wants to check it out. I worked for a company for 11 years that was partnered up with the university and I ran the shop there that was full of awesome toys including a 5 axis router. I have been on my own for a few years now and only have a 3 axis router for now.
Some may not call it machining, but I do.
http://www.practicalmachinist.com/vb/woodworking-woodworking-machinery/pics-work-projects-285643/
Some may not call it machining, but I do.
http://www.practicalmachinist.com/vb/woodworking-woodworking-machinery/pics-work-projects-285643/
ez-duzit
Well-known member
37--nice work.
OP
Hephaestus29
Well-known member

09zkrankin
Member
- Joined
- May 11, 2014
- Messages
- 23
The easiest way to indicate punch marks is to put a live center in the tailstock, then a dead center between the live center and the punch mark, indicate the dead center in just as you would a round part, we do this quite a bit for boring holes in square parts
383 240z
Well-known member
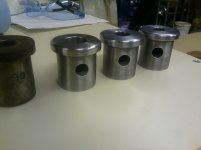
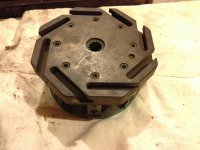
Here are a few of the parts I've been making. Average order is for between 10-100K parts. Takes between 4-22 seconds to make each part. These parts are made from 6061. All parts here are made in less than 6 seconds each.

These are all made from 12L14. These take between 5-7 seconds to produce.
The part I'm holding in this pic is part of an explosion proof conduit system.

These are a mix of 12L14 and 4041 steels. The one that is up against the one I'm holding is the little ******* that takes 22 seconds to make. It's 4041 steel. The outer edge has a 2" radius cut into the OD. It runs VERY tight on the tolerance. I've I go .001" oversize the surface doesn't clean up. If I go .002" undersize it will fail QC. I have a tolerance of only .002" Yes I have to sharpen that form tool often. The rest of the parts here are in the sub seven second cycle time. The simple looking ring laying on it's side, under the blanking plugs, also is made from 4041 and has similar tolerances.
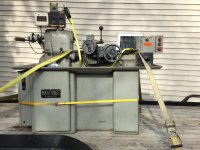
ALL of these parts are made on a single machine, the broached hexs, the teeth that are up-ended into the part everything. The part I'm holding is a sealing system for natural gas fittings.

Here is the machine They are made on.


Keith
These are all made from 12L14. These take between 5-7 seconds to produce.
The part I'm holding in this pic is part of an explosion proof conduit system.
These are a mix of 12L14 and 4041 steels. The one that is up against the one I'm holding is the little ******* that takes 22 seconds to make. It's 4041 steel. The outer edge has a 2" radius cut into the OD. It runs VERY tight on the tolerance. I've I go .001" oversize the surface doesn't clean up. If I go .002" undersize it will fail QC. I have a tolerance of only .002" Yes I have to sharpen that form tool often. The rest of the parts here are in the sub seven second cycle time. The simple looking ring laying on it's side, under the blanking plugs, also is made from 4041 and has similar tolerances.
ALL of these parts are made on a single machine, the broached hexs, the teeth that are up-ended into the part everything. The part I'm holding is a sealing system for natural gas fittings.
Here is the machine They are made on.
Keith
Xicaque
Well-known member
Impressive!
How often does it need maintenance?
How often does it need maintenance?
383 240z
Well-known member
Depends. Maintenance as in tooling changes, or broken machine? Sometimes I can go an entire shift (9 hours) with nothing more than loading stock, and keeping the cooling/cutting oil full. Other jobs I'm swapping cutters, recess tools, form and shave tools every time I turn around. I run 2 of these machines at a time. It keeps you moving. It's amazing how fast they turn out parts. However when you have a crash, it does some real damage. In 15 seconds you can wipe out 4 tools. Consider that a single carbide drill insert runs about $50, a TiN coated ream $150 and a custom carbide recess tool is about $200. Like a monkey ******* on a cash register, it will get into the money. Keith
383 240z
Well-known member
Damn good looking work Keith!
Thanks A_Pmech, coming from a real machinist like you that means a lot. Keith
wyo george
Well-known member
those high production CNC machines boggle my mind. I turn stuff manually and often spend 3-4 days on a single part, sometimes an entire week. Then again, when you're turning at a blistering 8 RPM and taking 3-4 hours per pass things don't happen quickly!
383 240z
Well-known member
those high production CNC machines boggle my mind. I turn stuff manually and often spend 3-4 days on a single part, sometimes an entire week. Then again, when you're turning at a blistering 8 RPM and taking 3-4 hours per pass things don't happen quickly!
My machines are not CNC. They use cams and followers to move the slides, mechanical linkages to move the recess tools. If I need to move a tool in, I don't modify g-code, I get out a DI and tools, and move the tool. Keith
wyo george
Well-known member
My machines are not CNC. They use cams and followers to move the slides, mechanical linkages to move the recess tools. If I need to move a tool in, I don't modify g-code, I get out a DI and tools, and move the tool. Keith
That's cool, I didn't realize people were still using those setups. I guess they make perfect sense for large production runs though. I've never worked in a production shop though so it's all interesting, but foreign to me

Kevin54
MEMBER EMERITUS
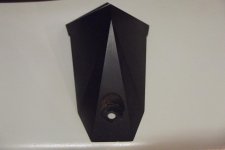
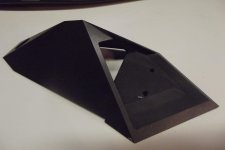
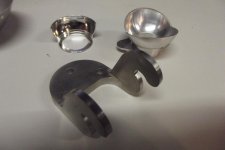
Just some random stuff I had left in my toolbox except for the black part. The black part hangs on my wall but I had to machine it. Due to an error in the blueprint that I found (.005) the part order was cancelled at a cost of $50,000. I had +/- .002 or +/- .001 on every dimension on the part. The parts would have worked, but being it was a government part, it has to meet the print. The bad thing was that I couldn't make it meet the print because it was a hand drawn print from the early '80's. I always drew everything up that I made to make sure the prints were correct. BTW......the black part is razor sharp on the edges 
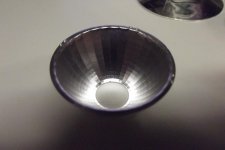
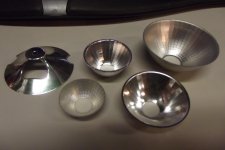
The other parts I had to build the dies to make the parts. One is a stainless hinge latch though that was machined out of stainless. Anyone that has ever flown has more than likely seen the reflectors.
The other parts I had to build the dies to make the parts. One is a stainless hinge latch though that was machined out of stainless. Anyone that has ever flown has more than likely seen the reflectors.
Attachments
OP
Hephaestus29
Well-known member
I like to see different set-ups like that, especially ones that you've ever seen. I watched something similar on youtube about screw machines that tubil cain filmed, the place was going out of business & he was there to see one last production run before they shut down.
Kevin54
MEMBER EMERITUS
I'm new to machining, just curious what you'll put in your tailstock that will have your new tool rotating to dial in on it? Other than rotating centers aren't most things held static?
I just use a drill chuck. The rod doesn't rotate, the point just goes into the punch mark and that is what you are referencing for center. Think of it as a long skinny dead center.
Mike.
zmotor explained it perfectly.
OP
Hephaestus29
Well-known member
I bought a Hardinge lathe last month and went to pick it up today, I'm still not back. Actually I was already in Tennessee then went on over to N.C. back in T.N. now heading home tomorrow. Hopefully I wont have another flat tire on the trailer.
Have a safe trip home and don't forget to post some photos!
Kevin is the real machinist in this thread.
Thanks A_Pmech, coming from a real machinist like you that means a lot. Keith
Kevin is the real machinist in this thread.
Clark_uk
Member

OP
Hephaestus29
Well-known member
Have a safe trip home and don't forget to post some photos!
Kevin is the real machinist in this thread.
Well i'm finally home, it took 8.5 hrs to travel 290 miles today, major traffic jams due to construction. I was also pulling the hardinge lathe.
An even bigger bummer is: I switched trucks with my dad "he has a dodge diesel so it handles the load much better than my f-150 would have" and left my remote to the garage in my f-150 now I can't get in the garage until the remote arrives via Unacceptable Parcel Service. I did cover the lathe with a tarp & sprayed it down with white lithium grease, so hopefully there wont be any major rust issues.
OP
Hephaestus29
Well-known member
I got the lathe off the trailer today. My neighbors son-in-law I guess you could say, has a wrecker across the street so he came over & took it off for me.
He had his boom extended as far is it would reach though, any farther and it wouldn't have happened.
It's a Hardinge Model HC
It has a cross slide & 8 position turret, and some other square tool holder on it now that has a cut off tool on it.
20 something collets
2 reamers 1 drill bit
a couple tool holders for the turret
some HSS and other misc stuff I don't know anything about.
Attachments


OP
Hephaestus29
Well-known member
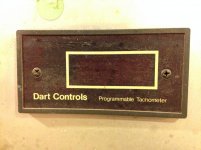
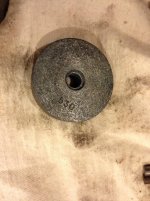
There were some other things I'm curious about that came with the lathe, some of it must be some type of material they were machining . It looks like a cross between bakelite & some kind of pressed fiberboard some of it looks to be saturated with dykem layout fluid or something.
Then there's a real light part, I can't tell if it's beryllium or ? seems to light for alum, magnesium ? im thinking not. ?
Then there's a real light part, I can't tell if it's beryllium or ? seems to light for alum, magnesium ? im thinking not. ?
Attachments
Jim Johnstone
Well-known member


I don't know if this counts because it wasn't done in my home shop lol. But here are a few recent projects.
OP
Hephaestus29
Well-known member
Is that where you work ? Is that some kind of die ?