Last night I finished up my new power drawbar for my milling machine. I fabricated one when I first got my new mill but I saw one that a guy (Collin @ Comp Edge X) fabricated and really liked his design, so I copied it somewhat. I liked his design because it was so much more compact as he used the air cylinder in the "pull" fashion rather than "push" so I was able to keep the overall height much less. I also went and machined some of the brass fittings rather than used over the counter ones purchased from my local hardware store.
Here are my preliminary drawings for the base plate and top plate along with all of the ports and screw holes for the butterfly air gun.
Top plate roughly layed out. I will get exact once I put it on my mill table and indicate off measurements exactly using the DRO.
Top plate machined to size and drilled/tapped for the butterfly air ratchet.
Bottom plate machined to size and drilled for the mounting location as well as the holes drilled and countersunk for the vertical guide rods. Also pictured are the guide rods.
Guide rods mocked into position. Bronze and brass in the background to be used for the bushings and the "tees" for the fittings.
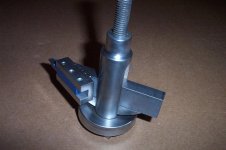
Completed unit and bolted on the mill. Looks and works awesome.