To avoid these ads, REGISTER NOW!

The Machine Work Thread

Bigblue&Goldie

Well-known member
Joined
Mar 12, 2009
Messages
10,662
Location
AZ
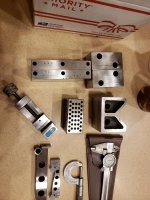
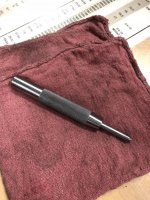
No work to show, but I picked up some tools off of a retired die maker. Super cool old guy that took a ton of pride in his work. I didn't need most of it, but I liked the guy and couldn't help but buy stuff from him. He had a ton of self made grinding tools that I really wanted, but no grinder to use them with.

- Starrett telescoping gages
- Starrett adjustable parallels
- Starrett 1" ball mic
- Helio German made caliper
- DoAll 5" and 2.5" sine bars
- Self made grinding vise (super nice)
- Self made matched setup blocks
- Self made setup block with dozens of tapped holes
- Matched V-blocks

I really didn't need the vise or setup blocks, but he was telling me how all of his tooling he machined, marked, through hardened, then final ground. The blocks are well used, but actually lightly rung together on the large faces. My wife didn't believe me that they weren't magnetic. He had 3 vises that were all buttery smooth, but figured the only one I could really use was the smallest one. Hard to pass on tools that were made with pride.
 

Attachments

  • 20190819_193618.jpg
    20190819_193618.jpg
    110.2 KB · Views: 225
  • 20190819_193614.jpg
    20190819_193614.jpg
    105.7 KB · Views: 193
Last edited:
To avoid these ads, REGISTER NOW!

4 FN 27

ALLIANCE MEMBER
Joined
Oct 19, 2015
Messages
4,635
Location
Minnesnowta
- Starrett telescoping gages
- Starrett adjustable parallels
- Starrett 1" ball mic
- Helio German made caliper
- DoAll 5" and 2.5" sine bars
- Self made grinding vise (super nice)
- Self made matched setup blocks
- Self made setup block with dozens of tapped holes
- Matched V-blocks

Nice score.
 

ez-duzit

Well-known member
Joined
Jun 24, 2013
Messages
5,094
Location
Marina del Rey
Couple of recent jobs:
Some Delrin deck hold-down plugs (~2-1/8" OD) for a 229' yacht.
And special zincs (~1-1/4" OD) for Larry Ellison's 184' yacht "Asahi".


MushCreek

Well-known member
Joined
Jan 14, 2015
Messages
9,737
Location
Upstate South Carolina
Those machinist tools make me wonder what will become of my stuff. I have a lot of really nice stuff that I made over the years. There's very little demand for it considering what it would have cost new.
 

Slupie

Well-known member
Joined
Dec 19, 2010
Messages
162
Location
Bartlett, IL
My dad just retired and I have the task of selling off his machinist tools; verniers, dial indicators, depth gauges, mics, etc... I'm still creating a list and taking photos. It's a tough task since there is not much demand for items like that. Unfortunately machining is a dying trade and it is harder and harder to find young tool and die makers.
 

Toolmaker51

Well-known member
Joined
Nov 26, 2015
Messages
176
Location
Missouri
No different than the woodworkers, mechanics, blacksmiths and so on.
Expecting young interested parties to just 'show up' won't happen; we all have to create the interest and perform as mentors. Start with local middle or high schools that participate in Dean Kamen's LEGO League and FIRST Robotics.
You'll find more than sufficient eager minds.
 

stioc

Well-known member
Joined
May 2, 2005
Messages
1,317
Location
SoCal
I've started building Harold Hall's simple grinding rest. This is one of those projects that's been on my 'would love to make it some day' list for a long time. However, I have a hard time staying focused on bigger projects that require multiple parts and potentially many weekends making progress little by little so I haven't attempted it thus far. I blame it on living in the instant gratification era where all you need is a credit card and 2 days later parts magically appear at your doorstep lol.


Anyway, so after studying the plans (in millimeters) several times, I made a list of parts and went shopping a few days ago.


Yesterday and today rough cut and squared most of the parts:

48613065346_1cb4057aee_z.jpg


48613219652_2dfbe25aeb_z.jpg


48613065406_08abcd33f5_c.jpg


Now Dykem is on, ready for layout work. I can do this in Fusion and just use CNC but I'm doing this the manual way:

48612713518_5f18e2e861_z.jpg
 

stioc

Well-known member
Joined
May 2, 2005
Messages
1,317
Location
SoCal
Making progress on Harold Hall's tool grinding rest. Cutting a 30 deg ball seat in this 1/4" flat.

48626110333_d7c129bea1_o.jpg


48626110373_c50251c360_o.jpg


48626652367_0655277f10_o.jpg
 
Last edited:

stioc

Well-known member
Joined
May 2, 2005
Messages
1,317
Location
SoCal
Any tips on how you centered the work on the face plate?

I simply seated an appropriate sized center/transfer punch (held in the tail stock) into the pilot hole and rotated the face plate a few times all the way around to make sure it's nice and square before tightening it all down. Then I took a spring pass to scribe a circle to make sure it indeed is within tolerance. This was good enough for the job at hand. For very strict tolerance work you'd use a dial test indicator in that pilot hole to make sure it's turning concentrically.

48626110268_4605820907_o.jpg


The pucker factor here was that the part was just barely squeaking by from hitting my ways and I was worried that even a small slip in the work holding would make my 9" lathe a 'gap-bed' lathe permanently :lol_hitti
 
Last edited:

stioc

Well-known member
Joined
May 2, 2005
Messages
1,317
Location
SoCal
Dang, look out, actual machinist stuff going on now Stioc!

LOL - thanks dude! I pretend to be a machinist on occasion! Post up what you've been up to lately? or suffer the many more pics of my amateurish attempts :D
 

RonRock

Well-known member
Joined
Oct 6, 2007
Messages
1,171
Location
Iowa, USA
Not an actual "work" post, but I figured I'd have my best chance here with my question.

So I recently bought a Kurt Power Drawbar head for my Bridgeport. Got it off Ebay for what I think was a good price. But it came without the air control valve/switch. I found it on Kurt's site but the price is much higher than I want to spend. I don't know if they actually manufacture the switch/valve themselves or if it is an off the shelf item that I can buy from another supplier. Pretty sure that the regulator and oiler is a "stock" item, or I could use some that I have and simply run a line to the input.

Anybody have one that they can look at for a part number or manufactures name? Any way to identify it? Where I can buy a switch/valve like that?


Here's a link to Kurt,

https://www.kurtworkholding.com/kurt-valve-assembly-toggle-switch-wflr-p-3188.html
 

Attachments

  • 6ed510052cc262498654cf267a739d88.thumb.jpg
    6ed510052cc262498654cf267a739d88.thumb.jpg
    16 KB · Views: 48

KBigg

Well-known member
Joined
Apr 15, 2019
Messages
474
Location
NE Indiana
My dad just retired and I have the task of selling off his machinist tools; verniers, dial indicators, depth gauges, mics, etc... I'm still creating a list and taking photos. It's a tough task since there is not much demand for items like that. Unfortunately machining is a dying trade and it is harder and harder to find young tool and die makers.

Do you have a sale thread posted anywhere? Im a youngish (25) tool and die maker and always looking,
 

whateg01

Well-known member
Joined
Mar 13, 2006
Messages
11,187
Location
doo dah, kansas, usa
I simply seated an appropriate sized center punch (held in the tail stock) into the pilot hole and rotated the face plate a few times all the way around to make sure it's nice and square before tightening it all down. Then I took a spring pass to scribe a circle to make sure it indeed is within tolerance. This was good enough for the job at hand. For very strict tolerance work you'd use a dial test indicator in that pilot hole to make sure it's turning concentrically.

...
The pucker factor here was that the part was just barely squeaking by from hitting my ways and I was worried that even a small slip in the work holding would make my 9" lathe a 'gap-bed' lathe permanently :lol_hitti

At low rpm, as long as it's well clamped, it shouldn't go anywhere, but clamping stuff to a faceplate always makes me nervous. Much better if I can put a bolt through the part into a t-slot.

Not that it's needed for this job, but a better way of centering a feature on the lathe is to turn a point on one end of a round bar and center drill the other. Then with the pointed end in the hole on the workpiece, and the other end on a center in the tailstock, nudge/dial it in with a DI just like you would with any round stock.

Dave
 

kazlx

Well-known member
Joined
Oct 30, 2012
Messages
2,851
Location
Tustin, CA
Since I'm getting called out by Stioc. Finally got moving on some parts again after just being slammed with other non-machining stuff. Some flat parts for my brothers work with the good old tape and super glue method. I really need a vacuum fixture.

The round plate is a 'rigging' plate. Still needs a fixture, flip and op2.
 

Attachments

  • IMG_3655.jpg
    IMG_3655.jpg
    153.2 KB · Views: 105
  • IMG_3657.jpg
    IMG_3657.jpg
    154.3 KB · Views: 110
  • 8A81215C-9746-4D9D-A0E0-3AD284D60DA3.jpg
    8A81215C-9746-4D9D-A0E0-3AD284D60DA3.jpg
    151.1 KB · Views: 117

kazlx

Well-known member
Joined
Oct 30, 2012
Messages
2,851
Location
Tustin, CA
It's powdercoat tape from McMaster https://www.mcmaster.com/7630a23

Comes in a few different widths. You can use regular blue painters tape as well, this just seems to work a bit better on machined surfaces.

Easiest way for me is to drop a thick plate in my vise or vises depending on size. Then I skim a few thou with my face mill to true it up. Apply tape to as much surface area as you need to hold your part. I usually run the tape a little off the edge for a tail to grab to remove. Do the same on your part. I have a big 1" dowel pin I use to burnish it down and remove the bubbles. Then I just use the super thin Starbond CA glue on the fixture side(Amazon https://www.amazon.com/dp/B00C32ME6G/?tag=atomicindus08-20)

You can use accelerator on the part if you want. I haven't yet, but will order some. I usually just give it a few minutes to cure. When you drop your part, make sure it's square and lined up, 'cause it ain't moving.

After I machine, usually you can knock the parts sideways with a soft mallet or a block in between or pry if there's a spot. Really works great for flat parts with minimal fixturing.
 
To avoid these ads, REGISTER NOW!

stioc

Well-known member
Joined
May 2, 2005
Messages
1,317
Location
SoCal
At low rpm, as long as it's well clamped, it shouldn't go anywhere, but clamping stuff to a faceplate always makes me nervous. Much better if I can put a bolt through the part into a t-slot.

Not that it's needed for this job, but a better way of centering a feature on the lathe is to turn a point on one end of a round bar and center drill the other. Then with the pointed end in the hole on the workpiece, and the other end on a center in the tailstock, nudge/dial it in with a DI just like you would with any round stock.

Dave

:thumbup:

Since I'm getting called out by Stioc. Finally got moving on some parts again after just being slammed with other non-machining stuff. Some flat parts for my brothers work with the good old tape and super glue method. I really need a vacuum fixture.

The round plate is a 'rigging' plate. Still needs a fixture, flip and op2.

Haha, I knew you were working on something, it's not possible kazlx doesn't have a project or two going on at any given point. As always- very nice work man! :bowdown:

It's good to see various projects others post here and in the welding thread too. Really the only two threads I check on regularly here lol
 

stioc

Well-known member
Joined
May 2, 2005
Messages
1,317
Location
SoCal
The second piece (no through hole this time but I drilled a pilot part way) is smaller and on the contrary required more careful clamping because the clamping similar to the first one shifted when I tried to take a cut. I rearranged it such that it's 'boxed in' and not only clamped down. This worked great!

48626110428_526cf61897_o.jpg
 

ClappedOutBport

Well-known member
Joined
Mar 30, 2016
Messages
998
My dad just retired and I have the task of selling off his machinist tools; verniers, dial indicators, depth gauges, mics, etc... I'm still creating a list and taking photos. It's a tough task since there is not much demand for items like that. Unfortunately machining is a dying trade and it is harder and harder to find young tool and die makers.

No different than the woodworkers, mechanics, blacksmiths and so on.
Expecting young interested parties to just 'show up' won't happen; we all have to create the interest and perform as mentors. Start with local middle or high schools that participate in Dean Kamen's LEGO League and FIRST Robotics.
You'll find more than sufficient eager minds.

This. It goes both ways. Every time I watch Abom 79's channel someone has given him another damn micrometer. He could probably fill a small swimming pool. But the young guys channels I watch like Donn DIY, Macro Machines, Geoffrey Croker, glassglowz, Tabletop Machine Shop, and others are rarely if ever given tools. I'm sure channel size matters too, but it seems a little strange when people give the man with 100 mics one more, and the man with 0 mics still has none. All us young fellas have to "earn our way."

I simply seated an appropriate sized center/transfer punch (held in the tail stock) into the pilot hole and rotated the face plate a few times all the way around to make sure it's nice and square before tightening it all down. Then I took a spring pass to scribe a circle to make sure it indeed is within tolerance. This was good enough for the job at hand. For very strict tolerance work you'd use a dial test indicator in that pilot hole to make sure it's turning concentrically.

48626110268_4605820907_o.jpg


The pucker factor here was that the part was just barely squeaking by from hitting my ways and I was worried that even a small slip in the work holding would make my 9" lathe a 'gap-bed' lathe permanently :lol_hitti

Here's a tip I learned I can now pass on. If you have a punch mark, center drill, or hole, and a dead center with a center hole in the rear: place the 60* point in the hole/punch mark, and put the mt end of the center in a tailstock center. Now you can just indicate the dead center instead of having to try to finagle your indicator tip on a tiny surface.
 

Toolmaker51

Well-known member
Joined
Nov 26, 2015
Messages
176
Location
Missouri
The slipping workpiece is almost certainly due to the clamping arrangement. That variety of clamping has to rely on leverage and contact. Here a 5 conditions, all of which form a successful setup.
(1) Lessen the bite on workpiece.
(2) Increase thickness of the spacer somewhat.
(3) Position the bolt closer to the clamped part.
(4) Put washers on the strap or use thicker strap. When you've tightened to point of bending, clamping is lost.

Mentoring budding machinists, I'd demonstrate clamping with a pencil. With hands on a table, I laid the pencil across their thumbs. Pushing down on the middle got no reaction, pushing closer to a thumb got the point across quickly.
 

stioc

Well-known member
Joined
May 2, 2005
Messages
1,317
Location
SoCal
Great tips guys, thanks. @toolmaker51 great point where you say 'when you've tightened to the point of bending, clamping is lost'!

OK so the base is complete now. I've actually created a 'build thread' over at HM if anyone's interested in more details: https://www.hobby-machinist.com/threads/building-harold-halls-simple-grinding-rest.79476

48626460096_19b2310cb0_o.jpg


48626606202_509b72471f_o.jpg


I still have to stone/deburr the sharp corners and get a flat head fastener for the ball clamp and may be a Kipp lever for the nut.
 

Ecosta777

Well-known member
Joined
Apr 26, 2016
Messages
271
Location
MA
Just digging through some old photos on my phone and found these. Can't give to much info on what they go to, but it does involve a machine with a laser. I can't quite remember what each one did since it was a while ago when these were made. All 6061 aluminum.

First one: if memory serves it was some sort of bearing housing. It bolted into something and then a shaft and the bearings slid into it, and a captive plate bolted into the back. Mostly done in the 4 jaw on the lathe and did the square profile and bolt holes in the Bridgeport.

Second one had something to do with the laser itself I think, or maybe the camera that looked at it. Mostly done in the 4 jaw as well, and bolt holes and angle done on the Bridgeport as well.

Third one I honestly have no idea what it did, but a cool part nonetheless. IMG_20181001_132543.jpgIMG_20181001_132557.jpgIMG_20181001_132603.jpgIMG_20181001_132622.jpgIMG_20180509_070843.jpgIMG_20180509_070853.jpgIMG_20180509_070902.jpg

Sent from my Pixel 2 using Tapatalk
 

spoon671

Well-known member
Joined
Aug 31, 2014
Messages
403
Location
SFCA
Not the most complex piece, but just posting to show how I finish the parts off. After deburring, I have a red Scotch pad wrapped around a block, and stuck in a vise, and then I pass the part squarely over the block, at 90 degree angles, on all sides, to scuff the part creating a sort of cross-hatch. My buddy says it's a waste of time but I like the way it looks. And I like that you can tell what I've built (assuming there's no paint/powedercoat), I'm the only one in the company that does exactly that lmao.

What you see is part of a machine I built for Taser (Axon), a bowl feeder system which then orients and loads probe ejectors together into Taser cartridges.

7830ef3cb246328e0a8364fb4bdae252.jpg537e043f6ef080a09efe6dfc97a9204d.jpg14b9833ec0895a3463ffb8c492403f0e.jpg

Aluminum
 

Attachments

  • 14b9833ec0895a3463ffb8c492403f0e.jpg
    14b9833ec0895a3463ffb8c492403f0e.jpg
    63.5 KB · Views: 0
  • 537e043f6ef080a09efe6dfc97a9204d.jpg
    537e043f6ef080a09efe6dfc97a9204d.jpg
    47.9 KB · Views: 0
  • 7830ef3cb246328e0a8364fb4bdae252.jpg
    7830ef3cb246328e0a8364fb4bdae252.jpg
    41.3 KB · Views: 1
Last edited:
OP
H

Hephaestus29

Well-known member
Joined
Mar 13, 2011
Messages
2,969
Location
Indianapolis
Brackets for a digital readout I bought off ebay.
It’s mounted on the same Hardinge.
 

Attachments

  • 4B81ACBC-0F27-4237-8C33-EAD0263FAB9C.jpg
    4B81ACBC-0F27-4237-8C33-EAD0263FAB9C.jpg
    69.9 KB · Views: 143
  • EF5A0692-1321-4D82-8648-12B7B5A833B3.jpg
    EF5A0692-1321-4D82-8648-12B7B5A833B3.jpg
    20.7 KB · Views: 49
  • 731C97E5-92F4-4DCC-A2EA-147E1B6FD590.jpg
    731C97E5-92F4-4DCC-A2EA-147E1B6FD590.jpg
    85.9 KB · Views: 161
  • 7FEB37D8-254E-4D02-A707-C5641360A66E.jpg
    7FEB37D8-254E-4D02-A707-C5641360A66E.jpg
    87.7 KB · Views: 149

Toolmaker51

Well-known member
Joined
Nov 26, 2015
Messages
176
Location
Missouri
I've seen different DRO installs for tailstock quills, this one good as any.
I think being able to register depth just begs a reliable stop to position the tailstock as well.
 

matt_i

Well-known member
Joined
Mar 14, 2008
Messages
10,717
Location
SE Michigan
So I had this OTC pail pump for 5 to 7 years...forgot exactly how many. I fill up a transfer container for various tractors and trucks which consume oil and need changes here and there. I buy this 15w40 from Tractor Supply as sort of a bulk purchase.


But I've always hated the fact that oil streamed down the OD/outside of it, leaking out thru the pump shaft on every single upstroke (see top barrel below for what a fraction of this accumulation looks like). I felt like I was missing a part, it even came with an exploded view that I've since lost but my feeling from that was that I was not. Big mess on the plastic pail top see below). In OTC's defense they do offer a stamped metal cover which affixes the pail pump to the metal cover with a setscrew, and maybe the spillage is supposed to run thru, but WTH, I can't have motor oil with fuzzies and flies going down the OD of the pump barrel back into the clean reservoir below...and there's a lot of wasted oil and mess. The steel dish replaces the entire plastic 5 gallon top but that's also a lot of work vs. cutting the spout with a razor knife and dropping in the pail pump (a tight fit) and big chance for spilling a LOT of oil imo if it ever got kicked over.


I tried a buna O-ring from a kit but the choice was not great. Shaft is .372" dia and this o-ring is .375 nominal ID and squashing it with the tube nut didn't do what I wanted. Still leaking....


I was searching Mcmaster for a better o-ring and was dissatisfied and thinking of $10 shipping for $4 worth of parts not to mention having 99 left over. Flash of brainstorm hit me last night, I had a piece of 1/8" leather belting and I could make my own seal of about 1/32" less ID...but then I have no punches....but I can make punches (!!) on the lathe.

After some turning here's what I have, 5/16" ID and .350" OD so my wall is in the .020" range. 1/2" dia W1 drill rod which is used in the "soft" state. I "sharpened" the edge slightly with a 3/8" center drill, very gently to avoid crushing or hooking the thin wall. The idea in the leather washer was to get approx 1/32" of stretch on the ID of the washer and then use the tube-nut to hold it in place.


A piece of wood, a hammer and the washer is made, cut the OD with heavy scissors as it doesn't have to be precise...its an ID and face-seal.


I forgot to take a pic of the washer itself but the ID is nice and clean.


And the best part? NO LEAKS :bounce: 
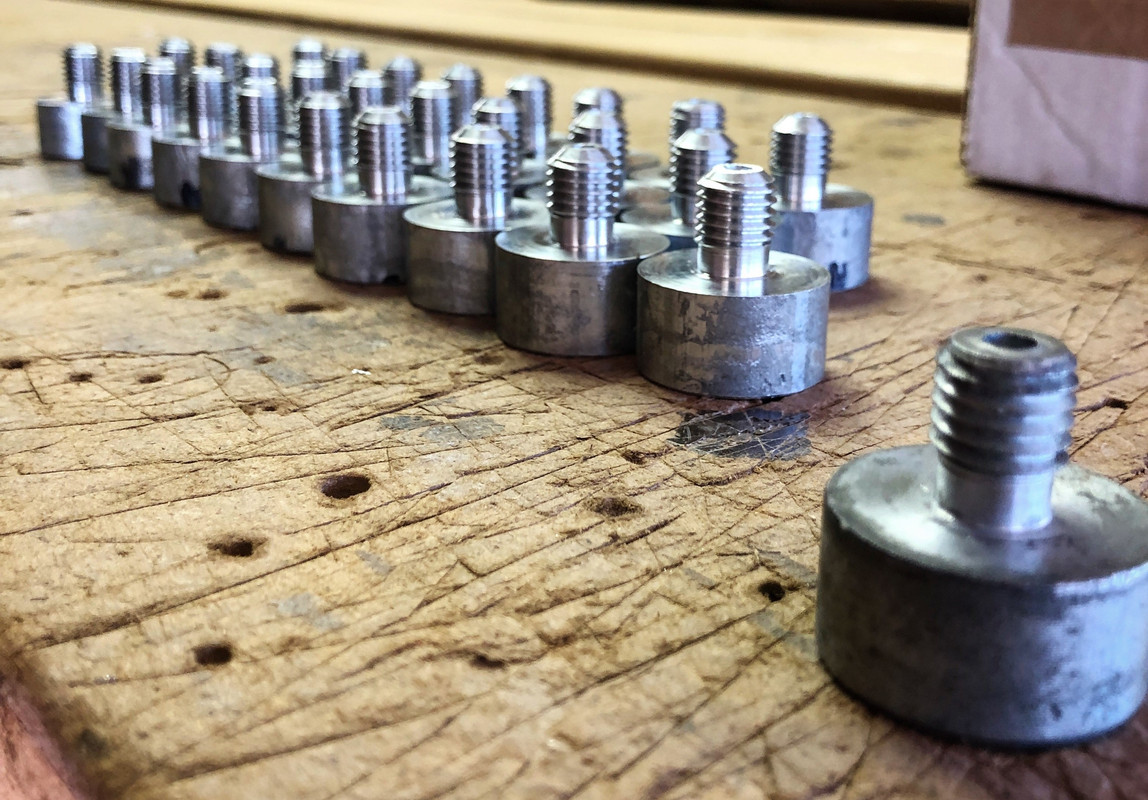
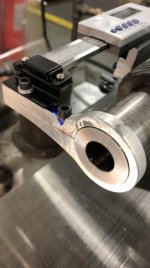
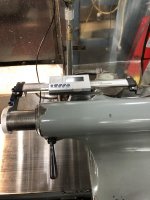
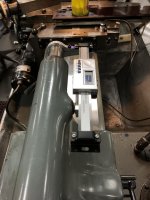
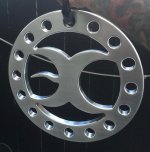
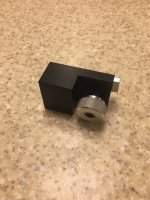
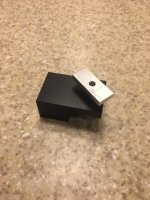
Sort of a low grade turning job but I'm quite happy. Actually got a stalled project off the list lol.


A lot of work is typically spent in the shop removing sharp edges but this was one of a few times that the sharp edge is the feature which is highly desired. I have done this several times in the past, works for web-straps, leather, most ductile plastics. Now to get a proper set of arch punches......:D
 
Last edited:

whateg01

Well-known member
Joined
Mar 13, 2006
Messages
11,187
Location
doo dah, kansas, usa
I've seen different DRO installs for tailstock quills, this one good as any.
I think being able to register depth just begs a reliable stop to position the tailstock as well.

That's a lot harder to pull off. Anything that would work for that is bound to get in the way of the carriage. For most manual stuff, I just need to know when the corner of the flute reaches the face so I can zero the indicator or whatever I'm using for measurement. For stuff that requires accurate depth, it gets bored anyway since you aren't going to be all that accurate with a drill.

Dave
 
OP
H

Hephaestus29

Well-known member
Joined
Mar 13, 2011
Messages
2,969
Location
Indianapolis
I've seen different DRO installs for tailstock quills, this one good as any.
I think being able to register depth just begs a reliable stop to position the tailstock as well.

Thanks, That’s a lathe at work, so I had to
make it in such a way that I didn’t modify
or drill anything.

Yes it could get in the way, but I had a lot of
holes to drill at 2 and 3 inches, and 20-30
turns of the handle each time gets very old
really quick. Sometimes I was thinking: was
that 18 or 19 turns etc. and to watch the dial
turn around slows you down in my opinion.
 

kazlx

Well-known member
Joined
Oct 30, 2012
Messages
2,851
Location
Tustin, CA
Delivered rigging plate yesterday. Guy wants a second one. He was beyond stoked.
 

Attachments

  • IMG_3721.jpg
    IMG_3721.jpg
    87.9 KB · Views: 92

sanddan

Well-known member
Joined
Jul 7, 2005
Messages
708
Location
Oregon
The pocket doors on my motorhome have been coming loose when driving and I determined that the door could tilt when turning on an off camber road. When it tilts the lock at the bottom comes out of the hole and the door goes bang. To stop this movement I came up with a spacer for the gap at the top. Spacer is a block of Delrin with a thumb screw and retainer plate that locks to the door track.
 

Attachments

  • IMG_1184.JPG
    IMG_1184.JPG
    79.3 KB · Views: 80
  • IMG_1185.JPG
    IMG_1185.JPG
    73.2 KB · Views: 81
  • IMG_1186.JPG
    IMG_1186.JPG
    126.8 KB · Views: 75
  • IMG_1187.JPG
    IMG_1187.JPG
    118.8 KB · Views: 79
  • IMG_1183.JPG
    IMG_1183.JPG
    74.7 KB · Views: 82
  • IMG_1188.JPG
    IMG_1188.JPG
    121.3 KB · Views: 72
To avoid these ads, REGISTER NOW!
Top Bottom