Cue
Well-known member
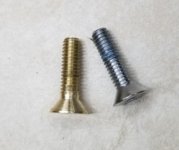
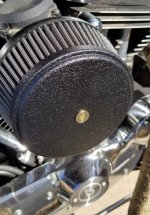
Nothing too special but I got to try out my new rotary broach set and make a brass Hex head/Allen bolt for my friends motorcycle air filter. Now he wants me to make brass bolts to replace all the chrome ones. 


Great solution Dan. One of the pocket doors in our Dynasty did the same thing years ago but I went a different direction and just made a slightly longer plunger or pin for the bottom so it wouldn't come out of the locking hole.
Hope you and the wife have been able to get out and enjoy that coach of yours a bit lately.
stioc - Nice project. I saw your build of this over on hobby machinist. I am trying to understand all of the ways the grinder attachment moves.
Thanks Mike. We just got back from a 2 week trip to Idaho, did about 1100 miles on the coach. Lots of learning was done, we used every system on the coach, some for the first time. Also learned about engine temps and how to avoid. The fix for the pocket doors worked great, very happy with the results. Still plan on getting over to your neck of the woods some time. Most likely next year. The wife just did early retirement so more trips are on the horizon.
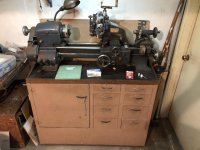
Picking up this dude tomorrow night. Already paid my $300.
If you got that for $300 then you got deal. Logan is a good lathe.
lg
no neat sig line
Thanks man.

The knob labeled 1 moves the fence left and right, the fence itself pivots in any angle you want. Knob 3 is a fine movement for the table front and back -about half an inch or so. Knob 2 is a locking screw preventing the table from moving front and back. The whole table is sitting on a ball-joint so it can be angled in any possible way desired. The rest is adjustable height wise and it can also side front and back on it's base. So lots of adjustments possible. However, you really need a couple of accessories to go with it too which I'll be making in the near future. Harold's grinding book is worth the small $10 it goes for if you have any interest in tool grinding in a home shop without a real tool grinder. Though I would suggest may be making Harold's 'advanced tool rest' as it's simpler/quicker to adjust and use. Hope that helps!
Picking up this dude tomorrow night. Already paid my $300

Thank you! What did you use to true the grinder wheel?
Picking up this dude tomorrow night. Already paid my $300

-That is easily the most complex milling attachment I've ever seen. He even has a digital readout on it.
Yeah, for $300, I'd have been all over that like nobody's business, too.
Doc.


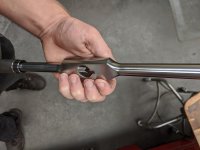
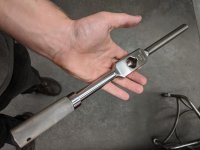
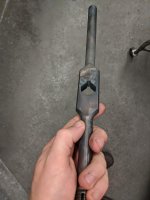

Homemade Starrett style tap wrench.
Homemade Starrett style tap wrench. This is the largest size (Starrett 91D).
Cost me $60 in material plus my time, brand new from Starrett it's $180.
Made from A2, hardened and polished.
The turning was all done manually, and I ground large radius cutter to do the radii on the body of it. Most of the milling was done on the bridgeport, but the profile on the body where it sweeps up on the ends, and the engraving I did in the HAAS. Took the easy way out and broached the relief in the corner of the tap hole to remove the radius left after milling, instead of making my own fancy broach to make a sharp corner. Polished up with crocus cloth and simichrome after heat treat.
The spring I ordered for it is waiting at home, so I'll be able to do the final assembly tonight!

Wow, really badass!
Beautiful work Eric.
Worth it though, that is gorgeous.I use a #0 center drill, DOC was .001 at a time, I think I ended up at about -.003" to get the desired boldness.wow, really nice work on the tap wrench!! What endmill are you using for engraving and what's the DOC for it?
I use a #0 center drill, DOC was .001 at a time, I think I ended up at about -.003" to get the desired boldness.
Sharpened an old endmill on the tool rest I made...
Looks a little rough yet.

Which part?...
Look at the grinding marks on the ends of the flutes. There should be no grooves.
...That has to do partly with the camera through the magnifying glass...
They should also have a relief cut for plunging.
You shouldn't plunge with that endmill anyway. It doesnt have a center cutting flute.