
You are using an out of date browser. It may not display this or other websites correctly.
You should upgrade or use an alternative browser.
You should upgrade or use an alternative browser.
The Machine Work Thread
- Thread starter Hephaestus29
- Start date
Bigblue&Goldie
Well-known member
Wow, great work/design!
4 FN 27
ALLIANCE MEMBER
Cool!!!
ez-duzit
Well-known member
i--great project and photo documentary.
pb57
Well-known member
Very nice job. Paul
JeepJohn62
Well-known member
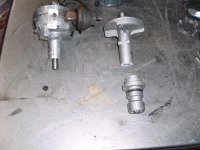
Little project I hacked out over a couple of weeks.
Goal is to adapt a new electronic distributor in place of an old breaker point model. After some heat scratching and some CAD sessions I came up with a plan to cut down the main tube. It does take a bit of dialing up the confidence to take a brand new distributor out of the box and go over and slice it on the bandsaw....
Very cool! I don't see provision for a rotor or cap, is this a trigger for individual coils?
matt_i
Well-known member
Thanks everybody! This used to be a GM 4.3L distributor from 1990s. About a 30 year gain in distributor & ignition technology. Hopefully widely available parts for another 30 
One of the basic dimensional problems was as soon as the housing gets sawed, the internal hole that's left is just a rough-drilled hole non-concentric with the OD. So I relied on the flange to be square to the OD, and then went from there on that premise to get everything back to concentric again.

One of the basic dimensional problems was as soon as the housing gets sawed, the internal hole that's left is just a rough-drilled hole non-concentric with the OD. So I relied on the flange to be square to the OD, and then went from there on that premise to get everything back to concentric again.
Last edited:
Bigblue&Goldie
Well-known member
I'm curious what the rest of the project looks like.
Toolmaker51
Well-known member
"No distributors were harmed during this production..."
Following the process, it's a clear example of what is thought of as a small shop, is not restricted as it seems. In reality, no shop has every single means to produce each object desired. The small shop usually has better thinking processes, creativity that essentially extends their footprint. Being able to perform and describe that is a detail few resumes contain any more.
Following the process, it's a clear example of what is thought of as a small shop, is not restricted as it seems. In reality, no shop has every single means to produce each object desired. The small shop usually has better thinking processes, creativity that essentially extends their footprint. Being able to perform and describe that is a detail few resumes contain any more.
shortykorte
Well-known member
Matt_i
Been a few years since I’ve been following hot rods but I thought there are manufacturers making electronic distributors that fit the old SB.
Sent from my iPhone using Garage Journal
Been a few years since I’ve been following hot rods but I thought there are manufacturers making electronic distributors that fit the old SB.
Sent from my iPhone using Garage Journal
matt_i
Well-known member
Matt_i
Been a few years since I’ve been following hot rods but I thought there are manufacturers making electronic distributors that fit the old SB.
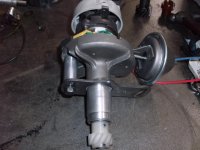
Hi Shorty this is an old line-6 application, the original distributor is 1950s breaker-point technology and will be forevermore messing with points, capacitors, the swing-weights getting bound up, wondering why there are two dimensions of springs on the swing weights, green corrosion under the cap, etc. The GM small cap series are excellent performing and excellent value replacements in my estimation.....provided one can get them to fit....which was my adaptation project above. So its really not a hot rod, that's for people with more money
 its just about not having to lose productivity, mess around and troubleshoot ad infintium.
WoodsTruck
Well-known member
- Joined
- Jan 12, 2013
- Messages
- 1,029
Is that a mechanical tach that comes off the side of the original housing?
Would you be using an electric tach now?
Would you be using an electric tach now?
ttpete
Well-known member
Is that a mechanical tach that comes off the side of the original housing?
Would you be using an electric tach now?
It could be for a tach or used to drive the pump for the Rochester fuel injection system.
dkmc
Well-known member
Super job Matt!
I did one for the Slant 6 in my 1970 Yale forklift a number of years ago. Also about 15+ years ago I put a large cap HEI in a 1953 Yale Forklift, flathead 6 Chrysler engine. I don't think you can beat the GM HEI setup. No more issues with cleaning points, or rough running in damp-cold weather.
I did one for the Slant 6 in my 1970 Yale forklift a number of years ago. Also about 15+ years ago I put a large cap HEI in a 1953 Yale Forklift, flathead 6 Chrysler engine. I don't think you can beat the GM HEI setup. No more issues with cleaning points, or rough running in damp-cold weather.
Attachments

matt_i
Well-known member
Matt_i, is that off your IH 460 utility by chance?
Very good detective work, I've got several dirt work projects planned and need the old beast to do a big part of it, tired of constantly messing around trying to limp it thru to project's end so I'm trying to flip the script and put in some work up front so when I get to the field I can proceed in a more efficient manner.
Mechanical tach isn't going to happen this go-round. It's never worked - seems the cable inner-shaft is MIA and the tach itself is in bad shape. I did consider attaching the magnetic pole & module to the old cast base to preserve the helical gear drive for the tach but getting into grafting shafts with various super-hard spots on them didn't seem like a path of low resistance....
DK - you have some more exotic workholding than me!!

Bigblue&Goldie
Well-known member
One of my hobbies in life is gunsmithing, and one of the platforms that I do a fair amount of work on is the AK-47. I have a really nice parts kit that I'm going to be assembling soon and I wanted a better method of installing the barrel. For those that aren't familiar, and AK barrel presses into the front trunion and is retained by a 7mm pin. On a kit build where the barrel was previously drilled for the pin you have to press the barrel in to exactly where the pin lines up which isn't always the easiest task. On a virgin barrel, you press the barrel in and set the "headspace" (chamber depth), then drill for the 7mm pin. Headspace is measure in the thousandths, so it's a precise process and critical to safety and function.
In the past, I've used an AK-Builder tool in a HF 12T press. It's a 5 handed job to line everything up, it's scary, and you risk bending the barrel or other components if things go wrong. The other popular method is the "all thread" method, which has been used for decades, but is most commonly associated with the tool manufactured by Toth. Toth's tool is very popular as it eliminates the need for a press, is economical, and will push a barrel in and out. There are a few elements of the Toth tool I don't need (I use a Robert Forbus tool for pushing out) and few I tried to improve upon.Basically, you use the side plates to "sandwich" the receiver/trunion in a vise and press the barrel in by turning the big bolt that puts pressure on the muzzle. This allows very fine movement of the barrel compared to a hydraulic press that tends to be jumpy.
My design uses a standard thread protector (14x1LH) that would thread onto the end of a barrel. I used a boring head to mill out a piece of 1.000" round stock to slide on top of the thread protector. On the other side I used a .375" carbide burr (I didn't have a ball nose endmill) to make a dimple to retain a ball bearing. The same thing was done to the end of a 1/2"-20 grade 8 bolt. The carriage is simply 1.500"x.750" cold roll. I originally designed the tool around 5/16" all thread, but I quickly realised I had purchased 3/8"-24 high strength all thread.......


The receiver plates are the same.500"x.750" cold roll material. Dimples were made to clear the rivets by plunging an end mill. The top's received a cut so you can view the barrel pin channel (something I don't think is possible on the Toth tool). The plates were also drilled and tapped for the all thread (another difference). A .100" lip helps line everything up off the front of the receiver.


Here it is all setup on a demilled receiver with a barrel stub.


In the past, I've used an AK-Builder tool in a HF 12T press. It's a 5 handed job to line everything up, it's scary, and you risk bending the barrel or other components if things go wrong. The other popular method is the "all thread" method, which has been used for decades, but is most commonly associated with the tool manufactured by Toth. Toth's tool is very popular as it eliminates the need for a press, is economical, and will push a barrel in and out. There are a few elements of the Toth tool I don't need (I use a Robert Forbus tool for pushing out) and few I tried to improve upon.Basically, you use the side plates to "sandwich" the receiver/trunion in a vise and press the barrel in by turning the big bolt that puts pressure on the muzzle. This allows very fine movement of the barrel compared to a hydraulic press that tends to be jumpy.
My design uses a standard thread protector (14x1LH) that would thread onto the end of a barrel. I used a boring head to mill out a piece of 1.000" round stock to slide on top of the thread protector. On the other side I used a .375" carbide burr (I didn't have a ball nose endmill) to make a dimple to retain a ball bearing. The same thing was done to the end of a 1/2"-20 grade 8 bolt. The carriage is simply 1.500"x.750" cold roll. I originally designed the tool around 5/16" all thread, but I quickly realised I had purchased 3/8"-24 high strength all thread.......
The receiver plates are the same.500"x.750" cold roll material. Dimples were made to clear the rivets by plunging an end mill. The top's received a cut so you can view the barrel pin channel (something I don't think is possible on the Toth tool). The plates were also drilled and tapped for the all thread (another difference). A .100" lip helps line everything up off the front of the receiver.
Here it is all setup on a demilled receiver with a barrel stub.
Bigblue&Goldie
Well-known member
More pics. Obviously, this is just mocked up on a barrel stub, but it gives you an idea of what's going on.
In this pic you can see the 7mm pin mentioned above.

From the chamber side

This is probably like reading Chinese for 99% of you, but maybe there are some people here that are into these rifles that will comprehend what I'm trying to achieve. Hopefully my description will allow the 99% a vague idea of the purpose of the tool.
In this pic you can see the 7mm pin mentioned above.
From the chamber side
This is probably like reading Chinese for 99% of you, but maybe there are some people here that are into these rifles that will comprehend what I'm trying to achieve. Hopefully my description will allow the 99% a vague idea of the purpose of the tool.
Last edited:
OP
Hephaestus29
Well-known member
I understand what you’re doing, I don’t
have the ak but...
I like making jigs, fixtures, etc. Things like
that are challenging to make and rewarding
when you’re finished.
have the ak but...
I like making jigs, fixtures, etc. Things like
that are challenging to make and rewarding
when you’re finished.
Jim Johnstone
Well-known member


OP
Hephaestus29
Well-known member
What does it do/what’s the purpose?
I mean other than carry cut in half sprockets?
I mean other than carry cut in half sprockets?
Willie Makeit
Well-known member
- Joined
- Dec 30, 2013
- Messages
- 922
What does it do/what’s the purpose?
I mean other than carry cut in half sprockets?
... someone has never been around a true racing go-kart
Jim Johnstone
Well-known member
thats literally all it does lolWhat does it do/what’s the purpose?
I mean other than carry cut in half sprockets?
Sent from my SM-G970W using Tapatalk
slowtwitch73
Well-known member
Sprocket caddy... 'nuff said.
OP
Hephaestus29
Well-known member
Is that how go-kart sprockets are made?
in two pieces? I thought it was decorative
at first.
in two pieces? I thought it was decorative
at first.
Jim Johnstone
Well-known member
there are 2 piece and single piece sprockets. we use 2 piece because the 4 stroke engines have the output shaft to the left, so the sprocket is inboard on the axle. if you used solid sprockets inboard, you'd have to remove the entire axle to do a gear change.Is that how go-kart sprockets are made?
in two pieces? I thought it was decorative
at first.
most 2 strokes are outboard so you just need to remove the right rear wheel to change a solid sprocket.
Sent from my SM-G970W using Tapatalk
matt_i
Well-known member
More pics. Obviously, this is just mocked up on a barrel stub, but it gives you an idea of what's going on.
This is probably like reading Chinese for 99% of you, but maybe there are some people here that are into these rifles that will comprehend what I'm trying to achieve. Hopefully my description will allow the 99% a vague idea of the purpose of the tool.
Good stuff there, lots of details baked into the design...I can see how the fine-threaded bolt for pressing will give you the control you need and the ball bearing presumably isolates the rotation from the pressure screw.

Willie Makeit
Well-known member
- Joined
- Dec 30, 2013
- Messages
- 922
there are 2 piece and single piece sprockets. we use 2 piece because the 4 stroke engines have the output shaft to the left, so the sprocket is inboard on the axle. if you used solid sprockets inboard, you'd have to remove the entire axle to do a gear change.
most 2 strokes are outboard so you just need to remove the right rear wheel to change a solid sprocket.
Sent from my SM-G970W using Tapatalk
ran a LOT of roundy round stuff back in the day with a Yamaha KT100 running inboard thru a jack shaft. we used the split sprockets too. also ran a lay-down/enduro with a KT100 monted on leftside & output was inboard. But those karts use axle clutches and 2" wide Gates toothed belts instead of chain. Also split sprockets.
Jim Johnstone
Well-known member
A lot of the KT100 stuff looked so cool. I never ran KT100, but I raced Rotax 2 strokes back in the day. Funny how times change, the kart club my son races in outlaws jackshafts, belt drives, and axle clutches lol.ran a LOT of roundy round stuff back in the day with a Yamaha KT100 running inboard thru a jack shaft. we used the split sprockets too. also ran a lay-down/enduro with a KT100 monted on leftside & output was inboard. But those karts use axle clutches and 2" wide Gates toothed belts instead of chain. Also split sprockets.
Sent from my SM-G970W using Tapatalk
ClappedOutBport
Well-known member
- Joined
- Mar 30, 2016
- Messages
- 998
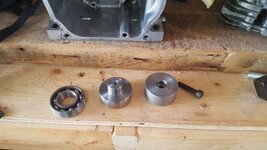
Nothing too exciting today, had some run time on my CNC mill so I hopped on the lathe at work and whipped up a bearing press tool to help install new bearings in my son's go kart rims.
Sent from my SM-G970W using Tapatalk
I made almost the exact same thing recently for installing 6305/6206 bearings deep in a gearbox. Less useful than I thought, but still sort of useful. I found that I didn't need the 6206 side, so I machined it off and used that side to drive bearings on to shafts already in the bore. Threaded on is a good idea, Aluminum less so. Got beat up fast, but did the job. I also had a recess on mine as Duc916 suggested.
Attachments

Jim Johnstone
Well-known member
I made this one a while back, specifically for 6205 bearings in Honda crankcase. It uses a bolt to draw the bearing into the crankcase rather than beating it in with a hammer. works ok, but probably should have used a fine pitch thread.I made almost the exact same thing recently for installing 6305/6206 bearings deep in a gearbox. Less useful than I thought, but still sort of useful. I found that I didn't need the 6206 side, so I machined it off and used that side to drive bearings on to shafts already in the bore. Threaded on is a good idea, Aluminum less so. Got beat up fast, but did the job. I also had a recess on mine as Duc916 suggested.
I like the idea of having it threaded on for different bearings.

Sent from my SM-G970W using Tapatalk
Attachments
kazlx
Well-known member

Jim Johnstone
Well-known member
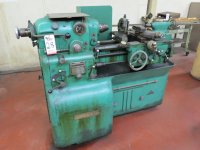
ohhh im jealous. sure beats the heck out of the lathe I just brought home. What did that go for at auction? if you don't mind me asking.Bringing some new ladies home from an auction this week
Sent from my SM-G970W using Tapatalk
bradpac
Well-known member
Bringing some new ladies home from an auction this week
They just made things with style back in the day. Industrial machines with curves, something you just like to look at. Maybe that is what is wrong with the world today.
kazlx
Well-known member
ohhh im jealous. sure beats the heck out of the lathe I just brought home. What did that go for at auction? if you don't mind me asking.
Sent from my SM-G970W using Tapatalk
I paid $4k plus fees for the pair. I've been looking for one for a while. I need something for just general shop work, but I'm tired of small Logans and stuff like that. I wanted something compact and stout. I sort of regret selling my 1440 Cadillac a while ago, as it was awesome, but never needed a 7' long lathe.
ez-duzit
Well-known member
k--nice find.
kazlx
Well-known member
They just made things with style back in the day. Industrial machines with curves, something you just like to look at. Maybe that is what is wrong with the world today.
Hell yes they did. I think this is ones of the nicest looking lathes ever made. They are just nice to look at.
Jim Johnstone
Well-known member
well done man, good for you! I'd like to add something that nice to my home shop someday.I paid $4k plus fees for the pair. I've been looking for one for a while. I need something for just general shop work, but I'm tired of small Logans and stuff like that. I wanted something compact and stout. I sort of regret selling my 1440 Cadillac a while ago, as it was awesome, but never needed a 7' long lathe.
Sent from my SM-G970W using Tapatalk
kazlx
Well-known member
well done man, good for you! I'd like to add something that nice to my home shop someday.
Sent from my SM-G970W using Tapatalk
Thanks. Yea, I have the Fadal and at some point I'd like a nice CNC lathe, but there's always a need for manual stuff to modify things or make quick one-off pieces. Can't wait to get them home and get sorted. I'll be picking one and then I'm sure one of my buddies will take the other. My rigger is set to grab them Monday and bring them. It was nice the auction was only about 20 minutes from me.