To avoid these ads, REGISTER NOW!

The making of a table

OP
R

RivennHewn

Well-known member
Joined
Jun 4, 2011
Messages
10,372
Location
PNW
Got the afternoon to myself!!!!

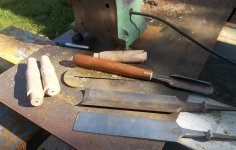
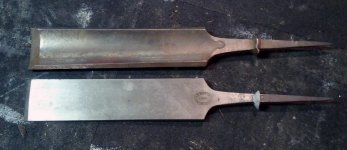
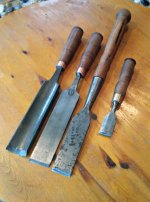
The other day I dug out some old tools, and found a pair of D R Barton edge tools. A 2" chisel, and a 2" gouge. Both needed handles.

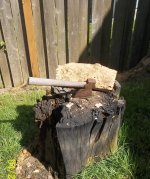
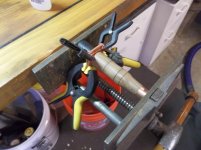
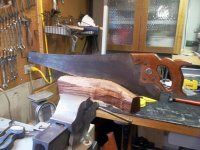
Found a likely piece of Mesquite in the firewood pile, and went to work.

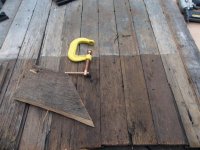
Roughed with a hewing hatchet and cut to size with an old Disston.

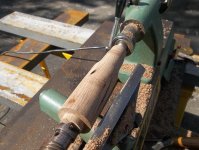
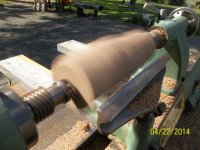
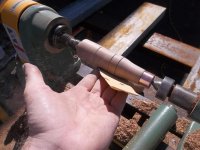
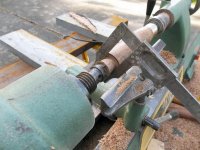
Pulled out an old smitty-made gouge and roughed in the shape.

I need to find something for the ferrules. The **** ends will be leather capped.
 

Attachments

  • firewood.jpg
    firewood.jpg
    150 KB · Views: 146
  • squaring.jpg
    squaring.jpg
    156.5 KB · Views: 150
  • sizing.jpg
    sizing.jpg
    155.6 KB · Views: 147
  • roughturn.jpg
    roughturn.jpg
    143.6 KB · Views: 159
  • spinninghandle.jpg
    spinninghandle.jpg
    142.7 KB · Views: 159
  • Bartons.jpg
    Bartons.jpg
    148.7 KB · Views: 180
To avoid these ads, REGISTER NOW!
OP
R

RivennHewn

Well-known member
Joined
Jun 4, 2011
Messages
10,372
Location
PNW
Repost of the tools.

These have the 1882 logo.

I believe that places them at the end of Barton's life, or just after he died in 1875.

Mack & Co. kept the Barton tool name around for a few years.

Both of these appear to be unused, with no handles or any signs of sharpening.
 

Attachments

  • bartons.jpg
    bartons.jpg
    136.4 KB · Views: 91
  • bartonmack1908AD.jpg
    bartonmack1908AD.jpg
    31.6 KB · Views: 73
OP
R

RivennHewn

Well-known member
Joined
Jun 4, 2011
Messages
10,372
Location
PNW
Another beautiful afternoon in Seattle!!

(We have to celebrate the little things, right?)

Fitted copper for the ferrules.

I did some filling on some cracks in the Mesquite. I used cyanoacrylate glue and dust from the lathe.

Then finished the profile and got them sanded and waxed.

Next is to cut some leather for the butts.
 

Attachments

  • cracks.jpg
    cracks.jpg
    143.4 KB · Views: 121
  • sanding.jpg
    sanding.jpg
    141.9 KB · Views: 125
  • color.jpg
    color.jpg
    154.2 KB · Views: 135
OP
R

RivennHewn

Well-known member
Joined
Jun 4, 2011
Messages
10,372
Location
PNW
Cut some leather washers and glued them onto the tenons I had cut on the **** ends.

Clamped them up in the vise.
 

Attachments

  • calipertenon.jpg
    calipertenon.jpg
    143.6 KB · Views: 136
  • holes.jpg
    holes.jpg
    140.4 KB · Views: 137
  • glueup.jpg
    glueup.jpg
    130.9 KB · Views: 175
OP
R

RivennHewn

Well-known member
Joined
Jun 4, 2011
Messages
10,372
Location
PNW
This is a 3rd D R Barton chisel. Thought I'd turn them all at the same time.

A socket type with an earlier logo circa 1865.

this one has a little wear and tear, but will hone up fine.

The blade is 1-3/4" wide, and with the new handle, overall it's 21".

I roughed the cone that goes into the socket on the lathe, then trimmed it to fit with my shoulder plane.

Should make for a nice tool to have around the shop.
 

Attachments

  • bartonchisel.jpg
    bartonchisel.jpg
    154.8 KB · Views: 185
  • Trimming.jpg
    Trimming.jpg
    147 KB · Views: 157
OP
R

RivennHewn

Well-known member
Joined
Jun 4, 2011
Messages
10,372
Location
PNW
Finally got around to setting all the handles on the chisels.

The smaller one is an Eric Anton Berg from Sweden.
 

Attachments

  • chiselhandles.jpg
    chiselhandles.jpg
    137 KB · Views: 137
  • chisellogos.jpg
    chisellogos.jpg
    132.7 KB · Views: 108
OP
R

RivennHewn

Well-known member
Joined
Jun 4, 2011
Messages
10,372
Location
PNW
This is to show just how boring a rainy Sunday afternoon can be:

I broke the handle off my hewing hatchet while roughing in the chisel handles.

Pulled another log from the firewood pile, and went to work with my old Disston, Stanley no. 40 scrub plane, a drawknife and a spokeshave.

While it's easy to buy a new straight handle for a hatchet, a hewing hatchet is supposed to have an angle on it. They are a little harder to find.

The piece of wood I used had a nice bend in the grain, so I just followed that.

The angle is to give your fingers some clearance while hewing a large flat face.

In the last pic, you can really see the angle of the handle/ head.
 

Attachments

  • hewinghandle.jpg
    hewinghandle.jpg
    148.3 KB · Views: 177
  • hewing.jpg
    hewing.jpg
    140.2 KB · Views: 169
  • drawknife.jpg
    drawknife.jpg
    134.2 KB · Views: 159
  • no.40.jpg
    no.40.jpg
    138.9 KB · Views: 150
  • sawr.jpg
    sawr.jpg
    141.8 KB · Views: 152
  • firewoodhandle.jpg
    firewoodhandle.jpg
    136.4 KB · Views: 152
OP
R

RivennHewn

Well-known member
Joined
Jun 4, 2011
Messages
10,372
Location
PNW
In an attempt to get the shop a little more organized, I decided that a stand for some of the toolboxes would be a good thing.

On top of the Delta lathe legs, I added some rusted 3/16" plate that's been sitting around in the rain for a few years.

I was going to run a continuous weld around the perimeter, but kinda like the "Tacked" look.

Maybe I just got lazy? Ehh! Who cares, it's just a stand and that's as far as I'm taking it.
 

Attachments

  • rust.jpg
    rust.jpg
    151.6 KB · Views: 222
  • tacked.jpg
    tacked.jpg
    152 KB · Views: 282
  • tacked2.jpg
    tacked2.jpg
    146.3 KB · Views: 243
OP
R

RivennHewn

Well-known member
Joined
Jun 4, 2011
Messages
10,372
Location
PNW
Looks better with some boxes on it.

This one will live in my basement.

Working on what will live underneath it.
 

Attachments

  • boxstand.jpg
    boxstand.jpg
    136.6 KB · Views: 250
OP
R

RivennHewn

Well-known member
Joined
Jun 4, 2011
Messages
10,372
Location
PNW
All work and no play make me…..Boring as hell!

Trying to get a restaurant up and running so they can make some money.

I thought I'd post my logo and maybe get some feedback on the design.
 

Attachments

  • RivenAndHewnBanner760x100-1.jpg
    RivenAndHewnBanner760x100-1.jpg
    25.8 KB · Views: 66
OP
R

RivennHewn

Well-known member
Joined
Jun 4, 2011
Messages
10,372
Location
PNW
No work on my son's car this weekend, as he had to work one of his two jobs.

That meant I got the day to set up shop in my back yard.

I've been looking at this old material that I brought home from a demo job where I took up some 125 year old Douglas Fir flooring.

I spent a few hours cleaning it up with a wire brush and a shop vac.

I have always like the look of old weathered barn doors, so I thought I'd build one.

One face of the door will be from the 1X8 ship lap diagonal sheathing. I choose to show the under side of it, I like the way you can see were the joist were.

I also like the "ghost paint"

The other side will be the 3.5" T&G DF flooring. It is heavily worn, and has been painted in places.

Can't wait to see it finished. I plan on putting some of my recycled hardware on it.
 

Attachments

  • clampup.jpg
    clampup.jpg
    148.9 KB · Views: 154
  • barnwood3.jpg
    barnwood3.jpg
    152.1 KB · Views: 137
  • barndoor2.jpg
    barndoor2.jpg
    147.6 KB · Views: 136
  • barndoor1.jpg
    barndoor1.jpg
    147.6 KB · Views: 142
  • dirtywood.jpg
    dirtywood.jpg
    138.6 KB · Views: 140
OP
R

RivennHewn

Well-known member
Joined
Jun 4, 2011
Messages
10,372
Location
PNW
A little more progress on the barn door.

I still need to cut it to size, and square it up some.

I did add a zinc brake/flashing to just above the bottom rail. I used some metal black, which turned it from shinny silver to an aged brown. Blends in so nicely that you can barely see it.
 

Attachments

  • door.jpg
    door.jpg
    145 KB · Views: 141
  • doorbackside.jpg
    doorbackside.jpg
    128.4 KB · Views: 131
  • doortexture.jpg
    doortexture.jpg
    156.8 KB · Views: 137
  • doorbottom.jpg
    doorbottom.jpg
    147.5 KB · Views: 129

Tucko

Well-known member
Joined
Jul 28, 2012
Messages
1,650
Location
Whittier, Ca
To give the table the look of an "old factory", I'm adding some patches.

I want them to look different from each other, so they look like they were added at different times.

Since I want the top to remain level, I had to relieve the plywood so the patches won't add thickness and unevenness to the top.

I then added a backer strip of zinc under where the joint will be.

The next step was to form the edges of the main panel to fit the patches. Kinda like the patch panels you'd do on a rusty floor board or trunk.

Then I started on the edge detail. Each flap will be soldered.

Last pic is a sneak peak of what it will look like complete.

I like your Pexto hand tongs...:)
 

xyster101

Well-known member
Joined
Jul 3, 2013
Messages
640
Location
Upstate NY
Looks great! Lots of time into all that.
As for the spot welder, check out youtube videos. There will be specific ones related to the harbor freight spot welder too. I know on cars they put a lot more then you have on yours. I have never spot welded, so don't listen to me anyway.
 
OP
R

RivennHewn

Well-known member
Joined
Jun 4, 2011
Messages
10,372
Location
PNW
Looks great! Lots of time into all that.
As for the spot welder, check out youtube videos. There will be specific ones related to the harbor freight spot welder too. I know on cars they put a lot more then you have on yours. I have never spot welded, so don't listen to me anyway.


I think I got the spot welder down.

I replaced the tips, and used thinner material.

The 16 gauge maxed it out (two layers).

Now I just need to dream up another project for it.
 
To avoid these ads, REGISTER NOW!
OP
R

RivennHewn

Well-known member
Joined
Jun 4, 2011
Messages
10,372
Location
PNW
Drank a little Kool-Aid this afternoon.
 

Attachments

  • Festering.jpg
    Festering.jpg
    144.4 KB · Views: 305
OP
R

RivennHewn

Well-known member
Joined
Jun 4, 2011
Messages
10,372
Location
PNW
Borrowed a Festool track saw. Might have talked myself into acquiring one.

made short work of squaring and truing up the door.

I'll be trimming out the edges, so you don't see the end grain of the 45 degree boards.

This will also give me a better place to mount hinges/ hardware.

Not sure if this door will swing, or roll. I kind of like the idea of this one on pipe rollers.
 

Attachments

  • sawrs.jpg
    sawrs.jpg
    149.9 KB · Views: 156

1/2 Cup

Member Emeritus
Joined
Apr 28, 2012
Messages
19,283
Location
Shepparton. Victoria. Australia
Borrowed a Festool track saw. Might have talked myself into acquiring one.

made short work of squaring and truing up the door.

I'll be trimming out the edges, so you don't see the end grain of the 45 degree boards.

This will also give me a better place to mount hinges/ hardware.

Not sure if this door will swing, or roll. I kind of like the idea of this one on pipe rollers.

Great job on the door :thumbup:

I have seen the track saws about and it is certainly on myshopping list.
 

Beaumont67

Well-known member
Joined
Apr 10, 2011
Messages
526
Location
St. Thomas, Ontario

RivennHewn - Great thread here BTW...I've enjoyed it, from the start.
- very repurposed & creative use of materials, besides the stunning detail & your workmanship

I've got a custom dining table to have made, using raw sawmill cut black walnut/burly maple/cherry.
- As I have a 1/4 grove in the top surface design, separating the 3 different wood species:
I wanted to use a hard & black color filler...one that will not shrink away from the hardwood.
(aka - avoid crack line, running down the plank lengths).
Question - does the Life Caulk product, cure hard or stays somewhat rubbery ?
- your post #59 photos, has a similar filled grove in table top...I am referring to

Product Description
Great for sealing teak decks
Fast-curing, two-part polysulfide for use on deck seams. Sandable, paintable and chemical-resistant. Pourable. Black.
•Formulation: Two-part polysulfide caulking compound
•Recommended Usage: Wood or metal deck seams; easily poured or injected
•Material Incompatibilities: ABS, Lexan; plastic hardware; rubrails to fiberglass
Adhesion Rating: Tensile strength: 465 psi; elongation: 700%
•Cure Time Tack free: 3 hrs; complete cure: 24 to 72 hrs
•Cleanup: Life-Calk solvent or acetone
•Removal: Mechanical removal
 
Last edited:
OP
R

RivennHewn

Well-known member
Joined
Jun 4, 2011
Messages
10,372
Location
PNW
Beaumont,

Thank you.

The life Caulk has held up very well.

Pics is from today on the table that is my entryway catch all. It gets used for computers, backpacks, writing desk, and occasionally an extra dinner table or buffet. It gets used.

Although the caulk has some flexibility, it is not soft like regular caulking. More like hard rubber.

About the only thing I don't like to do on the table is writing on a single piece of paper, over the joint.

Overall I feel good about recommending the product.

If you do use it, over fill your grooves as it does shrink a little while drying.

Let it dry. This may take 3-5 days to dry enough to sand. don't rush it.

Post a pic when you're done!
 

Attachments

  • lifecaulk1.jpg
    lifecaulk1.jpg
    149.2 KB · Views: 126
  • likecaulk2.jpg
    likecaulk2.jpg
    143.6 KB · Views: 124
OP
R

RivennHewn

Well-known member
Joined
Jun 4, 2011
Messages
10,372
Location
PNW
Spent more time "AntiQ'n" the door for some added "Patina".

I saved the original nails that the old floor was put down with.

In order to not split out the old wood, I pre-drilled the holes, and then had to cut the nails to the right length. Time consuming PITA, but I like the look.

Also added a zinc patch to cover some holes. Used more metal black to give it the old, used look.

Door is ready to go into the finishing shop for some final touches.
 

Attachments

  • cutnails.jpg
    cutnails.jpg
    147.2 KB · Views: 154
  • oldnails.jpg
    oldnails.jpg
    155.3 KB · Views: 149
  • DoorA.jpg
    DoorA.jpg
    130.8 KB · Views: 175
  • DoorB.jpg
    DoorB.jpg
    118.1 KB · Views: 186
  • zincpatch.jpg
    zincpatch.jpg
    147.5 KB · Views: 154
Last edited:
OP
R

RivennHewn

Well-known member
Joined
Jun 4, 2011
Messages
10,372
Location
PNW
Not a lot of woodworking going on around my house these days.

I just finished up an oyster bar that has been consuming my time for the last few months.

Hoping to get back to more creative endeavors.
 

Attachments

  • TSPS.jpg
    TSPS.jpg
    141.8 KB · Views: 344
OP
R

RivennHewn

Well-known member
Joined
Jun 4, 2011
Messages
10,372
Location
PNW
Or, a new project.

This looks like a fun one.

Amazing old building.

Wish it was mine.
 

Attachments

  • truck.jpg
    truck.jpg
    135.4 KB · Views: 214
OP
R

RivennHewn

Well-known member
Joined
Jun 4, 2011
Messages
10,372
Location
PNW
maybe its just me but I think his pricing is way too high.[/QUOTE said:
That's Etsy for ya, and the reason I sell instead of buy.

I just loaded this one on a truck headed for it's new owner in New York.

Hope he likes it as much as I do.
 

Attachments

  • Graham1.jpg
    Graham1.jpg
    144.9 KB · Views: 223
Last edited:

metalhead212121

Well-known member
Joined
Mar 21, 2010
Messages
2,898
RivennHewn- nice table. I got to imagine your stuff isn't cheap since your in Seattle and that table went to NY. The shipping alone must have been a small fortune. Can I get a link to your etsy page? I didn't see that you put a link in your previous posts.
 
OP
R

RivennHewn

Well-known member
Joined
Jun 4, 2011
Messages
10,372
Location
PNW
RivennHewn- nice table. I got to imagine your stuff isn't cheap since your in Seattle and that table went to NY. The shipping alone must have been a small fortune. Can I get a link to your etsy page? I didn't see that you put a link in your previous posts.

Metalhead,

Thanks.

Shipping is no fun. I had to do a lot of research before securing shipping for the table.

The big name players wanted up to $3000 for door to door.

I went thru uship.com, and found an independent for significantly less.

My Etsy shop is way down on inventory due to a summer of other pursuits.

https://www.etsy.com/shop/RivenAndHewn?ref=hdr_shop_menu
 
OP
R

RivennHewn

Well-known member
Joined
Jun 4, 2011
Messages
10,372
Location
PNW
Things that follow you home:

Vintage Delta Rockwell belt sander.

Missing the table, and the vacuum/dust shoot is broken.

If I can't find parts, I may use the stand for a jointer.

They used the same stand for both machines.

First order of business it to get it back to it's original grey.

That green has got to go:scared:
 

Attachments

  • Deltaswitch.jpg
    Deltaswitch.jpg
    139.3 KB · Views: 98
  • Centurymotor.jpg
    Centurymotor.jpg
    142.2 KB · Views: 106
  • Deltastand.jpg
    Deltastand.jpg
    151.1 KB · Views: 130
  • deltabeltsander.jpg
    deltabeltsander.jpg
    145.6 KB · Views: 148
  • Deltabelt2.jpg
    Deltabelt2.jpg
    141.4 KB · Views: 132
OP
R

RivennHewn

Well-known member
Joined
Jun 4, 2011
Messages
10,372
Location
PNW
Ripped a couple pics off the interwebs.

A nicely done sander and jointer.

Not sure which one I'd rather have.
 

Attachments

  • 6293-A.JPG
    6293-A.JPG
    16.3 KB · Views: 94
  • $T2eC16J,!zoE9s5ndzcFBRUPU5Rgow~~60_57.jpg
    $T2eC16J,!zoE9s5ndzcFBRUPU5Rgow~~60_57.jpg
    127.5 KB · Views: 89
Last edited:
OP
R

RivennHewn

Well-known member
Joined
Jun 4, 2011
Messages
10,372
Location
PNW
I have most of the disassembly complete, but I have a question on the main shaft.

With the retainer nuts removed from either side, the drum doesn't seem to want to come off. In the first pic, you can see the shaft is threaded, but the drum spins on the shaft(tight) but doesn't seem to be threaded.

Any ideas on how this comes off? I hate to start putting any force on it until I understand how it's attached.

Then, is the shaft pressed into the main bearing housing?

Any thoughts or insight would be much appreciated.
 

Attachments

  • shaft2.jpg
    shaft2.jpg
    127.9 KB · Views: 53
  • shaft1.jpg
    shaft1.jpg
    141.9 KB · Views: 52
  • shaft3.jpg
    shaft3.jpg
    138.1 KB · Views: 62

1/2 Cup

Member Emeritus
Joined
Apr 28, 2012
Messages
19,283
Location
Shepparton. Victoria. Australia
My 2 cents worth,

The drum looks like you would need to get a puller onto it, I think you would have to remove this first.

Once the drum is removed I would expect you would see another bearing on the drum side.

The two bolts you see in the second pic look like they hold a backing plate to retain the bearing.

I don't believe the bearings would be pressed on but you would expect them to be fairly tight given its age.

Regards
 
To avoid these ads, REGISTER NOW!
Top Bottom