To avoid these ads, REGISTER NOW!

Between 705 & 1200 SQ/FT The 'NOT' a garage, CABIN build.

Workspaces between 705 and 1200 squarefeet.
OP
P

PWC Repair

Well-known member
Joined
Dec 27, 2012
Messages
3,189
Location
Arkansas
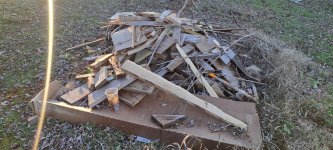
Not much new to report. Whole house is now almost fully blocked out. I have some more to do up in the trusses but I think that's it. My wife caulked around all the windows today while I built the crawl door. Also included is a pic of the burn pile........44oz cup for reference. The first pile was also this same size. THAT'S IT!!!! That's all the lumber waste from this whole build!
 

Attachments

  • 20251206_154307_044107.jpg
    20251206_154307_044107.jpg
    735.4 KB · Views: 274
  • 20251206_154344_044028.jpg
    20251206_154344_044028.jpg
    777.1 KB · Views: 134
  • 20251206_160541_043937.jpg
    20251206_160541_043937.jpg
    993.1 KB · Views: 135
To avoid these ads, REGISTER NOW!
OP
P

PWC Repair

Well-known member
Joined
Dec 27, 2012
Messages
3,189
Location
Arkansas
Impressive!
This is the difference when you really put the pencil to it and order the lumber required so as to have minimal cutoff waste. The average GC probably doesn't care too much couse it's YOUR money and not HIS. They will tell you to figure an extra 15% AT LEAST for waste............I call a HUGE B.S. on that!!
 
OP
P

PWC Repair

Well-known member
Joined
Dec 27, 2012
Messages
3,189
Location
Arkansas
Well done, that is an insanely small amount of waste for your build! 👌
Thanks! I knew some of you guys who have been around build sites would get a kick out of that. Even the guys who set up the trusses and sheathed it all for us commented about how MUCH WASTE there usually is at the jobsites. I spent many hours with my pencil drawings........uh, I mean.........blueprints LOL!! I double and triple checked, trying to squeeze the list for the best outcome.
 
OP
P

PWC Repair

Well-known member
Joined
Dec 27, 2012
Messages
3,189
Location
Arkansas
I'm STILL WAITING on the power company engineer to come out and tell me where the mast and socket need mounted. But we measured, marked, and installed almost all the receptacle and light boxes downstairs today. We're putting can lights in the kitchen and utility room, here's the kitchen.
 

Attachments

  • 20251209_153851_054750.jpg
    20251209_153851_054750.jpg
    673.5 KB · Views: 109
OP
P

PWC Repair

Well-known member
Joined
Dec 27, 2012
Messages
3,189
Location
Arkansas
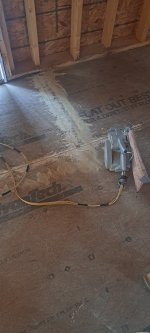
I thought I'd share this short video we took today. I like Advantech sub floor.........but the "no sand" guarantee.......??? Well, I started a bit of sanding today. I installed this at the manufacturers specs, and I spaced the ends correctly. It's not terrible but I didn't expect to do this AT ALL. Now if you go back through all my posts you'll see the FIRST SHEETS of Advantech subfloor went down November 15th 2024. You'll also see I went the extra mile to wrap everything up and keep it as dry as I could. Then on March 6th 2025 the roofing underlayment went on, and then May 5th the shingles went on and the house was "in the dry". That's a TOTAL of 171 days,.....MOST of which I kept water out. There were a handful of rains and pretty humid air BUT at 171 days we were NOWHERE NEAR the 500 day "no sand" guarantee.........in fact we're STILL NOT at 500 days!! I'm just saying, pure marketing BS, and if you want the seams flat you'll do a bit of sanding.
 

Attachments

  • 20251213_121226_024912.jpg
    20251213_121226_024912.jpg
    465.1 KB · Views: 67
  • 20251213_121554_024942.jpg
    20251213_121554_024942.jpg
    748 KB · Views: 44
OP
P

PWC Repair

Well-known member
Joined
Dec 27, 2012
Messages
3,189
Location
Arkansas
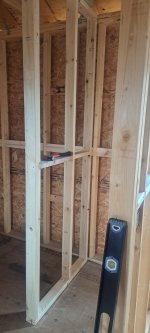
Also today I added the short wall at the end of the tub, and got the pocket door frame put up for the small downstairs bathroom.
 

Attachments

  • 20251213_114614_024813.jpg
    20251213_114614_024813.jpg
    381.2 KB · Views: 41
  • 20251213_114904_024844.jpg
    20251213_114904_024844.jpg
    422.5 KB · Views: 31
  • 20251213_142821_025027.jpg
    20251213_142821_025027.jpg
    478.8 KB · Views: 46
OP
P

PWC Repair

Well-known member
Joined
Dec 27, 2012
Messages
3,189
Location
Arkansas
The last couple of days my wife has been carefully cutting and installing foil backed polyiso inside all the window jambs. While she did that I went through and added more blocking that was missed, and framed out both scuttles into the attic to access the power gable vents. Then we went ahead and added a floor to this little drop down section back in behind the cubby closet in the spare bedroom. It's around 24 cubic feet of bonus storage now!
 

Attachments

  • 20251216_105719_062246.jpg
    20251216_105719_062246.jpg
    388.2 KB · Views: 38
  • 20251217_150945_062347.jpg
    20251217_150945_062347.jpg
    302.1 KB · Views: 63
OP
P

PWC Repair

Well-known member
Joined
Dec 27, 2012
Messages
3,189
Location
Arkansas
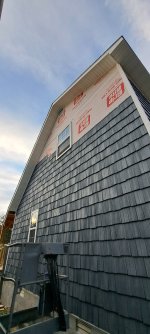
Well, last weekend I rented a lift again to finish the siding...............never got one piece hung! The basket wouldn't tilt, so as you raised the arm it tried to dump you out!! The bigger one was already spoken for so they gave me a discount and I picked it up today. I get to keep it until Monday. This afternoon I finished the last bit of soffit and fascia on the remaining gable end. I don't like the heights any better than last time!
 

Attachments

  • 20251224_132301_044830.jpg
    20251224_132301_044830.jpg
    659.7 KB · Views: 52
  • 20251224_162542_044926.jpg
    20251224_162542_044926.jpg
    477 KB · Views: 45
  • 20251224_162607_044949.jpg
    20251224_162607_044949.jpg
    534 KB · Views: 82
OP
P

PWC Repair

Well-known member
Joined
Dec 27, 2012
Messages
3,189
Location
Arkansas
Christmas was about 78* !!!!! But it was Christmas, so we didn't work on the house. Then I got about 2 pieces of siding hung this morning and got down in my lower back. I had to get down and stretch and walk around just to keep spasms at bay. So wifey went up in the lift and got the rest of this gable side hung today!!
 

Attachments

  • 20251226_112955_060319.jpg
    20251226_112955_060319.jpg
    788.7 KB · Views: 91
OP
P

PWC Repair

Well-known member
Joined
Dec 27, 2012
Messages
3,189
Location
Arkansas
The engineer from the power company finally came out. They can move the old pole out of the backyard no problem, and he told me where to mount the meter base. I picked up MOST of the electrical stuff and started drilling & pulling wire today !!
 

Attachments

  • 20260101_160614_054013.jpg
    20260101_160614_054013.jpg
    484.2 KB · Views: 56
OP
P

PWC Repair

Well-known member
Joined
Dec 27, 2012
Messages
3,189
Location
Arkansas
Got some more wiring done today. Living room and downstairs bathroom are now both done. You can see the breaker panel area starting to get populated with wire ends, and one wall of the bathroom.
 

Attachments

  • 20260103_132907_013912.jpg
    20260103_132907_013912.jpg
    543 KB · Views: 43
  • 20260103_132930_013951.jpg
    20260103_132930_013951.jpg
    511.8 KB · Views: 65
OP
P

PWC Repair

Well-known member
Joined
Dec 27, 2012
Messages
3,189
Location
Arkansas
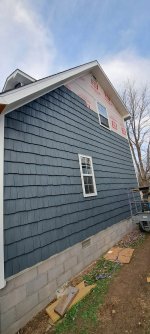
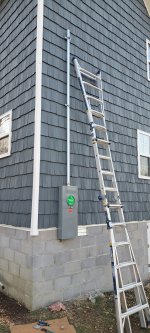
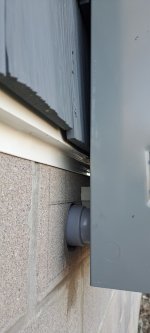
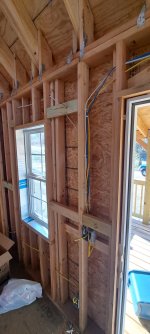
Today, after LOTS of measuring, I drilled a 3" hole through the block foundation EXACTLY where the conduit comes into the back of the meter base. I used lag hangers for the top mounts and carefully opened the siding JUst enough for a 1.25" aluminum spacer. That way I could fully tighten the meter base against the sheathing and 2x4 backer I put in the wall.....all sealed up of course. Then on the bottom, I cut some PVC trim board down to space it out plumb and anchored right through to the concrete block. I also drilled through for the mast supports and set the spacing on those....also reinforced inside the walls with 2x's. I have to trim off the rear threaded rod so it doesn't come right through the drywall and into the room! And I picked up the 2/0 copper to run in to the breaker panel. Maybe tomorrow I'll get this finished up.
 

Attachments

  • 20260105_154751_094045.jpg
    20260105_154751_094045.jpg
    695.4 KB · Views: 47
  • 20260105_154815_094155.jpg
    20260105_154815_094155.jpg
    233.7 KB · Views: 48
  • 20260105_154803_094131.jpg
    20260105_154803_094131.jpg
    334.3 KB · Views: 49
  • 20260105_154822_094217.jpg
    20260105_154822_094217.jpg
    260.7 KB · Views: 65

gte718p

Well-known member
Joined
Mar 12, 2009
Messages
3,977
Thanks! I knew some of you guys who have been around build sites would get a kick out of that. Even the guys who set up the trusses and sheathed it all for us commented about how MUCH WASTE there usually is at the jobsites. I spent many hours with my pencil drawings........uh, I mean.........blueprints LOL!! I double and triple checked, trying to squeeze the list for the best outcome.
It is satisfying to do well.

Unfortunately for most people they don't have the luxury. When it is the architect at $100+ an hour, or even a draftsman at $40 or so an hour, it doesn't take much time to add up to way more than a pile of lumber scraps.

In Upstate SC, you can't find a framing crew for less than $150 an hour, most are running $200+ an hour. Minutes cost money. Cheaper to blaze through and not worry about it then to stop, think, manage your cutting schedule, keep track of cut offs, etc.
 
To avoid these ads, REGISTER NOW!
OP
P

PWC Repair

Well-known member
Joined
Dec 27, 2012
Messages
3,189
Location
Arkansas
Oh, I understand that........BUT, if the 'cut man' had any semblance of conscious brain activity, the cut-offs would sit in an organized pile and be used instead of discarded. It takes zero time longer to guess the length and throw down like cord wood, compared to grab the board and chunk it in a pile. Same for cutting a board at the better side away from a knot or split.......if there is ANY brain activity at all, that's just an automatic act. The same money paid CAN do a much better job if there was any " I care" at all.
 
OP
P

PWC Repair

Well-known member
Joined
Dec 27, 2012
Messages
3,189
Location
Arkansas
Today I got the service mast installed and locked down. I also blocked for the 2 lights/fans in the vaulted ceiling area and got those boxes put in. Then instead of finishing up the main power IN to the breaker panel I drilled holes and finished the downstairs wiring. Only thing left for downstairs is stapling the wires.
 

Attachments

  • 20260106_151217_042215.jpg
    20260106_151217_042215.jpg
    536 KB · Views: 57
  • 20260106_161637_042301.jpg
    20260106_161637_042301.jpg
    500.5 KB · Views: 64
OP
P

PWC Repair

Well-known member
Joined
Dec 27, 2012
Messages
3,189
Location
Arkansas
.....MORE electrical today!!! I got all the interconnected smokes wired. I also ran the 2/0 copper feeder from the meter base, in the conduit through the crawl, and up to the breaker panel. I still need to install an LB or something where it meets the breaker panel but I was already beat from pushing/pulling that tough wire through and I'm going to have to unscrew the panel to make enough room to get that sucker on. I also measured a dozen times and cut a hole for the back door porch light, mounted the box, and sealed that sucker up.
 

Attachments

  • 20260108_162104_050802.jpg
    20260108_162104_050802.jpg
    593.3 KB · Views: 40
  • 20260108_162206_050833.jpg
    20260108_162206_050833.jpg
    548.4 KB · Views: 37
  • 20260108_162011_050733.jpg
    20260108_162011_050733.jpg
    465.3 KB · Views: 51
OP
P

PWC Repair

Well-known member
Joined
Dec 27, 2012
Messages
3,189
Location
Arkansas
.......same old, same old today........drilled a bunch more holes and ran more wire......then ran out of wire!! I need to pick up some more 12/2 for the upstairs bathroom.
 
OP
P

PWC Repair

Well-known member
Joined
Dec 27, 2012
Messages
3,189
Location
Arkansas
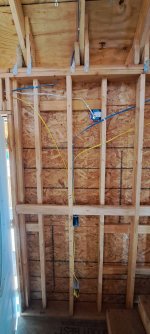
We wired and stapled and pulled and.........you get it. And the wiring is now completely roughed in....YAY!! Several pics.......because.
 

Attachments

  • 20260113_131733_071633.jpg
    20260113_131733_071633.jpg
    507.8 KB · Views: 33
  • 20260113_131819_071728.jpg
    20260113_131819_071728.jpg
    490.1 KB · Views: 31
  • 20260113_131833_071759.jpg
    20260113_131833_071759.jpg
    489.2 KB · Views: 31
  • 20260113_131959_071849.jpg
    20260113_131959_071849.jpg
    596.6 KB · Views: 29
  • 20260113_131919_071827.jpg
    20260113_131919_071827.jpg
    405.8 KB · Views: 48
OP
P

PWC Repair

Well-known member
Joined
Dec 27, 2012
Messages
3,189
Location
Arkansas
Just when I THOUGHT all the blocking was done, I found a few more areas. We put 2 rows in the vaulted ceiling area today. I knew it needed done, I just kept putting it off cause I had to climb on a ladder ON the scaffolding.
 

Attachments

  • 20260116_131407_030953.jpg
    20260116_131407_030953.jpg
    498.8 KB · Views: 37
  • 20260116_144106_030922.jpg
    20260116_144106_030922.jpg
    446.4 KB · Views: 64
OP
P

PWC Repair

Well-known member
Joined
Dec 27, 2012
Messages
3,189
Location
Arkansas
Be careful. A fall will change your life forever.
Trust me.......since I don't like heights anyway, every move I make climbing around is thought out carefully. Above the stairs I ended up screwing a board to the INNER stair wall, then setting my walkboards on that.....over the stairs......and on top of the scaffolding. Good-n-solid.
 
OP
P

PWC Repair

Well-known member
Joined
Dec 27, 2012
Messages
3,189
Location
Arkansas
I hope you have someone around when you do those ladder climbing jobs.
You bet, wifey is helping and always with me working. She is usually the 'cut man'. I just had to get her a tape measure that has the 1/4's and 1/8"s MARKED out on it, and show her what I mean by a 'long' or 'short' cut. Saves a LOT of up and down on the ladders or even the stairs.
 
OP
P

PWC Repair

Well-known member
Joined
Dec 27, 2012
Messages
3,189
Location
Arkansas
Up next.......PLUMBING!! I spent last night and this morning drawing a stick map and making a list. It's a good thing I'm doing this cause I don't think anybody else could decipher it... :lol: 🤣
 

Attachments

  • 20260119_115229_114854.jpg
    20260119_115229_114854.jpg
    497.6 KB · Views: 55

Steve W.

Well-known member
Joined
Mar 27, 2019
Messages
1,263
Location
Southwest oHIo
I am not a plumber, but I seem to remember some advice from when I built my shop. An AAV is only allowed when there is an actual vent through the roof somewhere withing a certain distance. You seem to be using them exclusively. NOTE: I could easily be (and probably am) wrong.

.
 
OP
P

PWC Repair

Well-known member
Joined
Dec 27, 2012
Messages
3,189
Location
Arkansas
I am not a plumber, but I seem to remember some advice from when I built my shop. An AAV is only allowed when there is an actual vent through the roof somewhere withing a certain distance. You seem to be using them exclusively. NOTE: I could easily be (and probably am) wrong.

.
That's what I mean.......my diagram is a HOT MESS!! There's a 3" that comes up to catch the upstairs then 2" from there up and out the gable side of the attic. You can find it labeled in the top left of that.......um......blueprint 🤣
 
OP
P

PWC Repair

Well-known member
Joined
Dec 27, 2012
Messages
3,189
Location
Arkansas
We got most of the plumbing stuff and then that arctic blast moved down. Of course we had snow and sleet and single digit temps just like about HALF the country!!! So for the last 10 days or so NOTHING got done. BUT TODAY....we ran all the CAT6a for internet AND poe security. We used some nice 23ga solid copper, double shielded stuff. Also ran some outdoor rated RG6 coax to the rooms as well.
 

Attachments

  • 20260202_161136_052435.jpg
    20260202_161136_052435.jpg
    588.6 KB · Views: 24
  • 20260202_161207_052617.jpg
    20260202_161207_052617.jpg
    620.2 KB · Views: 34

Xti04

Well-known member
Joined
Nov 11, 2016
Messages
2,357
I ran all my cat6 and coax when I built my house. At the time I did not consider making runs for cameras so I got the joy of dpong that after the house was finished. It would be nice if I truly knew how to finish out my network setup to improve speed and wifi in my shop.
 
OP
P

PWC Repair

Well-known member
Joined
Dec 27, 2012
Messages
3,189
Location
Arkansas
I ran all my cat6 and coax when I built my house. At the time I did not consider making runs for cameras so I got the joy of dpong that after the house was finished. It would be nice if I truly knew how to finish out my network setup to improve speed and wifi in my shop.
I ran a Cat6 line to my shop. It comes right out of the router in the house. Then it comes into a wireless router in my shop that is set up as just an access point. My shop wi-fi works like a champ.
 
OP
P

PWC Repair

Well-known member
Joined
Dec 27, 2012
Messages
3,189
Location
Arkansas
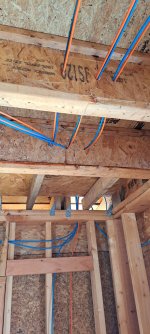
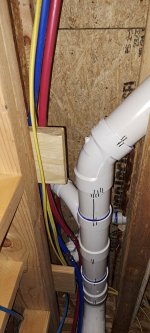
Last couple days........PLUMBING! Trying to fit the drains in and keep it sloped, and get the drops to line up with the Tees or Wyes........OH mY GOSH!!! Upstairs drains are done and the main vent is run. The mess under the utility sink is me trying to figure out how to get the trap AND the AAV to both fit up under it.
 

Attachments

  • 20260207_174617_070120.jpg
    20260207_174617_070120.jpg
    503.3 KB · Views: 16
  • 20260207_174640_070203.jpg
    20260207_174640_070203.jpg
    608.5 KB · Views: 16
  • 20260207_174752_070241.jpg
    20260207_174752_070241.jpg
    485.8 KB · Views: 21
To avoid these ads, REGISTER NOW!
Top Bottom