To avoid these ads, REGISTER NOW!

Between 265 & 485 SQ/FT The Scooter Workshop

Workspaces sized between 265 and 485 squarefeet.
OP
M

Modern Jess

Well-known member
Joined
Jan 2, 2011
Messages
1,362
Location
Bay Area, California
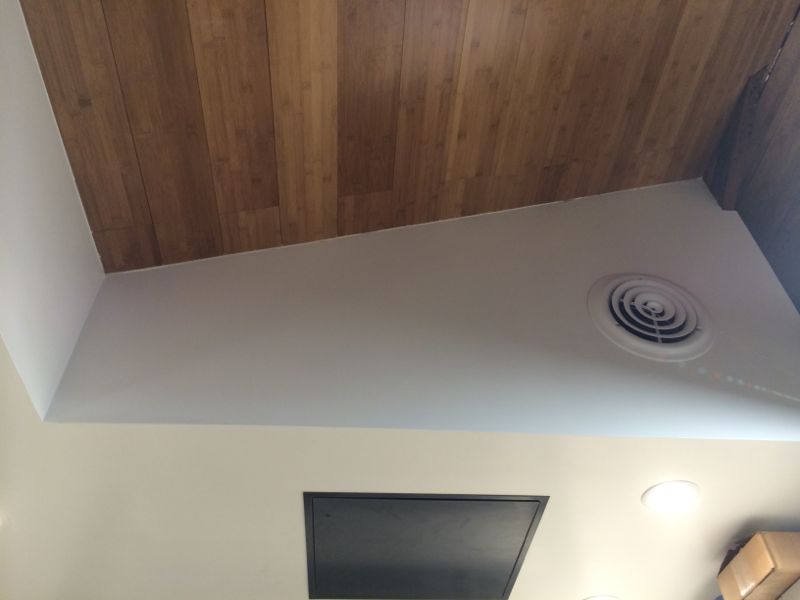
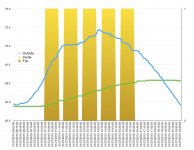
Okay, managed to pull some data about thermal performance. It's only one day, so you'll have to compare it to the previous graph I posted (which I am including in this post as well).

It looks like I got a 5-ish degree rise in shop temperature, all while the shop was completely closed up with the fan running in automatic mode. The temperature inside the shop ends up almost at the outdoor peak temperature, which is exactly what I was hoping for. It will lose a few degrees overnight, but I'd wager it will be above 60 tomorrow morning.

w00t!

Here's the previous graph:
auto-ventilation-1.jpg


Here's today:
shoptemp.png
 
To avoid these ads, REGISTER NOW!
OP
M

Modern Jess

Well-known member
Joined
Jan 2, 2011
Messages
1,362
Location
Bay Area, California
You know I'm really jealous of your blue line to say nothing of your green one. Very cool stuff.

Hah! Thanks. It really didn't occur to me that anyone would envy the temperatures on display in the graphs. But then, that's one of the many draws of living in California.

The peak of summer will be a different story. I live in a fairly hot area of the Bay Area (it's all micro-climate around here) and so I'll be interested to see if the automatic fan control will be able to appreciably cool down the shop overnight, and retain that cool through the day.
 
OP
M

Modern Jess

Well-known member
Joined
Jan 2, 2011
Messages
1,362
Location
Bay Area, California
Current temperature in the shop is hovering around 63 degrees, so the insulation again proved pretty effective at keeping my modest heat gain steady. That said, it didn't get very cold last night, despite very frosty overnight lows for the last few weeks.
 
OP
M

Modern Jess

Well-known member
Joined
Jan 2, 2011
Messages
1,362
Location
Bay Area, California
Intake, Redux

I've been monitoring the temperature data in my shop for the last week or so, and I am not entirely happy with the results. The automatic ventilation comes on and runs as I've coded it, but I'm not seeing a rise in temperature that I can directly correlate to the fan being on.

I think this largely comes down to two factors:

1) The make-up air inlet into the shop is undersized. At only 4" (compared to an 8" exhaust) it is clearly imbalanced. I knew this, of course, but didn't know how much air I would need to draw through the shop to equalize the air temperature between inside and outside. Apparently, I need more.

2) The make-up air inlet placement is sub-optimal, at least for this season. The inlet is placed up high, as is the exhaust fan. They're on opposite ends of the shop (which is good) but with both being up high, it tends to replace the warmest air in the shop with outside air, which may or may not actually be warmer than what I'm exhausting. In the summertime (which is probably more important in my climate) that arrangement will work reasonably well, as getting rid of warm air and replacing it with cool night air will be great.

I can't really fix #2 without sacrificing noise containment and/or running big ducts up the wall. And I'm not willing to do either of those two things.

I can fix #1, though, by adding another make-up air inlet to the shop. Naturally, I've got to hide the ductwork, and this will not have a significantly better placement than the first one. But it will more than double the inlet capacity I have today, so that can't be a bad thing.

I started out Saturday by cutting a hole in the drywall and taking out the insulation. Then I cut a hole from the other side and inserted a vent. That does an immediate 90° turn inside the wall, then another 90 to come out behind one of the rafter ties (which will be boxed in later).

secondvent-1.jpg


secondvent-2.jpg


secondvent-3.jpg


secondvent-4.jpg
 

MKE Mike

Well-known member
Joined
Sep 8, 2011
Messages
88
Location
Milwaukee, WI
Re: Intake, Redux

I've been monitoring the temperature data in my shop for the last week or so, and I am not entirely happy with the results. The automatic ventilation comes on and runs as I've coded it, but I'm not seeing a rise in temperature that I can directly correlate to the fan being on.


I think this largely comes down to two factors:


1) The make-up air inlet into the shop is undersized. At only 4" (compared to an 8" exhaust) it is clearly imbalanced. I knew this, of course, but didn't know how much air I would need to draw through the shop to equalize the air temperature between inside and outside. Apparently, I need more.


2) The make-up air inlet placement is sub-optimal, at least for this season. The inlet is placed up high, as is the exhaust fan. They're on opposite ends of the shop (which is good) but with both being up high, it tends to replace the warmest air in the shop with outside air, which may or may not actually be warmer than what I'm exhausting. In the summertime (which is probably more important in my climate) that arrangement will work reasonably well, as getting rid of warm air and replacing it with cool night air will be great.


I can't really fix #2 without sacrificing noise containment and/or running big ducts up the wall. And I'm not willing to do either of those two things.


I can fix #1, though, by adding another make-up air inlet to the shop. Naturally, I've got to hide the ductwork, and this will not have a significantly better placement than the first one. But it will more than double the inlet capacity I have today, so that can't be a bad thing.


I started out Saturday by cutting a hole in the drywall and taking out the insulation. Then I cut a hole from the other side and inserted a vent. That does an immediate 90° turn inside the wall, then another 90 to come out behind one of the rafter ties (which will be boxed in later).


secondvent-4.jpg


I'll be curious to find out how your fix of "#1" affects your temps. Keep us posted...

More graphs next week? [emoji6]


Sent from my iPad using Tapatalk
 
OP
M

Modern Jess

Well-known member
Joined
Jan 2, 2011
Messages
1,362
Location
Bay Area, California
Re: Intake, Redux

I'll be curious to find out how your fix of "#1" affects your temps. Keep us posted...

More graphs next week? [emoji6]

Definitely.

I'm also considering putting another temperature sensor up high, near the exhaust vent. This would give me a good idea of whether the air I'm exhausting is warmer than what I'm bringing in from outside.
 
Last edited:

Denwood

Well-known member
Joined
Sep 22, 2014
Messages
4,180
Location
Thunder Bay, Ontario, Canada
If a reversible fan is an option, then you're set. Summer your exhaust is high, intake low. Winter intake is high, exhaust is low.

I'd say 8" circular minimum (or equivalent) for both intake/exhaust so you can run the fans a bit slower..you mention noise is an issue. I have a few 8" inline fans in my home setup specifically to run warm air down to the basement when our high efficiency fireplace is on. This works very well even when outside temps are in the -25C range.
 
Last edited:
OP
M

Modern Jess

Well-known member
Joined
Jan 2, 2011
Messages
1,362
Location
Bay Area, California
Well, this is encouraging. I've just remotely pulled some data from the temperature controller showing how it has performed today. Graphing the data, I do believe I'm seeing a rise in the temperature while the fan is on (yellow bars) that flattens out while it is off. It's nowhere near to keeping pace with the outside rise in temperature, but there are hours left in the day still. I'll keep monitoring.

attachment.php
 

Attachments

  • tempgraph.jpg
    tempgraph.jpg
    93.8 KB · Views: 2,065
OP
M

Modern Jess

Well-known member
Joined
Jan 2, 2011
Messages
1,362
Location
Bay Area, California
you mention noise is an issue. I have a few 8" inline fans in my home setup specifically to run warm air down to the basement when our high efficiency fireplace is on. This works very well even when outside temps are in the -25C range.

Noise is an issue, but the fan isn't one of the primary noise sources I'm worried about. I'm running a Panasonic inline 8" ventilator, and it's reasonably quiet. The output is routed through a short section of insulated duct, and that contains just about all of the noise from the fan itself. Outside, you can just hear a bit of air moving through the vent. Which is great!

What I'm really concerned about is running air tools (die grinders, etc) inside the shop. That sound will travel really well, and so for the sake of my neighbors I'm doing everything in my power to keep that kind of sound from leaking out of the shop. Hence, just cutting a hole in the wall with a straight-through vent isn't an option. It has to be ducted (preferably with insulated ductwork) and change direction a couple of times to keep the noise in.
 

bazzateer

Well-known member
Joined
Oct 8, 2009
Messages
6,075
Location
Watford, Great Britain
Only just discovered this thread. Spent the last hour or two reading through. Some great work and a superb workshop. Going to get one of those Belkin socket doo-dahs for my battery chargers.
 
OP
M

Modern Jess

Well-known member
Joined
Jan 2, 2011
Messages
1,362
Location
Bay Area, California
Only just discovered this thread. Spent the last hour or two reading through. Some great work and a superb workshop. Going to get one of those Belkin socket doo-dahs for my battery chargers.

Thanks!

I've been really happy with my Belkin timer. And I don't lose any sleep at night wondering if my battery chargers are going to set fire to my workshop.
 
OP
M

Modern Jess

Well-known member
Joined
Jan 2, 2011
Messages
1,362
Location
Bay Area, California
Here's a final graph for today. Again, the yellow bars are where the fan was on. I have it set to run for a max of one hour, then rest for a minimum of 20 minutes. In the first two 20 minute rest periods, the temperature rise inside the shop clearly leveled off, which seems to indicate that the system is working as designed. In the remaining two rest periods, it's a little hazier -- there was still some temperature rise, but it's unclear if it ended up being equivalent to when the fan was on.

I think tonight I'll re-code the program so that on and off periods are of equal length. That should make it a little easier to visually see the effect of having the fan on.

EDIT: Oh, and I clearly didn't come anywhere near capturing the potential ambient warmth from outside. So that part is a bit of a disappointment.

attachment.php
 

Attachments

  • wstemp2.jpg
    wstemp2.jpg
    115.7 KB · Views: 2,001
OP
M

Modern Jess

Well-known member
Joined
Jan 2, 2011
Messages
1,362
Location
Bay Area, California
What's your target temp range?

It is not so much a range and more an upper limit (for warming) and a lower limit (for cooling). The program is modal, and I'll switch it between seasons.

For warming, I have an upper target temperature of 75°. If the outside ambient temperature is less than that, then the target is adjusted downwards. The theory is that I'll take advantage of any outside temperature that is higher than the inside temperature, but only to the point that I manage to get the inside up to 75°. In practice, the outside temperature actually needs to be at least 3° warmer than the inside before the fans will turn on.
 
OP
M

Modern Jess

Well-known member
Joined
Jan 2, 2011
Messages
1,362
Location
Bay Area, California
More Graphs

I never in a million years imagined that I would be posting charts to my build thread, but here I am, doing exactly that.

This chart reflects the data I've logged so far today, with the fan programmed to be on then off for the same amount of time, 45 minutes at a stretch. This makes the comparison of effect a little easier to calculate.

In this graph, orange is now the "fan on" state. The yellow bars in between show the total gain in that period. Note that I moved the yellow bars to the center of the period for visual reasons, but the data is actually measured from the start to the end of the period.

The good news: It's pretty clear that the fan is having a positive effect on pushing the inside temperature in the direction that I want it. You can see a bigger gain in the "on" periods than the "off" periods.

The bad news: The difference -- at best -- is 0.2 degrees. Which hardly seems worth the effort.

Back to the drawing board.

attachment.php
 

Attachments

  • tempgraph2.jpg
    tempgraph2.jpg
    118.8 KB · Views: 1,935

Denwood

Well-known member
Joined
Sep 22, 2014
Messages
4,180
Location
Thunder Bay, Ontario, Canada
Jess, our upper floor (about 4000 sq/ft) is serviced by three air handlers, all acoustically isolated. The lack of cross talk between spaces is surprising. Our film studio uses a separate air handler but even those ducts are acoustically insulated to manage system noise. It's an STC 60 rated room, and ducting was factored in.

It's great that you're thinking about sound leakage as few do. I suspect you'll need to play with length if you can to attenuate. My roll up steel door has very poor sound properties, so is likely similar to just cutting a hole in the wall...I hope your door is better!
 
Last edited:
OP
M

Modern Jess

Well-known member
Joined
Jan 2, 2011
Messages
1,362
Location
Bay Area, California
I suspect you'll need to play with length if you can to attenuate.

Yep. But I'm out of space to do so, I think. Overall, I'm pretty happy with the noise reduction. My noisiest air compressor checks in at 60db standing just on the other side of the stucco wall, near the neighbors that I'm most worried about. Their air conditioning compressor is quite a bit louder than that, even at a distance as I stand in my yard. I've sealed up that wall really wall, and the vents are on a different wall, aimed in a direction that is less of an issue. I wouldn't want to add any more vent holes, but the ones I have are reasonably well isolated.
 
To avoid these ads, REGISTER NOW!
OP
M

Modern Jess

Well-known member
Joined
Jan 2, 2011
Messages
1,362
Location
Bay Area, California
Just for fun, I pulled today's data down and graphed it. Curiously, the performance seems a little bit better than it did on my last graph. The difference between on and off states is a bit more pronounced. I'm not really sure why -- all the variables were the same.

attachment.php
 

Attachments

  • wstemp3b.jpg
    wstemp3b.jpg
    110.6 KB · Views: 2,099
Last edited:
OP
M

Modern Jess

Well-known member
Joined
Jan 2, 2011
Messages
1,362
Location
Bay Area, California
Okay, this is a bit of a milestone. These are (barring some patches I have to make here and there) the last pieces of drywall that I'll hang in this shop. Obviously, there's still a lot of mudding and sanding to be done. But still. Let me enjoy this moment. :bounce:

lastdrywall-1.jpg


lastdrywall-2.jpg


lastdrywall-3.jpg
 
Last edited:
OP
M

Modern Jess

Well-known member
Joined
Jan 2, 2011
Messages
1,362
Location
Bay Area, California
Continuing on with the temperature control project, I had a spare temperature sensor lying around. It was a freebie with the purchase of the X-300 controller, and is a much simpler type of device than the combo temperature / humidity sensors that I have installed elsewhere. It seemed a shame not to use it, and so I came up with a location that would be helpful.

In my quest to understand the air flow patterns through the shop, I was curious how much warmer it was up near the peak of the ceiling, and also how much I was just replacing warm air with warm air when the ventilation runs automatically. I built a simple little bracket out of scrap sheet metal and epoxied the probe in place (see picture). This was then inserted in a hole in the exhaust duct, almost immediately behind the grill inside the shop where inside air is pulled into the ventilator. The data logged from this probe will tell me (a) what the temperature is near the ceiling, and (b) the temperature of the air being vented out during the automatic ventilation periods.

I'll be very interested to see the data. Hopefully it will make sense.

IMG_4308.jpg
 
OP
M

Modern Jess

Well-known member
Joined
Jan 2, 2011
Messages
1,362
Location
Bay Area, California
At this point in the project, I'm starting to look around and wonder where I'm going to put everything. Not only do I have Too Much Stuff, there are still a few major things (like the CNC mill) that aren't even in the shop yet. I always knew that I wouldn't be able to have everything I want in the shop -- my interests are just too diverse -- but I don't think I really anticipated the level of crowding that I'm now looking at. I'm going to have to get imaginative, or throw some things out. Probably both.

How on earth do people manage to share their garage with a daily driver? I'm extraordinarily lucky in that I have a workshop that is separate from the garage, and the garage itself doesn't ever get used for cars. Even with that, I am simply out of space.
 
OP
M

Modern Jess

Well-known member
Joined
Jan 2, 2011
Messages
1,362
Location
Bay Area, California
If you can't go out, go up.

I'd love to. I don't think I can pull it off, though.

That said, I'm doing my best to use the space high-up that would otherwise go to waste. The suspended shelves are a good example of that, and I have a few more ideas up my sleeves.

The real issue I'm having right now, though, is where to put the machinery.
 
OP
M

Modern Jess

Well-known member
Joined
Jan 2, 2011
Messages
1,362
Location
Bay Area, California
News flash: just checked the temperature logs.

Code:
02/04/2015 14:10:00,075.5,063.5,070.1,0

That log entry indicates that the intake side of the main exhaust vent is sitting at 70.1°, while the human-inhabitable part of the shop is down at 63.5. This is after a couple of fan runs, with warm outside air coming in. Each run has raised the temperature near the ceiling by a whopping 4.5-ish degrees, which is great!

Clearly, I can get warm air into the shop. It's just (as I feared) stratified. So now my task will be to figure out a clean way to mix the upper air with the lower air. In theory, that should lower the temperature of the upper air and raise the temperature of the lower air, which will eventually stratify again. However, by exhausting more of the cooler air (now mixed in with the upper air), I should be able to raise the overall temperature inside the shop.

At least, that's what it looks like in my head. We'll see if reality conforms to my fantasy. :)
 
Last edited:
OP
M

Modern Jess

Well-known member
Joined
Jan 2, 2011
Messages
1,362
Location
Bay Area, California
I put my cnc router in the basement. You got areas you can "take over"?

Nope. No basements here. And the workshop is really the right place for the CNC mill -- I even have a corner carved out where it will go. That much is pretty much fixed. The machinery I'm now concerned about are the multitude of bench grinders and belt sanders that I will eventually need, the drill press, the welders, and the shop press. And if I ever want a lathe, that's going to be even tougher.
 

Denwood

Well-known member
Joined
Sep 22, 2014
Messages
4,180
Location
Thunder Bay, Ontario, Canada
Ah, the drywall milestone! Congrats.

On the stratification issue, other than a ceiling fan, what are you thinking? 63F would be suntanning weather here right about now :) We saw -30C last night :-(
 
OP
M

Modern Jess

Well-known member
Joined
Jan 2, 2011
Messages
1,362
Location
Bay Area, California
Ah, the drywall milestone! Congrats.

Thanks! I would actually be more excited, but I know that hanging it is the easy part. :)

On the stratification issue, other than a ceiling fan, what are you thinking?

I was thinking of a simple enclosed box fan (though probably smaller) up above the rafter ties, aimed sideways across the flow of air. The air should blow against the slope of the ceiling and down the side of the soffit into the space below. I'm picturing (I hope) kind of a circular flow pattern that mixes the upper and lower air. The fan could be tucked out of the way fairly easily, and powered by the NEMA conduit I have running down the middle of the shop.

63F would be suntanning weather here right about now :) We saw -30C last night :-(

You're right. 63° is really quite comfortable. At this point I'm looking at the difference between outside and inside in the abstract, rather than the absolute temperature. The weather has been warm the last week or two, making this all seem silly. But we get cold snaps as well.

Put another way, it's the principal of the thing! :D
 
OP
M

Modern Jess

Well-known member
Joined
Jan 2, 2011
Messages
1,362
Location
Bay Area, California
Okay, I've been watching the raw log data all day (remotely from work). Just had a chance to finally graph the data, and it's a bit of a head scratcher. The yellow line is the new probe, stuck inside the main exhaust duct right behind the interior intake grill. I'm including a picture for reference:

millcorner2-4.jpg


And here's the graph:

attachment.php


You can see that the yellow line makes great strides during the first "fan on" period, and then rises a bit more (in an erratic fashion) once the fan goes off. On the next "fan on" event, the temp plunges suddenly, right about to the point where it last left off. And then the cycle repeats.

I think what's happening here is that the probe is getting a rise during the fan-off period from an incursion of outside air, coming back through the main exhaust duct. There is no damper on this duct (my fault -- I didn't have one handy at install time, and I went without it) and so naturally there's some air going back and forth. I didn't initially think this was a huge problem, but now I can see that the effect is quite large. And it also means I'm probably losing a lot of heat via this path at night, when the shop is still warm and the outside air is cool. Supporting this theory is the fact that the very same probe is actually cooler than the regular shop temperature earlier in the morning, before the outside temperatures started picking up. Up high, I expected it to be much warmer. Also, the shape of the yellow line during "fan off" periods echoes the shape of the outside temperature line.

So clearly, I need a damper. And clearly, there's a lot of heat gain to be had if I can just un-stratify it.
 

Attachments

  • threetemps.jpg
    threetemps.jpg
    136 KB · Views: 1,873
Last edited:
OP
M

Modern Jess

Well-known member
Joined
Jan 2, 2011
Messages
1,362
Location
Bay Area, California
Just managed to retrofit an 8" butterfly damper onto the output side of my inline ventilation fan. That should take care of outside air creeping in through the vent when the fan is off. It's raining today, though, so I won't really get to see it in action.

Already, though, as I stand here in my shop and type this, I can hear the butterfly damper whapping closed whenever the wind blows in the right direction. This might have been a mistake.
 

Denwood

Well-known member
Joined
Sep 22, 2014
Messages
4,180
Location
Thunder Bay, Ontario, Canada
Jess, we have an external fan damper that used to "whap" like crazy when the fan was off. It's a 5000 CFM fan in a 24 wall cavity. We super-glued some small rare earth magnets to the edge of each flap on the outside of the building. Air pressure pops the flaps open, but the small magnets keep the four flaps from driving us crazy otherwise.

On the stratification issue, just try a box fan or similar up top..perhaps only running when your exhaust/intake system is running. My guess is a high volume/slow speed brushless ceiling fan would do the trick if you see results.

Some pretty efficient fans here: https://www.energystar.gov/index.cfm?c=most_efficient.me_ceiling_fans_under_52_inches

The first fan on that list, "Aeratron", indicates annual operating cost of $0.75!
 
Last edited:
OP
M

Modern Jess

Well-known member
Joined
Jan 2, 2011
Messages
1,362
Location
Bay Area, California
Jess, we have an external fan damper that used to "whap" like crazy when the fan was off. It's a 5000 CFM fan in a 24 wall cavity. We super-glued some small rare earth magnets to the edge of each flap on the outside of the building. Air pressure pops the flaps open, but the small magnets keep the four flaps from driving us crazy otherwise.

Interesting! There is already a spring on the damper, which keeps it closed most of the time. I think if the wind blows just right it creates enough vacuum to open the damper, and then the spring whaps it closed again.

I'll have to play it by ear (so to speak) as to whether this is going to bother me enough to un-duct-tape the soft insulated duct a second time. Not sure the plastic sleeve will survive another de-taping, though I suppose I could always replace it.
 
OP
M

Modern Jess

Well-known member
Joined
Jan 2, 2011
Messages
1,362
Location
Bay Area, California
Inspired by Denwood's use of Robertson-head screws on his electrical covers, I did something similar with SS allen-head screws. I have a bit of a stainless steel fetish, so it seemed appropriate.

And no more indexing!

attachment.php


attachment.php
 

Attachments

  • IMG_4311.jpg
    IMG_4311.jpg
    31.1 KB · Views: 1,778
  • IMG_4312.jpg
    IMG_4312.jpg
    25.7 KB · Views: 1,772
To avoid these ads, REGISTER NOW!
Top Bottom