Maui
Well-known member
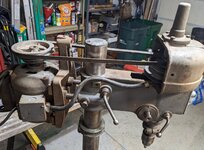
Here's a Walker-Turner drill press that I just finished restoring earlier today. It runs smooth and quiet. 


")


Thank you!@shoot summ that jointer is spectacular, a true eye-catching restoration. Love that pristine 1939 badge and that extremely hard to find W-T cast iron belt cover. Here is that beauty in the 1939 catalog.
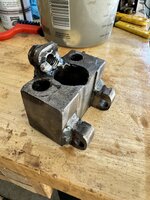
The wheel adjusting bracket in the blade tensioning assembly looks homemade to me. It didn't move as though the spring was doing anything so I took it apart.@bogelas beautiful example of a 1939 bandsaw. Those were never shipped bare metal. The versions I have seen in my workshop with original paint were mid-40s and had the same baked on enamel that was on the body, on the handles.
It does appear as if the band saw has been repainted at some point, perhaps the knobs were painted cream at that time. Nice closed cast iron stand, and your motor is magnificent. The badge alone is virtually pristine.
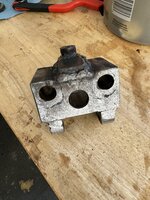
Yes, part 78 is there and the tension adjustment and tracking adjustment screws both work. The tension adjustment wasn't smooth though. There is no bearing or bushing to smooth out the sliding of the adjustment bracket.@bogelas does the home-made upper wheel adjustment bracket allow you to mount the idle shaft bracket (78) or to raise and lower it via the raising/lower screw.

I'm definitely going to keep an eye on Ebay. Can I use the Carter Cobra Coil for a replacement spring?@bogelas based on that, it sounds like it will at least run decent and perform.
I'd still look on eBay for a replacement bracket for insurance.

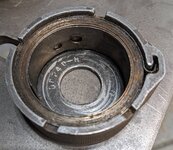
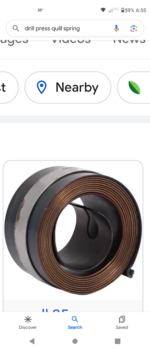
I have the original spring out so I know the Cobra Coil looks about twice as tall. I thought taller springs could be used. I hadn't compared the IDDoubtful. I believe they are too narrow and tall in comparison to the W-T upper wheel assembly spring. Here is an image of the spring prior to assembly, it's in the yellow bin.


The fence adjustment knob is missing as well as the scale for it.Very nice late 1930s example, at a fair price. Only issues seem to be the missing blade guard assembly and an aftermarket motor.

"Got the parts to the jointer blade guard back from powder coat yesterday. Masking was pretty good, as always had a few holes that had PC in them that had to be addressed. ..."
They do pretty well, I could probably communicate better on what needs to be kept free as well. Your work is a completely different league, I always enjoy seeing what you've done.Geez, it sounds like you need someone who cares. I'd love an opportunity to earn your business.
https://www.garagejournal.com/forum/threads/custom-powder-coating-leannas-powder-****.502335/
+1 on that. I went on cuda chick's Instagram and saw total badassery. @CudaChick1968 top tier work!


Yea, the only thing that one appeared to be missing was the belt guard, I should have snagged it, it was in Mountain Home, AR, which is about 4.5 hours from me. And I am trying to finish projects, not add new ones...I have a bench top W-T press, and I do miss the crank. That said, it isn't too hard for me to raise the table when I need too. I put a screw jack underneath it and away she goes!
That said, the press you are showing is in great condition, and would make a lovely addition to most shops, not mine as it is only 11'x13'. You can always add a crank later, as they do show up from time to time. And that one has the slow speed pully system, worth its weight in gold!


Must be the week for them, this one is in CA, has both wrenches too!! It is $850....Those W-T cast iron lathe bases don't pop up very often. Even more remarkable is the fact it still has the original locking wrench!


Thank you for the picture! Perhaps the spring had one but the tail end of spring broke off and the previous owner drilled the holes in the remaining end?I think your spring needs a slot behind the hole so spring slips over hole then sits in slot which is diameter of stud smaller than head.like the picture