To avoid these ads, REGISTER NOW!

Tooling organization

OP
L

lilscorpion

Well-known member
Joined
Mar 15, 2010
Messages
3,599
Location
Colorado
Where are you getting your material? I like the colors but having a hard time finding anything.

Thanks for the inspiration.

Rick

I bought the yellow and blue stuff from this guy on eBay. He has a few listings for various sizes.
http://www.ebay.com/itm/1-2-inch-Ki...489?pt=LH_DefaultDomain_0&hash=item3371ddf829

I think its actually called King Colorboard. i found it using the Keywords: king & starboard and the color ones jump off the page if you look at the pictures. It's not on ebay often.
 
To avoid these ads, REGISTER NOW!

Skelly

Active member
Joined
Aug 18, 2012
Messages
29
Love your organization. As an aspiring woodworker I love your cabinets. Would love to see a detailed cabinet build post. I would love to build some to match your look. What material is the black face on the cabinets?


Also, any details on how the wall cabinet doors are built?
-kevin
 
Last edited:
OP
L

lilscorpion

Well-known member
Joined
Mar 15, 2010
Messages
3,599
Location
Colorado
Love your organization. As an aspiring woodworker I love your cabinets. Would love to see a detailed cabinet build post. I would love to build some to match your look. What material is the black face on the cabinets?


Also, any details on how the wall cabinet doors are built?
-kevin

I plan on documenting a full cabinet build when it warms up. Until then: the black centers in the doors are 1/4-inch double sided melamine. The slide in finished and are super easy to clean. All of the door frames are made out of 3/4-inch Baltic Birch plywood that use tongues and grooves like done in this article - http://www.newwoodworker.com/basic/vttgdoors.html. I've played with a few different techniques and this seems to be the fastest for a simple door. Anything that requires complex shaping or routing is more effort than it turns out I want to put into doors. Once the door is glued up, I fill any brad holes, sand smooth, and break the edges with a 3/16-inch quarter round in the router. The finish is a polyurethane that's reduced in half with mineral spirits and brushed on giving a fine sanding between coats...number of coats depends on how quickly it builds but probably 4 thinned like that. I don't try to get a heavy buildup, I'm shooting for a flat, sealed, and dust free finish. I wanted something simple enough that's made out of easily accessible materials so I could easily replace a door if need be. If I'd gone with a wood panel I'd probably spay them...hind sight though, I liked the simplicity and contrast of the melamine and dealt with brushing in compromise.
 

santagary

Well-known member
Joined
Mar 23, 2010
Messages
821
Location
Pagosa Springs, Colorado
Ditto on going crazy unless I'm doing something around the ranch, in the house or in the garage....I've GOT to have a project. My parents taught me that work (projects) are fun and to keep moving after getting up early in the AM. It's a compulsion I guess, but it's how I'm built. Lately, after a prostatectomy and a saddled pulmonary embolism last May and diverticulitis in January of this year, I'm fighting to keep pushing. If I sit around, I feel sorry for myself, so it's up and at'em. Thank God there are 24 hours in a day and for me 6 to 7 hours of sleep is just right. :D
 

jose's garage

Well-known member
Joined
Oct 16, 2012
Messages
112
Location
LI, NY
Ditto on going crazy unless I'm doing something around the ranch, in the house or in the garage....I've GOT to have a project. My parents taught me that work (projects) are fun and to keep moving after getting up early in the AM. It's a compulsion I guess, but it's how I'm built. Lately, after a prostatectomy and a saddled pulmonary embolism last May and diverticulitis in January of this year, I'm fighting to keep pushing. If I sit around, I feel sorry for myself, so it's up and at'em. Thank God there are 24 hours in a day and for me 6 to 7 hours of sleep is just right. :D

I feel the same way. Can't just sit around. Can't wait to retire and finish the projects I have and start bigger ones.
 

Skelly

Active member
Joined
Aug 18, 2012
Messages
29
I plan on documenting a full cabinet build when it warms up. Until then: the black centers in the doors are 1/4-inch double sided melamine. The slide in finished and are super easy to clean. All of the door frames are made out of 3/4-inch Baltic Birch plywood that use tongues and grooves like done in this article - http://www.newwoodworker.com/basic/vttgdoors.html. I've played with a few different techniques and this seems to be the fastest for a simple door. Anything that requires complex shaping or routing is more effort than it turns out I want to put into doors. Once the door is glued up, I fill any brad holes, sand smooth, and break the edges with a 3/16-inch quarter round in the router. The finish is a polyurethane that's reduced in half with mineral spirits and brushed on giving a fine sanding between coats...number of coats depends on how quickly it builds but probably 4 thinned like that. I don't try to get a heavy buildup, I'm shooting for a flat, sealed, and dust free finish. I wanted something simple enough that's made out of easily accessible materials so I could easily replace a door if need be. If I'd gone with a wood panel I'd probably spay them...hind sight though, I liked the simplicity and contrast of the melamine and dealt with brushing in compromise.

That would be awesome if you did did a detailed cabinet build. I like the idea of using birch plywood for the rail and stiles, keeps things on a budget.

Are you painting the melamine for the door centers? If so what type of paint?
 

supra90turbo

Well-known member
Joined
Sep 30, 2011
Messages
595
Location
Central MA
Fantastic thread, I'm in awe. I just read through it in it's entirety, and there are so many ideas, and they are so well documented...
All of this is incredibly inspiring.

Subscribed.
 
OP
L

lilscorpion

Well-known member
Joined
Mar 15, 2010
Messages
3,599
Location
Colorado
That would be awesome if you did did a detailed cabinet build. I like the idea of using birch plywood for the rail and stiles, keeps things on a budget.

Are you painting the melamine for the door centers? If so what type of paint?

The door panels are not painted, I've left them as the black melamine surface to try to reduce the finishing work and the melamine surface is probably more durable than if I had finished them myself. I've inadvertently clear coated the melamine and think it almost looks funny. As a result, I leave them them in their given finish.
 
OP
L

lilscorpion

Well-known member
Joined
Mar 15, 2010
Messages
3,599
Location
Colorado
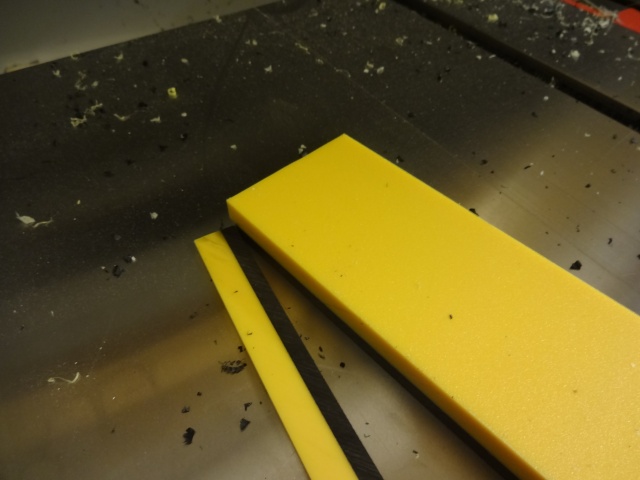
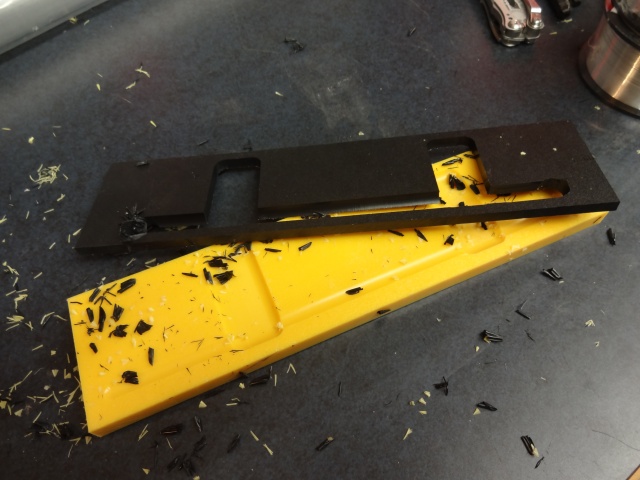
Got a little impatient tonight and pulled the clamps off of the plastic, took it out to the saw, and trimmed it up. It's been setting since Sunday at about 4pm so that's 4 full days of dry time at 70 degrees.

SocketDrawerW.jpg


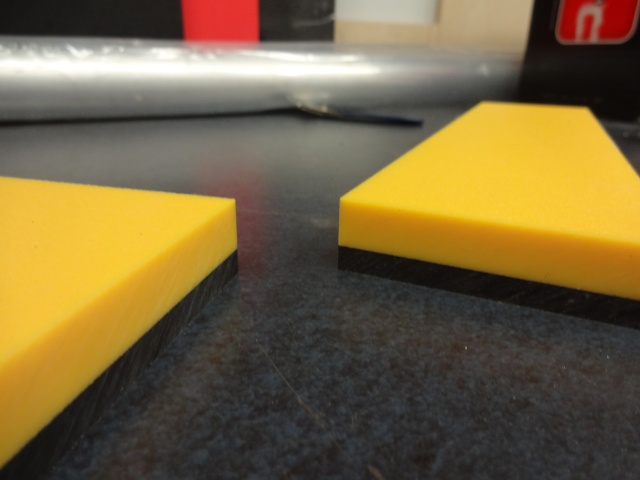
I had to cut it with the black side down otherwise the heat appeared to smear the black into the yellow. The cut turned out amazing. It almost looks like one piece of material that's two colors.

SocketDrawerX.jpg


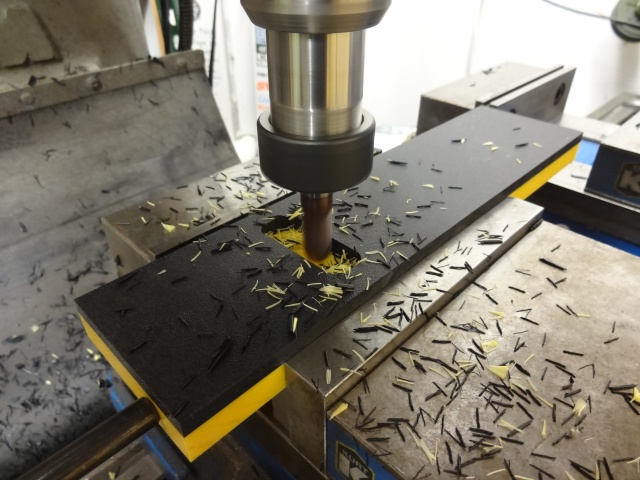
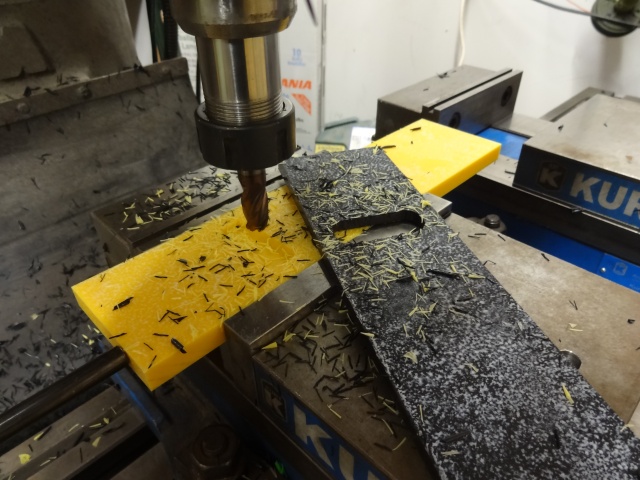
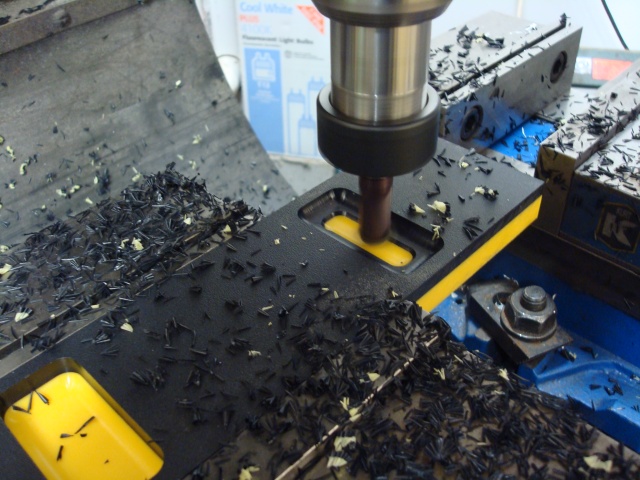
I threw have of the piece on the mill and ran the 3/8-inch impact socket extension program. The first hole gave a really nice glimpse of what was to come.

SocketDrawerY.jpg


And then a sucking sound and the material separated. I couldn't believe it but the glue was still not dry between the two pieces of plastic. I think the bond had started however I may need to be extra gentle when cutting by reducing the depth of the cut, slowing down the feed rate, increasing the RPM, and/or reducing the step over. I also need to sink the material fully into the vise jaws. I had most of the 1/4-inch HDPE sticking out over the top so the material was mostly being held in place by the glue (which was dumb).

SocketDrawerZ.jpg


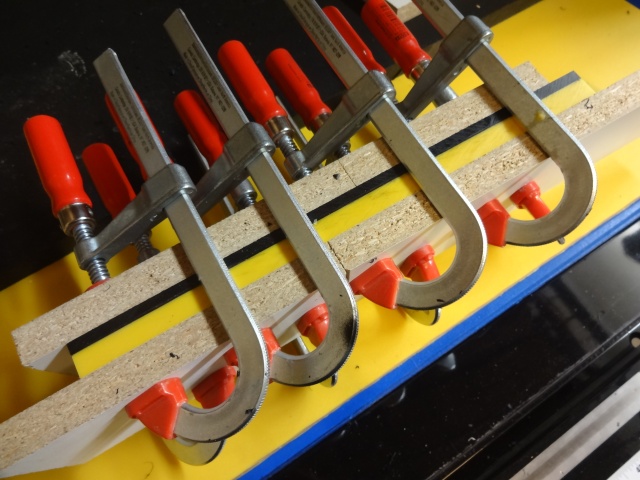
I pulled it out, cleaned it off, stuck it back together, sank it deeper in the vise and continued. Unfortuantely a later step muts have been way to aggressive for the glue and it pulled it apart again.

SocketDrawerZB.jpg


Bummed, I took the second half of it and re-clamped it. Maybe all of the posts on the internet are correct, you can't glue HDPE together. I do wonder why the green and red cutting board stuff stuck together well. Maybe the food grade stuff is more porous (though that doesn't make any sense to me).

SocketDrawerZA.jpg


Back to waiting. If this doesn't work I'll try an epoxy but I'm more motivated than ever to make it work seeing the potential.
 
Last edited:

SteveL

Well-known member
Joined
Jan 14, 2005
Messages
760
Location
St. Louis, MO
Curious if you scuffed up the surfaces before gluing? With the HDPE being so slick, a rougher surface may help a little, maybe not.

Steve <<<< Jealous of your mill skilz!
 
OP
L

lilscorpion

Well-known member
Joined
Mar 15, 2010
Messages
3,599
Location
Colorado
Curious if you scuffed up the surfaces before gluing? With the HDPE being so slick, a rougher surface may help a little, maybe not.

Steve <<<< Jealous of your mill skilz!
I've been doing some research on HDPE and it seems that "welding" is the only real effective way to bond two pieces of HDPE due to its characteristics. For gluing, as you indicated, a scuffed or textured surface helps. The starboard has a textured surface that's likely more textured than if I were to rough it using a large fly cutter or something so I left the surface alone. That being said, I have no idea how the surface is prepared when it is manufactured. The creation of the textured surface could impact adhesion...I have no idea, I'm not a plastic-ologist. This is just **** I ponder when I'm wasting shop time watching what some call "Must See TV". Anyway, the last time I glued it, I pre-heated the surface until it was tacky, applied the glue, and clamped quickly. If it doesn't work, I'll try an epoxy. If that doesn't work it's too much effort for the tool box I'm thinking.
 

supra90turbo

Well-known member
Joined
Sep 30, 2011
Messages
595
Location
Central MA
I'm no 'plastiologist' or even a machinist for that matter, but why not run the program twice, once on each piece and then glue/epoxy them together?
 

Cryptic1911

Well-known member
Joined
May 24, 2008
Messages
2,884
Location
Willimantic, CT
lilscorpion, would it make sense to countersink a few holes from the bottom up into the top piece, and put some small screws in it? I think glued and screwed would hold much better
 

x133

Member
Joined
Jul 27, 2012
Messages
20
Location
NJ
lilscorpion, would it make sense to countersink a few holes from the bottom up into the top piece, and put some small screws in it? I think glued and screwed would hold much better

+1 This is what I would do, heck I would even do them from the top down and use some nice SS #6 flat head cap screws, but I like that look so may just be me.
 

mdbeck1

Well-known member
Joined
Mar 7, 2010
Messages
2,297
Location
Norman, OK
lilscorpion, would it make sense to countersink a few holes from the bottom up into the top piece, and put some small screws in it? I think glued and screwed would hold much better

You have woodworking tools and know how to use them. Make a double sided dovetail "key" and then put a dovetail into the top/bottom. This will give you one thick piece of material that will hold until the glue dries. You should be able to machine through it without fear of damaging your bits.

...and you don't have to wait for the glue to dry.
 
OP
L

lilscorpion

Well-known member
Joined
Mar 15, 2010
Messages
3,599
Location
Colorado
lilscorpion, would it make sense to countersink a few holes from the bottom up into the top piece, and put some small screws in it? I think glued and screwed would hold much better

+1 This is what I would do, heck I would even do them from the top down and use some nice SS #6 flat head cap screws, but I like that look so may just be me.

Yeah, I've considered using fasteners. Bottom up wont work because the top material is only 1/4-inch thick. Top down would work but I'd have to leave space enough to have them but I could easily do it. I've been attempting to stay fastener free so I don't have to program around them. Stainless on black would look really nice though. I could even find black if I wanted them to blend.

You have woodworking tools and know how to use them. Make a double sided dovetail "key" and then put a dovetail into the top/bottom. This will give you one thick piece of material that will hold until the glue dries. You should be able to machine through it without fear of damaging your bits.

...and you don't have to wait for the glue to dry.

Huh...interesting idea. Not sure I could pull it off with the top being only 1/4-inch thick but on deeper trays (like 1/2-inch on top and bottom) I could do something like that. Would make a really interesting pattern machined as well. I'll keep that one in the back of my head. I like it.
 
OP
L

lilscorpion

Well-known member
Joined
Mar 15, 2010
Messages
3,599
Location
Colorado
I'm no 'plastiologist' or even a machinist for that matter, but why not run the program twice, once on each piece and then glue/epoxy them together?

I certainly could. Hadn't thought about it. Only issue with machining the top layer seperately is I'd need a fixture plate to attach it to because the 1/4-inch isn't rigid enough to clamp in the vise by itself. Not a huge deal but it adds another step to the process.
 
To avoid these ads, REGISTER NOW!
OP
L

lilscorpion

Well-known member
Joined
Mar 15, 2010
Messages
3,599
Location
Colorado
What's the plan for some heat in the garage, it seems like that would greatly help you out.

Don't I know it. I have a HotDawg natural gas ceiling heater that I need to install...well, have needed to install since the first winter. I have to run a gas line up from the basement (essentially two floors) to the garage and the cut the vent into the roof. I've been too lazy for years - my wife says I don't want to do it. Seems she's right but I don't want to admit it to her. You're completely right, I need to just do it. It would probably take me a half a day of freezing my **** off max. Maybe it's time. ****.
 

Kevin54

MEMBER EMERITUS
Joined
Jan 12, 2005
Messages
29,341
Location
Urbana, Ohio
Scorpion....have you give double sided tape a try? Any time that we milled thin plastic we used double sided tape. But we had to be very careful separating the parts. In your case, put the tape on, put your top piece on, then clamp them to insure a good bond between the two. You should have no problem at all.
 
OP
L

lilscorpion

Well-known member
Joined
Mar 15, 2010
Messages
3,599
Location
Colorado
Yeah but if you'd slept in a Holiday Inn Express last night, you'd know.

So there are advantages to being in the dog house!

Scorpion....have you give double sided tape a try? Any time that we milled thin plastic we used double sided tape. But we had to be very careful separating the parts. In your case, put the tape on, put your top piece on, then clamp them to insure a good bond between the two. You should have no problem at all.

I've not heard of that? Any special kind or just heavy duty double-sided? I'll get some, slick trick. Im gonna go get some epoxy today so I can pick up a roll while I'm there. Slick trick, thanks for the tip. Would you still use plastic if you cut all the way through it or just for surface machining?
 

NUTTSGT

Super Moderator
Staff member
Joined
Sep 14, 2009
Messages
50,853
Location
Northern Central Ohio
Don't I know it. I have a HotDawg natural gas ceiling heater that I need to install...well, have needed to install since the first winter. I have to run a gas line up from the basement (essentially two floors) to the garage and the cut the vent into the roof. I've been too lazy for years - my wife says I don't want to do it. Seems she's right but I don't want to admit it to her. You're completely right, I need to just do it. It would probably take me a half a day of freezing my **** off max. Maybe it's time. ****.

I'm going to laugh now and agree with your wife. :lol_hitti
 

dladcock

Well-known member
Joined
Jan 29, 2010
Messages
855
Location
North Carolina
Do what you're doing, just use clamps on the material while machining. I do a lot of parts out of 1/8" and 1/4" Lexan. Most of the time I clamp a backer block in the vise, then clamp the material to the block. No glue involved here, but it holds the part securely.

A couple of clamps will prevent the process from stressing your glue joint.

Are you Climb milling or Conventional milling?

dla
 

mdbeck1

Well-known member
Joined
Mar 7, 2010
Messages
2,297
Location
Norman, OK
...
Huh...interesting idea. Not sure I could pull it off with the top being only 1/4-inch thick but on deeper trays (like 1/2-inch on top and bottom) I could do something like that. Would make a really interesting pattern machined as well. I'll keep that one in the back of my head. I like it.

When you put that together you can "lock" it in place by drilling a hole or two and put in a dowel (or a small cylinder) of the same material. Years ago I made a shaker style cradle for my son. It was all dovetails locked together like that. I think that there were four screws in it.
 

Kevin54

MEMBER EMERITUS
Joined
Jan 12, 2005
Messages
29,341
Location
Urbana, Ohio
So there are advantages to being in the dog house!


I've not heard of that? Any special kind or just heavy duty double-sided? I'll get some, slick trick. Im gonna go get some epoxy today so I can pick up a roll while I'm there. Slick trick, thanks for the tip. Would you still use plastic if you cut all the way through it or just for surface machining?

We used double sided tape when we cut all the way through the plastic. I looked for my roll that I had in my toolbox to see what brand it was but the wife must have latched on to it. I'm fairly certain it was 3-M brand. The peelable covering was green and white. Believe it or not, but we've used it on the wet grinder to hold down parts to grind.
 

bottom feeder

Well-known member
Joined
Dec 10, 2012
Messages
331
Location
Utah
Regarding the glue, it would seem to me that the melamine glue would dry around the edges where air could get at it, but the rest of it wouldn't dry because air can't penetrate through the material. In other words, the inner glue would behave as if it were still in the sealed glue bottle and remain liquid.

Have you tried contact cement?
 
OP
L

lilscorpion

Well-known member
Joined
Mar 15, 2010
Messages
3,599
Location
Colorado
Regarding the glue, it would seem to me that the melamine glue would dry around the edges where air could get at it, but the rest of it wouldn't dry because air can't penetrate through the material. In other words, the inner glue would behave as if it were still in the sealed glue bottle and remain liquid.

Have you tried contact cement?

I was thinking the same thing about how it's drying. I wasn't able to put it in a sentence though so I'm glad you were able. Actually, today I went to Lowes and looked through the various epoxys and found that gorilla glue had the strongest holding power that was still clear out of all off them so I purchased a stick. I glued up two 24-inches long sections 3-inches wide and they were dry in about 3 hours. Dunno why I never tried an epoxy before, the dry time is way better than the melamine glue even in cold weather (likely because of the chemical reaction when mixing).

I really was off to a kick-a$$ start. I reduced the depth of cut per pass to .100 and kept the speed where it was (about 2200rpm).

SocketDrawerZC.jpg


As soon as the cutter had to go deep enough where the 1/4-inch (black) HDPE was fully on the side of the end mill, it broke the top piece loose. It was looking really great too. So for shoots and giggles I decided to finish it no matter what so I could see it. Without any glue left bonding, I threw brads in at strategic locations to ensure it wouldn't shift. The brads did the trick really well however they were needed all over the damn place because of the number of spots where the material get's scarce. I don't like the look of the brads however it does give me an idea of what the finished piece will look like if I can work it out.

SocketDrawerZD.jpg


It really does add another dimension to the drawer and I can totally see how it will bring it to life. Looks neat when a tool is missing too.

SocketDrawerZE.jpg


One of my thoughts was that I might be attempting to do this two layer design on the wrong tray. This tray does have a bunch of really thin pieces that clearly are going to be difficult to hold down. Maybe this would be better for a socket tray or something else where there's much more material left after cutting (and between the pieces).

I have two more I can cut - one that's left over from my melamine glue attempt and the second from this round with the Gorilla Glue. At the recommendation of dladcock (about 10 or so posts earlier) I'm going to try to reverse the cutting direction from conventional to climbing. That may reduce the pressure but I don't know if it will make enough of a difference. I'm also going to try the fastener idea just in the corners to see if I can give the glue some help. Maybe that will be just enough to keep it from breaking loose in the first place. I keep thinking of the double sided tape thing and can't figure out how it would be any stronger than the glues except for one thing (that intrigues me), maybe it will be able to flex slightly and never offer that "break free moment". I may have to try it before i give up. Closer though. :rocker:
 

Kevin54

MEMBER EMERITUS
Joined
Jan 12, 2005
Messages
29,341
Location
Urbana, Ohio
SocketDrawerZD.jpg


You know that once you are done, there are going to be quite a few that will want to buy some of those or something similar. You might be pretty busy from now on in. :lol:
 
OP
L

lilscorpion

Well-known member
Joined
Mar 15, 2010
Messages
3,599
Location
Colorado
You know that once you are done, there are going to be quite a few that will want to buy some of those or something similar. You might be pretty busy from now on in. :lol:

I think there really is something here as a product line if someone was interested going there. Mechanics Time Savers are probably marked up about 400% I'm guessing based on simple calculations. There are probably more cost effective plastics to use as well, not familiar with plastics in general to figure that out. My limiting factor is time. Between youth sports, work, family, and my projects, it would be hard to find the time just to consider it. Lol...as you mention it, I feel like I'm getting side-tracked by this stuff. I was giving myself **** yesterday when I pushed on by using brads instead of scraping the project and calling it a failure. It's just an extension tray.
 
Last edited:

paranoid56

Well-known member
Joined
Dec 18, 2008
Messages
1,596
Location
San Diego, Ca
lilscorpion, as another guy who cuts a lot of plastic (cnc router) have you tried using the hdpe thats already dual color?

and kinda saw i saw this as i was planning on doing the same damn thing lol but now i wont be the first lol
 
OP
L

lilscorpion

Well-known member
Joined
Mar 15, 2010
Messages
3,599
Location
Colorado
lilscorpion, as another guy who cuts a lot of plastic (cnc router) have you tried using the hdpe thats already dual color?

and kinda saw i saw this as i was planning on doing the same damn thing lol but now i wont be the first lol

(Just like I said it in my head when I read your post)...You gotta be frickin' kidding me. I had no idea...I'm gonna go look now.
 

paranoid56

Well-known member
Joined
Dec 18, 2008
Messages
1,596
Location
San Diego, Ca
like this, i think the stuff i used was king colorcore.
i am heading to my plastic place tomorrow and can ask them too. (i usually buy my full sheets of hdpe there.)

colorcore2.jpg
 

stuk4x4

Active member
Joined
Feb 11, 2013
Messages
29
Location
Gods Country NC
Thanks for the great thread. I am building a new shop as we speak and I got alot of great ideas from your setup. Thanks again for taking the time to detail so much of it.
Walt
 
To avoid these ads, REGISTER NOW!
Top Bottom