To avoid these ads, REGISTER NOW!

Tooling (Re)Organization

BoilermakerFan

Well-known member
Joined
Apr 17, 2006
Messages
2,188
Location
Indianapolis, Indiana
Haven’t made progress on it since the last update. I’ve been stuck (haven’t found them yet) at needing to get two 80/20 90* internal connectors to set the motor mount rack (the right way)

Send me a DM with the part number. I can cross it to TSLOTS and we can sell it to you via a CC and drop ship it to you.
 
To avoid these ads, REGISTER NOW!

sakurama

Well-known member
Joined
Oct 10, 2010
Messages
1,458
Location
Portland - the cool one.
Cool stuff as usual but damn, 2% - you really live on the edge man. If my phone gets below 20% it makes me nervous and I'm looking for the charger. But you, no, you're making screen shots to populate this thread. Dedication.

Gregor
 

Firebrick43

Well-known member
Joined
May 12, 2015
Messages
13,971
Location
West central Indiana
It came. What's comes in the box.
View media item 85335
View media item 85336
Dust port. Sort of disappointed here. It's so low that with a hose attached the hose hangs below the sole and then longer/bigger boards are not possible with the hose hooked up.

View media item 85337
Clamps and even a rubber pad included to mount to a bench.

View media item 85338
Two knobs and this plastic fence make a jointing attachment?

View media item 85339

View media item 85340
This is where I will be installing mine. It will be attached to an aluminum or plywood plate and mount in the router table that I need to finish. The incra plate for my router came in the other day and is shown for size comparison

Thanks lilscorpion for leading me down the rabbit hole.
 

WhoWhatNow

Well-known member
Joined
Feb 22, 2011
Messages
1,884
Location
Collegeville, PA
It came. What's comes in the box.

View media item 85335


View media item 85336


Dust port. Sort of disappointed here. It's so low that with a hose attached the hose hangs below the sole and then longer/bigger boards are not possible with the hose hooked up.


Clamps and even a rubber pad included to mount to a bench.


Two knobs and this plastic fence make a jointing attachment?


This is where I will be installing mine. It will be attached to an aluminum or plywood plate and mount in the router table that I need to finish. The incra plate for my router came in the other day and is shown for size comparison


Thanks lilscorpion for leading me down the rabbit hole.


How well does it work? Does it feel reasonably well made? Would you recommend buying one for hobbiest use or do you think a used PC would be a better bet?
 
OP
L

lilscorpion

Well-known member
Joined
Mar 15, 2010
Messages
3,599
Location
Colorado
It came.

Thanks lilscorpion for leading me down the rabbit hole.

Welcome, it’s nice down here ain’t it? [emoji4] I got too busy and you beat me to it. Great summary, was thinkin alike.

WhoWhatNow said:
How well does it work? Does it feel reasonably well made? Would you recommend buying one for hobbiest use or do you think a used PC would be a better bet?

Dust collector. Works ok but agree kinda janky. The hose adapter size is smallish-weird. I was able to cram the small DC Festool hose in it and it stayed on during the test on the bench. Not sure if the adapter will stay connected during hand use.

a4c40cda260a8e19fb9f0874f17c2f10.jpg

Did a little test sanding

a1945713a7fc7468a442ec62c3012d98.jpg

Total oscillation travel is 1/4-inch which is about 1/3rd of the travel of the Porter Cable unit I have. This will distribute the wear a little less on the paper cylinder than the PC unit so paper won’t last as long on repetitive ops. The power seems good enough on highest setting but easily bogs down on lowest setting.

Other notable difference - I e gotten fairly good at rounding off corners using my PC unit. Given the same level of effort, the results aren’t as smooth. I suspect the spindle has less support than the PC unit so the spindle may not run as true. Not sure if I could test it will a dial indicator or not or if it really matters.

10d57f34441620abd9fcb43bb10f3b6f.jpg

A little more effort and the finish is good.

61d022204584c7ca7adcbe48485df4f1.jpg

What needs improvement - the screws that hold on the friction plate are course thread screws sunk into plastic bosses. (I’ll add a pic when I get home). The two holes shown below have threads into the steel plate which make them suitable for mounting to a router table. The other 6 are not. I think a Mod will be necessary to create additional metal bosses before it would be mounted in a table.

6f1b518fe2530f881818bd31cca33556.jpg

Show and tell only - how it fits in the Systainer.

72823eeec0bd8f6feccdc221db119afb.jpg

Edit: missed my summary.

Summary: @ $79 shipped, I’d say the value is proportional to the cost. My Porter Cable unit is about 3x in cost and I’d venture to say its about 3x the machine (oscillation of the spindle, tightness of the motor, power, weight, size/format, housing quality, attachment points, etc). The most appropriate analogy is likely Harbor Freight VS Dewalt/Milwaukee (you pick the tool).
 

Attachments

  • 72823eeec0bd8f6feccdc221db119afb.jpg
    72823eeec0bd8f6feccdc221db119afb.jpg
    320.7 KB · Views: 0
  • 6f1b518fe2530f881818bd31cca33556.jpg
    6f1b518fe2530f881818bd31cca33556.jpg
    324.6 KB · Views: 0
  • 61d022204584c7ca7adcbe48485df4f1.jpg
    61d022204584c7ca7adcbe48485df4f1.jpg
    254 KB · Views: 0
  • 10d57f34441620abd9fcb43bb10f3b6f.jpg
    10d57f34441620abd9fcb43bb10f3b6f.jpg
    244.4 KB · Views: 0
  • a1945713a7fc7468a442ec62c3012d98.jpg
    a1945713a7fc7468a442ec62c3012d98.jpg
    36.7 KB · Views: 0
  • a4c40cda260a8e19fb9f0874f17c2f10.jpg
    a4c40cda260a8e19fb9f0874f17c2f10.jpg
    51.5 KB · Views: 0
Last edited:
OP
L

lilscorpion

Well-known member
Joined
Mar 15, 2010
Messages
3,599
Location
Colorado
Firebrick43 said:
This is where I will be installing mine. It will be attached to an aluminum or plywood plate and mount in the router table that I need to finish. The incra plate for my router came in the other day and is shown for size comparison

28b347da71ec091c0fdd1399d5a0a566.jpg

Can you share some details about your table build? Curious, what will this slot be used for?
 

Attachments

  • 28b347da71ec091c0fdd1399d5a0a566.jpg
    28b347da71ec091c0fdd1399d5a0a566.jpg
    302 KB · Views: 0
Last edited:
OP
L

lilscorpion

Well-known member
Joined
Mar 15, 2010
Messages
3,599
Location
Colorado
More thoughts: used it again last night not attached to the bench and freehand. I like it’s smaller size and lighter weight for hand held operations. The bigger PC was a beast and difficult to maneuver. This unit is more nimble which is nice. The switch and speed control isn’t exactly easy to get to. The plastic friction plate (that rides on the surface you’re sanding) doesn’t seem all that durable. It’s cheap plastic. Guess it doesn’t matter as long as it doesn’t damage the work piece.
 

Strouty

Well-known member
Joined
Mar 21, 2010
Messages
38,206
Location
Southern Maine
Just checking in, thanks to your post on that oscillating sander on eBay, I am out $250. Hope you are happy. LOL

We need our fix of awesome upgrades!
 
OP
L

lilscorpion

Well-known member
Joined
Mar 15, 2010
Messages
3,599
Location
Colorado
Just checking in, thanks to your post on that oscillating sander on eBay, I am out $250. Hope you are happy. LOL

We need our fix of awesome upgrades!


It’s a good one, you’ll love it.

Been doin some other stuff for the past 3 weeks. e.g. - Son turned 15 and got his learners permit. Colorado requires he gets 50 hours in before he’s 16 and we’ve done about 25 in the last three driving all over. Today we logged a bunch more but, a first for him, off-road.

c50495b21b7c1b7109185f59b1f51c9e.jpg

Took him a little while to get the touch right on the go pedal but he caught on quickly. Just yesterday it seems like we were watching peewee football.

074921c5e207d148a7dbbeb3c2b14c3e.jpg

I do plan on some shop time tomorrow and a post shortly after.
 

Attachments

  • c50495b21b7c1b7109185f59b1f51c9e.jpg
    c50495b21b7c1b7109185f59b1f51c9e.jpg
    482.4 KB · Views: 0
  • 074921c5e207d148a7dbbeb3c2b14c3e.jpg
    074921c5e207d148a7dbbeb3c2b14c3e.jpg
    360.5 KB · Views: 2

Nuts

Well-known member
Joined
Jan 31, 2010
Messages
376
Location
Baker City, Or
I really like your systainer work station.

Not got into Festool as of yet, budget constraints have a way of doing that.
Looking at your systainer cabinets, I think I would prefer all of them to be on slides,
letting you access the systainer without removing it from the base. Also would want to be
able to leave the latch in the open position with the systainer slid all the way in.

This guy, along with being a fine woodworker has had some brilliant ideas in configuring
the Festool systainer system.

https://www.youtube.com/user/ruskijager/videos

In particular this box would make a great setup for the smaller oscillating sanders
you guys are buying.


86turbodsl

Well-known member
Joined
Jul 1, 2005
Messages
6,553
Location
Michigan
Pretty much all the woodworking guys buy slides from ahturf. Hard to beat them.

Sent from my LG-TP450 using Tapatalk
 
OP
L

lilscorpion

Well-known member
Joined
Mar 15, 2010
Messages
3,599
Location
Colorado
Lilscorpion, I am guessing that you buy your drawer slides in bulk? I am in need of 12 pairs of 16" slides and would like to know what brand you are using and recommend? I have been looking at these https://www.amazon.com/dp/B078N1TC8H/?tag=atomicindus08-20. The price is low and ratings are great, just a bit worried they may not last. Never heard of the brand?


I’ve always regretted buying off-brand slides. Unfortunately the $$ I’ve saved have resulted in me compromising quality and every time I open the drawer I’m reminded of my sacrifice. If I need to save a buck or two, I’ll figure out another way. I buy Accuride slides for side mount and Blum for bottom mount.

I don’t buy them in bulk buy I found a place that offers such competitive pricing on the name brand good stuff that you’d think you’re buying in bulk. Check out http://www.ahturf.com. The search and filtering functions leave something to be desired but the prices are the best I’ve found by quite a bit. If you’re looking for side mount slides, here’s the link to the 100lb Accuride 3832 full extension slides in 16” lengths - https://ahturf.com/store/index.php?route=product/product&path=306_320_371_517&product_id=113205
 
To avoid these ads, REGISTER NOW!

slodat

ALLIANCE MEMBER
Joined
Feb 6, 2010
Messages
3,679
Location
Central-ish, WA
Made these tonight. Inspired my your creations.

Smaller rack for my woodshop:
2d2d66b51cadb235736c23dbd64935da.jpg

Larger rack for the rest:
4dbf60785a316df86d1fb570424a59cf.jpg
 

Attachments

  • 4dbf60785a316df86d1fb570424a59cf.jpg
    4dbf60785a316df86d1fb570424a59cf.jpg
    736.2 KB · Views: 0
  • 2d2d66b51cadb235736c23dbd64935da.jpg
    2d2d66b51cadb235736c23dbd64935da.jpg
    671.6 KB · Views: 0
OP
L

lilscorpion

Well-known member
Joined
Mar 15, 2010
Messages
3,599
Location
Colorado
Made these tonight. Inspired my your creations.

Smaller rack for my woodshop:
2d2d66b51cadb235736c23dbd64935da.jpg

Larger rack for the rest:
4dbf60785a316df86d1fb570424a59cf.jpg

Those look fantastic!! Those parts look perfect. Did you cut them on a CNC?

Hi
I thought i was bad with 11 drills & impacts LOL
jeff


No kidding, I thought I had a lot but apparently I need to try a little harder. [emoji6]
 

Attachments

  • 2d2d66b51cadb235736c23dbd64935da.jpg
    2d2d66b51cadb235736c23dbd64935da.jpg
    99.3 KB · Views: 1
  • 4dbf60785a316df86d1fb570424a59cf.jpg
    4dbf60785a316df86d1fb570424a59cf.jpg
    114.9 KB · Views: 1

86turbodsl

Well-known member
Joined
Jul 1, 2005
Messages
6,553
Location
Michigan
I can't imagine why you would need so many of the same thing. Hoarder?

Sent from my LG-TP450 using Tapatalk
 

slodat

ALLIANCE MEMBER
Joined
Feb 6, 2010
Messages
3,679
Location
Central-ish, WA
I can't imagine why you would need so many of the same thing. Hoarder?

Sent from my LG-TP450 using Tapatalk

I own a business. I use drills for dedicated tasks when I’m making different items so I don’t have to change bits in the process, etc. As an example, one of the smaller drills is dedicated to raising/lowering my router lifts.. and so on.

Parts where cut on the CNC router.
 
Last edited:
OP
L

lilscorpion

Well-known member
Joined
Mar 15, 2010
Messages
3,599
Location
Colorado
Paging lilscorpion! Any updates???


Coming back soon! I managed to get myself into some trouble with the Mrs...remember the deadline to make space for her new car? Yeah well I took so long that I ate into a fair chunk out of fair weather so I had to scramble and get a mess of projects done which require finishing (paint, stain, etc). Built, finished, and installed all of the cabinet doors in the office.

c0ff1f8c30965f312d8116a3942466ec.jpg

Used a lazy Susan spinner gizmo to make a painting turntable. Worked slick.

12329ee682311b1362296a16425b025e.jpg

Glass panels are on order.

4a8943cbd9da471f859ce9bc070fbd90.jpg

Had to remake all of the drawers for the base cabinet on this wall so we could use under mounted drawer slides. I’ll have to wait until spring to make the fronts. Too cold now to spray.

d813ece2e9310855981e0c6ca8eb0821.jpg

Built and finished the face frames for the guest bedroom built in.

b5961dec1af1f73af0b5587ef51a7c0d.jpg

5b84abb6060c96d245957fda4bf927dc.jpg

We put in a fire pit on the new patio. S’mores and homework by firelight!

1c643615cb708415e8647dfe8df3d5d7.jpg

Turns out the dogs like the fire too so we have to set up chairs for them as well.

2df187431a8f8bb89d942094ce4aff39.jpg

I ran into a spot of luck though. The car my wife wanted hasn’t been released yet...so I bought another project (oops) to build with my son in the meantime.

f198054690cd64f68bd53287ea77bef9.jpg

And I had to get rid of our other two rides because we just don’t have enough spots. Selling private party is a pain but, since I’m good at detailing, they sold fairly quickly. Had to focus..

c5053e5fd1e5ff3ae92a6a0a15c2347f.jpg

92646dabc9a343f02ac7abeb1e7b00cf.jpg

And my son helped me make significant progress organizing things and optimizing space...for the moment we only have Jeeps!!

782b6a386a9d6362345fcca062336d04.jpg

And I’ve continued to peck away at garage Organization and coming up with some drawer Organization ideas. I’ve started to play with Kaizen foam, a post coming on that. I rebuilt/expanded my R8 Tooling station, most coming on that. I added some shelving to my overhead storage...will post soon on that one as well.
 

Attachments

  • 1c643615cb708415e8647dfe8df3d5d7.jpg
    1c643615cb708415e8647dfe8df3d5d7.jpg
    37.1 KB · Views: 0
  • c0ff1f8c30965f312d8116a3942466ec.jpg
    c0ff1f8c30965f312d8116a3942466ec.jpg
    362.3 KB · Views: 0
  • 12329ee682311b1362296a16425b025e.jpg
    12329ee682311b1362296a16425b025e.jpg
    332.5 KB · Views: 0
  • 4a8943cbd9da471f859ce9bc070fbd90.jpg
    4a8943cbd9da471f859ce9bc070fbd90.jpg
    64.7 KB · Views: 0
  • d813ece2e9310855981e0c6ca8eb0821.jpg
    d813ece2e9310855981e0c6ca8eb0821.jpg
    56.8 KB · Views: 0
  • b5961dec1af1f73af0b5587ef51a7c0d.jpg
    b5961dec1af1f73af0b5587ef51a7c0d.jpg
    305.1 KB · Views: 0
  • 5b84abb6060c96d245957fda4bf927dc.jpg
    5b84abb6060c96d245957fda4bf927dc.jpg
    48.6 KB · Views: 0
  • 2df187431a8f8bb89d942094ce4aff39.jpg
    2df187431a8f8bb89d942094ce4aff39.jpg
    339.9 KB · Views: 0
  • f198054690cd64f68bd53287ea77bef9.jpg
    f198054690cd64f68bd53287ea77bef9.jpg
    59.8 KB · Views: 0
  • c5053e5fd1e5ff3ae92a6a0a15c2347f.jpg
    c5053e5fd1e5ff3ae92a6a0a15c2347f.jpg
    303.6 KB · Views: 0
  • 92646dabc9a343f02ac7abeb1e7b00cf.jpg
    92646dabc9a343f02ac7abeb1e7b00cf.jpg
    66.3 KB · Views: 0
  • 782b6a386a9d6362345fcca062336d04.jpg
    782b6a386a9d6362345fcca062336d04.jpg
    350.8 KB · Views: 0
OP
L

lilscorpion

Well-known member
Joined
Mar 15, 2010
Messages
3,599
Location
Colorado
As some of my energy returns. I will be starting a shop projects thread for all of the unrelated stuff I’m doing.
 
Last edited:

zmotorsports

ALLIANCE MEMBER
Joined
Oct 20, 2009
Messages
21,308
Location
Northern Utah
Cool LJ project. Looking forward to seeing what you and your son are going to do to it. I still can't believe my son sold his LJ to buy this WJ but I have to keep my mouth shut about it because I was informed it bothers him by questioning his decision.

I'm at least glad to see his WJ project is not going to be a run of the mill WJ with a lift kit though.

I really like the LJ's and will be tuned in for this project. Do you have any plans for it yet or are you just going to "wing it"?
 
OP
L

lilscorpion

Well-known member
Joined
Mar 15, 2010
Messages
3,599
Location
Colorado
Cool LJ project. Looking forward to seeing what you and your son are going to do to it. I still can't believe my son sold his LJ to buy this WJ but I have to keep my mouth shut about it because I was informed it bothers him by questioning his decision.

I'm at least glad to see his WJ project is not going to be a run of the mill WJ with a lift kit though.

I really like the LJ's and will be tuned in for this project. Do you have any plans for it yet or are you just going to "wing it"?

I don’t blame your son for his choice. My XJ was likely the best wheeling and most rational 4x4 I’ve ever had. WJ is essentially a more modern XJ. Your son’s got it right if he can accept what it’s good at and what it’s not. What you’ve done this far he’ll certainly appreciate one he gets to drive if and that’s worth the effort x100.

We do have some plans for the LJ. Trying to finalize the details. It has to be stretched 4-7” to get its wheelbase into the sweet spot. After looking around a little, we like the setup Poison Spyder used on their Daddy Long Legs build.

67bb9920d492105521e96dfdcfdb7dde.jpg

It’s been copy catted more than a few times since Poison Spyder productionized the parts but it has the look we like and will suit us just fine on the trail. An added benefit is that we have a good relationship with 4WheelParts who’s parent company now also owns Poison Spyder Customs.

38a82a15c5cea44969d7bddd4eefb8e4.jpg

Some of the stuff new, some off the shelf from past projects - OME TJ springs, Dynatrac 60’s. 40’s, auto meter dash, dual batteries, and a Premier power welder setup. Just enough to go play and have fun.
 

Attachments

  • 67bb9920d492105521e96dfdcfdb7dde.jpg
    67bb9920d492105521e96dfdcfdb7dde.jpg
    323.8 KB · Views: 0
  • 38a82a15c5cea44969d7bddd4eefb8e4.jpg
    38a82a15c5cea44969d7bddd4eefb8e4.jpg
    494.7 KB · Views: 0
Last edited:

zmotorsports

ALLIANCE MEMBER
Joined
Oct 20, 2009
Messages
21,308
Location
Northern Utah
Sounds like an awesome plan.

My son's 2004 LJ was long armed 4" lift with 33" tires, 4.88:1 gears with TrueTrac's front and rear, Banks exhaust and was a great daily driver and weekend wheeler. It was tight as hell with no squeaks or rattles and rode/drove amazingly well for a lifted Jeep. The guy that bought it did pretty much exactly what you mentioned. A bit more lift, flat fenders, 60's riding on 40" tires and stretched a few inches. It turned out great but is essentially a trail rig, although does ride fair on the pavement.

When my son said he was selling it, and after I picked up my jaw from the ground, he told me that once he got married and started having kids the WJ just made more sense from a practical standpoint and then I started seeing his vision for it. That being said, he isn't a real fan of the rocks so for his style of wheeling it will be absolutely perfect. As a matter of fact, the older I get the more mild I like to wheel as well. I'm not about going out and flogging on my Jeep off-road. I like the technical stuff but usually stick to the 3-3.5 rated trails with an occasional 4 but that's about it. I know my Jeep will easily handle a 4+ trail but I pride myself on driving to the trail, wheeling, airing back up and then driving it back to camp without issue or especially damage. I'm into my current Jeep for the long haul and don't want to jeopardize the integrity of it. I want it to look just as clean and nice in 15 years as it does now.

I'm debating on stepping up to 37" tires in the near future and my wife asked if I was going to run tougher trails. I told her not necessarily, it will just do the trails we already run a bit easier with less or maybe even no dragging the control arms or skids. It will just ease over the obstacles with a bit less bumping and scraping but not looking to do higher rated trails. I also want to keep it 100% streetable as drivability is paramount.

Again, looking very forward to seeing the work on your LJ.
 
OP
L

lilscorpion

Well-known member
Joined
Mar 15, 2010
Messages
3,599
Location
Colorado
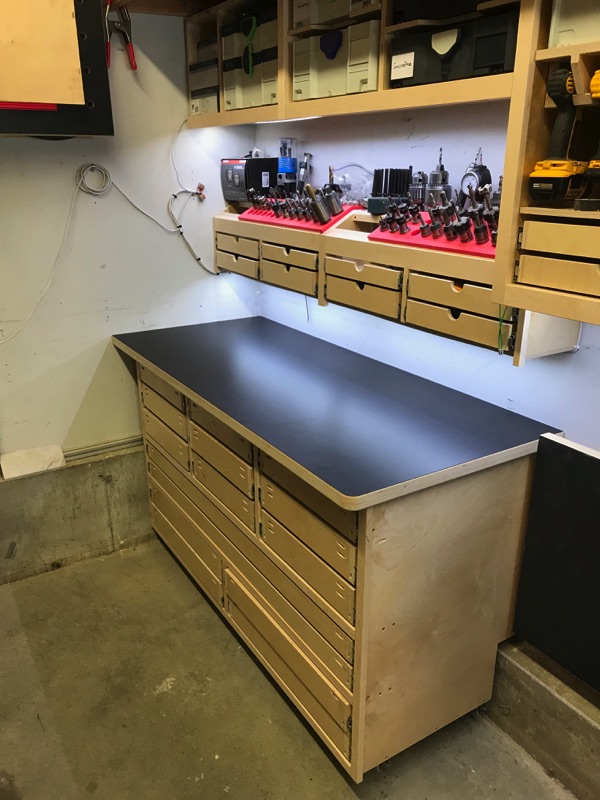
Having taking so much time away from the thread I actually had to go back through my pictures and figure out where I left off. I had just laminated the counter top for my tooling bench.

img_4424.jpg


Originally I had planned on using the same material as before (red 1/2-inch HDPE from Woodcraft) however, a week ago I found that the local store was “temporarily out of stock”. Supposedly the inventory they had was defective? Never seen defective HDPE. Bummed I had to drive there to find out, guess it didn’t matter...they have none so I needed another option. After looking around I found some 1-inch black from amazon which ended up cheaper anyway which arrived prime in 2 days.

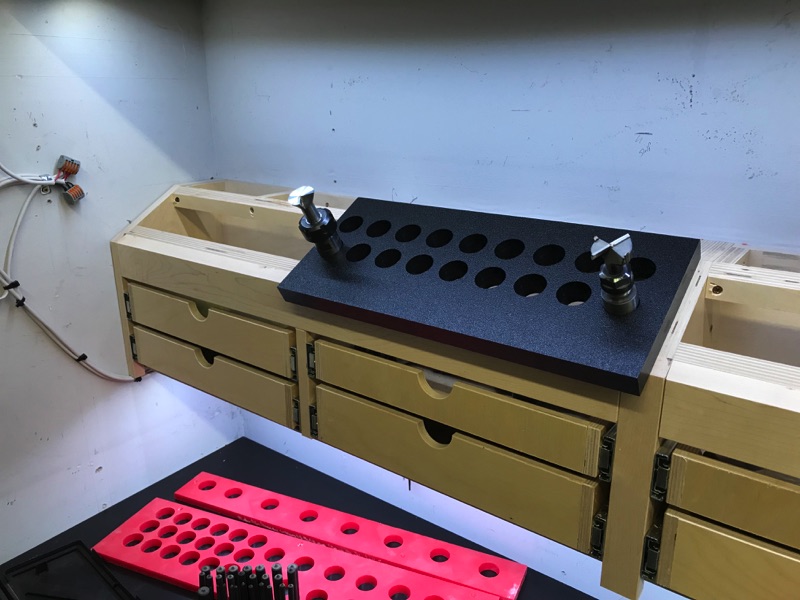
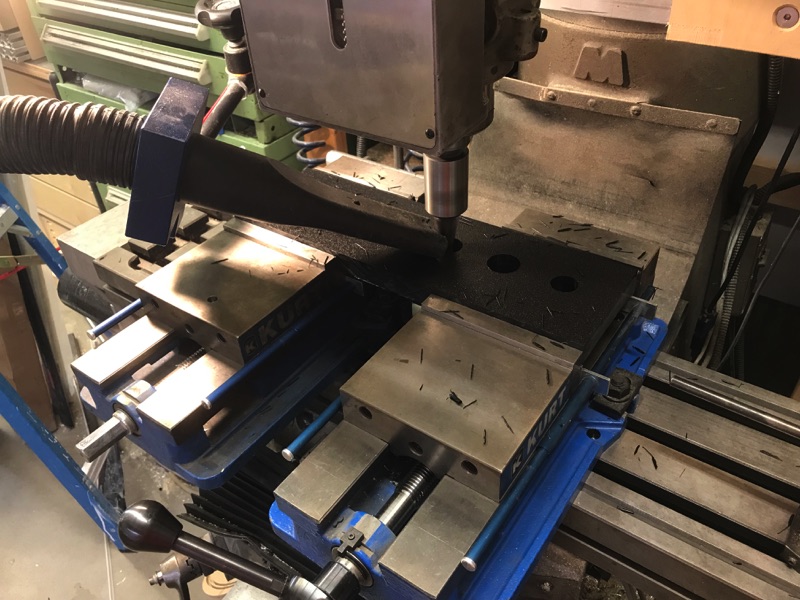
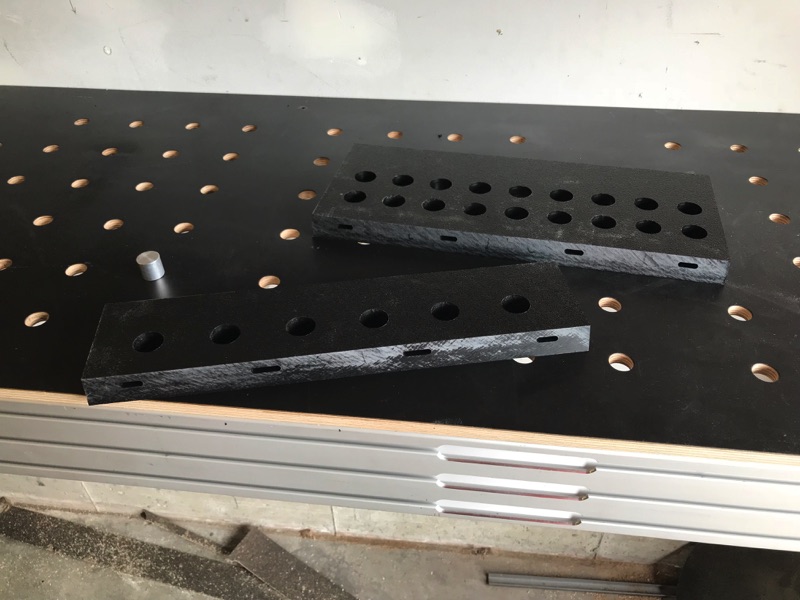
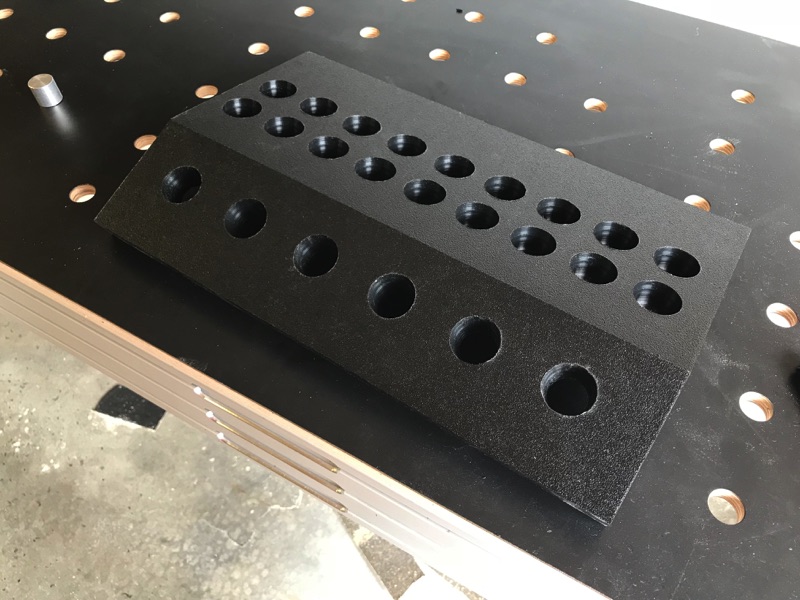
I programmed the two different hole arrays and got to making chips. With he first piece cut to size, I used two of the tools to keep the piece in place (like thumb tacks).

img_4427.jpg


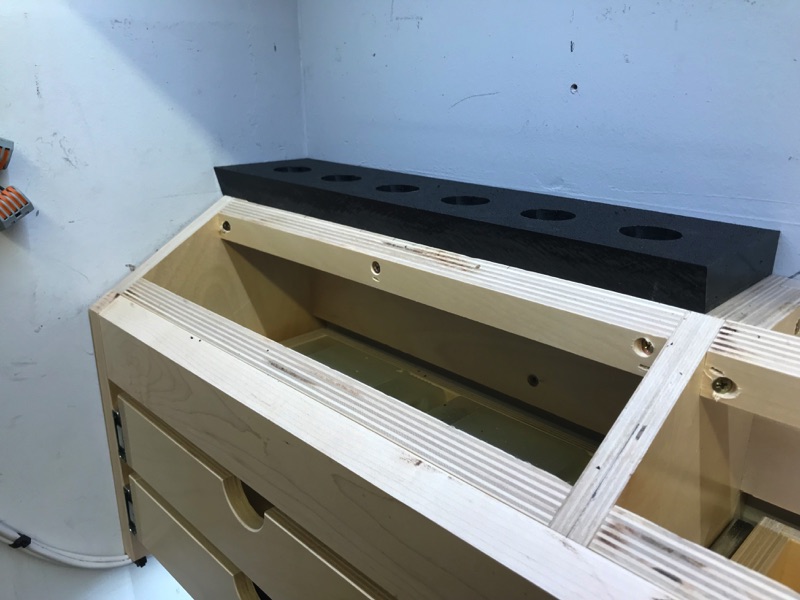
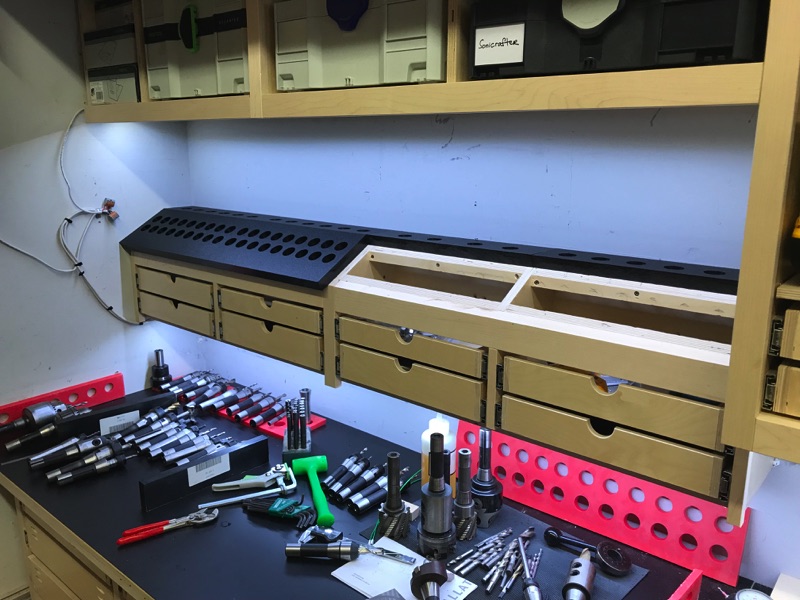
I added a 1-inch overhang to account for the eventual drawer faces.

img_4428.jpg


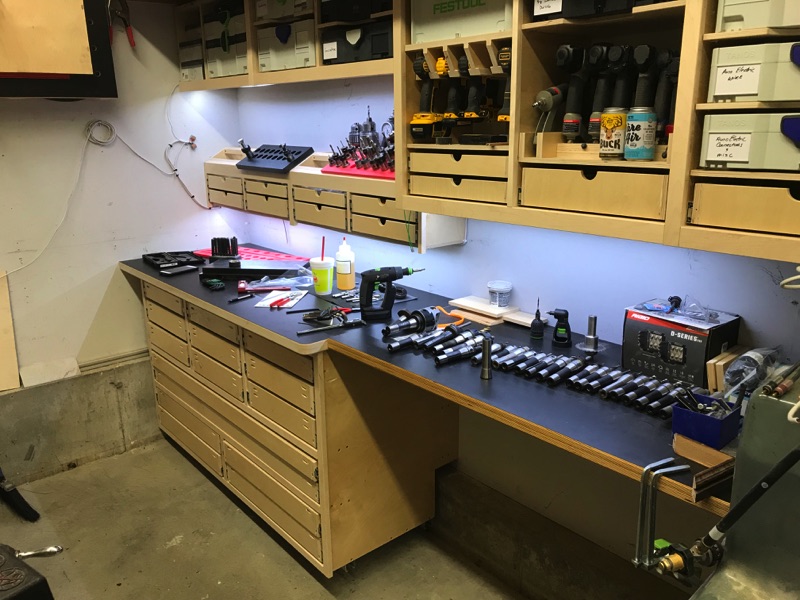
I know it’s been awhile - earlier this year I added a flip up top to give me additional work surface between the machines. Here’s the perfect example why.

img_4429.jpg


Cycle start, cut, finish, set in place, and repeat.

img_4431.jpg


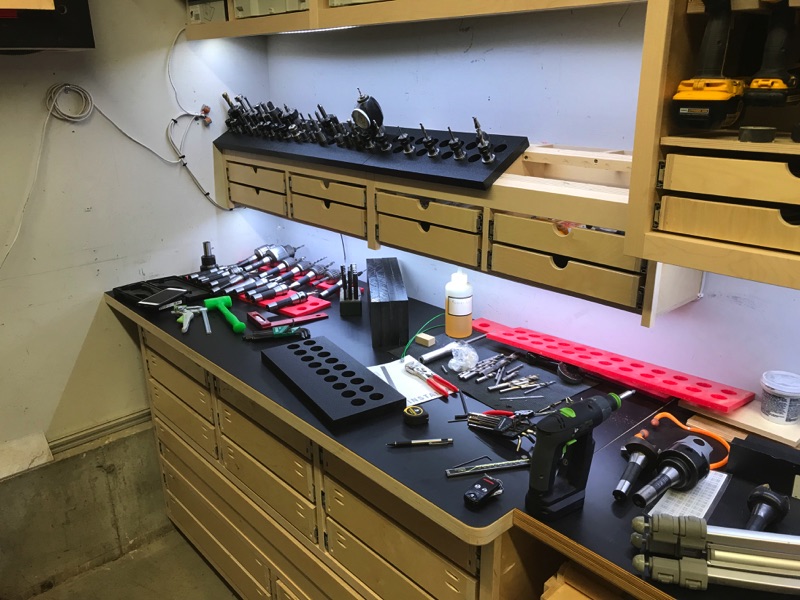
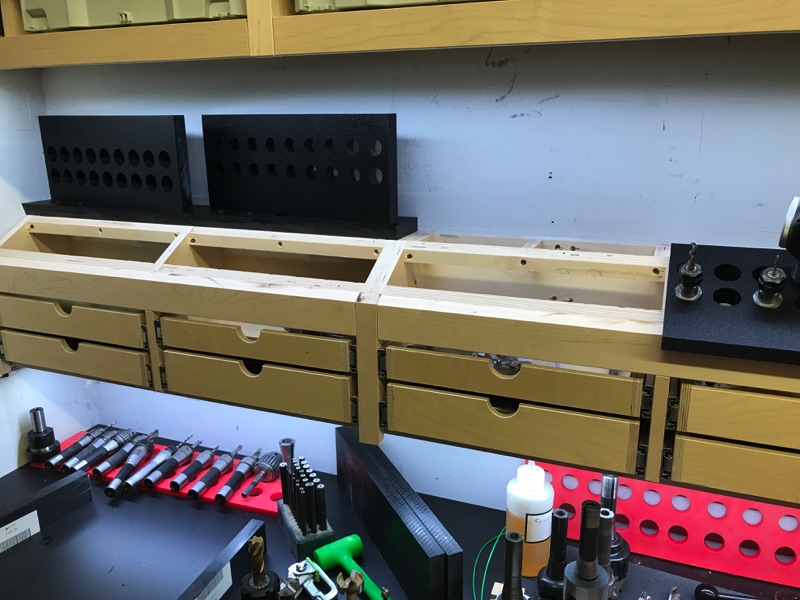
With all of the front pieces made, I now need to make he back row. This is where I’ll keep the larger and heavier tools.

img_4449.jpg


Shop vac attachments keeps the chips from going everywhere.
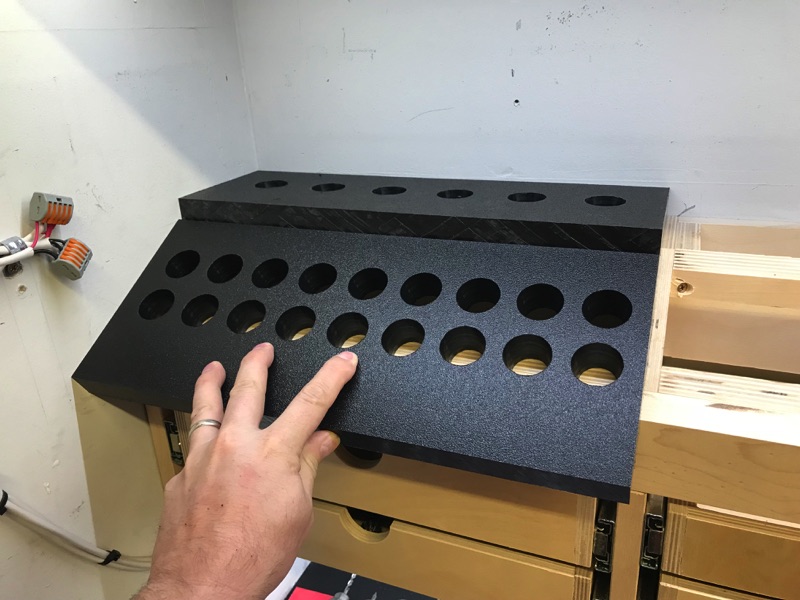
img_4450.jpg


Test fit.

img_4452.jpg


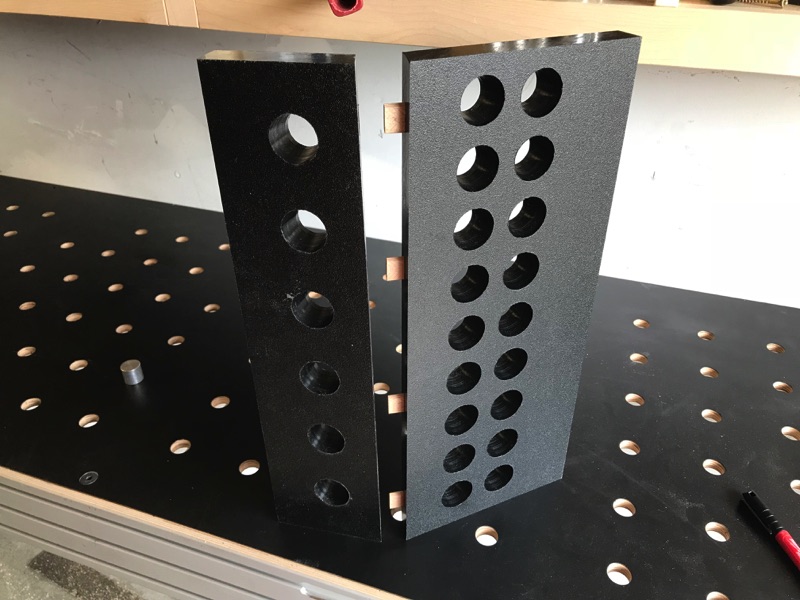
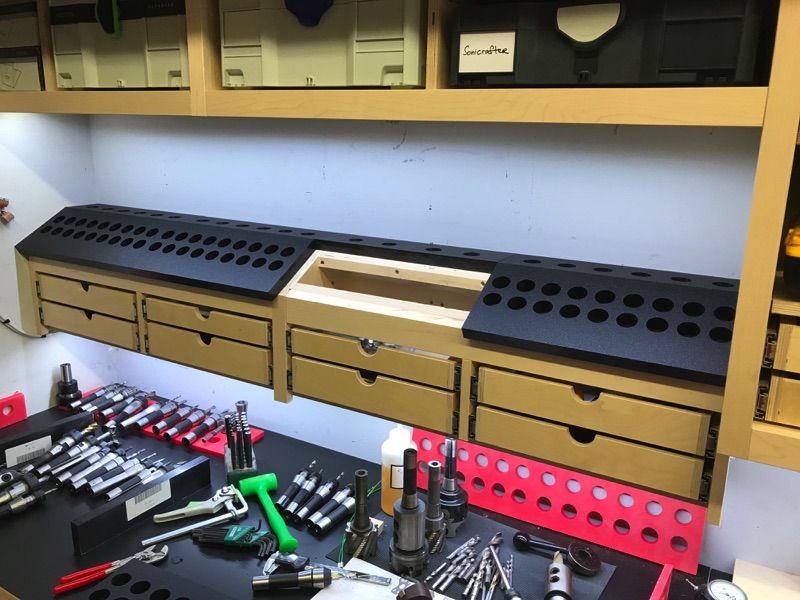
Mocking the two pieces together

img_4453.jpg


The angle needs to equal 30*. I set the table to 15* and both sides are trimmed.

img_4454.jpg


With all of the machines setup now, I just flow through the remaining pieces.

img_4456.jpg


Fab first for me - what if I use the domino and machine the HDPE pieces so I can perfectly align them using wood tenons? I was hesitant at first worrying that the chips wouldn’t evacuate as well which could cause heat buildup and then break the cutter. Worked just fine tho.

img_4458.jpg


Fit together with the tenons.

img_4459.jpg


Hot damn that turned out sweet. The seam isn’t noticeable even when you’re up close. It actually looks like one piece.

img_4460.jpg


Takes 4 of these assemblies to make the complete top.

img_4462.jpg


img_4463.jpg


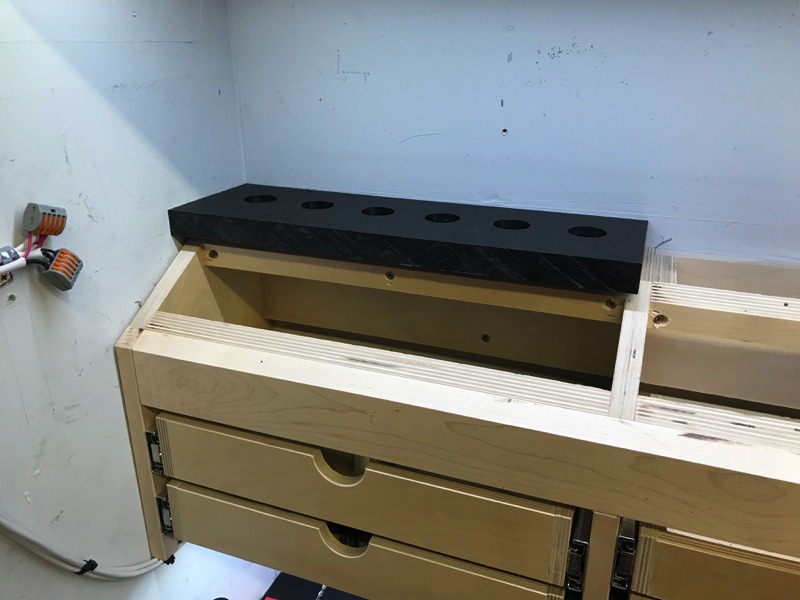
Countersunk some screws to retain them to the cabinet.

img_4465.jpg


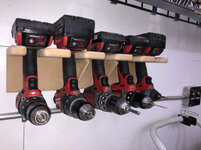
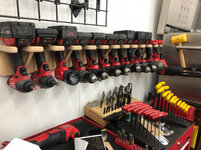
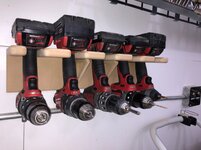
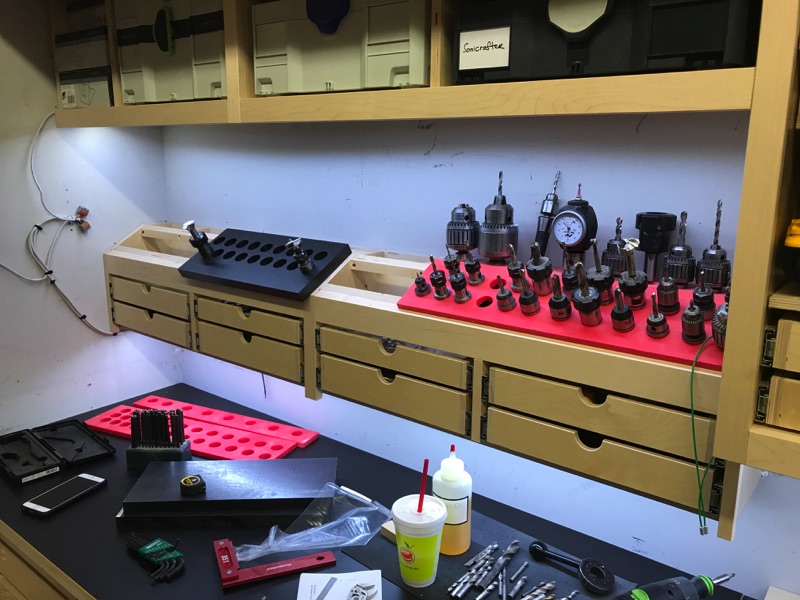
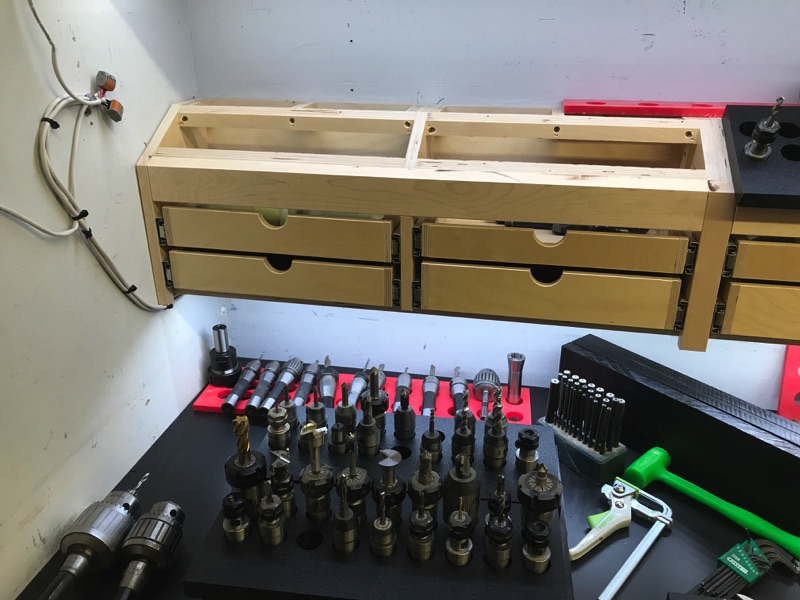
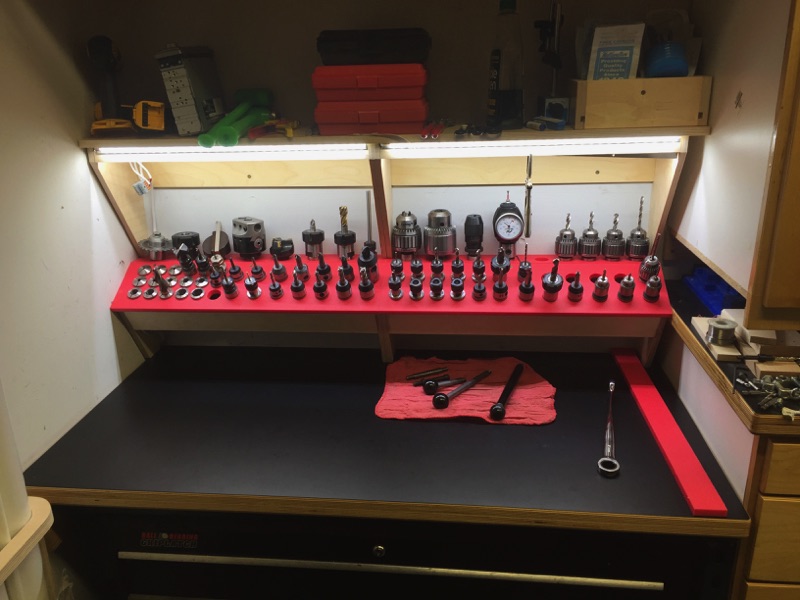
Before the reveal - heres the old tooling rack for comparison. Previous setup has the upper shelf supports which weren’t really needed even though I thought they were. What they did do well is interfere with accessing the tools in the back and it made tooling station feel a little closed in.

img_6961.jpg


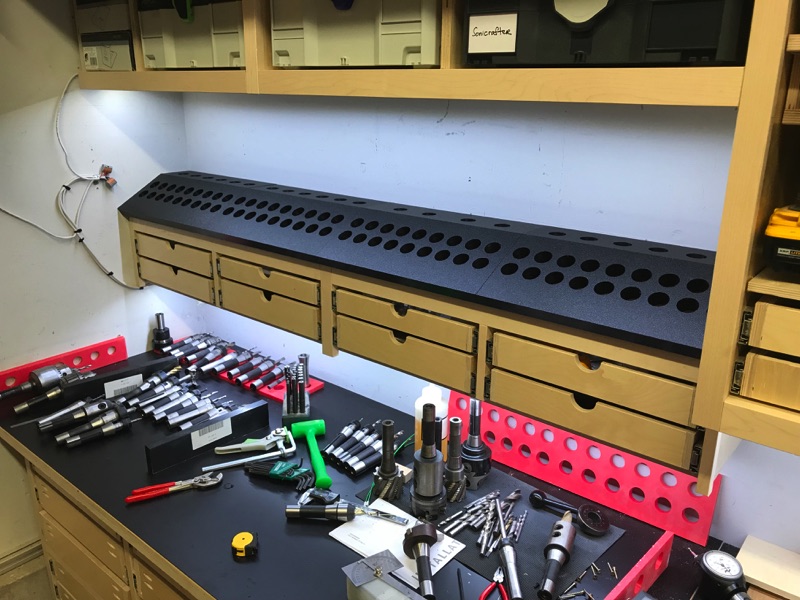
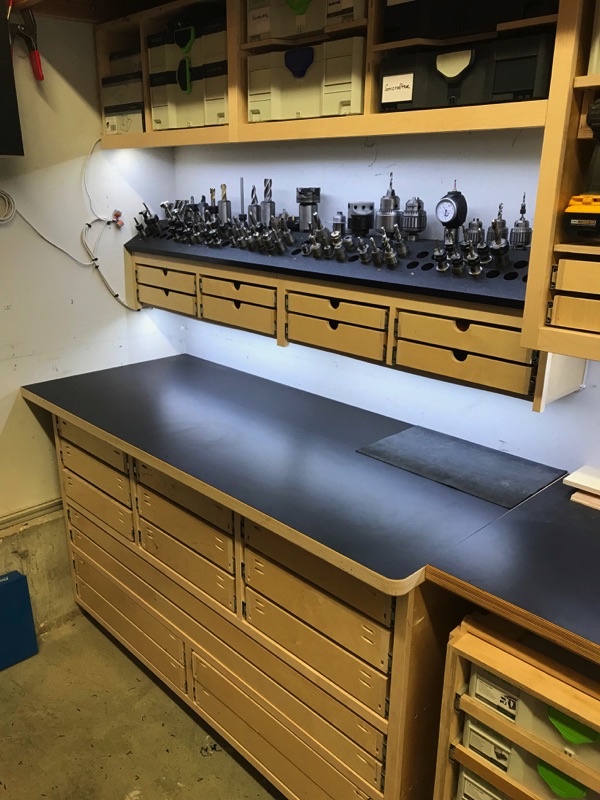
And the new rack loaded.

img_4469.jpg


Though it does look like I have room for expansion, I actually have about 10 ER Collet Chucks that I still need to setup and eventually add to the rack. Excited to have a bigger and better space to work in.
 
Last edited:
To avoid these ads, REGISTER NOW!
Top Bottom