To avoid these ads, REGISTER NOW!

Tooling (Re)Organization

OP
L

lilscorpion

Well-known member
Joined
Mar 15, 2010
Messages
3,599
Location
Colorado
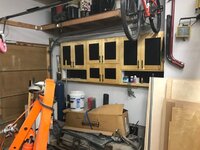
This weekend I got back after it and started in on the other side (the single car side) of the garage. The cabinets I had on the wall were super shallow. The total inner depth was just deeper than the thickness of a quart of oil. Great for storing the automotive fluids, spray paints, detail products, etc. if I were to make it deeper, I could store so much more.

5d9349f296d174337be3a85d2c94cc01.jpg

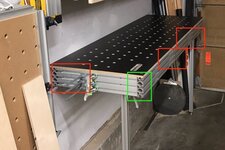
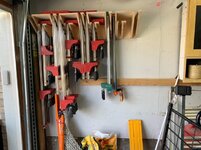
My previous clamp track only held 24 clamps and I have 60-something of them. The onset of the wall is 14” so I’ll keep all new cabinets around 12. At 40” this configuration fits way more than I currently have.

fd077bb97c4d3e731844a597ba5bc6de.jpg

With the rack fully loaded I was a little worried that brushing the clamps while walking but could put my Jeep (or toes) at risk. Came up with these cables to lock them in.

531e2e54a254aeffb3afd99eea570f11.jpg

I then re-hung the wire and hose organizers above.

a02448aee53bc760ca991c4b4518e846.jpg

I now have exactly enough room to add 60” shelves up to the garage door rail and replace that last remaining cabinet.

ffc6ae109b2fd8e0d71796edd561e63a.jpg

Austin Hardwoods in Denver, usually my goto for ply and other lumber, changed their policies in the last 3 weeks. They’ve decided to no longer cut plywood down to make it easier for people without trucks to get it home. What’s funny is they charged $10 per cut and the cuts took less than 15 minutes...meh. They have absolutely no idea how much Baltic birch I’ve purchased there.

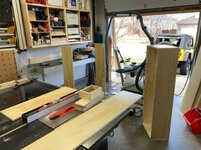
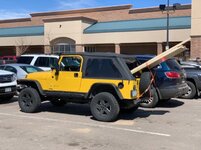
While at HD I noticed they now stock 4x8’s in a pre-finished. It’s not Baltic Birch. It has less ply and the ply is less dense. The ply doesn’t have many, it any, Voids. Figured I’d try it and they DO cut it down. I need to get four 11 7/8” wide strips cut out of a 48” wide board. At home, no problem. On the Home Depot saw? Figured no way. Well the guy who helped me nailed it. All seemed right with fish world until I loaded up those 3 sheets of ply in the Jeep.

117401bdfbcd85b5d202b404e9a85c42.jpg

I was aware that the weight of the ply was fully on the spare tire which is bolted with 4 grade 5 bolts, fully in sheer, which is attached to the tailgate. Surprisingly, I made it home.

Each of the boards came right out of the Jeep and through the saw.

f19ad98d0c68cbcb89c4768163691ef2.jpg

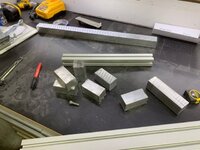
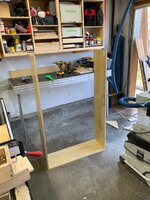
I then cut down the ply into the appropriate lengths. 60 for the verticals and 36 for the top and bottom.

4f96606a2c71ea038ecc359a82ad0c72.jpg

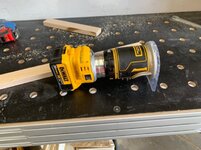
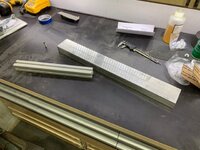
A little worried about using a lighter duty ply, I felt dominos for joinery was probably a good idea.

d7c0ef9ddb45d57ecd93f910bc1ee8f9.jpg

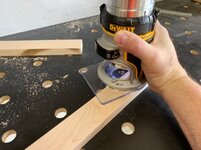
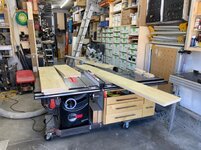
One by one I work through the pile of boards cutting in the dominos.

427eae7ea1f9aac301b2883ab861feae.jpg

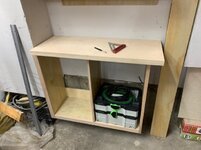
As I get pieces done, I put the assembly together.

0081f6969a734e5ea14cd3b3fd037105.jpg

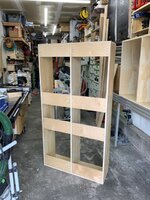
Fairly quickly the cabinets take shape.

4f66c5f8955309f15cda4bc18d6b7729.jpg

That little 9-foot wise wall space is handled. When I get time I’ll come back and make fancier shelves.

5d7eb8e6eca518a7f3af33d1b278b0f8.jpg
 

Attachments

  • fd077bb97c4d3e731844a597ba5bc6de.jpg
    fd077bb97c4d3e731844a597ba5bc6de.jpg
    64.5 KB · Views: 1
  • 4f96606a2c71ea038ecc359a82ad0c72.jpg
    4f96606a2c71ea038ecc359a82ad0c72.jpg
    64.4 KB · Views: 2
  • 5d7eb8e6eca518a7f3af33d1b278b0f8.jpg
    5d7eb8e6eca518a7f3af33d1b278b0f8.jpg
    66.4 KB · Views: 1
  • 4f66c5f8955309f15cda4bc18d6b7729.jpg
    4f66c5f8955309f15cda4bc18d6b7729.jpg
    70.5 KB · Views: 1
  • 0081f6969a734e5ea14cd3b3fd037105.jpg
    0081f6969a734e5ea14cd3b3fd037105.jpg
    74.9 KB · Views: 0
  • 427eae7ea1f9aac301b2883ab861feae.jpg
    427eae7ea1f9aac301b2883ab861feae.jpg
    64.5 KB · Views: 0
  • d7c0ef9ddb45d57ecd93f910bc1ee8f9.jpg
    d7c0ef9ddb45d57ecd93f910bc1ee8f9.jpg
    65.8 KB · Views: 0
  • f19ad98d0c68cbcb89c4768163691ef2.jpg
    f19ad98d0c68cbcb89c4768163691ef2.jpg
    82.2 KB · Views: 0
  • 117401bdfbcd85b5d202b404e9a85c42.jpg
    117401bdfbcd85b5d202b404e9a85c42.jpg
    64.4 KB · Views: 0
  • a02448aee53bc760ca991c4b4518e846.jpg
    a02448aee53bc760ca991c4b4518e846.jpg
    76.4 KB · Views: 0
  • 531e2e54a254aeffb3afd99eea570f11.jpg
    531e2e54a254aeffb3afd99eea570f11.jpg
    44.5 KB · Views: 0
  • 5d9349f296d174337be3a85d2c94cc01.jpg
    5d9349f296d174337be3a85d2c94cc01.jpg
    61.2 KB · Views: 1
  • ffc6ae109b2fd8e0d71796edd561e63a.jpg
    ffc6ae109b2fd8e0d71796edd561e63a.jpg
    76 KB · Views: 1
Last edited:
To avoid these ads, REGISTER NOW!

kshome

Member
Joined
Apr 9, 2019
Messages
20
Location
Kansas
Nothing huge but a little bit of 3D printed organization. One for holding hex bits, and the other for pocket knives.

IMG_9670_zpsaelzjkak.jpg
 

Prometheus

Well-known member
Joined
May 17, 2006
Messages
104
The clamp rack is slick. I've gotta figure out a way to do something similar with my f clamps and pipe clamps.

Instead of the cable did you consider adding a piece into the front making a lip? You would have to lift the clamp head over the lip and prevent them from falling on toes/Jeep's? I assume you decided against that, but I'm curious as to your thought process. Love your ingenuity.
 
OP
L

lilscorpion

Well-known member
Joined
Mar 15, 2010
Messages
3,599
Location
Colorado
The clamp rack is slick. I've gotta figure out a way to do something similar with my f clamps and pipe clamps.

Instead of the cable did you consider adding a piece into the front making a lip? You would have to lift the clamp head over the lip and prevent them from falling on toes/Jeep's? I assume you decided against that, but I'm curious as to your thought process. Love your ingenuity.


Thanks! Yeah. I thought about adding a lip to the end. I was worried about waking past the camp rack while the Jeep was in the garage and catching the bottom of a clamp with my jacket, a bag I’d have over my shoulder, etc and the force being enough to grab an putter camp and disrupt it over the stop. That’s were I started to think of ways to retain the clamp in a way that makes it so you can’t remove it without removing the stop. This cable thingy does that.
 

Strouty

Well-known member
Joined
Mar 21, 2010
Messages
38,209
Location
Southern Maine
And you didn't overthink things. I bet you could have designed something that cost a lot more time and money to do the same work. I haven't figured this out yet. :(
 
OP
L

lilscorpion

Well-known member
Joined
Mar 15, 2010
Messages
3,599
Location
Colorado
And you didn't overthink things. I bet you could have designed something that cost a lot more time and money to do the same work. I haven't figured this out yet. :(


I’m the master at overthinking things. I think I kinda got lucky on this one. I actually took the time to walk the isles at the big box and didn’t bail when I had my first idea. This one needed up being #3. Sometimes the ideas just come to me, others I gotta put in the time. [emoji41]
 
Last edited:
OP
L

lilscorpion

Well-known member
Joined
Mar 15, 2010
Messages
3,599
Location
Colorado
^^Exactly.

I really like the clamp storage rack Matt.:thumbup: I also like seeing that LJ out and about.

Thanks. I'm going to have to start a new thread in the projects section so my son and I are able to document the upcoming build that we'll be starting early May. Probably need to have another thread for non-shop related projects anyway..
 
OP
L

lilscorpion

Well-known member
Joined
Mar 15, 2010
Messages
3,599
Location
Colorado
Got a little more done today on the single deeps side of the shop. Built what will be the last two cabinets for this side. This one is a few inches short if 6’ tall.

4bb64f04ecba113d26479bacdf7e3da7.jpg

The nailers on the back are attached via pocket hole screws and strong enough to hold the cabinet and anything I put in them.

88894d5ecdf0aa1edb9e48fd619cbff1.jpg

I’ll tell ya, this little flip up bench (24” deep x 6 feet long) is becoming my favorite space to fab I wasn’t sure if it would be useful or not only being only 24” wide but I now used it all the time.
9d258efab2e3853bf5f051d1ed7b302f.jpg

And here’s how sweet the high rise doors are. I could stand up this cabinet on top of the bench while cutting in the dominos. Previously I had to do this further back in the garage.

d6d51d2e08e3361dac56884c7c45edb1.jpg

Installed it with a 29 3/8” high base cabinet that will eventually get a very narrow counter top and some drawers.

e638d6818406821dc43cc252bdb552df.jpg

I’ll have to finish trimming it out and install the shelves next.
 

Attachments

  • 4bb64f04ecba113d26479bacdf7e3da7.jpg
    4bb64f04ecba113d26479bacdf7e3da7.jpg
    76.6 KB · Views: 0
  • 88894d5ecdf0aa1edb9e48fd619cbff1.jpg
    88894d5ecdf0aa1edb9e48fd619cbff1.jpg
    80.3 KB · Views: 0
  • 9d258efab2e3853bf5f051d1ed7b302f.jpg
    9d258efab2e3853bf5f051d1ed7b302f.jpg
    76.9 KB · Views: 0
  • d6d51d2e08e3361dac56884c7c45edb1.jpg
    d6d51d2e08e3361dac56884c7c45edb1.jpg
    72.8 KB · Views: 1
  • e638d6818406821dc43cc252bdb552df.jpg
    e638d6818406821dc43cc252bdb552df.jpg
    53 KB · Views: 1

mmsheb

Well-known member
Joined
Mar 30, 2008
Messages
365
Location
Wisconsin
lilscorpian -
Can you tell me more about your flip up bench (24” deep x 6 feet long)? it looks like something I could use. Thanks, Mike
 
OP
L

lilscorpion

Well-known member
Joined
Mar 15, 2010
Messages
3,599
Location
Colorado

mmsheb

Well-known member
Joined
Mar 30, 2008
Messages
365
Location
Wisconsin
Thank you for the info/reference. I will study that, and also watch for your wider build in the future.

Mike
 
OP
L

lilscorpion

Well-known member
Joined
Mar 15, 2010
Messages
3,599
Location
Colorado
What will you use your tools for when you finish building cabinets? (Assuming you 'finish', that is...) :bow: :bowdown:


I sense you’re pokin fun at me. [emoji57]

In parallel to my shop crazy I’ve been working on the house (7 years now I believe). We’ve redone many aspects of it but still have quite a few projects left before I’ll be done enough to a not need a shop and, to your point, I’ll likely never be done on the shop so...

If you’re interested in the other stuff, I’ll be creating another thread to track non-shop related projects. Those are the ones I spend the most time on and the primary reasons for delays between updates on this thread.

Thanks for reminding me how much work I have left to do. [emoji16]
 
To avoid these ads, REGISTER NOW!
OP
L

lilscorpion

Well-known member
Joined
Mar 15, 2010
Messages
3,599
Location
Colorado
Don't worry, it never ends......


Oh it ends. When it does they’ll remember it as the shop that took as many years to do deal with after I was gone as it took me to build while I was here. Guess the up side is all the tools they’ll need will be easy to find. [emoji16]
 
OP
L

lilscorpion

Well-known member
Joined
Mar 15, 2010
Messages
3,599
Location
Colorado
Wish I could say amazing progress was made this weekend but instead I tackled the slower aspect of cabinet builds. Building the face frames and getting the counter top right took some fiddling. Fortunately a the new Dewalt 20v cordless router showed up late Friday so I found enjoyment in trying it out.

33264bd3d6f6dbd8c8264d953bf89612.jpg

It’s a slick unit. It’s brushless and has a break on it so using it is different. It’s noticably heavier than the corded version but that I fully expected. Was hoping it I’d feel like it’s “not as heavy as I expected” but it was exactly as heavy as I expected. I do most edge breaking and round-overing with a single hand and still can with this unit, it is balanced enough. None of my other routers have a light but this one makes it clear what I’ve been living without. I also like how it sits with the D-plate and battery on the counter top.

23e6f1f43608e4e2c364037dc3795d7e.jpg

It stays perfectly put where I leave it either on or off (yeah, no $hit). Grabbing it is so much easier without a wire too. Don’t need to consider where the wire is on a cut which itself makes using it faster.

I chose to get some over sized S4S Maple and cut it to size to save a few bucks. That’s where I lost so much time this weekend. Though it’s not all that hard, it’s more handling, measuring, and finishing than I’m used to. That **** takes time. In parallel I glued up the top and set it over the base in rough dimensions.

f7be529d5831adf73fe47d53037f689e.jpg

The inset depth of the cabinets wasn’t perfect so I had to make a relief cut in the frame so it could nicely overlay the drywall duct encasement.

87f0ad83f716f9b448ae955cae61ae14.jpg

Standing back to admire my work I realized that the cabinets on either side of the duct encasement were installed at different heights. Damn the unlevel floor. Had to uninstall and reinstall to fix.

b078fe82a64612be8662c81ebb974517.jpg

Then I moved to fitting the counter top. WAY too much fiddling. Turned out the duct encasement was out of square by .5* but initial measure was 1* so measure twice, cut twice.

a41d4543202b0b6fb626430ff9db5cea.jpg

Did a simple 1.5” radius on the right side after cutting it to final width. Fortunately both are a known quantity.

ad6ddbe599a1cb47c8476de11c2574d8.jpg

Now I just need some drawers, shelves, and to laminate the top.

a17ce630a6f6ed6e9b76d709e6a2c4fe.jpg

Thinking about colors now...what color would look good with the black counters, black drawer fronts, and natural finished ply edges? Medium gray?
 

Attachments

  • a17ce630a6f6ed6e9b76d709e6a2c4fe.jpg
    a17ce630a6f6ed6e9b76d709e6a2c4fe.jpg
    57.8 KB · Views: 1
  • a41d4543202b0b6fb626430ff9db5cea.jpg
    a41d4543202b0b6fb626430ff9db5cea.jpg
    26.8 KB · Views: 0
  • b078fe82a64612be8662c81ebb974517.jpg
    b078fe82a64612be8662c81ebb974517.jpg
    39.3 KB · Views: 0
  • 87f0ad83f716f9b448ae955cae61ae14.jpg
    87f0ad83f716f9b448ae955cae61ae14.jpg
    35.1 KB · Views: 0
  • 23e6f1f43608e4e2c364037dc3795d7e.jpg
    23e6f1f43608e4e2c364037dc3795d7e.jpg
    65.3 KB · Views: 0
  • 33264bd3d6f6dbd8c8264d953bf89612.jpg
    33264bd3d6f6dbd8c8264d953bf89612.jpg
    58.6 KB · Views: 0
  • ad6ddbe599a1cb47c8476de11c2574d8.jpg
    ad6ddbe599a1cb47c8476de11c2574d8.jpg
    49.8 KB · Views: 0
  • f7be529d5831adf73fe47d53037f689e.jpg
    f7be529d5831adf73fe47d53037f689e.jpg
    49.5 KB · Views: 0
Last edited:

Monza Harry

Well-known member
Joined
Dec 29, 2018
Messages
1,433
Location
Windsor ON
I also like how it sits with the D-plate and battery on the counter top.

All I can say is about F#$%^& Time! I have Diabetes and all of our supplies are in/made with round containers, (and a million other things) well there isn't a chance in … that anything that you sit down on it's side will not end up on the floor! [trying to keep the interfaces away from the tables etc.] Been following you Re Org. read it front to back , haven't read the first one yet, somewhat new here and there are a LOT of worthy reads here. Yours was among the first few, well enjoyed! Really seem like a "Quite Agreeable " Group here. :thumbup: Harry
 

Lightman 1

Active member
Joined
Apr 20, 2019
Messages
25
Location
England Ar
I keep most of my hand tools in a Craftsman roll around cabinet. I have another set that is in one of those wedge looking truck boxes. I used peg board to cover the inside walls of my shop. Several years ago I traded some electrical work to a guy that was a salesman for a large hardware company for a couple of stacks of parts drawers and a bunch of bolt style bins. I also got a drill bit cabinet and a tap and die cabinet.

I still need a few organizers for my tool chest drawers.
 
OP
L

lilscorpion

Well-known member
Joined
Mar 15, 2010
Messages
3,599
Location
Colorado
Okey...so I’ve moved forward a bit and have spent the last two weekends machining some key parts for the next project out of some 6061. Any guesses what they are for?

9e657ccc447ead45c3f98f81adedc5e0.jpg

04f1dfdd429575b3ca072ed028d99b9e.jpg
 

Attachments

  • 04f1dfdd429575b3ca072ed028d99b9e.jpg
    04f1dfdd429575b3ca072ed028d99b9e.jpg
    39.6 KB · Views: 0
  • 9e657ccc447ead45c3f98f81adedc5e0.jpg
    9e657ccc447ead45c3f98f81adedc5e0.jpg
    43 KB · Views: 0
OP
L

lilscorpion

Well-known member
Joined
Mar 15, 2010
Messages
3,599
Location
Colorado
Man, if you don't post I have no way to vicariously build stuff with you. It's means I actually need to build.

Dude, maybe we could take turns. I need some ideas!!!

Something 80/20 related? They look cool either way.

Good guess. I've been building out the single car deep side of my garage now for a month or so and many thought cycles trying to figure out how to best to utilize the space. The fold-up bench on the other side has proved to be my absolute favorite work space of all time. I find it so versatile and the fact that I have to fold it down every night means that the next time I use it, it’s always clean.

266d54a2373ad301c6475b5a9a7d177f.jpg

The bench isn’t perfect however it’s very close. Given how 80/20 extrusions are designed, there’s no way to bring them together to a corner and still have access to the adjoining corners’ t-slots and the visual finish isn’t exactly visually pleasing (green rectangles in the picture below). To enable slot access, I resolved that by machining access slots in the extrusion faces which worked fantastically (red rectangles below). As for visually pleasing, I had planned on machining an end-plate that would cover the ends and maybe put some cool scallops on it to give it a little flare.

a483d9ed75a3dbe2d856b14197a0603e.jpg

As I was planning out the design for the caps It occurred to me that I didn’t want to block access to the end of the front extrusion so I’d want to cut t-slots in the face. T-slots are fairly easy to machine but as I started looking at the end of the profile, I realized that unless I cut to a similar profile, the clamp wouldn’t easily slide into and out of the slot as anything less would create interference. When looking at the profile it occurred to me that the root of it wasn’t too dissimilar to the profile of a ball mill. I happened to have a 2 flute 3/4” ball mill that matches almost perfectly. I don’t need the end to capture the clamp, I need it to enable access to the extrusion’s T-track so the plan is to make it the width of the access slots (I cut into the other bench) which also happened to be 3/4”. It’s almost like it’s made to be…

7fe851ef6ed69ba994689cd9885ce726.jpg

Get it chucked up in one of my ER25 collets.

297774749158c875c0b89628c7890c1c.jpg

As I continued to think about the design of the end-plates I realized that making a simple plate out of 3/16 would be easy and take very little time but it’s also not really solving THE problem. Yes the cap will enable access to the front extrusion but it won’t do anything to solve accessing the side profile at all. This design is a cop-out. What I need to do is make a corner joint that enables access to both extrusion faces and is an integral part of the bench. Any corner I’d make should also eliminate the need for internal bracing in each corner.

538904e19f83e4ad71d1a9a9ad63f124.jpg

I found some 1.5 x 1.5 6061 on Ebay from my usual vender (who happens to be just south of me by an hour). Shipping never takes longer than a few days so I was able to get started quickly. I started with 2 lengths of 24” knowing that I’ll probably wreck maybe 6 - 10” of it. These chunks are also extruded so their shape and measurements are extremely consistent measuring in at 1.5071” x 1.5071-ish. A piece of 80/20 1515LS measures about 20-thou under 1.5 for perspective. That 25-thou isn’t enough difference worth messing with so I’ll run it like it is and just cut chunks to length.

1f2be0267a114d37edee19a07b35ef90.jpg

The new bench will be made out of 80/20 1530LS which (translated) is 1.5” x 3”. So the corners will need to measure 1.5” x 1.5” x 3”. A little thought will need to be put into how the corners will be bolted to the adjoining profiles. The holes can’t be too big in diameter or the extrusion will end up looking like a butchered piece of angle iron. The bolts will need to be machined deep enough so that they don’t interfere with each other too.

5ad9f75474bc0fc872cdcaa07f836ea7.jpg

After some rough math I realize that I can get 5 pieces 3” long and 4 pieces 4.5” long. Though I’ll only have one ‘extra’ piece to do my experimentation on, if I’m careful I’ll be able to make corners for the existing bench too (it was 80/20 1545LS which is 1/5” x 4.5”).

6eff47fb7dc5752770354b43da58f951.jpg

I cut all of my raw goods on a horizontal bandsaw. Though it does a fairly nice job and is quick, the cut does wander just a bit as the blade cuts through. In this 1.5” thick stock, it left about an 65-thou taper on the end which requires it be faced to square up. This is critical so I can get the part in the vise squarely and rotate it though the various operations. I start by setting part zero. If you’ve never used a Haimer indicator before, you’re missing out. Though it’s fairly pricy (like $400+), this thing is extremely accurate in zeroing X, Y, and Z and is the key to making consistent parts on my CNC Knee Mill. With the hand wheel I can center and zero the machine in a minute or so.

ee2cd3e47747e450419b6fce87f48b57.jpg

With the part located, I setup the 1” 4-flute end mill and take a skim pass on the first of the 2 rough ends. Why a 1”? Well I like taking a full width cut on the material and the larger diameter end mills prevent deflection. Believe it or not, over a 1.5” depth of cut a 1/2 or even 3/4 end mill can deflect even just a little and leave for a less than square facing operation. I take off maybe 50 or so thou on the first pass. The black tube bottom left corner is my shop vac. I put this in-line with the end mill less than 1/4” away and it gets most of the chips and prevents the end mill from re-cutting (pulling a chip around on the cutter back into the part) which helps leave a nice finish.

3c18efecd01d2e50239e3b5b8d76fea0.jpg

Second cut takes of another 10-thou and leaves a nice smooth square finish. I then program in a tool change (though I don’t change the tool) and remove the material flipping it end for ending the vise. The second half of the operation is 2 more similar facing operations which sizes the material to what I believe are final dimensions. Invariably I end up just a hair long and need to tweak in the final op so I take a measurement before the final pass and make the adjustment accordingly. As long as I don’t remove the stop, I can now repeat until all 5 pieces are cut to final length dimension.

b723f4d5d97fffeeb38822644cfd592f.jpg

How accurate do I try to get? Usually until the calipers hit their accuracy limit. The closer I can get to true measurement here the easier it is for me to rotate it in the vise as I play with it and dial in the program. The closer the parts are to being the same fit and finish. I’m not building parts for the space shuttle but I am building a bench that could be installed in one. The extra time it takes here to be spot on does make a difference. [emoji4]

46a25045e86821bba4800fbec99bda5e.jpg
b3a9f481712932aa35537a41a5925b9b.jpg
c5b4db4db499647189c07b40fadbedf5.jpg

Visualizing the part.

9fc0673059cfa8c826a4444f135cc173.jpg
20adcf925b973062e5da9faf206ef6c2.jpg

Ok, test part 1. I use a roughing 3-flute end mill to pre-machine the hole so the ball mill doesn’t have to work as hard.

0856ca64f7c087ad1ebc51b21a80c772.jpg

I have got the first face finished and checked the profile. It matches up surprisingly well.

653eec4fa8844b2a6365751b2d2ceae9.jpg

Surface finish on the finish pass of the ball mill is fantastic on the walls but ‘meh’ at the root. It just can’t accomplish enough surface speed to keep the tip from dragging. I tried adjusting the speed a little but when I got the tip moving fast enough, the outside of the end mill was going to fast and finish quality on the walls started to deteriorate.

71c013ae0f9bbf528e8f5abb30314448.jpg

Dropped the part back in the vise rotated forward 90-degrees and re-ran the program.

ba18a6abf4ec6d7112825e94ca26789d.jpg

Thought I’d step back and show you guys a clean workbench. Far too often I post up progress pictures that make my space look like an absolutely disaster…it is usable.

c1ed8374d698d19827edf8bd81cf42b4.jpg

With the second op finished, I realize the bolt holes are so close to the leading edge that there’s barely any material left between them.

265b621e2353690b5c120fc6bc5087e4.jpg

There’s maybe less than 50-thou here.

f7cba3f2c923641a58b7547532cd9b99.jpg

So a tweak to the program and the holes become slots.

6b1b7aef091168441eeeb24967d53264.jpg

Not only does it look better but I learned (on first assembly) that I had to remove that little amount of material in order to be able to get a conventional hex wrench in on the bolt.

6cab5cb62cf47a6927394a0fec33aed9.jpg

Looks good.

8873b8a2d9ab9545de46af3c561c252f.jpg

Now to test the profile with the clamps. Works well but the root of the two profiles doesn’t match up well enough for the clamp to slide into the extrusion easily. I mean it goes in, but you can feel friction since the ball mill doesn’t leave a flat bottom like the extrusion has.

c7968c3594a4f98a0f6164b9f7165649.jpg

Instead of making an immediate change If figured I’d round the edges over so I could have a final visual of the part…one completed piece anyway. Turned out damn click. Visually the poor surface finish of the root of the profile really bugs me. I’m sure that inserting the clamps over time will create some friction there but not any time soon.

432919dca87354bdea00a0e06053df47.jpg

Now to check the final both depth. In order for all for bolts to go in, they myst sink to the depth of the other’s outer diameter.

9a9106eb152229b3baf7703539f3ceaf.jpg

They’re just perfect so I went back in to the program and sank them another 25-thou just to be safe.

de2f79ef8605d0c947665c20ebd61981.jpg
6c56ee03f65bafcec8adb2a04644679b.jpg
9c6f5cbfe9ccce07cd8fcd97c41887de.jpg
 

Attachments

  • b723f4d5d97fffeeb38822644cfd592f.jpg
    b723f4d5d97fffeeb38822644cfd592f.jpg
    65.9 KB · Views: 0
  • 3c18efecd01d2e50239e3b5b8d76fea0.jpg
    3c18efecd01d2e50239e3b5b8d76fea0.jpg
    62 KB · Views: 0
  • ee2cd3e47747e450419b6fce87f48b57.jpg
    ee2cd3e47747e450419b6fce87f48b57.jpg
    65.3 KB · Views: 0
  • 6eff47fb7dc5752770354b43da58f951.jpg
    6eff47fb7dc5752770354b43da58f951.jpg
    56.4 KB · Views: 0
  • 5ad9f75474bc0fc872cdcaa07f836ea7.jpg
    5ad9f75474bc0fc872cdcaa07f836ea7.jpg
    45.7 KB · Views: 0
  • 1f2be0267a114d37edee19a07b35ef90.jpg
    1f2be0267a114d37edee19a07b35ef90.jpg
    45.3 KB · Views: 0
  • 538904e19f83e4ad71d1a9a9ad63f124.jpg
    538904e19f83e4ad71d1a9a9ad63f124.jpg
    61.5 KB · Views: 0
  • 297774749158c875c0b89628c7890c1c.jpg
    297774749158c875c0b89628c7890c1c.jpg
    45.6 KB · Views: 0
  • 7fe851ef6ed69ba994689cd9885ce726.jpg
    7fe851ef6ed69ba994689cd9885ce726.jpg
    40.8 KB · Views: 0
  • a483d9ed75a3dbe2d856b14197a0603e.jpg
    a483d9ed75a3dbe2d856b14197a0603e.jpg
    48.6 KB · Views: 0
  • 266d54a2373ad301c6475b5a9a7d177f.jpg
    266d54a2373ad301c6475b5a9a7d177f.jpg
    61.5 KB · Views: 0
  • c1ed8374d698d19827edf8bd81cf42b4.jpg
    c1ed8374d698d19827edf8bd81cf42b4.jpg
    71 KB · Views: 0
  • 46a25045e86821bba4800fbec99bda5e.jpg
    46a25045e86821bba4800fbec99bda5e.jpg
    47.9 KB · Views: 0
  • b3a9f481712932aa35537a41a5925b9b.jpg
    b3a9f481712932aa35537a41a5925b9b.jpg
    47.4 KB · Views: 0
  • c5b4db4db499647189c07b40fadbedf5.jpg
    c5b4db4db499647189c07b40fadbedf5.jpg
    53.4 KB · Views: 0
  • 9c6f5cbfe9ccce07cd8fcd97c41887de.jpg
    9c6f5cbfe9ccce07cd8fcd97c41887de.jpg
    48.6 KB · Views: 0
  • 6c56ee03f65bafcec8adb2a04644679b.jpg
    6c56ee03f65bafcec8adb2a04644679b.jpg
    43.6 KB · Views: 0
  • de2f79ef8605d0c947665c20ebd61981.jpg
    de2f79ef8605d0c947665c20ebd61981.jpg
    38.3 KB · Views: 0
  • 9a9106eb152229b3baf7703539f3ceaf.jpg
    9a9106eb152229b3baf7703539f3ceaf.jpg
    50.3 KB · Views: 0
  • 432919dca87354bdea00a0e06053df47.jpg
    432919dca87354bdea00a0e06053df47.jpg
    42.3 KB · Views: 0
  • c7968c3594a4f98a0f6164b9f7165649.jpg
    c7968c3594a4f98a0f6164b9f7165649.jpg
    47.1 KB · Views: 0
  • 8873b8a2d9ab9545de46af3c561c252f.jpg
    8873b8a2d9ab9545de46af3c561c252f.jpg
    40.4 KB · Views: 0
  • 6cab5cb62cf47a6927394a0fec33aed9.jpg
    6cab5cb62cf47a6927394a0fec33aed9.jpg
    40.9 KB · Views: 0
  • 6b1b7aef091168441eeeb24967d53264.jpg
    6b1b7aef091168441eeeb24967d53264.jpg
    48 KB · Views: 0
  • f7cba3f2c923641a58b7547532cd9b99.jpg
    f7cba3f2c923641a58b7547532cd9b99.jpg
    53.2 KB · Views: 0
  • 265b621e2353690b5c120fc6bc5087e4.jpg
    265b621e2353690b5c120fc6bc5087e4.jpg
    57.1 KB · Views: 0
  • ba18a6abf4ec6d7112825e94ca26789d.jpg
    ba18a6abf4ec6d7112825e94ca26789d.jpg
    57 KB · Views: 0
  • 71c013ae0f9bbf528e8f5abb30314448.jpg
    71c013ae0f9bbf528e8f5abb30314448.jpg
    45 KB · Views: 0
  • 653eec4fa8844b2a6365751b2d2ceae9.jpg
    653eec4fa8844b2a6365751b2d2ceae9.jpg
    41.6 KB · Views: 0
  • 0856ca64f7c087ad1ebc51b21a80c772.jpg
    0856ca64f7c087ad1ebc51b21a80c772.jpg
    49.8 KB · Views: 0
  • 20adcf925b973062e5da9faf206ef6c2.jpg
    20adcf925b973062e5da9faf206ef6c2.jpg
    44 KB · Views: 0
  • 9fc0673059cfa8c826a4444f135cc173.jpg
    9fc0673059cfa8c826a4444f135cc173.jpg
    39.3 KB · Views: 0
Last edited:

Dusty.Tools

Member
Joined
Aug 6, 2018
Messages
10
Location
Front of House
Awesome!!!!

How much would you charge make 8 for me?

I have been contemplating doing some similar but 3D printed! I have exactly the same design challenge...


——————————
dusty.tools
 

Strouty

Well-known member
Joined
Mar 21, 2010
Messages
38,209
Location
Southern Maine
I figured it was corners, but the reason wasn't apparent, thanks for the full description and it is a great idea, consider it stolen.
 

Mecha

Well-known member
Joined
Dec 28, 2016
Messages
194
Location
Volunteer State
This is pretty slick. I spent a fair amount of my time early in my factory engineering career using 80/20 like stuff (I bought from a company called AluFab in Cinci) and ultimately decided if it wasn't for a clamping surface or sliding guide, then I'd rather have it welded up. The problem with the aluminum extrusion is that over time with vibrating surfaces the material pulls itself apart. Make sure to use a lube or blue Locktite on those bolts during assembly to prevent stripping in the aluminum. The banjo's seemed to hold up better (steel on steel), but I still had to tight every screw once a year, every year on the stuff I built.

Absolutely beautiful and well thought out machine work though.
 

Strouty

Well-known member
Joined
Mar 21, 2010
Messages
38,209
Location
Southern Maine
My dad has a plasma table that is assembled from 80/20 and it does loosen up.

On another note, I did buy a bunch of ER collets for my mill, also bought this the other day and thought you might find it interesting, does from 1/8” to 7/8” with 8 collets, yes only 8. This one is essentially new, just looks like it was used a couple times. I have a larger version for my lathe, goes from 1/8” to 1 3/8” with 11 collets.


d8f8c04bd8a2ad773e96eea597a342c8.jpg
 
OP
L

lilscorpion

Well-known member
Joined
Mar 15, 2010
Messages
3,599
Location
Colorado
Awesome!!!!
How much would you charge make 8 for me?

When I sold the business I swore I wouldn't make parts for others again for a variety of reasons. The primary reason is time. Though I said I just 'set it and forget it', I do so until tool changes which can be every 4-10 minutes. Though I try to do other things in parallel, I really can't get much done. That being said, let me ponder...I did have an idea of how I could make larger batches in the 2 vises (like 6 at a time instead of just 2). If I decide to run a bigger batch, I'll let you know.

Awesome work on the end/corner pieces Matt.

Thanks!

The problem with the aluminum extrusion is that over time with vibrating surfaces the material pulls itself apart. Make sure to use a lube or blue Locktite on those bolts during assembly to prevent stripping in the aluminum.

Absolutely beautiful and well thought out machine work though.

Thank you. Yeah they can loosen up but I've planned to check them once a year. Easy to just add another task to the day mid-summer when I change the oil in the compressor, lube the machines, etc. I do use blue locktite during final assembly and I don't ram them home.

You'd think 80/20 would already have something like this available. Nice work!

Seriously, I can't believe they don't. The closest I've seen is this doohickey but I've only see int for the 1515 extrusions.

80-20-Inc.-14171.jpg


I did buy a bunch of ER collets for my mill, also bought this the other day and thought you might find it interesting, does from 1/8” to 7/8” with 8 collets, yes only 8. This one is essentially new, just looks like it was used a couple times. I have a larger version for my lathe, goes from 1/8” to 1 3/8” with 11 collets.

d8f8c04bd8a2ad773e96eea597a342c8.jpg

That's a really nice setup and the real deal too. Not import. Bet it's got a fairly low TIR. Where did you find it? Ebay or local?
 

Strouty

Well-known member
Joined
Mar 21, 2010
Messages
38,209
Location
Southern Maine
I found it on eBay, they say it is very low TIR, but I have not set it up yet, can’t confirm it, but every video I saw on the larger ones were saying only good things.
 
OP
L

lilscorpion

Well-known member
Joined
Mar 15, 2010
Messages
3,599
Location
Colorado
Wish I had a couple of those. IMO, low TIR collets are best used for finish mills (or any other tool where tolerance is desirable). having a few extra thou runout (Chinese collets) on something like drill bits is close enough to perfect you'd think it was anyway.
 

Strouty

Well-known member
Joined
Mar 21, 2010
Messages
38,209
Location
Southern Maine
Depending on your lathe mount you can find a decent set with the chuck pretty reasonable, most of the buy it now prices are ridiculous. As for the R8 ones, I had never seen them before, I think there were 3 or 4 completed listings for them over the last couple months. I will keep my eyes peeled for a deal, if I see one, I will at least let you know.
 
To avoid these ads, REGISTER NOW!
Top Bottom