

You are using an out of date browser. It may not display this or other websites correctly.
You should upgrade or use an alternative browser.
You should upgrade or use an alternative browser.
Truss Design
- Thread starter Medeek
- Start date
Version 0.7.9 - 06.18.2018
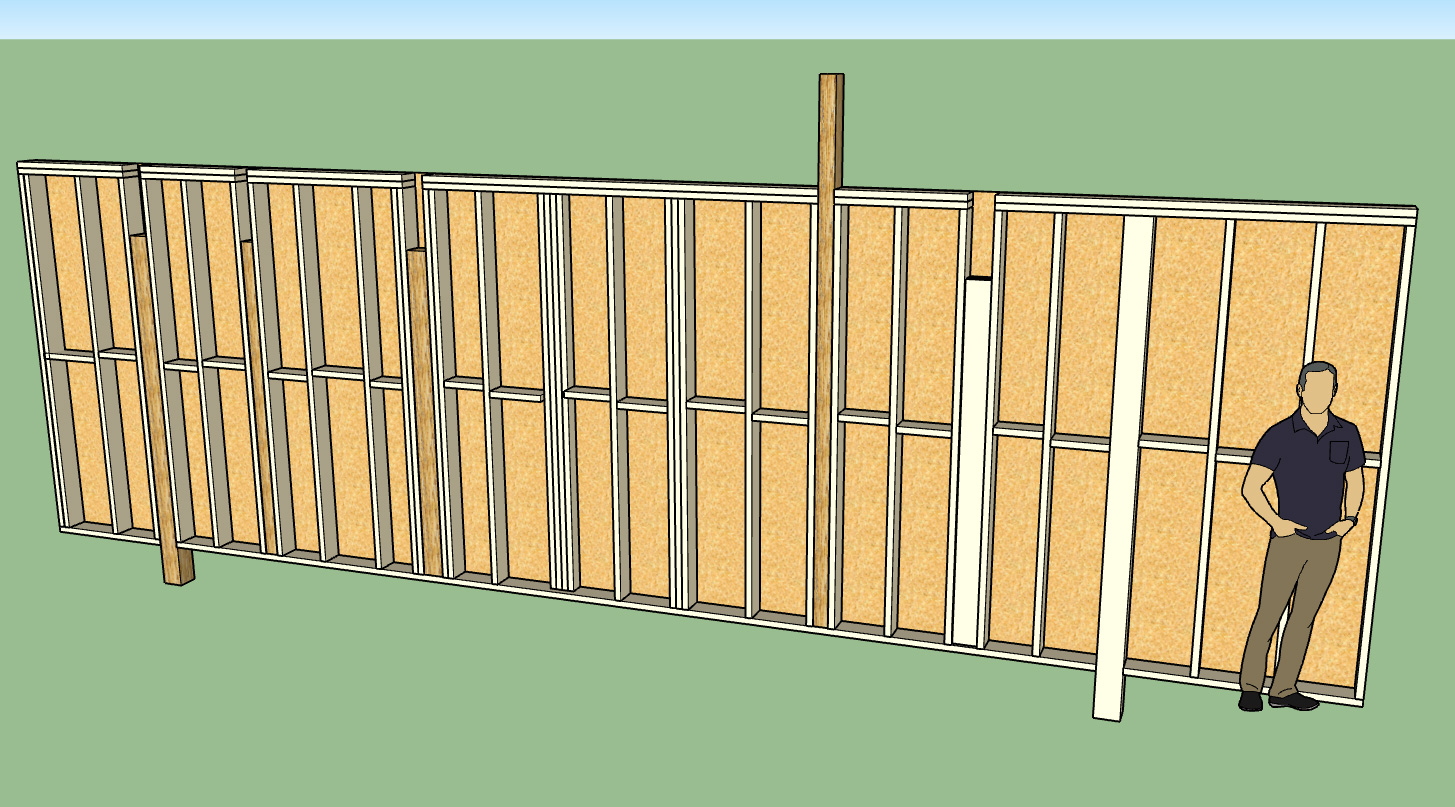
- Added the ability to draw, move and delete wall columns with the Beams/Column Toolset.
- Added a parameter in the global settings (General tab) in order to toggle beam and column annotations independent of window/door annotations.
- Column annotations and representative geometry added to the 2D and 3D (no framing) modes.
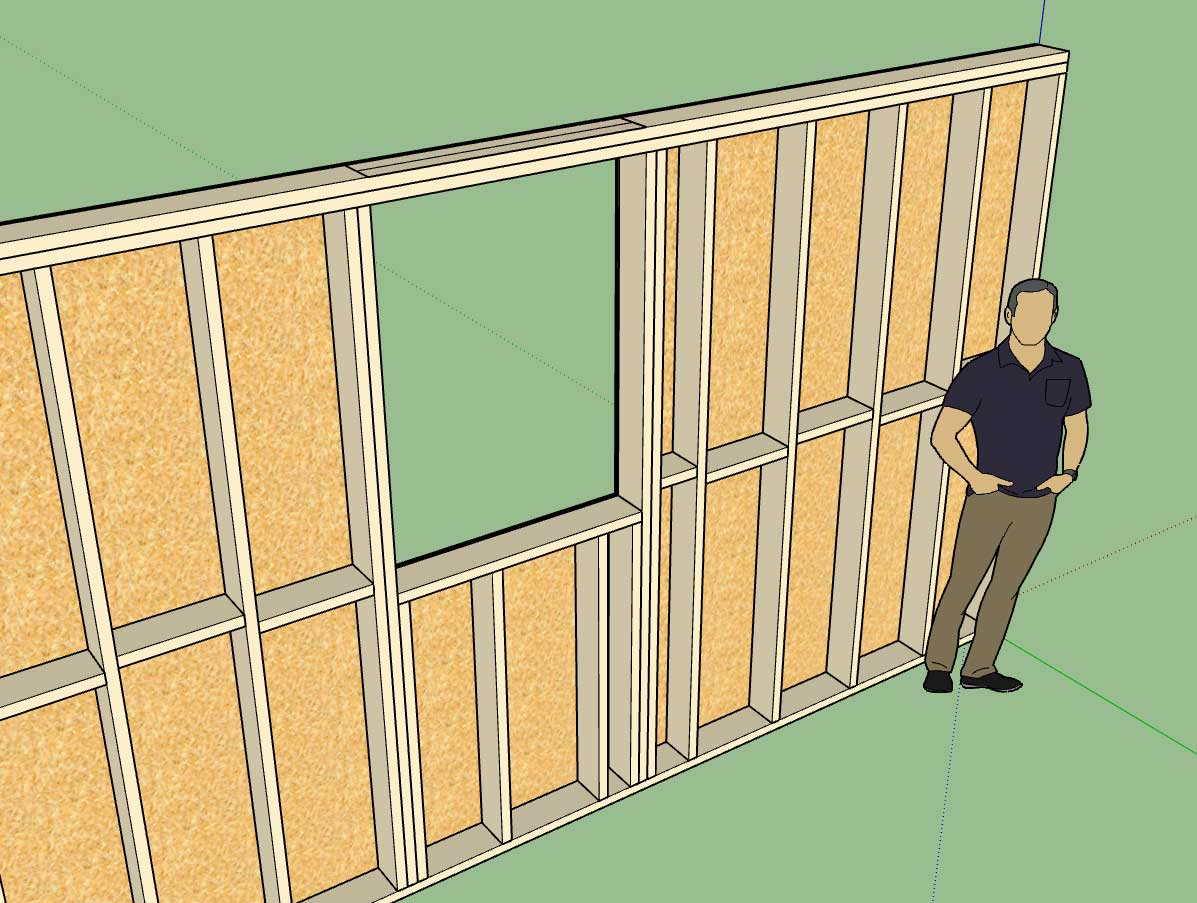
The three images below show the exact same wall (with columns) rendered in the three framing modes:
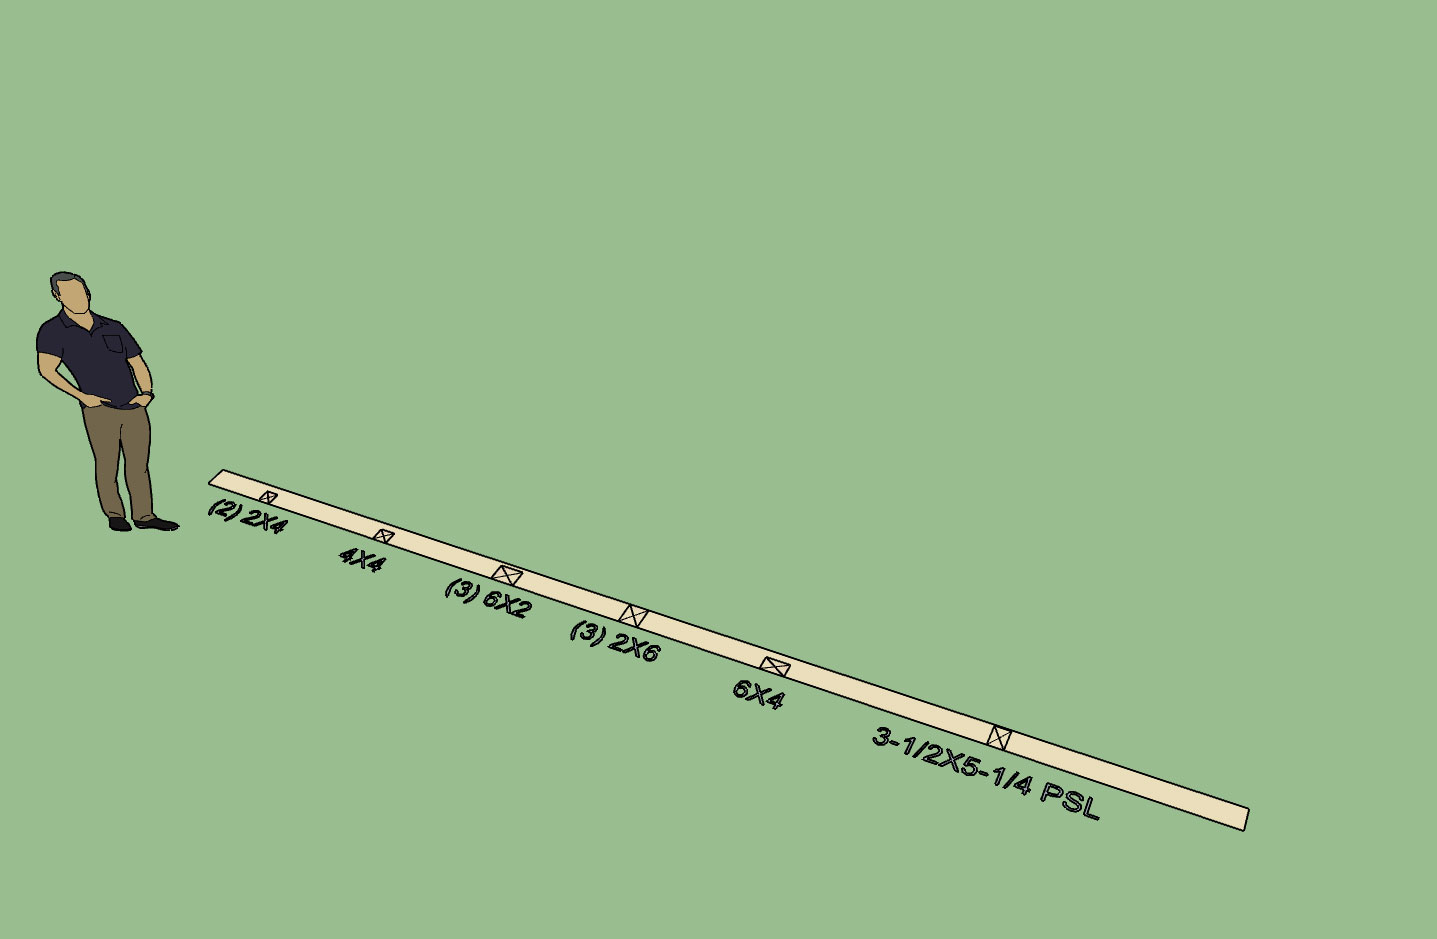
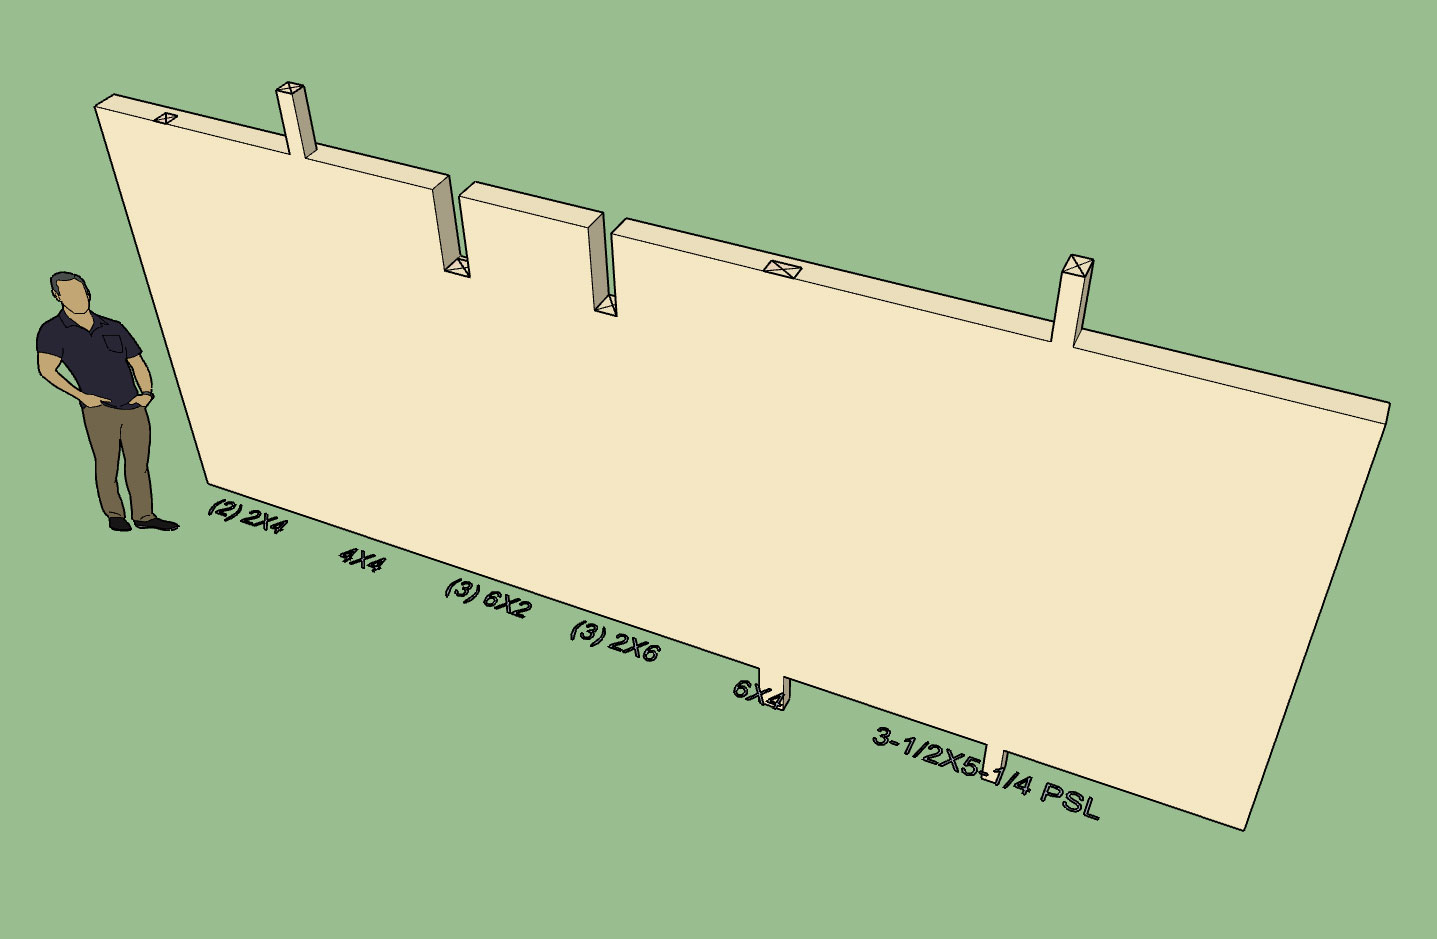
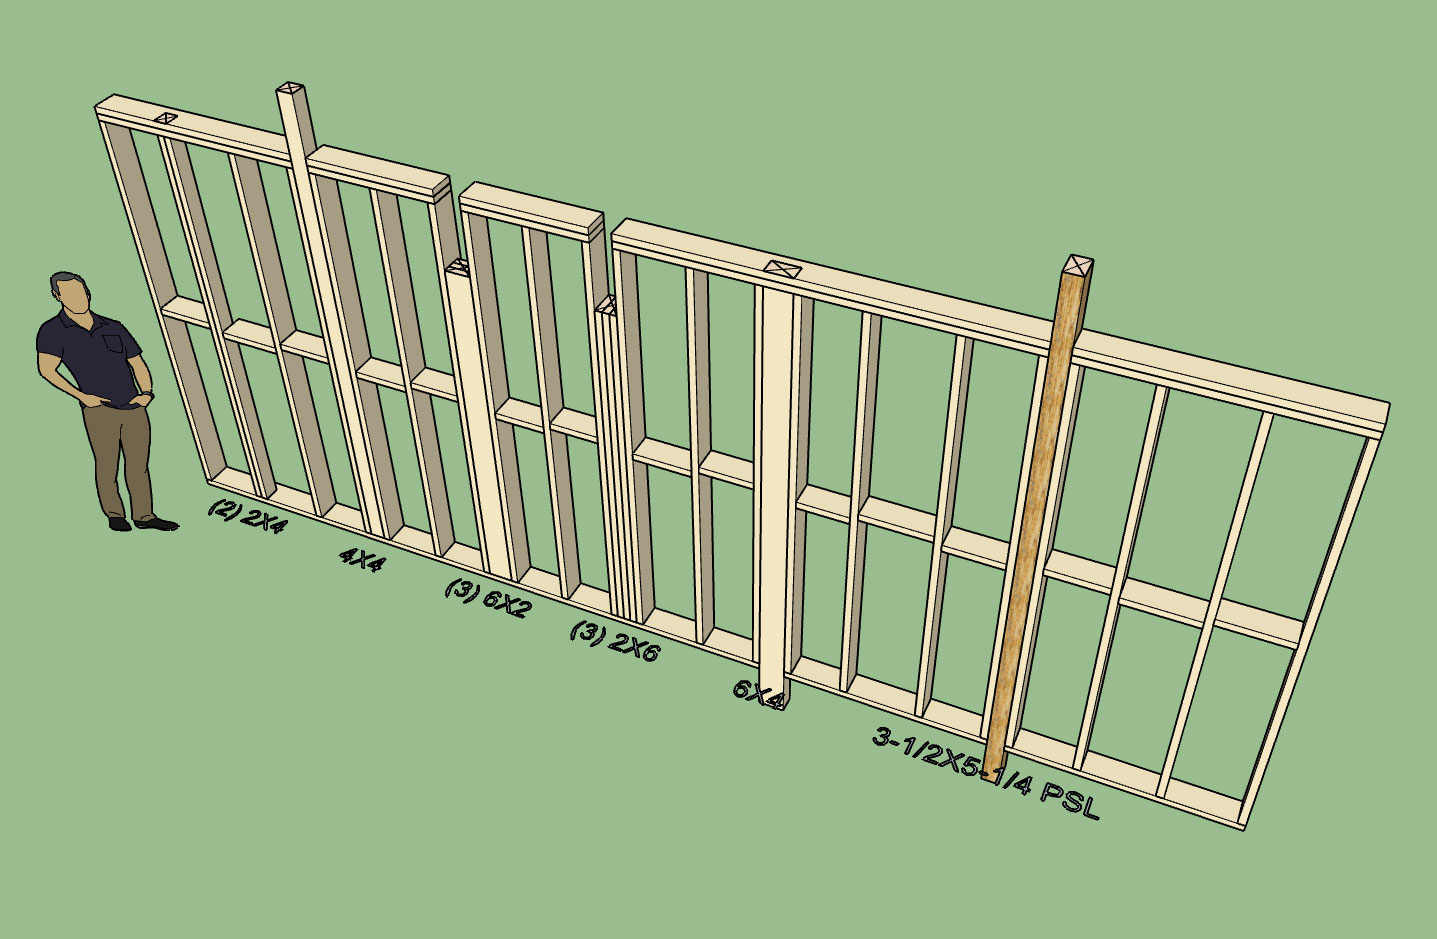
Note that I've turned off additional layers for clarity (ie. insulation, cladding, sheathing, trim, gypsum)
View model here:
https://3dwarehouse.sketchup.com/model/fde777e8-2086-4f6a-96cc-d74d255c959c/Framing-Test-25
- Added the ability to draw, move and delete wall columns with the Beams/Column Toolset.
- Added a parameter in the global settings (General tab) in order to toggle beam and column annotations independent of window/door annotations.
- Column annotations and representative geometry added to the 2D and 3D (no framing) modes.
The three images below show the exact same wall (with columns) rendered in the three framing modes:
Note that I've turned off additional layers for clarity (ie. insulation, cladding, sheathing, trim, gypsum)
View model here:
https://3dwarehouse.sketchup.com/model/fde777e8-2086-4f6a-96cc-d74d255c959c/Framing-Test-25
Version 0.8.0 - 06.21.2018
- Added the ability to draw, move and delete pre-fab shear wall panels with the SSW Toolset.
- Added a parameter in the global settings (General tab) in order to toggle SSW annotations independent of window, door and column annotations.
- SSW annotations and representative geometry added to the 2D and 3D (no framing) modes.
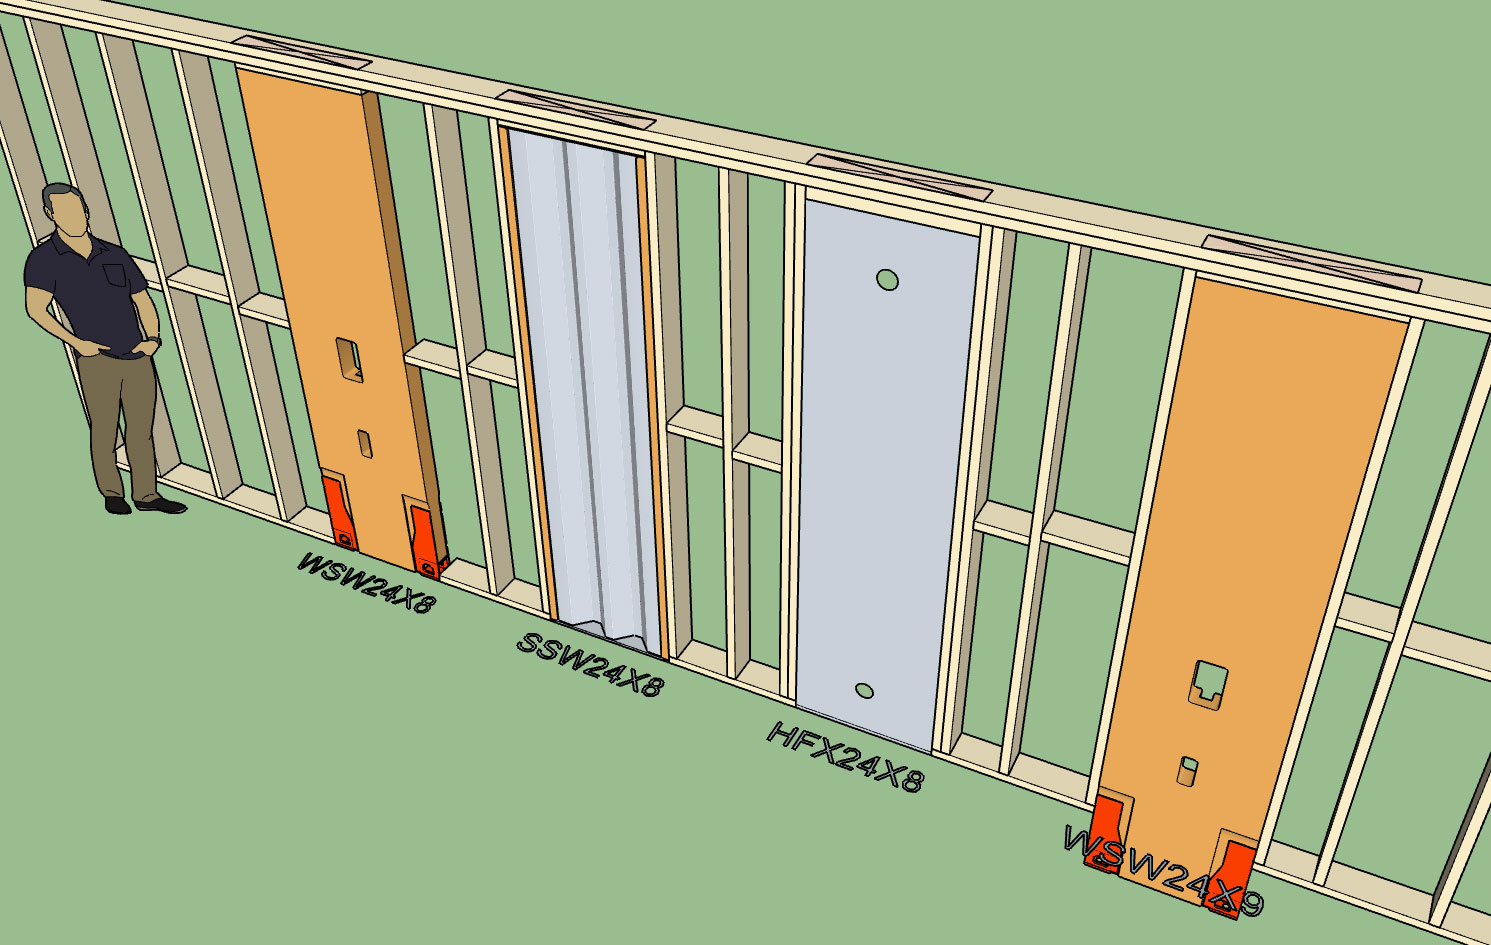
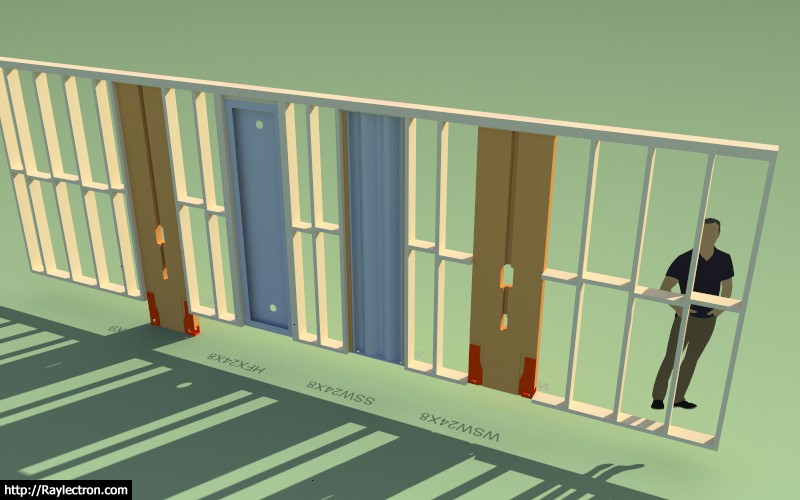
View model here:
https://3dwarehouse.sketchup.com/model/3f025bce-cf39-40f5-b5af-73921cc0d3a1/Framing-Test-26
- Added the ability to draw, move and delete pre-fab shear wall panels with the SSW Toolset.
- Added a parameter in the global settings (General tab) in order to toggle SSW annotations independent of window, door and column annotations.
- SSW annotations and representative geometry added to the 2D and 3D (no framing) modes.
View model here:
https://3dwarehouse.sketchup.com/model/3f025bce-cf39-40f5-b5af-73921cc0d3a1/Framing-Test-26
Version 0.8.0b - 06.21.2018
- Added the ability to toggle between center, left or right positioning (by pressing the CTRL key) while drawing windows, doors, columns or SSWs.
This was a highly requested update and did not require any significant code changes. I strongly suggest everyone upgrade to this latest release to take advantage of the convenience of being able to toggle the position of these elements, a small upgrade but a large functional increase.
- Added the ability to toggle between center, left or right positioning (by pressing the CTRL key) while drawing windows, doors, columns or SSWs.
This was a highly requested update and did not require any significant code changes. I strongly suggest everyone upgrade to this latest release to take advantage of the convenience of being able to toggle the position of these elements, a small upgrade but a large functional increase.
Version 0.8.1 - 06.24.2018
- Enabled exterior wainscoting for Ext-Int walls.
- Added additional parameters to the wainscot menu for window and wall ledges.
- Wainscot "cut" parameter added to the exterior trim menu in order to optionally cut corner trim at the wainscot height.
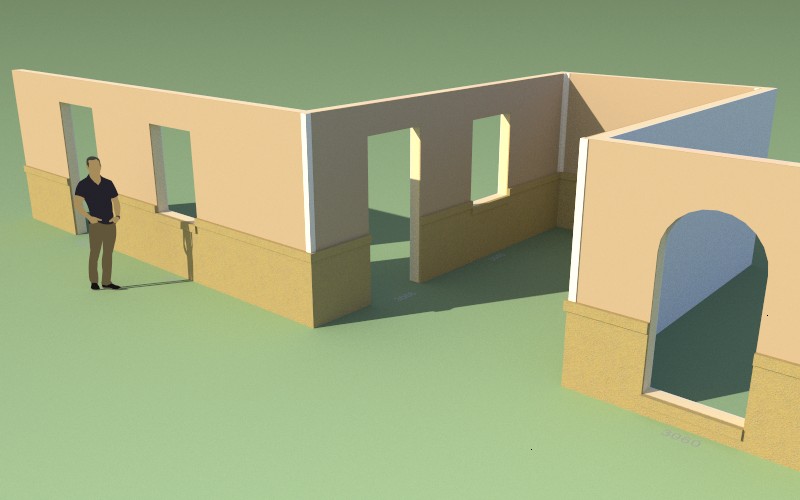
There are still a few more parameters and features that I feel needed to be added to this new feature class. I am also willing to take suggestions on how to make this more useful. Please give it a go and let me know what you think.
The wainscoting has also been added into the wall preset system.
Which brings me to a new idea I just had as I was applying presets to a few walls this morning. The wall preset feature is quite handy but rather tedious to use if one wants to apply a specific preset to a number of walls (granted the wall grouping feature would come in handy here but that is still in development).
What would be really handy is to have a "paintbrush" tool, where one could select any given wall panel and then all of its settings could then be transferred to any other wall panel with a single click of the mouse. Essentially treating the initially selected wall as a "preset" and then applying that preset to any walls selected. This would greatly speed up any changes one might need to make to a bunch of walls. I also think it would useful to have the tool differentiate between exterior and interior wall types. In other words if you initially select an exterior wall (ext-int) to copy those settings could not be applied to an interior wall (int-int).
- Enabled exterior wainscoting for Ext-Int walls.
- Added additional parameters to the wainscot menu for window and wall ledges.
- Wainscot "cut" parameter added to the exterior trim menu in order to optionally cut corner trim at the wainscot height.
There are still a few more parameters and features that I feel needed to be added to this new feature class. I am also willing to take suggestions on how to make this more useful. Please give it a go and let me know what you think.
The wainscoting has also been added into the wall preset system.
Which brings me to a new idea I just had as I was applying presets to a few walls this morning. The wall preset feature is quite handy but rather tedious to use if one wants to apply a specific preset to a number of walls (granted the wall grouping feature would come in handy here but that is still in development).
What would be really handy is to have a "paintbrush" tool, where one could select any given wall panel and then all of its settings could then be transferred to any other wall panel with a single click of the mouse. Essentially treating the initially selected wall as a "preset" and then applying that preset to any walls selected. This would greatly speed up any changes one might need to make to a bunch of walls. I also think it would useful to have the tool differentiate between exterior and interior wall types. In other words if you initially select an exterior wall (ext-int) to copy those settings could not be applied to an interior wall (int-int).
Version 0.8.1b - 06.25.2018
- Added the following double door types: solid, six panel, half glass, full glass.
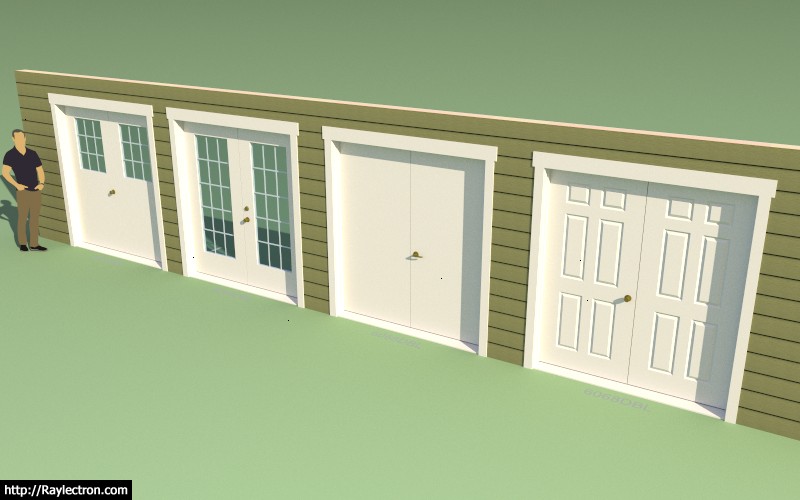
Choosing LH or RH places the door hardware on the indicated side of the double door. I should probably add an additional option "LRH" that places the hardware on both doors.
The image shows all as in-swing doors but they can also be drawn as out-swing as well.
I have not shown an astragal for any of the double doors but if someone would like that option added please indicate and also send me details on how you would like it modeled.
- Added the following double door types: solid, six panel, half glass, full glass.
Choosing LH or RH places the door hardware on the indicated side of the double door. I should probably add an additional option "LRH" that places the hardware on both doors.
The image shows all as in-swing doors but they can also be drawn as out-swing as well.
I have not shown an astragal for any of the double doors but if someone would like that option added please indicate and also send me details on how you would like it modeled.
Since I've got the beam icons already active on the beams/columns toolbar I've decided to try and put together the beam module. The HTML edit menu (draw tool menu is very similar):
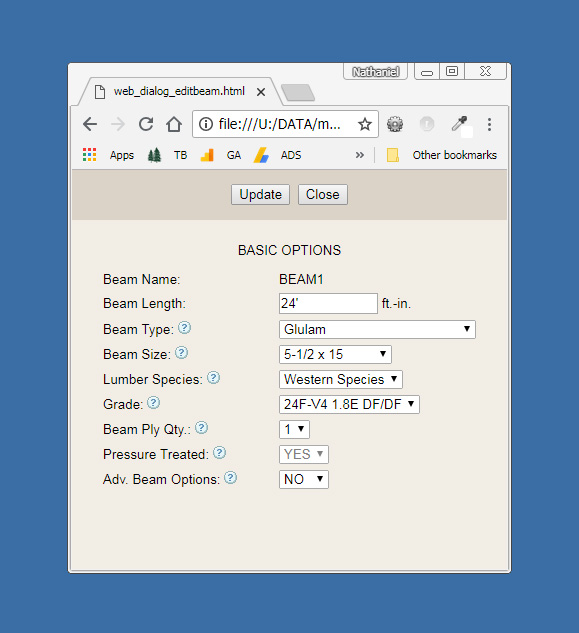
Initially I will start with wood beams only: Sawn Lumber, Timber, Glulam, SCL (LVL, PSL, LSL)
Similar to the truss plugin the beams created within the wall plugin will be able to be analyzed directly with the beam calculator on my website via the engineering tools (engineering icon). This chunk of code is already fairly well tested and is simply a matter of recycling some of it from the Truss Plugin.
Later on I would also like to add steel beams (W, C, L, and HSS) but this will be based on user demand.
I would also like to bring the engineering calcs directly within the plugin so that the user can run the numbers even if they are offline, something for the long term todo list.
Initially I will start with wood beams only: Sawn Lumber, Timber, Glulam, SCL (LVL, PSL, LSL)
Similar to the truss plugin the beams created within the wall plugin will be able to be analyzed directly with the beam calculator on my website via the engineering tools (engineering icon). This chunk of code is already fairly well tested and is simply a matter of recycling some of it from the Truss Plugin.
Later on I would also like to add steel beams (W, C, L, and HSS) but this will be based on user demand.
I would also like to bring the engineering calcs directly within the plugin so that the user can run the numbers even if they are offline, something for the long term todo list.
The currently available beam types are:
- Timber
- LSL
- Lumber
- Glulam
- LVL
- PSL
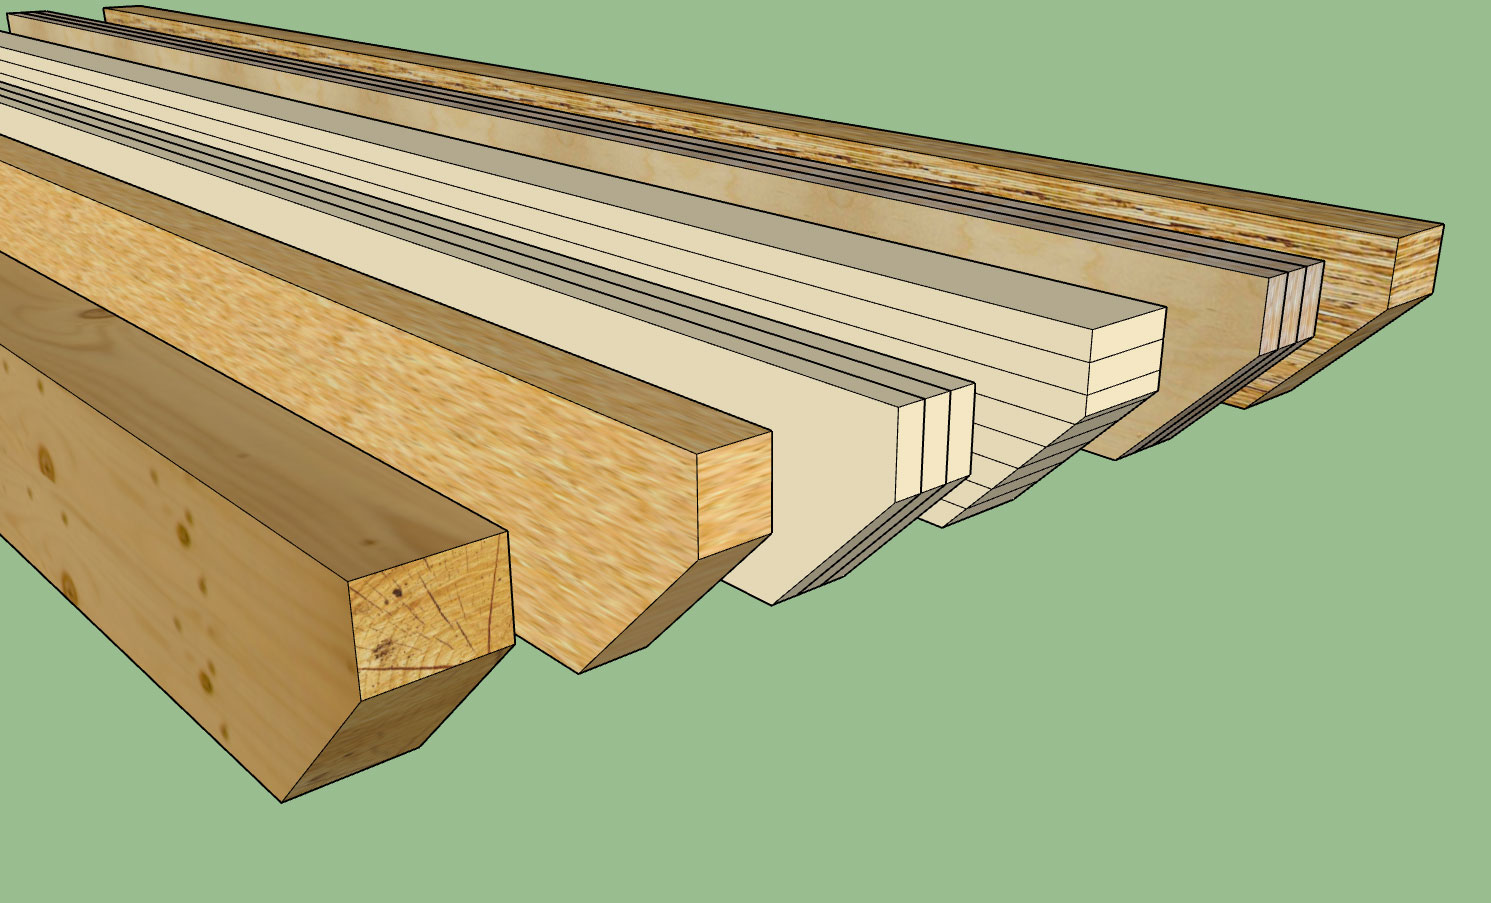
The number of plies can be 1, 2, 3, and 4
Glulam species are currently Western Species and Southern Pine.
SCL lumber (LVL, LSL, PSL) are the US industry standard sizes (Weyerhauser, Boise Cascade, Louisiana- Pacific).
The miter cut puts the diagonal facing the bottom, the fire cut puts the diagonal facing the top.
https://3dwarehouse.sketchup.com/model/fff4b0c1-c0c6-4ab3-865c-67c9836a99f9/Medeek-Beams-1
- Timber
- LSL
- Lumber
- Glulam
- LVL
- PSL
The number of plies can be 1, 2, 3, and 4
Glulam species are currently Western Species and Southern Pine.
SCL lumber (LVL, LSL, PSL) are the US industry standard sizes (Weyerhauser, Boise Cascade, Louisiana- Pacific).
The miter cut puts the diagonal facing the bottom, the fire cut puts the diagonal facing the top.
https://3dwarehouse.sketchup.com/model/fff4b0c1-c0c6-4ab3-865c-67c9836a99f9/Medeek-Beams-1
Version 0.8.2b - 06.29.2018
- Steel: Wide Flange (W) beam types added to the beam module.

I've only added five wide flange sizes thus far. I just need to know what sizes are most typically used and I can add them in.
Note that miter and fire cuts work with the steel beams as well.
I was also thinking an advanced option for steel beams might be a nailer plate on top and/or bottom of the beam, again feedback in this regard will determine if I pursue this further.
- Steel: Wide Flange (W) beam types added to the beam module.
I've only added five wide flange sizes thus far. I just need to know what sizes are most typically used and I can add them in.
Note that miter and fire cuts work with the steel beams as well.
I was also thinking an advanced option for steel beams might be a nailer plate on top and/or bottom of the beam, again feedback in this regard will determine if I pursue this further.
Version 0.8.2c - 06.29.2018
- Added a hanger library (customizable) and the ability to place hangers at the start and/or end of a beam.
Hangers shown are: HU612, LUC26Z and LUS26
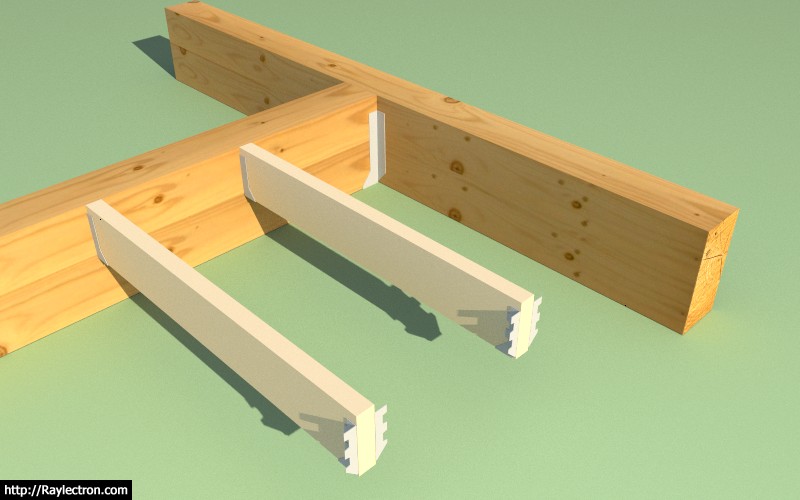
The hanger library is located in the "hangers" sub-folder of the library folder of the plugin.
I have a few Simpson Hangers included but any of these can be modified and additional SKP files can be put into this folder. The plugin will automatically allow the selection of any components found within this sub-folder when selecting hangers for beams within the draw and edit menus.
I have contacted Simpson Strong-Tie in an effort to get a few more of their more common hangers that I can then simplify and include in the plugin. I am particularly interested in the HUCQ series.
In order to minimize polygon count I typically eliminate most of the holes in the hangers and also any curved surfaces, the goal is to keep the file size below 50 kb if possible.
- Added a hanger library (customizable) and the ability to place hangers at the start and/or end of a beam.
Hangers shown are: HU612, LUC26Z and LUS26
The hanger library is located in the "hangers" sub-folder of the library folder of the plugin.
I have a few Simpson Hangers included but any of these can be modified and additional SKP files can be put into this folder. The plugin will automatically allow the selection of any components found within this sub-folder when selecting hangers for beams within the draw and edit menus.
I have contacted Simpson Strong-Tie in an effort to get a few more of their more common hangers that I can then simplify and include in the plugin. I am particularly interested in the HUCQ series.
In order to minimize polygon count I typically eliminate most of the holes in the hangers and also any curved surfaces, the goal is to keep the file size below 50 kb if possible.
The ability to easily add in components into the library is kind of nice. After about an hour of work I added in the following Simpson column caps just to give it a go:
- CCCQ6666
- CCOQ6
- CCQ66
- CCTQ666
- ECCLLQ666
- ECCLRQ666
- ECCQ66
It was as simple as dropping the files into the folder, no coding required.
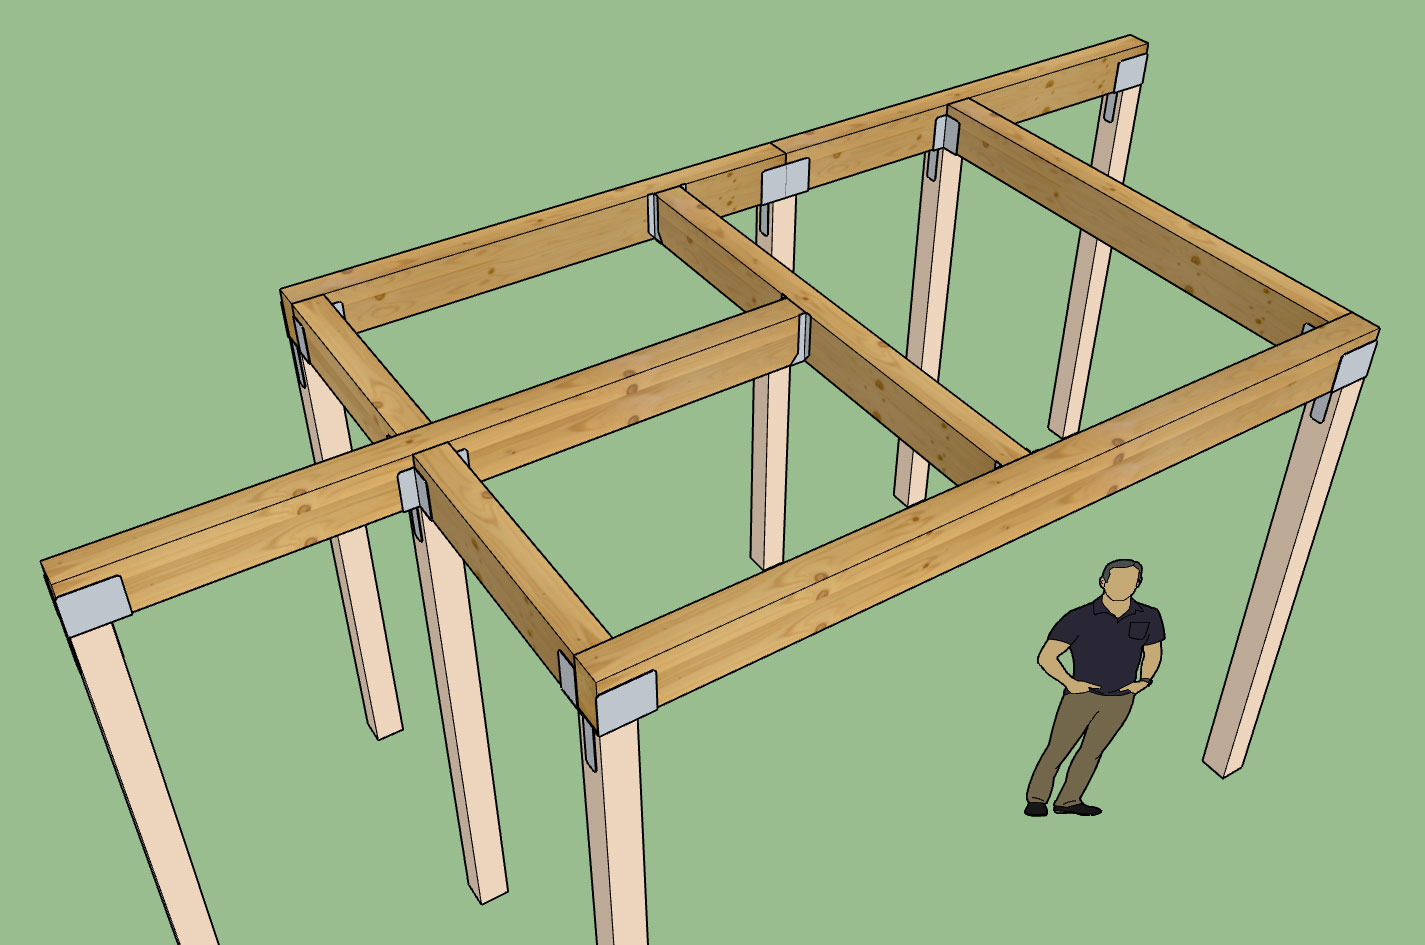
The parametric ability to change the "hanger" at each end is vital when setting something up like this. Not saying you would actually build this but I've worked on some local designs with complex porches that easily rival this monstrosity.
I will roll these components into the hanger library on the next sub. revision, probably tomorrow.
P.S. I will also include the following caps and hangers:
- CCOQ4, ECCOQ4
- CCQ44, CCQ46, CCQ64, CCQ88
- ECCQ44, ECCQ46, ECCQ64, ECCQ88
- HUCQ410, HUCQ412, HUCQ610, HUCQ612
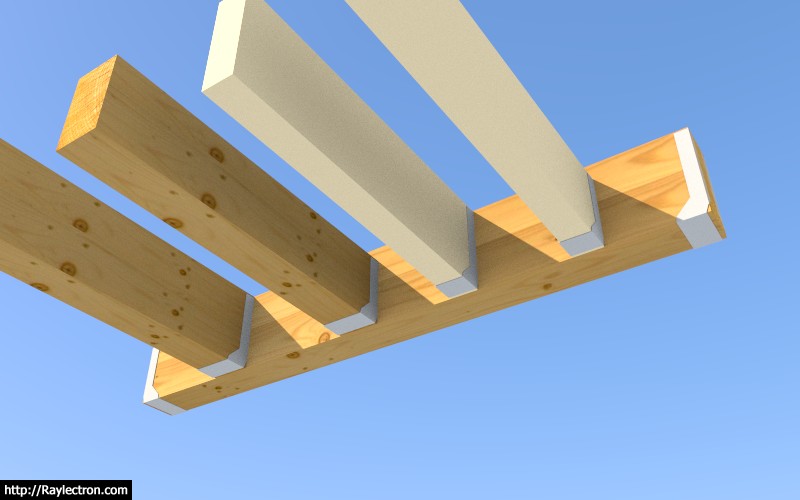
- CCCQ6666
- CCOQ6
- CCQ66
- CCTQ666
- ECCLLQ666
- ECCLRQ666
- ECCQ66
It was as simple as dropping the files into the folder, no coding required.
The parametric ability to change the "hanger" at each end is vital when setting something up like this. Not saying you would actually build this but I've worked on some local designs with complex porches that easily rival this monstrosity.
I will roll these components into the hanger library on the next sub. revision, probably tomorrow.
P.S. I will also include the following caps and hangers:
- CCOQ4, ECCOQ4
- CCQ44, CCQ46, CCQ64, CCQ88
- ECCQ44, ECCQ46, ECCQ64, ECCQ88
- HUCQ410, HUCQ412, HUCQ610, HUCQ612
Version 0.8.2d - 06.30.2018
- Created a number of low polygon count Simpson Strong-Tie hanger and column caps.
The full list of included hangers and column caps can be found here:
http://design.medeek.com/resources/wallpluginvendors.html
Any hardware included with the plugin are custom drawn by me to reduce polygon count and standardize layers and materials.
If you would like to see specific hardware added please email me the manufacturer, part numbers and reference material. For Simpson hardware I typically refer to their literature and their various DWGs files found on their website.
- Created a number of low polygon count Simpson Strong-Tie hanger and column caps.
The full list of included hangers and column caps can be found here:
http://design.medeek.com/resources/wallpluginvendors.html
Any hardware included with the plugin are custom drawn by me to reduce polygon count and standardize layers and materials.
If you would like to see specific hardware added please email me the manufacturer, part numbers and reference material. For Simpson hardware I typically refer to their literature and their various DWGs files found on their website.
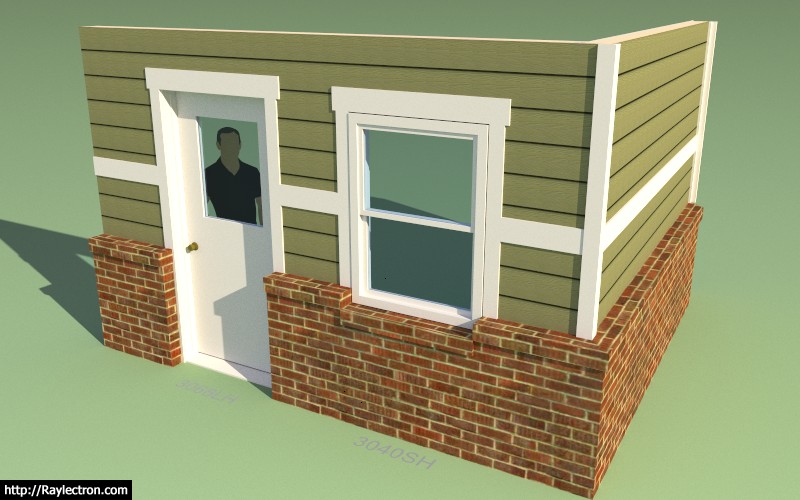
Frieze, Band and Skirt boards:
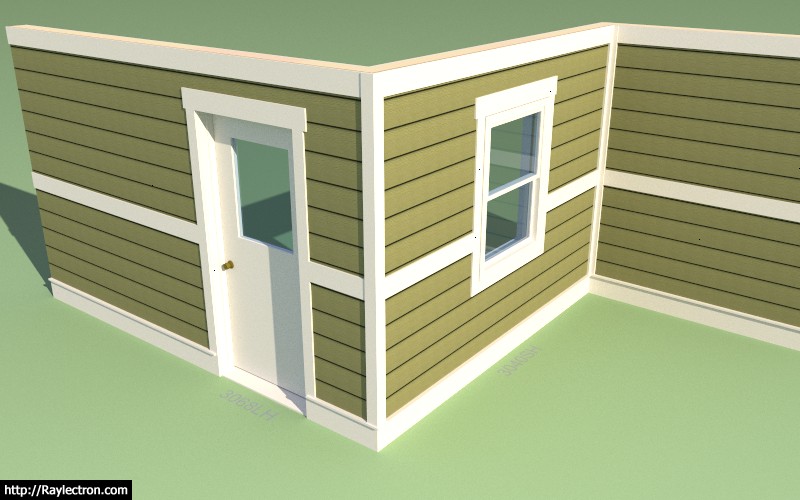
In this instance the skirt board is thru the corner, also notice the drip cap has been enabled for the skirt board.
All three of these horizontal trim elements can also be combined with the ext. wainscoting.
There is still some fine tuning I need to do with regards to how these horizontal elements terminate at window and door openings when trim is wrapping these elements, I will be looking at this tomorrow.
In this instance the skirt board is thru the corner, also notice the drip cap has been enabled for the skirt board.
All three of these horizontal trim elements can also be combined with the ext. wainscoting.
There is still some fine tuning I need to do with regards to how these horizontal elements terminate at window and door openings when trim is wrapping these elements, I will be looking at this tomorrow.
I will need to give the window module some more thought, it is very limited at the moment, only some very basic window types. Also the ability to customize the callout would be useful I think.
Testing the wall presets with the new trim features. The example below shows the water table terminated at the corners, compare to the previous example.
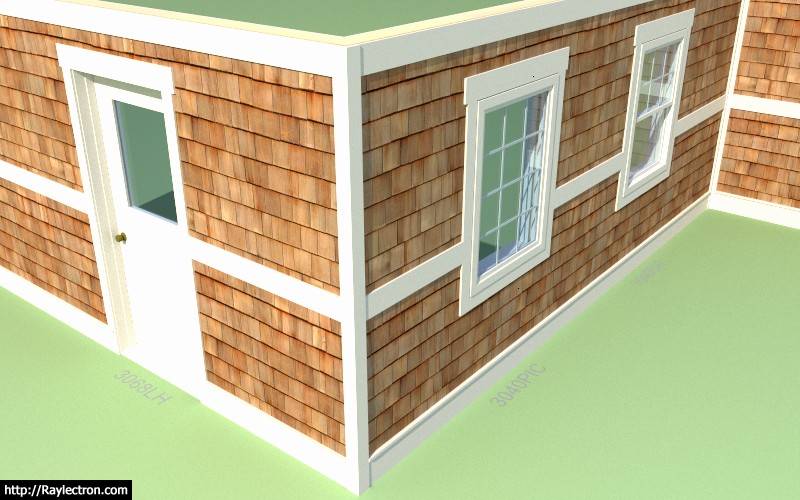
Testing the wall presets with the new trim features. The example below shows the water table terminated at the corners, compare to the previous example.
Version 0.8.4 - 07.05.2018
- Added frieze and skirt board options to the exterior trim module.
- Added an optional drip cap to the skirt board (dimensions can be set in the global settings).
- Similar to the band board the skirt and frieze can cut through the corner trim.
- Each wall panel now has a name assigned to it, which can be edited in the wall edit menu.
- LVL beam depths now include 22" and 24" beam sizes. LVL edge texture has been updated.
- Added frieze and skirt board options to the exterior trim module.
- Added an optional drip cap to the skirt board (dimensions can be set in the global settings).
- Similar to the band board the skirt and frieze can cut through the corner trim.
- Each wall panel now has a name assigned to it, which can be edited in the wall edit menu.
- LVL beam depths now include 22" and 24" beam sizes. LVL edge texture has been updated.
The horizontal trim elements (frieze, band, skirt) are now interacting with the exterior window and door trim as one would expect:
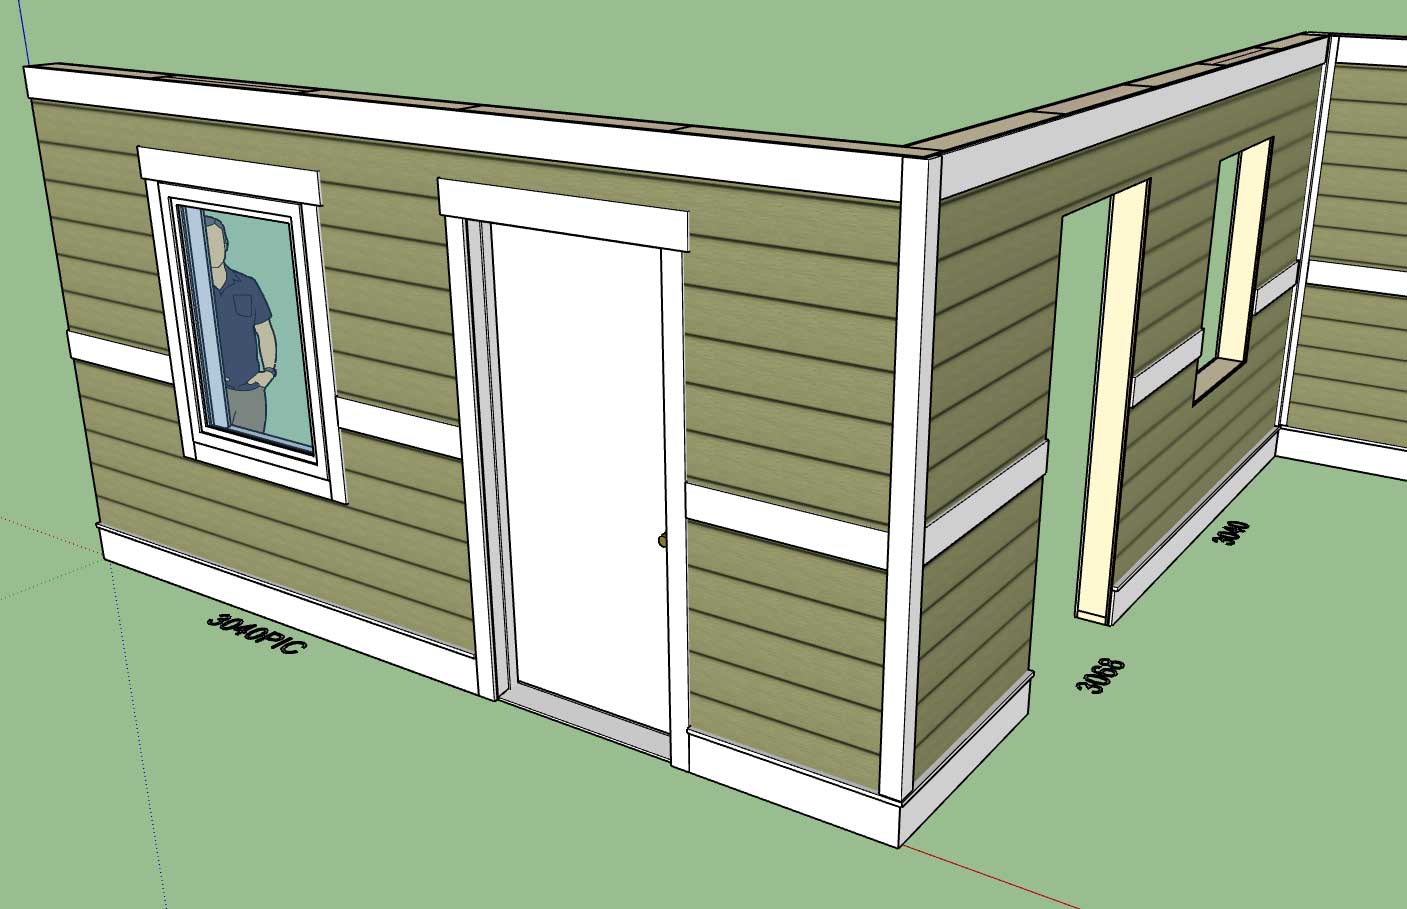
When no trim is installed (wall to the right) the band board is cut at the opening(s) flush with the sheathing and cladding. When trim is installed the band board and skirt terminate at the edge of the window/door trim.
Little details really, but the devil is in the details.
Reminds me of the days working construction for a general contractor in Utah some 20 years ago. I was installing faux log siding on a high end residence and if our pieces butted up with a gap anymore than 1/32" he would make us pull it off and redo it (especially on the front of the house).
When no trim is installed (wall to the right) the band board is cut at the opening(s) flush with the sheathing and cladding. When trim is installed the band board and skirt terminate at the edge of the window/door trim.
Little details really, but the devil is in the details.
Reminds me of the days working construction for a general contractor in Utah some 20 years ago. I was installing faux log siding on a high end residence and if our pieces butted up with a gap anymore than 1/32" he would make us pull it off and redo it (especially on the front of the house).
Today was one of those days where I got seriously pulled sideways, so rather than jump back into the larger important items I put out a few small fires and some low hanging fruit, kind of needed a break anyways after working straight through the 4th.
Flat two and four panel doors, single and double options:
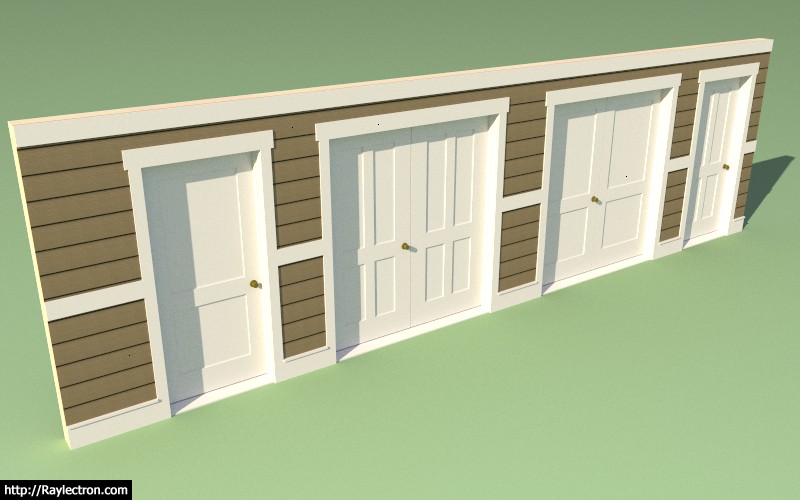
A slightly more contemporary look versus the more traditional six panel doors.
Flat two and four panel doors, single and double options:
A slightly more contemporary look versus the more traditional six panel doors.
Just for curiosity sake I gave crown molding some more thought this morning and it quickly became apparent to me that interior trim is far more complicated than I originally thought.
The problem arises when you have a long ext. or int. wall that is adjacent to multiple rooms, where multiple walls tee into this wall. Some of these rooms may have crown molding and some may not.
To make this completely parametric would require some very serious logic.
Another option would be to decouple the crown molding from the wall panels and just make a separate tool for this function.
Option C would be just to leave this venue to other plugins like Profile Builder. The problem with this option is that with baseboard and chair rail the door and window openings would have to be manually removed.
For now I don't have an optimal solution for interior trim, I will need to give this some more thought.
The problem arises when you have a long ext. or int. wall that is adjacent to multiple rooms, where multiple walls tee into this wall. Some of these rooms may have crown molding and some may not.
To make this completely parametric would require some very serious logic.
Another option would be to decouple the crown molding from the wall panels and just make a separate tool for this function.
Option C would be just to leave this venue to other plugins like Profile Builder. The problem with this option is that with baseboard and chair rail the door and window openings would have to be manually removed.
For now I don't have an optimal solution for interior trim, I will need to give this some more thought.
To better reflect the distinction between a plugin and extension I will be re-branding the plugin and renaming it to just "Medeek Wall".
From here on out I will also be referring to it as an extension.
The entire collection of plugins will be re-branded as:
Medeek Architect - A SketchUp Extension Library
From here on out I will also be referring to it as an extension.
The entire collection of plugins will be re-branded as:
Medeek Architect - A SketchUp Extension Library
Version 0.8.5 - 07.11.2018
- Added the Prairie Grille for picture windows.
- Added "Casement" and "Fixed" to the window installation types, these currently are modeled identical to the picture window type.
- Added a "No Header" option for windows.
- Updated the licensing system to include a 30 day limit of the trial version.
- Added Simpson Strong-Tie APL4 Beam-to-Column Tie to the beam hanger library.
- Name of plugin changed to "Medeek Wall".
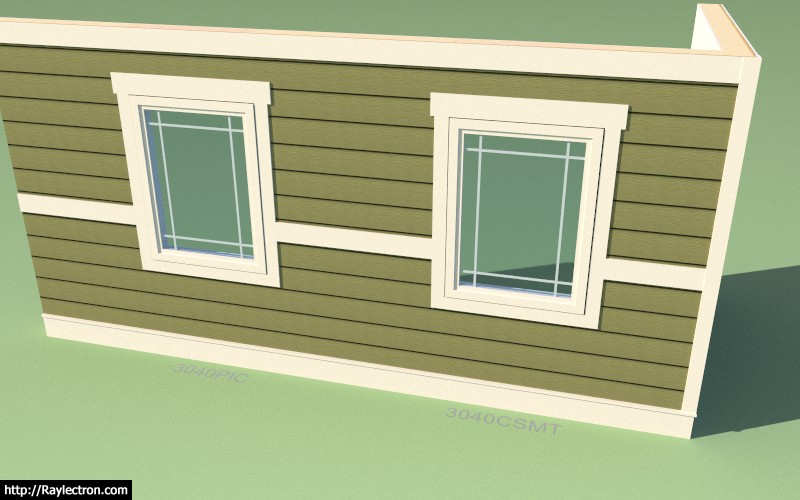
- Added the Prairie Grille for picture windows.
- Added "Casement" and "Fixed" to the window installation types, these currently are modeled identical to the picture window type.
- Added a "No Header" option for windows.
- Updated the licensing system to include a 30 day limit of the trial version.
- Added Simpson Strong-Tie APL4 Beam-to-Column Tie to the beam hanger library.
- Name of plugin changed to "Medeek Wall".
Beyond the trim and grilles the only exterior window treatment I am missing is shutters:
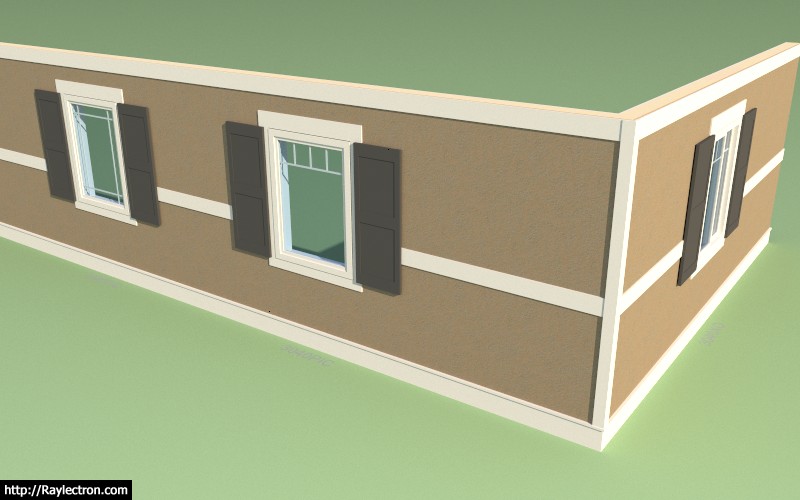
I will need to add in another set of parameters for shutters and associated menus.
The parameters will be:
Shutter Geometry: Single or Double
Shutter Style: Louver, Raised Panel, Flat Panel, Board & Batten
Shutter Material
Shutter Thickness
By default they will be half the width of the window opening and their height will be the same as the window opening. The shutter(s) will be offset 2" from the edge of the window to simulate the space taken up by hinges. I will not be showing hinges or any other hardware so as to keep the poly count reasonable.
I will need to add in another set of parameters for shutters and associated menus.
The parameters will be:
Shutter Geometry: Single or Double
Shutter Style: Louver, Raised Panel, Flat Panel, Board & Batten
Shutter Material
Shutter Thickness
By default they will be half the width of the window opening and their height will be the same as the window opening. The shutter(s) will be offset 2" from the edge of the window to simulate the space taken up by hinges. I will not be showing hinges or any other hardware so as to keep the poly count reasonable.
Version 0.8.6 - 07.14.2018
- Added shutters: Solid, Flat Panel, Raised Panel, Louver to rectangular windows.
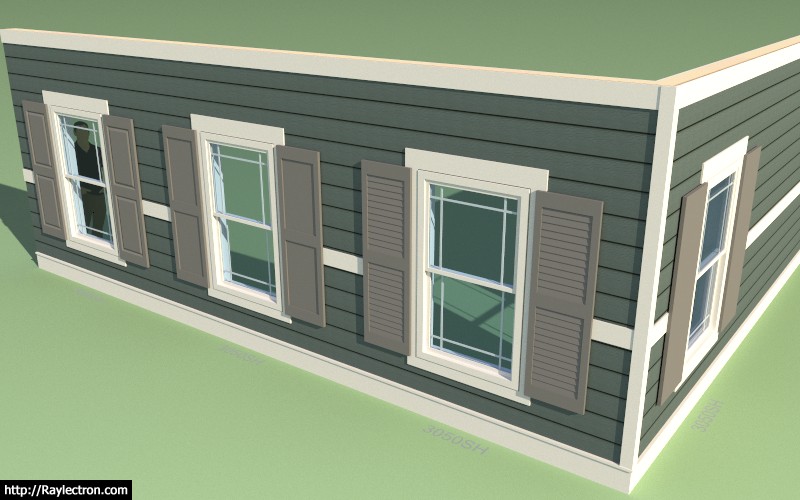
View model here:
https://3dwarehouse.sketchup.com/model/65abb50e-d8ab-4312-8d09-ed89afbccef0/Window-Test-3
Available shutter styles are:
- Solid
- Raised Panel
- Flat Panel
- Louver
I have not yet enabled shutters for arched windows, that will be next.
I also need to add in a board & batten shutter which is also quite popular.
Also note that you can position the shutters on either side of the window (left or right, single shutter) or the more common double shutter configuration as shown.
- Added shutters: Solid, Flat Panel, Raised Panel, Louver to rectangular windows.
View model here:
https://3dwarehouse.sketchup.com/model/65abb50e-d8ab-4312-8d09-ed89afbccef0/Window-Test-3
Available shutter styles are:
- Solid
- Raised Panel
- Flat Panel
- Louver
I have not yet enabled shutters for arched windows, that will be next.
I also need to add in a board & batten shutter which is also quite popular.
Also note that you can position the shutters on either side of the window (left or right, single shutter) or the more common double shutter configuration as shown.
Raised Panel Arched Shutter:
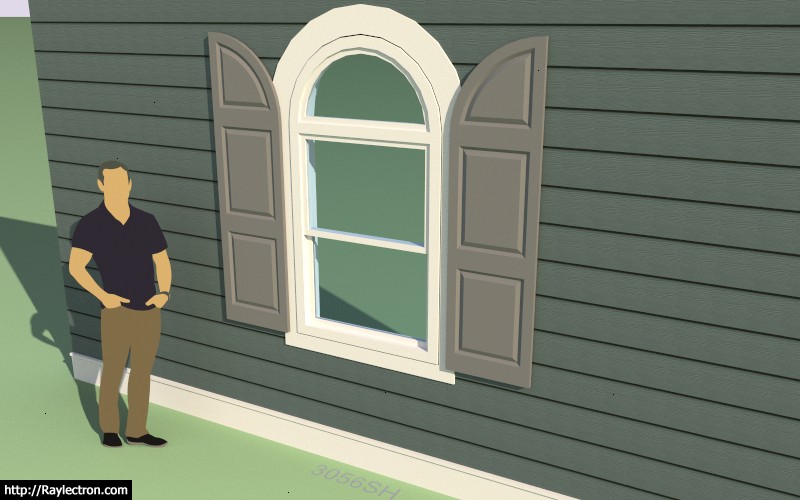
I now have all the shutter types working for arched windows:
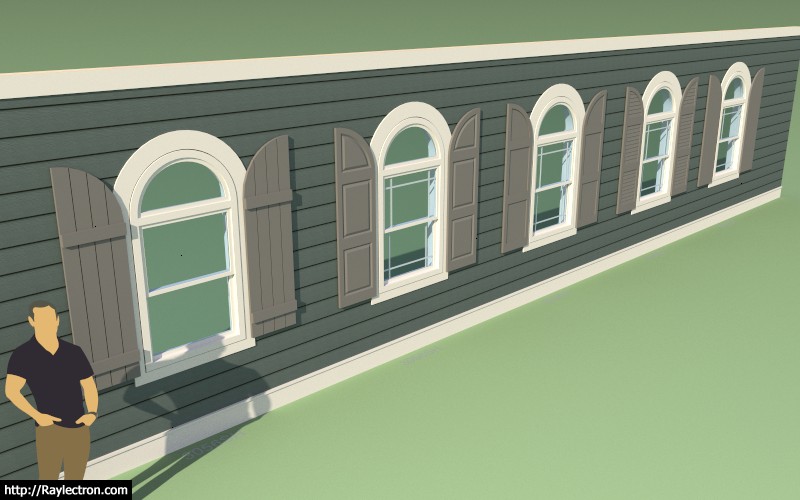
View model here:
https://3dwarehouse.sketchup.com/model/325dad97-0a74-48b7-b1c6-d335be371261/Window-Test-4
I now have all the shutter types working for arched windows:
View model here:
https://3dwarehouse.sketchup.com/model/325dad97-0a74-48b7-b1c6-d335be371261/Window-Test-4
Version 0.8.6b - 07.16.2018
- Added shutters: Solid, Flat Panel, Raised Panel, Louver, Board & Batten to arched windows.
- Shutter geometry parameter allows for: Left, Right or Double.
- Fixed bug in arched window module that was causing unpredictable push-pull behavior.
- Added shutters: Solid, Flat Panel, Raised Panel, Louver, Board & Batten to arched windows.
- Shutter geometry parameter allows for: Left, Right or Double.
- Fixed bug in arched window module that was causing unpredictable push-pull behavior.
Version 0.8.7 - 07.18.2018
- Added oval and round windows to the window draw and edit modules.
- Enabled trim, casing and window installation for oval and round windows.
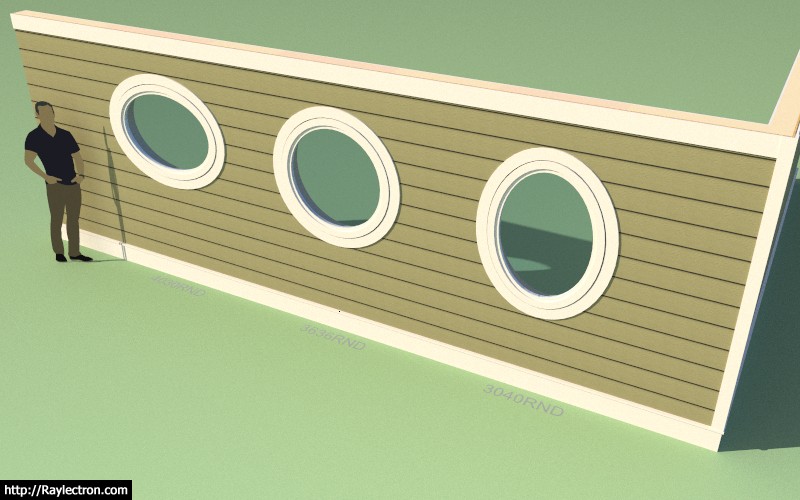
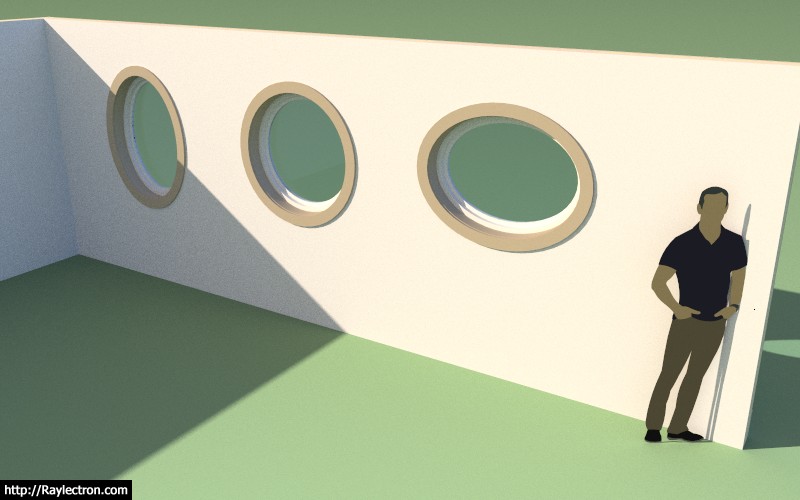
I haven't enabled shutters or grilles yet for this window type, it is not high on my todo list unless I receive additional requests for these features.
The trim and casing options are also pretty much plain jane for now.
Let's see if I can't knock out the Garage Door module this evening.
I also thought it might be helpful to reiterate that if you are an educator (teacher, professor, school) or a student I am offering full licenses of all my plugins for educational use. All that I ask is you provide some form of student ID or other proof that you are associated with an educational institution. The educational licenses provided to educators also allow installation on up to 50 seats.
- Added oval and round windows to the window draw and edit modules.
- Enabled trim, casing and window installation for oval and round windows.
I haven't enabled shutters or grilles yet for this window type, it is not high on my todo list unless I receive additional requests for these features.
The trim and casing options are also pretty much plain jane for now.
Let's see if I can't knock out the Garage Door module this evening.
I also thought it might be helpful to reiterate that if you are an educator (teacher, professor, school) or a student I am offering full licenses of all my plugins for educational use. All that I ask is you provide some form of student ID or other proof that you are associated with an educational institution. The educational licenses provided to educators also allow installation on up to 50 seats.
Version 0.8.7b - 07.19.2018
- Added a 5-Lite Circular Grille for all window types.
- Enabled all standard grille types for oval and round windows.
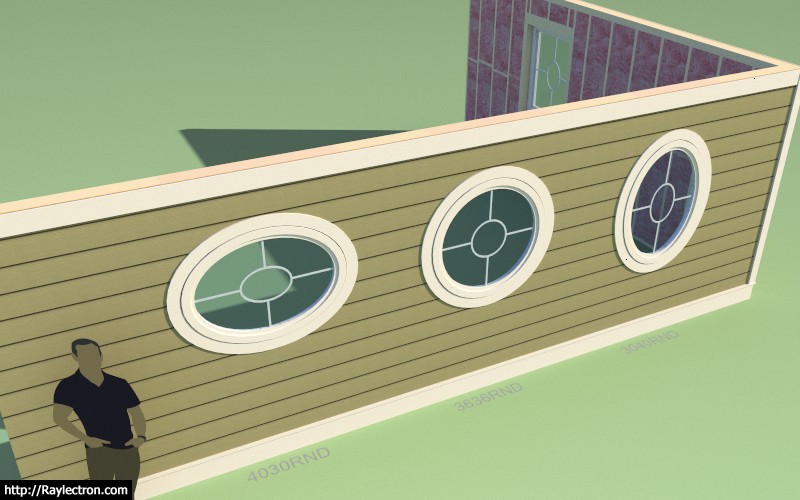
View model here:
https://3dwarehouse.sketchup.com/model/34b3256b-040c-4cb9-a662-d8b2491d077a/Window-Test-6
This grille pattern was added per customer request, also note that it can be applied to any of the other rectangular window types (picture, single hung, slider).
Lately I've been having so many smaller feature requests that it has been hard to focus on some of the big ticket items. I am doing my best not to be side tracked by these minor items and to just add them to the todo list so I can attend to them at a later date.
The todo list is now over three pages long, so rather than shrink it has continued to grow. Honestly the amount of items I'm currently looking at is really the work of an entire team of programmers, not just a single person. So if my progress seems rather slow at times then it probably is.
I've been trying to get some of my kids (teenagers) interested in helping out with some of the coding over their summer break but they seemed to be more inclined to spend their time playing computer/console games. I call them the Angry Birds or Pokemon Go generation. All of this technology is great but unless it is harnessed correctly it seems more detrimental than good.
- Added a 5-Lite Circular Grille for all window types.
- Enabled all standard grille types for oval and round windows.
View model here:
https://3dwarehouse.sketchup.com/model/34b3256b-040c-4cb9-a662-d8b2491d077a/Window-Test-6
This grille pattern was added per customer request, also note that it can be applied to any of the other rectangular window types (picture, single hung, slider).
Lately I've been having so many smaller feature requests that it has been hard to focus on some of the big ticket items. I am doing my best not to be side tracked by these minor items and to just add them to the todo list so I can attend to them at a later date.
The todo list is now over three pages long, so rather than shrink it has continued to grow. Honestly the amount of items I'm currently looking at is really the work of an entire team of programmers, not just a single person. So if my progress seems rather slow at times then it probably is.
I've been trying to get some of my kids (teenagers) interested in helping out with some of the coding over their summer break but they seemed to be more inclined to spend their time playing computer/console games. I call them the Angry Birds or Pokemon Go generation. All of this technology is great but unless it is harnessed correctly it seems more detrimental than good.
I've introduced a start and end parameter for the wainscoting which allows for partial wainscoting on exterior walls:
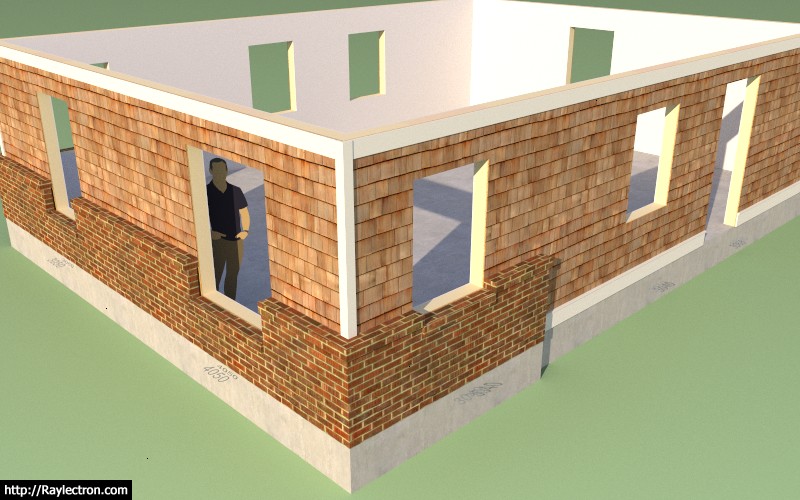
View model here:
https://3dwarehouse.sketchup.com/model/2bbae1f7-ca62-4cf0-b02a-7e1496a6bf22/Wainscot-Test-1
This feature has been requested a number of times in that last month so it managed to float to the top.
View model here:
https://3dwarehouse.sketchup.com/model/2bbae1f7-ca62-4cf0-b02a-7e1496a6bf22/Wainscot-Test-1
This feature has been requested a number of times in that last month so it managed to float to the top.
Version 0.8.8 - 07.24.2018
- Added an additional "mode" parameter for exterior wainscoting, which allows for multiple configurations of partial wainscoting.
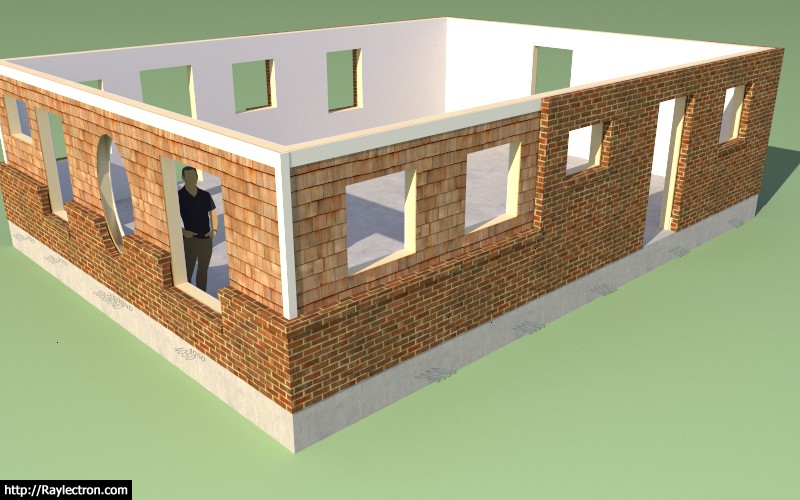
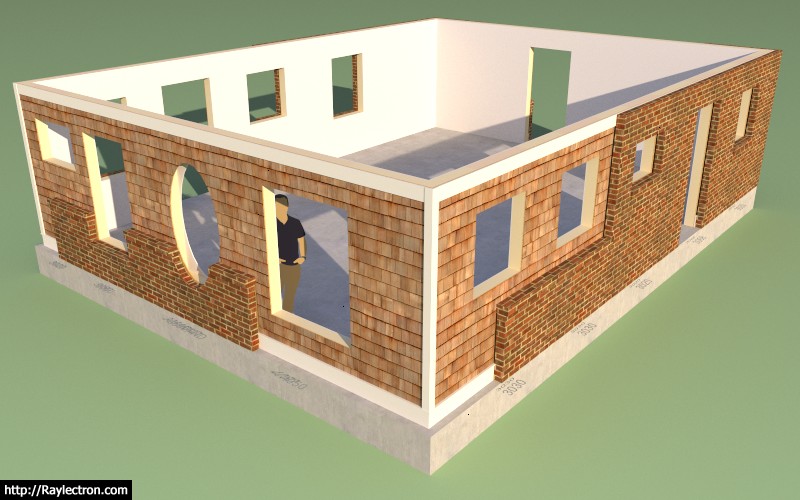
There are now four modes however there are other modes possible but I think I have spent enough time on this for now until further requests propel this to the top of the list again.
- Added an additional "mode" parameter for exterior wainscoting, which allows for multiple configurations of partial wainscoting.
There are now four modes however there are other modes possible but I think I have spent enough time on this for now until further requests propel this to the top of the list again.
Version 0.8.9 - 07.25.2018
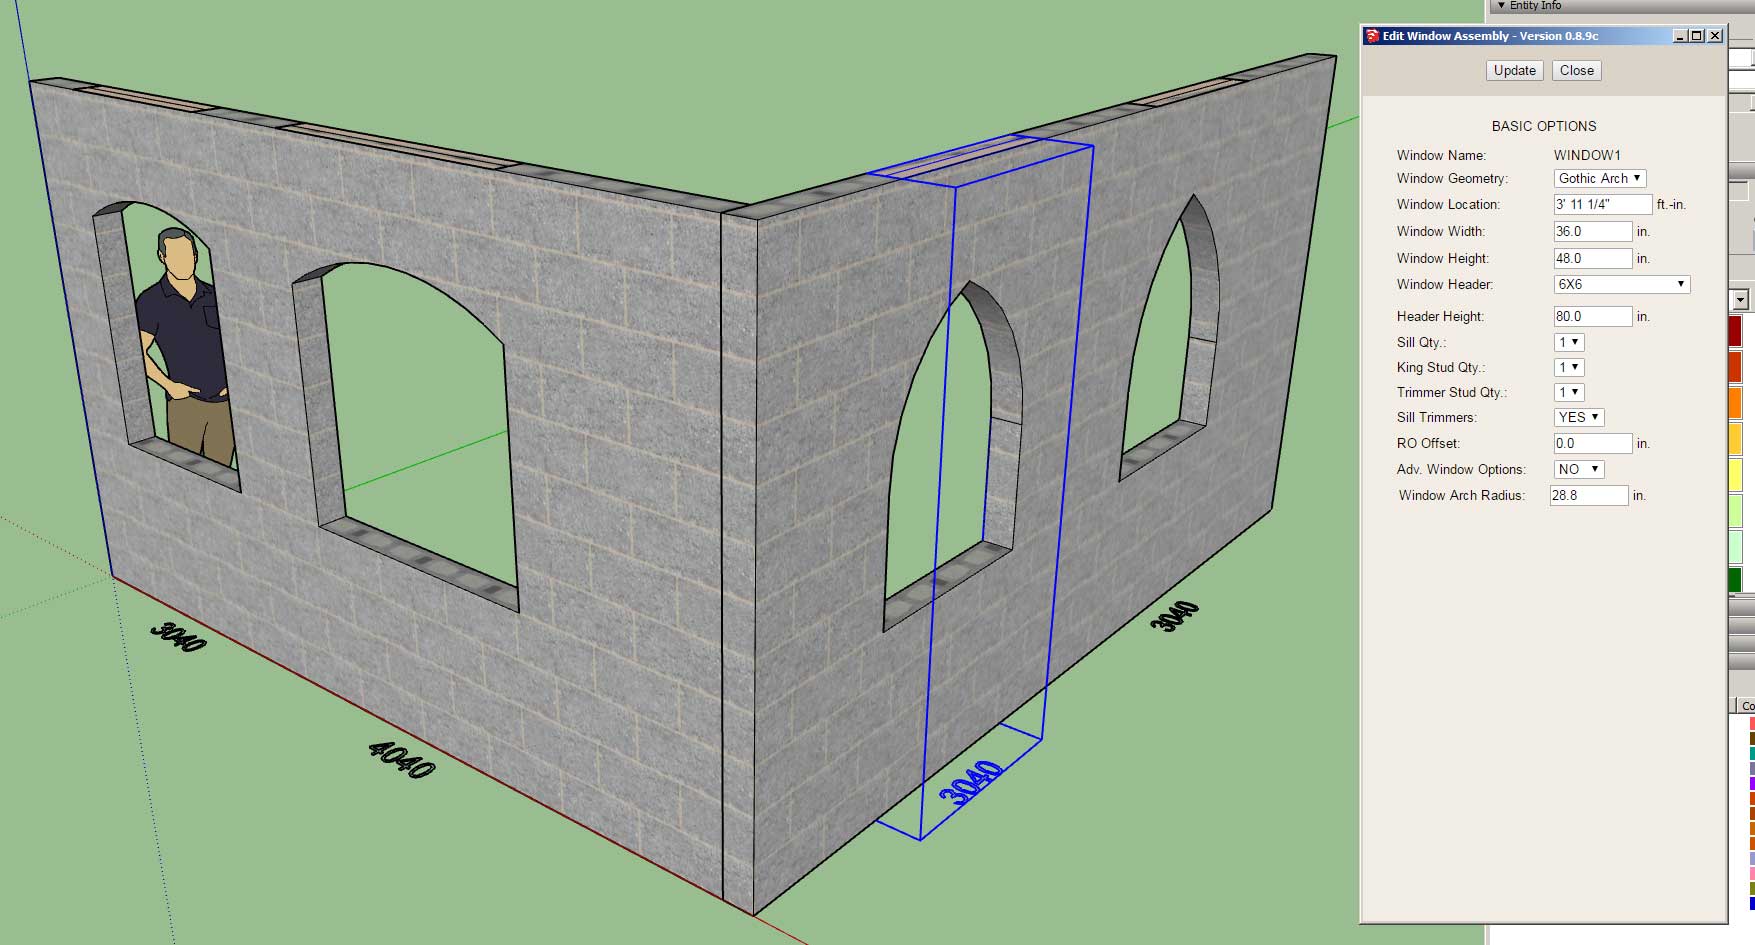
- Added the CMU framing mode for concrete block wall construction.
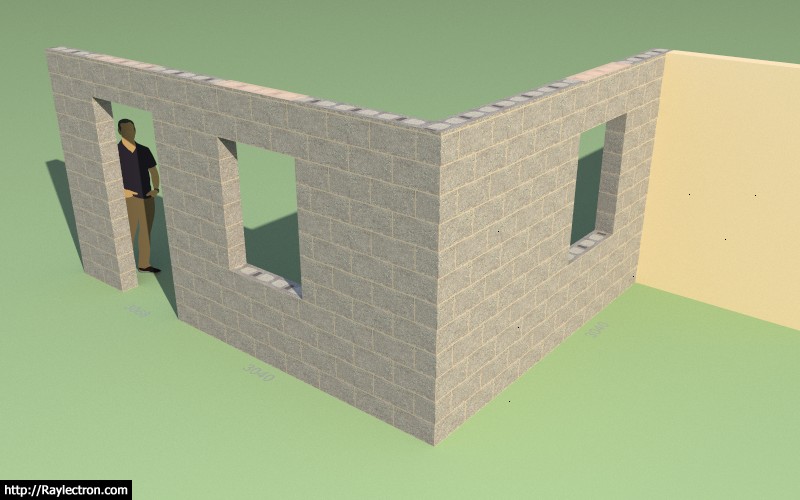
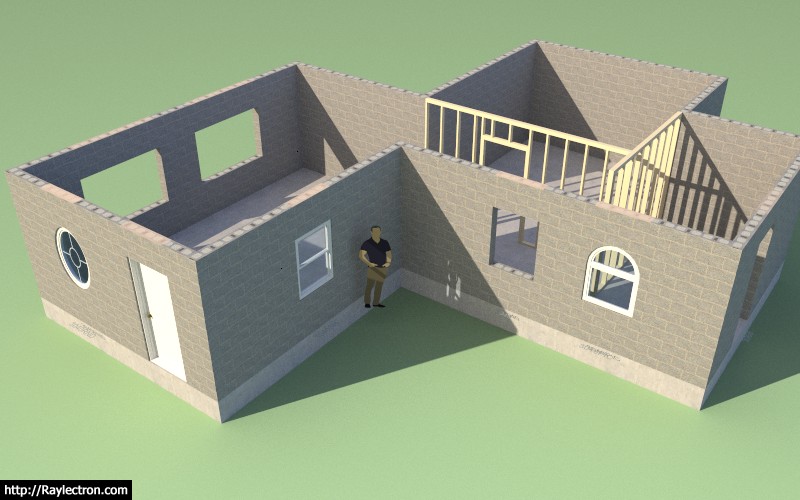
Currently the CMU mode is mostly the same as the "No Framing" mode with a few subtle differences:
1.) Concrete block texture is applied to vertical and horizontal faces of the wall solid to simulate a block wall.
2.) Round openings in the wall are cut out to follow the curve of the window or door.
3.) Description of the group (solid) has CMU in the text. This will be important in later releases as the estimating and engineering modules are developed and implemented.
As I receive further input on this new wall type I'm sure additional features will need to be added to fully bring the CMU wall framing mode up to speed.
View model here:
https://3dwarehouse.sketchup.com/model/439b7b2e-0df4-4f82-97bb-a03494d24dd8/CMU-Test-2
- Added the CMU framing mode for concrete block wall construction.
Currently the CMU mode is mostly the same as the "No Framing" mode with a few subtle differences:
1.) Concrete block texture is applied to vertical and horizontal faces of the wall solid to simulate a block wall.
2.) Round openings in the wall are cut out to follow the curve of the window or door.
3.) Description of the group (solid) has CMU in the text. This will be important in later releases as the estimating and engineering modules are developed and implemented.
As I receive further input on this new wall type I'm sure additional features will need to be added to fully bring the CMU wall framing mode up to speed.
View model here:
https://3dwarehouse.sketchup.com/model/439b7b2e-0df4-4f82-97bb-a03494d24dd8/CMU-Test-2
Version 0.8.9c - 07.26.2018
- Added double, triple and quad casement windows to the window draw and edit modules.
- Resolved a bug in the window and door attribute library modules.
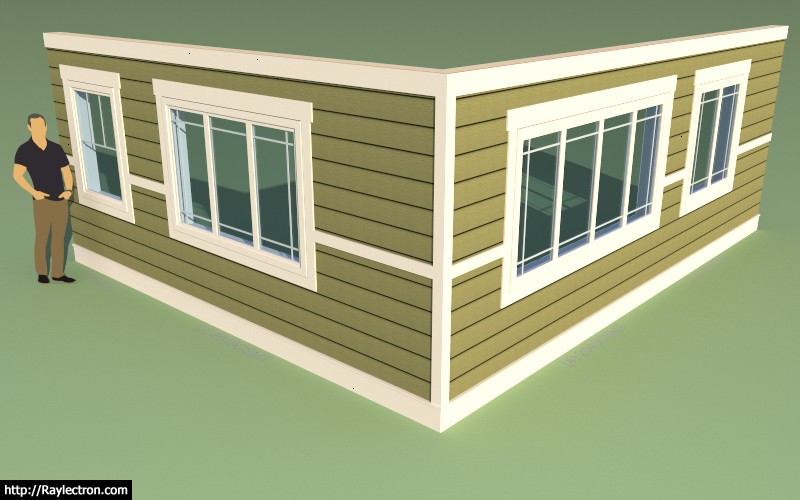
I'm not sure if the callouts are really visible with this image but they are formatted like so:
(3) 2040CSMT (for the 3 lite 6040 window)
This update is per customer request.
View model here:
https://3dwarehouse.sketchup.com/model/05ae80f6-3945-43a7-8c59-a773380f1ce1/Window-Test-7
I've also been thinking quite a bit about integration with other plugins and how I can best facilitate that plugin-to-plugin communication.
My first thought is that the under the hood structure of the wall is actually fully exposed already and can be modified with any other third party plugin. Everything required to build the wall is contained within the attribute library of the wall panel group (outermost container). I will be publishing a specification which delineates each value and position within the attribute library so other plugin authors can easily obtain or set this information as required and have an exact understanding of what each parameter is.
I will also be assembling an API so that another plugin author can cut holes in the walls for openings (windows and doors) and also rebuild the wall panels etc... I'm not exactly sure on all of the details yet but hopefully this will make the plugin more accessible to other plugin authors and allow for better integration.
- Added double, triple and quad casement windows to the window draw and edit modules.
- Resolved a bug in the window and door attribute library modules.
I'm not sure if the callouts are really visible with this image but they are formatted like so:
(3) 2040CSMT (for the 3 lite 6040 window)
This update is per customer request.
View model here:
https://3dwarehouse.sketchup.com/model/05ae80f6-3945-43a7-8c59-a773380f1ce1/Window-Test-7
I've also been thinking quite a bit about integration with other plugins and how I can best facilitate that plugin-to-plugin communication.
My first thought is that the under the hood structure of the wall is actually fully exposed already and can be modified with any other third party plugin. Everything required to build the wall is contained within the attribute library of the wall panel group (outermost container). I will be publishing a specification which delineates each value and position within the attribute library so other plugin authors can easily obtain or set this information as required and have an exact understanding of what each parameter is.
I will also be assembling an API so that another plugin author can cut holes in the walls for openings (windows and doors) and also rebuild the wall panels etc... I'm not exactly sure on all of the details yet but hopefully this will make the plugin more accessible to other plugin authors and allow for better integration.
These arched windows and their grilles (Prairie Style shown) were a bit more than I was wanting to bite off when I started into them this morning but perseverance won over in the end and I finally got them sorted out:
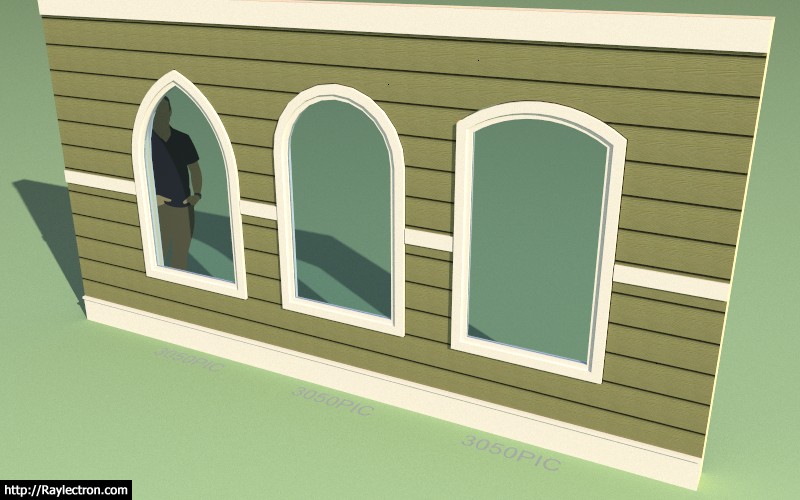
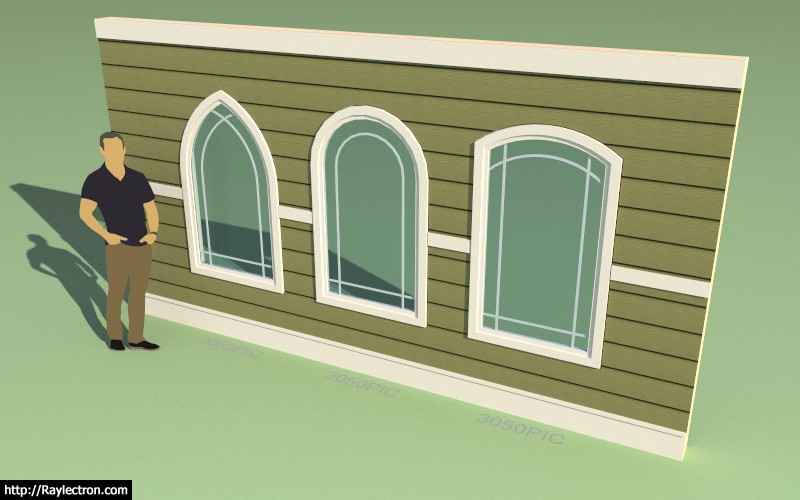
The half round springline window is created by setting the radius to half the window opening.
Also note that only the picture or fixed window type is available for the arch and gothic arch geometry.
I still need to work on shutters for these window types but that is a job for another day.
View model here:
https://3dwarehouse.sketchup.com/model/03ca029f-e028-4171-85cd-a336eba4ac10/Window-Test-8
The half round springline window is created by setting the radius to half the window opening.
Also note that only the picture or fixed window type is available for the arch and gothic arch geometry.
I still need to work on shutters for these window types but that is a job for another day.
View model here:
https://3dwarehouse.sketchup.com/model/03ca029f-e028-4171-85cd-a336eba4ac10/Window-Test-8
Version 0.9.0 - 08.03.2018
- Added gothic and segmental arched windows to the window draw and edit modules.
- Added shutters: Solid, Flat Panel, Raised Panel, Louver, Board & Batten to arched and gothic arch windows.
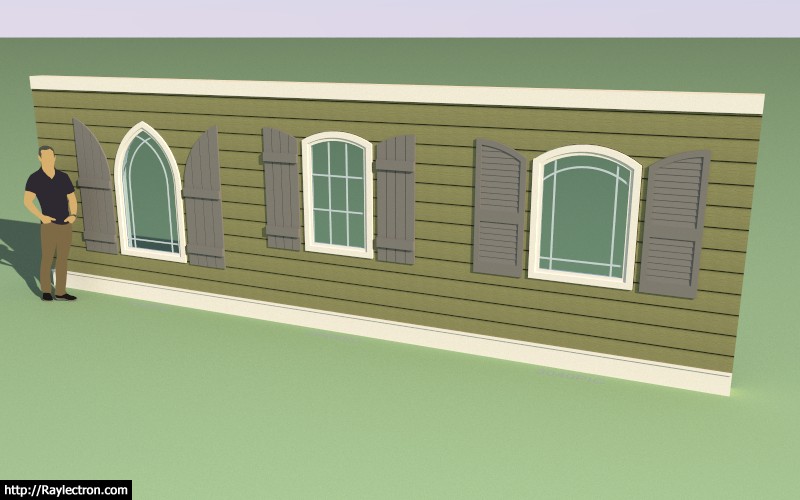
View model here:
https://3dwarehouse.sketchup.com/model/717611a9-f02a-477b-863f-4c0fa04e9247/Window-Test-9
- Added gothic and segmental arched windows to the window draw and edit modules.
- Added shutters: Solid, Flat Panel, Raised Panel, Louver, Board & Batten to arched and gothic arch windows.
View model here:
https://3dwarehouse.sketchup.com/model/717611a9-f02a-477b-863f-4c0fa04e9247/Window-Test-9
The arch/gothic arch window rabbit hole was very deep:
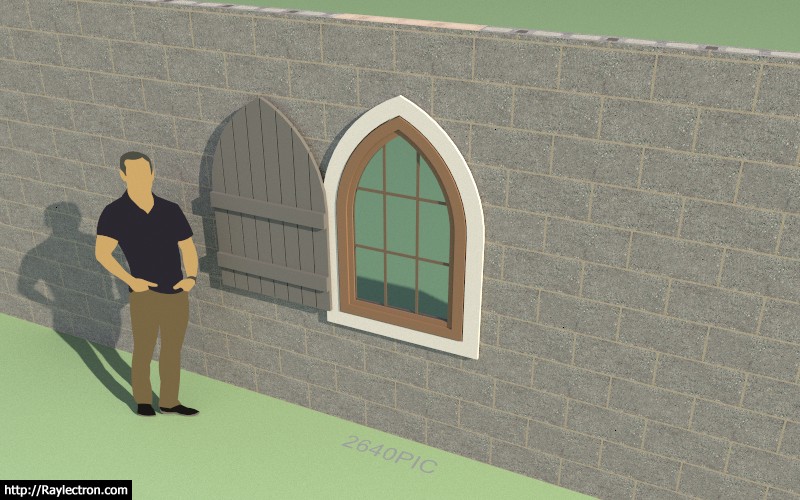
Ext. Trim and Shutter (Left)
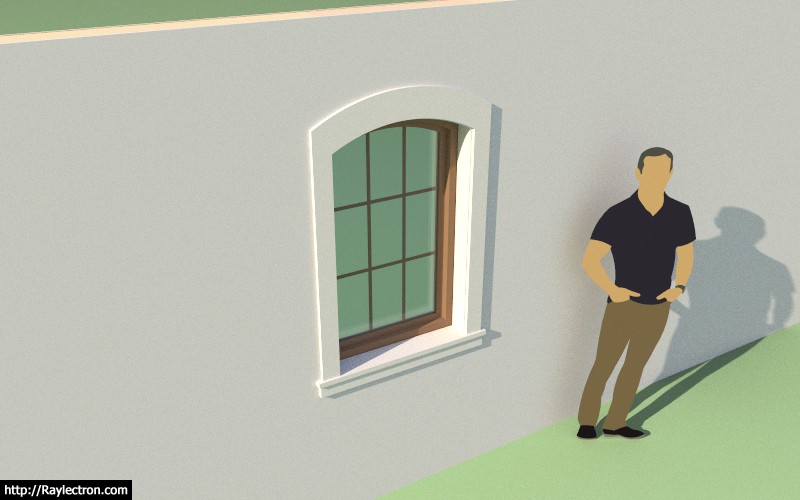
Interior Casing
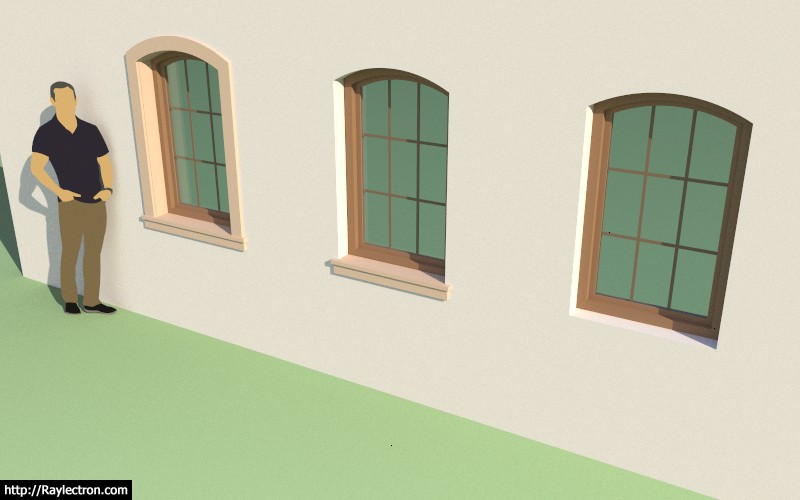
Interior Casing Options
Adding a new window type now entails the following additional features that must all be considered:
1.) Exterior Trim (Style A, Style B)
2.) Interior Casing/Trim (Style A, Style B, Style C)
3.) Window frame, casing and glass (window geometry will dictate if additional styles can be created for that geometry in addition to the standard fixed window).
4.) Window Grille (ten different grille configurations currently)
5.) Shutters (five different shutter types currently in three different configurations)
Some window types will also involve additional parameters due to asymmetry or other special features.
The trapezoid or triangular window may also involve a pitched header will further complicate matters with wall framing.
Ext. Trim and Shutter (Left)
Interior Casing
Interior Casing Options
Adding a new window type now entails the following additional features that must all be considered:
1.) Exterior Trim (Style A, Style B)
2.) Interior Casing/Trim (Style A, Style B, Style C)
3.) Window frame, casing and glass (window geometry will dictate if additional styles can be created for that geometry in addition to the standard fixed window).
4.) Window Grille (ten different grille configurations currently)
5.) Shutters (five different shutter types currently in three different configurations)
Some window types will also involve additional parameters due to asymmetry or other special features.
The trapezoid or triangular window may also involve a pitched header will further complicate matters with wall framing.
Just an FYI there is a known issue with stacking walls right now (multi-level structures), funny that this did not show up previously. I am currently working on it and should have a new revision in a few hours that hopefully addresses it fully.
The issue is with the auto-corner configuration, apparently the algorithm is detecting walls on different levels when it should only be detecting the walls within a specified vertical range (on the same level).
I think I've got my head back in the game now after a short hiatus from the code.
Currently the three hot development items are:
1.) New HTML menu/draw tool
2.) Gable Walls
3.) Garage Door Module
I'm also excited to report that the new reseller system is live and ready to go. I am currently recruiting resellers so please contact me directly if you are interested. I haven't determined the number of resellers or if there will be a specific limit however I am looking for people with diverse backgrounds and people who are passionate about promoting SketchUp as a primary architectural design tool for residential and commercial design.
The issue is with the auto-corner configuration, apparently the algorithm is detecting walls on different levels when it should only be detecting the walls within a specified vertical range (on the same level).
I think I've got my head back in the game now after a short hiatus from the code.
Currently the three hot development items are:
1.) New HTML menu/draw tool
2.) Gable Walls
3.) Garage Door Module
I'm also excited to report that the new reseller system is live and ready to go. I am currently recruiting resellers so please contact me directly if you are interested. I haven't determined the number of resellers or if there will be a specific limit however I am looking for people with diverse backgrounds and people who are passionate about promoting SketchUp as a primary architectural design tool for residential and commercial design.