To avoid these ads, REGISTER NOW!

Truss Design

OP
M

Medeek

Well-known member
Joined
Jan 13, 2013
Messages
550
Location
Copalis Beach, WA
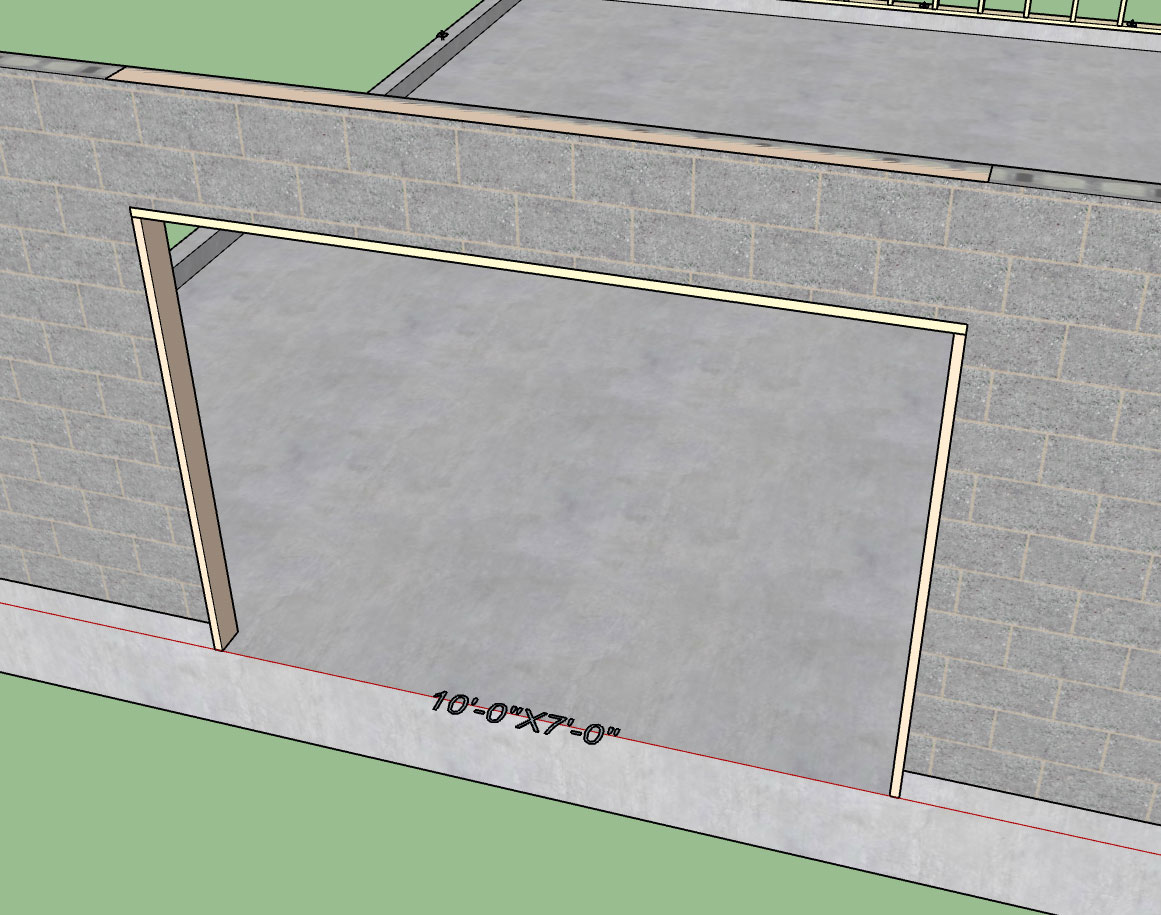
Version 0.9.0d - 08.09.2018
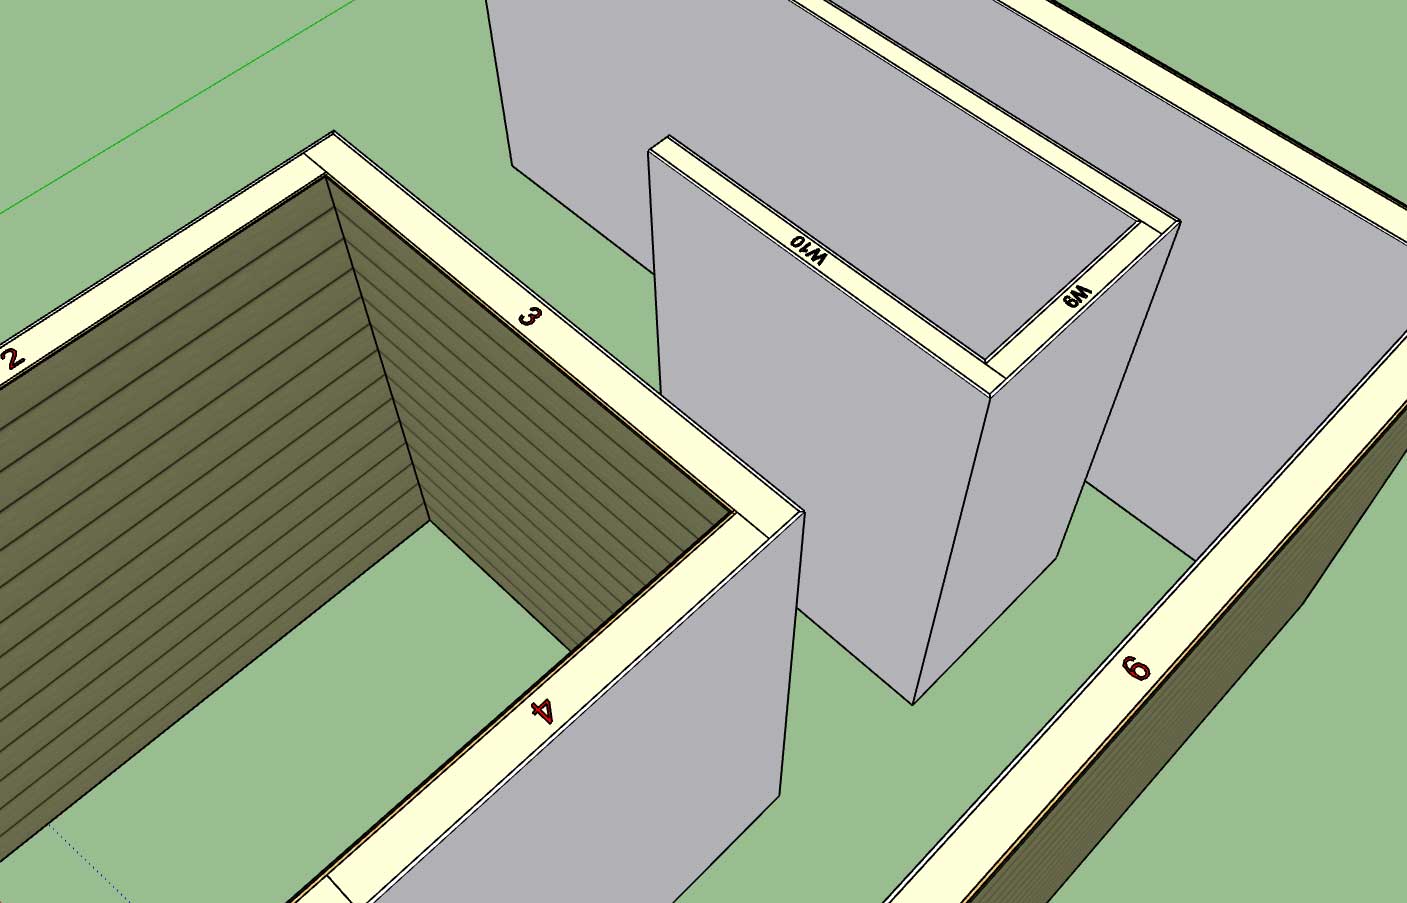
- Added logic so that callouts for stacked windows are properly cascaded.

wall_su188_800.jpg


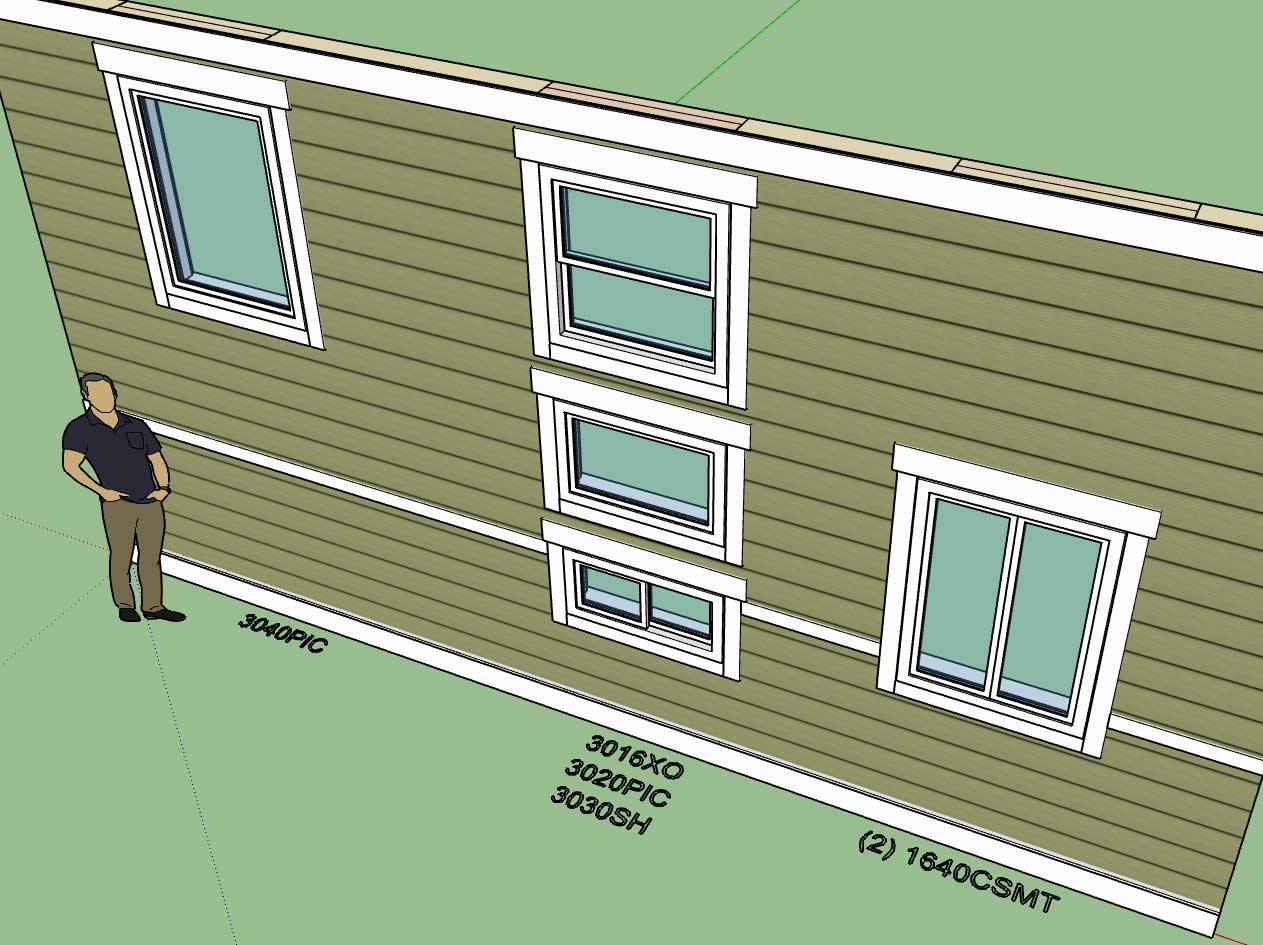
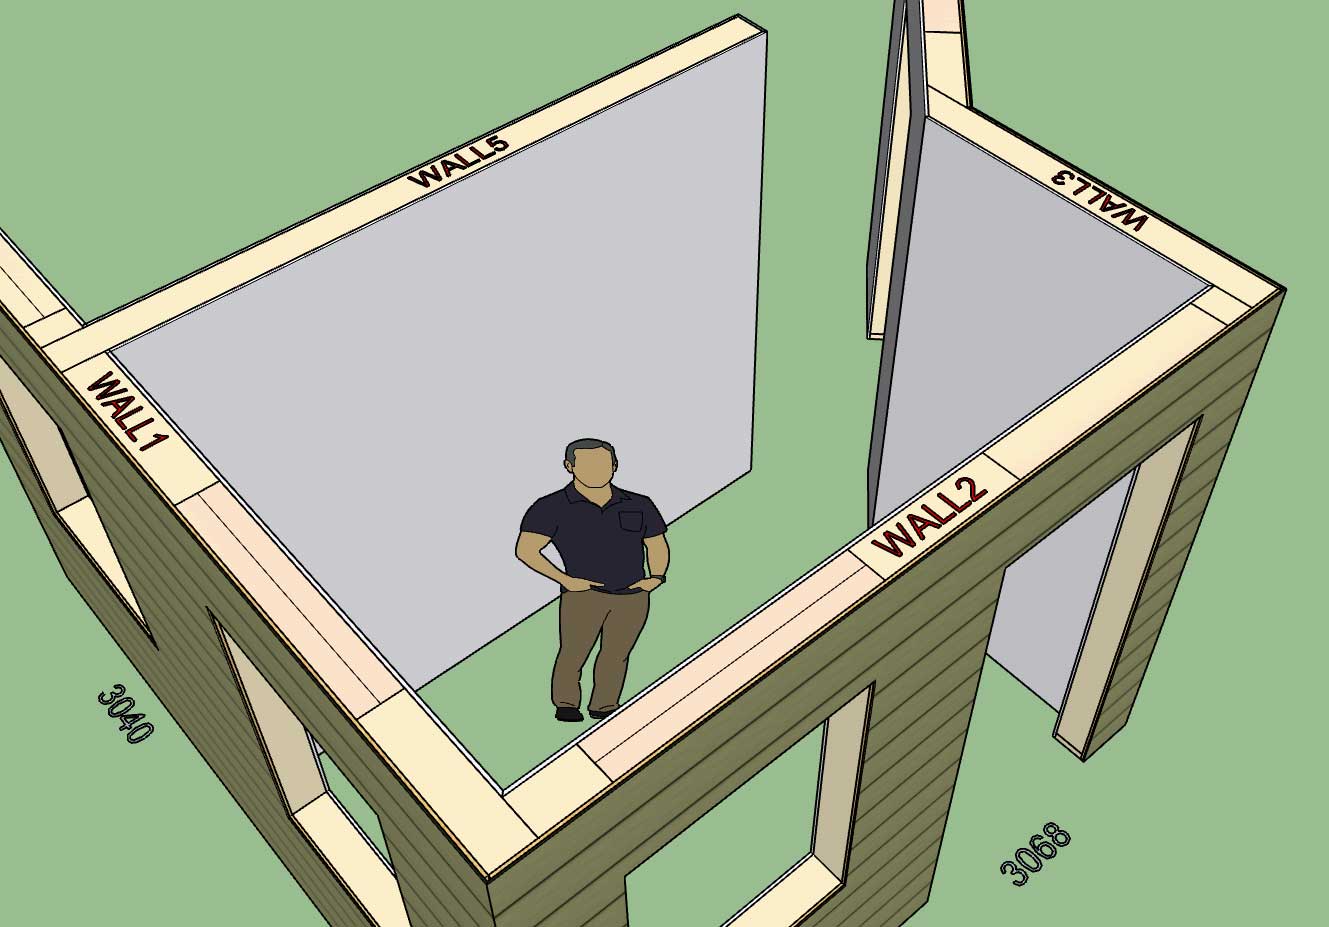
Note that there is still an issue with stacking windows in the full framing mode. The plugin will not throw any errors (within the ruby console) but I will need to add some additional logic to properly frame up the cripple studs between windows, if any are required. Also the algorithm for the trimmer studs will require some modifications.

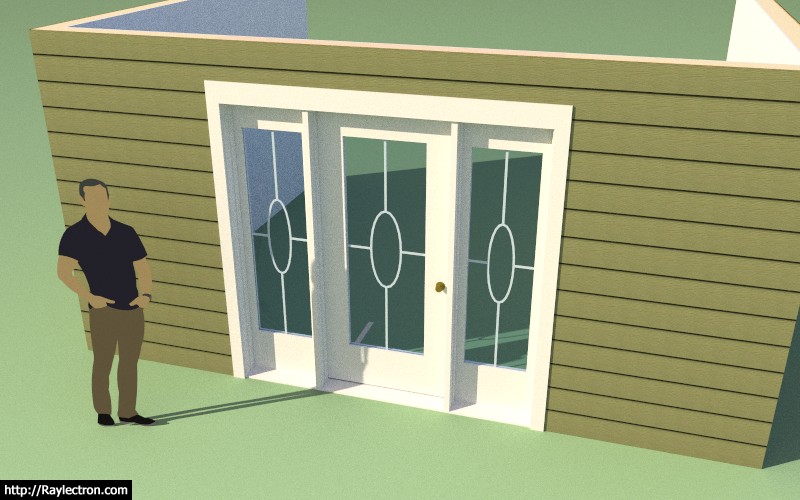
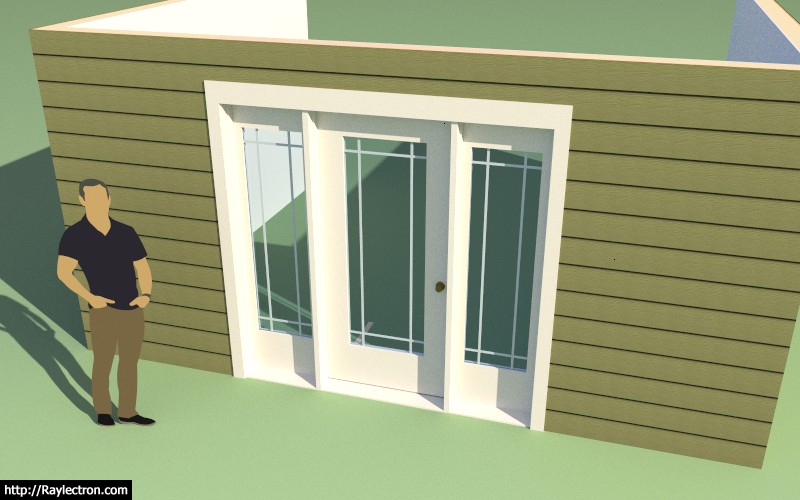
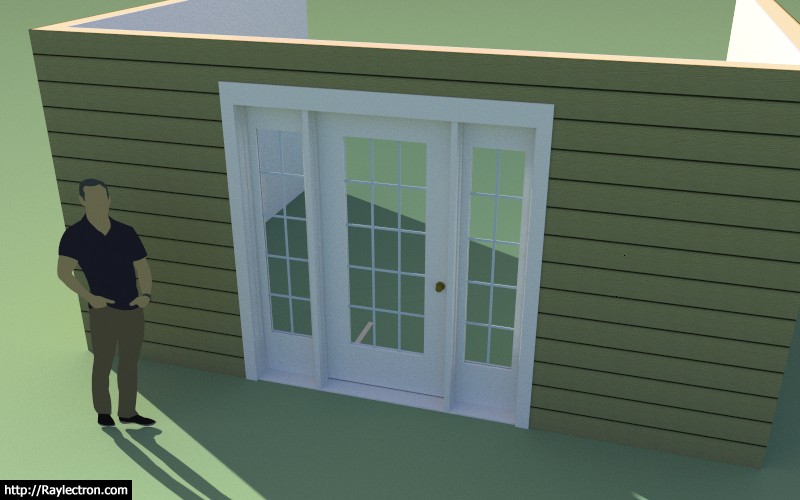
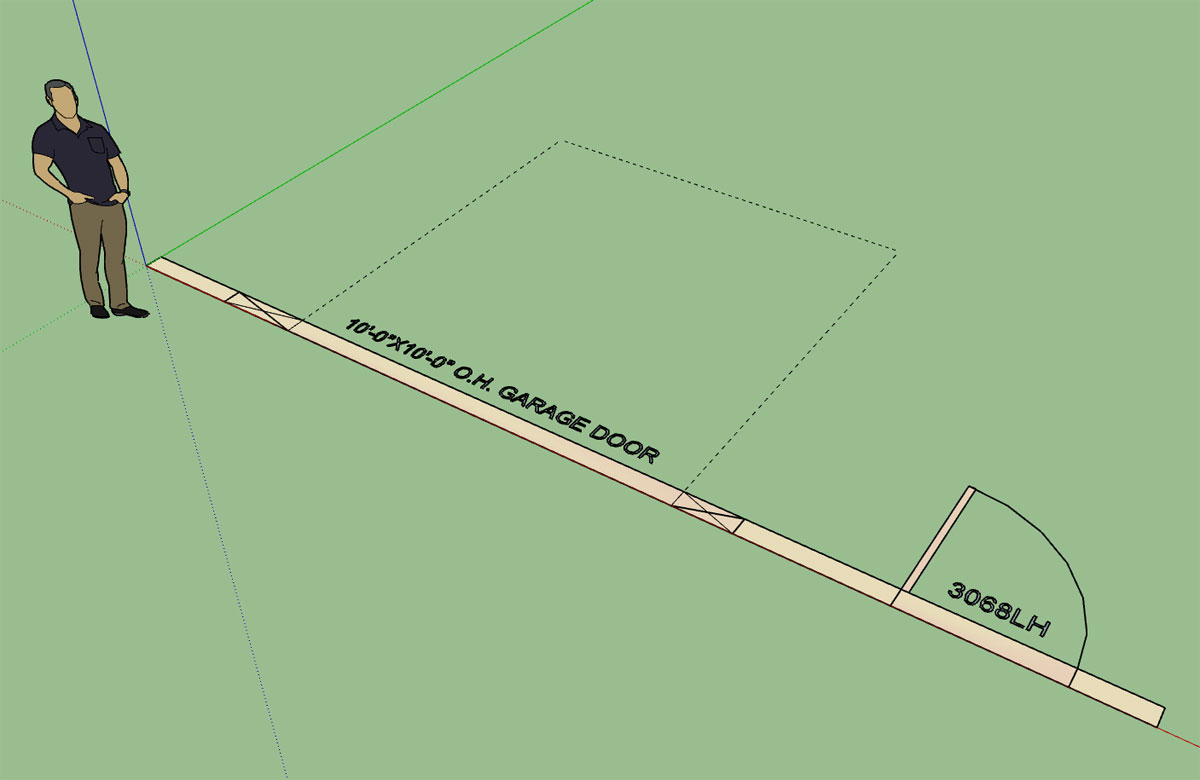
Initially I did not foresee stacked windows but they do seem to be quite common so they have become a high priority.

View model here:

https://3dwarehouse.sketchup.com/model/33f30348-1e8d-4e6b-9c4a-1a313103ef30/Window-Test-12
 
To avoid these ads, REGISTER NOW!
OP
M

Medeek

Well-known member
Joined
Jan 13, 2013
Messages
550
Location
Copalis Beach, WA
Looking at this screenshot one would think I am attempting to edit a wall panel however if you look a little closer you will notice that I am actually drawing a wall panel:

wall_su189_800.jpg


The HTML draw menu (Graphical UI Option) is almost ready to release. I have a bit more testing to do and some additional javascript logic to add to the HTML itself and then I think it will ready for prime time.

I think everyone will find this is a much quicker and easier way to create wall panels than the legacy (non-GUI) method. However, for those who prefer the old menu system that will still be available by setting the graphical UI option in the global settings (General tab) to "NO".

The other upside will be the ability to select from your presets rather than having to edit the wall panel after the fact.

Pressing the spacebar will exit out of the draw wall menu and tool, as is usual for SketchUp tools.

Pressing the ESC key on Windows will exit the current wall panel polyline and allow the user to start a new series of wall panel(s).

Clicking the Update button will update the draw tool with the parameters shown in the menu and allow the user to change things up mid-stream during the creation of wall panel(s).

I am hoping that this will be a big usability improvement for the plugin and make it quite a bit more efficient.
 
OP
M

Medeek

Well-known member
Joined
Jan 13, 2013
Messages
550
Location
Copalis Beach, WA
Version 0.9.1 - 08.15.2018
- Added an HTML "Draw Wall" menu option. This is toggled in the global settings with the Graphical UI parameter.
 
OP
M

Medeek

Well-known member
Joined
Jan 13, 2013
Messages
550
Location
Copalis Beach, WA
I've got a lot of things on my plate right now (plugin development and other unrelated items) but as I've been communicating with various parties today regarding the current functionality of the plugin it would appear that a common theme is the ability to better manage and apply materials.

With that being said I've decided to develop my own material manager (within the global settings of the plugin). The user will be able to easily add, edit and delete materials. A material can be either a color or image based material. For an image based material the user will be able to specify the image (upload to library) and then specify the scaling (horz and vert). For a color based material the color can be set with a palette picker or RGB code. Additional customization (ie. transparency) can be accomplished via the standard SU material dialogs/tools.

This will allow the user to setup commonly used materials and have those populate the various drop downs in the draw and edit menus of the plugin.

Initially I wanted to go the SKM route but this has some serious backward compatibility problems so I've since abandoned that idea.

Currently the wall cladding drop down allows for the selection of any material currently defined within the model however this methodology is flawed in that it becomes too cluttered with materials that the user probably does not care to utilize for the wall geometry.

I may also incorporate some sort of flag system so that the user can specify which custom material will appear in which drop down field (ie. sheathing or cladding or both). I will need to give this some additional thought.

There will still exist some standard materials that are hard coded into the plugin and cannot be removed (ie. OSB, Plywood etc...) The idea being that some users may not want to spend the time defining a custom library and just want some standard materials right out of the box.

I think I've nailed down most of the details on how this will all go together but any suggestions or thoughts are always helpful.
 
OP
M

Medeek

Well-known member
Joined
Jan 13, 2013
Messages
550
Location
Copalis Beach, WA
How would you call out a entrance door with sidelights?

https://www.homedepot.com/p/Feather...g-Front-Door-w-Sidelites-873191-3A4/203126132

Along that same vein here is a schematic of how the single and double side lites for doors will be calculated:

DOOR_SIDELITES_800.jpg


Rather than provide doors with side lites as a new type of door I will probably just make side lites an additional option for existing doors.

Switching a door from RH to LH will move a single side lite to the same side as the door knob, this seems to be the most common configuraton. Of course a door with a double side lite will be symmetrical and it doesn't matter on the door handedness.
 
OP
M

Medeek

Well-known member
Joined
Jan 13, 2013
Messages
550
Location
Copalis Beach, WA
Version 0.9.1c - 08.17.2018
- Added an option in the Walls tab of the Global Settings to auto-load a wall preset within the HTML Draw Wall menu.

wall_su190_800.jpg


If the auto-load preset option is enabled then each time the draw tool is activated it will pull the parameters from the preset, otherwise the parameters will be per the previous wall drawn.

Note that the Auto-Load Wall Preset parameter only applies to the HTML draw menu. If the graphical UI is not enabled then the legacy system is in place and there is no way to auto-load a preset.

Some may still find the HTML draw menu a bit overwhelming with all of its parameters. I may add a +/- button at the top which will allow the user to shrink the menu so that only the presets are shown and possibly a few other options. The menu configuration will then be memorized and will pop up the same as the previous configuration (large or small). Along those same lines I should probably also provide a global settings which will allow the user to set the default behaviour of the menu configuration.
 
OP
M

Medeek

Well-known member
Joined
Jan 13, 2013
Messages
550
Location
Copalis Beach, WA
Version 0.9.2 - 08.21.2018
- Added sidelites (double and single) for all door types.
- Enabled 5-lite (full glass) and 3-lite (half glass) grilles for door sidelites.

wall_su193_800.jpg


View model here:

https://3dwarehouse.sketchup.com/model/930bc1a3-1a33-4ad7-bd77-25b7d1218cbd/Door-Test-2

I will probably need to add a few more options for grilles for the sidelites and probably even a couple more parameters so that full glass sidelites can be mixed and matched with half glass doors, but I think I've got a decent start on this one for now.

Note, that sidelites can be moved to the right or left of the door (single sidelite) by changing the handedness of the door.

Both the door draw and door edit menus have been updated with this new feature. The sidelite width can be set to any value and defaults to 12" (400mm) which seems to be the most common size.

Download the trial version here:

http://design.medeek.com/calculator/sketchup/medeek_wall_ext.rbz
 
OP
M

Medeek

Well-known member
Joined
Jan 13, 2013
Messages
550
Location
Copalis Beach, WA
Featured on SketchUp Essentials (Justin Geis):


Note that this video was made prior to the new HTML draw menu, so unfortunately it is already a bit dated.
 
OP
M

Medeek

Well-known member
Joined
Jan 13, 2013
Messages
550
Location
Copalis Beach, WA
Preview of the upcoming Material Manager in the Global Settings:

wall_su197_800.jpg


This will allow the defining of both color based and texture based materials that will then populate the various drop down menus of the plugin.

I am also including the ability to inactivate/activate a material so that it can be turned off without having to completely delete it. Also the ability to fully edit a material or delete one will be included.

A 16x16 preview (thumbnail) of the material will be standard. I will probably enable some sort of javascript element so that as you mouse over the thumbnail you are able to view a larger preview of the texture or color.
 
OP
M

Medeek

Well-known member
Joined
Jan 13, 2013
Messages
550
Location
Copalis Beach, WA
Version 0.9.3 - 08.26.2018
- Added a Custom Material Library/Manager in the Materials tab of the Global Settings.
- Enabled custom materials for sheathing, cladding and ext. wainscoting in the HTML wall draw and edit menus.

Being that this a completely new feature I may have missed something in my testing but overall I'm fairly happy with the way it has turned out.

Currently I am limiting image type (for textures) to .jpg or .png, but may extend it to other image types if the need arises.

As noted in the changelog notes above the custom materials are only able to be applied to sheathing, cladding, and wainscoting. I will be extending this feature to other elements in the near future (ie. gypsum, trim, casing etc...)

Clicking on the status icon (red or green) will allow the toggling between inactive or active status. If a material is listed as "inactive" it will not appear in the draw or edit menus and cannot be utilized in the model. This feature has been included so that a user can define as many materials as they like but only activate a handful that they may need for a project, thereby keeping the drop down menus from becoming too cluttered.

One thing I have thought about doing is grouping materials within the material manager. This would then allow the user to determine which materials get loaded into which drop down menu. (ie. sheathing, cladding etc...) I haven't implemented this yet since I haven't determined the best way to handle this yet within the interface but it is probably something for future releases.
 
OP
M

Medeek

Well-known member
Joined
Jan 13, 2013
Messages
550
Location
Copalis Beach, WA
Version 0.9.3b - 08.29.2018
- Enabled the ability to group materials (in the Material Library) and control which drop down menu they will appear in.
- Added an SKM file import utility to the Material Library.

wall_su199_800.jpg
 
OP
M

Medeek

Well-known member
Joined
Jan 13, 2013
Messages
550
Location
Copalis Beach, WA
Version 0.9.3c - 08.30.2018
- Enabled the Wall Gypsum Corner parameter in the sheathing tab of the global settings (MITER/FLUSH).
- Interior walls now receive end treatment when gypsum enabled.
- Gypsum wrap enabled for openings in interior walls that do not have a window or door installed.

wall_su203_800.jpg


wall_su202_800.jpg
 
OP
M

Medeek

Well-known member
Joined
Jan 13, 2013
Messages
550
Location
Copalis Beach, WA
Version 0.9.4 - 08.31.2018
- Added additional (New Zealand) standard metric stud sizes: 45x90, 45x140, 45x190, 45x240, 45x290
- Addressed multiple bugs having to do with metric templates (glulam headers, columns, SSWs).
- Added (New Zealand) standard metric sizes for window and door headers.

If you are using metric templates you will want to update the plugin to this latest version which addresses a number of critical bugs when using metric units. I really need to spend more time in metric templates testing things. Unfortunately, most of my time is spent working in imperial/US units so that side of the house is more thoroughly vetted.

While I'm on the topic of metric templates I still need to provide standard size metric columns and beams (the plugin currently defaults to imperial sizes for these two building elements). I have a pretty good idea on column sizes in New Zealand since I just spent some time perusing their building code and becoming familiar with it but I need some input from other countries who use metric lumber sizes (ie. UK, France, Norway, Sweden, South Africa, Germany etc...)
 
OP
M

Medeek

Well-known member
Joined
Jan 13, 2013
Messages
550
Location
Copalis Beach, WA
Version 0.9.4b - 08.31.2018 thru 09.01.2018
- Fixed a bug with corner stud placement where corner angles are extreme values.

wall_su204_800.jpg


The one thing I am noticing with this plugin is that the level of complexity is such that it is hard to predict all of the potential states it can get itself into. Each time it gets itself into a state for which it does not have a solution it will typically throw an error and you will see your wall panel appearing at the origin in some fashion or another.

I am doing my very best to find all of these unanticipated states and rectify the logic or add additional logic as required. A number of dedicated users are helping in this process, I appreciate the assistance and the patience with the plugin and my programming.
 
OP
M

Medeek

Well-known member
Joined
Jan 13, 2013
Messages
550
Location
Copalis Beach, WA
Not wanting to clutter the toolbars any further I waffled quite a bit on this decision but I think it makes more sense to provide a separate icon and a "Draw Garage Door" feature, hence the new menu will appear as below:

wall_su_menu_active.jpg


Garage doors are kind of their own beast. Typically much larger than a simple man door and various options such portal framing further complicate the matter. By completely separating the two I am better able to fully customize the UI for garage door specific parameters and features.
 
OP
M

Medeek

Well-known member
Joined
Jan 13, 2013
Messages
550
Location
Copalis Beach, WA
The recent update with the gypsum option (miter) needed some further attention. While I was sorting that out it became obvious that, along with tee intersections, columns that are not full height need to have the ability to cut out the gypsum, sheathing or cladding when the column is less than the full height of the wall.

wall_su208_800.jpg


Note that the advanced options for columns allows the user to specify which element to trim away as shown in the column edit menu above. In some cases the beam may project through the wall to the exterior of the structure. In this case one would want to cut away the interior gypsum, sheathing and cladding as shown. The exterior gypsum is referring to interior walls with gypsum cladding on both sides.
 
OP
M

Medeek

Well-known member
Joined
Jan 13, 2013
Messages
550
Location
Copalis Beach, WA
So here is what I have for the garage door callout so far:

wall_su211_800.jpg


The second (smaller) line of text will display the header/lintel size:

Glulam headers will display the glulam dimensions and the term "GLULAM BEAM"

A typical lumber (nail lam) beam will be: (2) 2X8 LUMBER BEAM

A typical LSL Callout: (2) 1-3/4X7-1/4 LSL BEAM

I'm sure everyone has their own favorite way of making these callouts and I need to figure out a way to allow for enough flexibility but at the same time to not over complicate the matter.

The dashed line shows the footprint of the overhead door, with its depth equal to the door height.

Please feel free to chime in with suggestions or concerns.
 
OP
M

Medeek

Well-known member
Joined
Jan 13, 2013
Messages
550
Location
Copalis Beach, WA
PF Framing algorithm is complete:

wall_su212_800.jpg


Double, Single (Left), Single (Right)

In this case a 10' wall creates a pony wall above the headers.

Now I just need to add in the logic for the optional jamb studs.
 
OP
M

Medeek

Well-known member
Joined
Jan 13, 2013
Messages
550
Location
Copalis Beach, WA
A garage door with optional head and jamb studs enabled:

wall_su213_800.jpg


Also note that this feature can be utilized in the CMU or no framing mode:

wall_su214_800.jpg


Typically I see jamb studs used in a situation like this, where the door drops below the framed wall (vertically offset) into a garage curb or stemwall. By default the jamb studs are assigned to PT lumber. However, they can also be utilized without a vertical offset.
 
To avoid these ads, REGISTER NOW!
OP
M

Medeek

Well-known member
Joined
Jan 13, 2013
Messages
550
Location
Copalis Beach, WA
A typical raised panel and flat panel garage door (10'x7') with the panels parameters set to "AUTO":

wall_su215_800.jpg


wall_su216_800.jpg


I may need to fine tune the spacing parameters a bit (I have not exposed the parameters to the user, it would probably just over complicate things) depending on feedback from designers.

Working on the window versions of these two variants now.

Then the all glass version for commercial applications (ie. Fire Station overhead doors etc...)

I will probably not release a carriage door style just yet, not until I have further researched this type of door and determined what configuration and additional parameters might be needed.

Below is a preview of the Garage Door Edit Menu (note that most of the advance options have been disabled so that if fits on the screen):

wall_su217_800.jpg


I've enabled the Portal Frame option so that you can see the available parameters.
 

Handyfarmer

Well-known member
Joined
Dec 20, 2014
Messages
316
Location
in the high plains of Colorado
in the good old days they would build a 24 foot building with 2x4 or 2x6 rafters, no trusses, may be a collar or two, but there would not be the fret or worry that is going in to this building, most likely today it would be suggested to go 2x8 for a rafter only design,
 
OP
M

Medeek

Well-known member
Joined
Jan 13, 2013
Messages
550
Location
Copalis Beach, WA
The number of horizontal and vertical panels can be specified or be set to AUTO so virtually any number of combinations are possible:

wall_su220_800.jpg


Full glass door exterior and interior. However I'm noticing that these types of doors usually have a kick panel (no glass) installed.

wall_su221_800.jpg


wall_su222_800.jpg
 
OP
M

Medeek

Well-known member
Joined
Jan 13, 2013
Messages
550
Location
Copalis Beach, WA
A glass door with a threshold and door lever (hardware):

wall_su223_800.jpg


Note that the grey material applied to the door was first created in the material manager in the global settings and then applied in the garage door edit menu. I am very happy with the implementation and added functionality of the new material manager.

The blocked out areas on each side of the garage door indicate the extent of the portal frames when enabled:

wall_su224_800.jpg
 
OP
M

Medeek

Well-known member
Joined
Jan 13, 2013
Messages
550
Location
Copalis Beach, WA
Version 0.9.5 - 09.17.2018
- Added advanced options to the column edit menu which allows for notching out of gypsum, sheathing and cladding for beam pockets.
- Tee intersections will now automatically remove gypsum where walls meet.
- Added the garage door module with the following garage door variants: Solid, No Panels, Raised Panel, Flat Panel, Glass Raised Panel, Glass Flat Panel, Glass Panel.
- Added Portal Frames: Both, Left, Right to the garage door module.
- Removed garage door option from door draw and edit menus.

Just a word of CAUTION when upgrading to this latest version from previous installed versions:

Upgrading to 0.9.5 will break all previously installed plugin models. The reason being is that the door module and attribute library associated with doors has been changed in this latest version.
 
OP
M

Medeek

Well-known member
Joined
Jan 13, 2013
Messages
550
Location
Copalis Beach, WA
Interesting question today on using presets in the Draw Wall Menu. In response to this question and to help people further understand the order of operations when using presets see answer below:

ANSWER:

I may need to change up the logic a bit to make it a bit more intuitive when utilizing presets within the Draw Wall Menu.

First, when you hit the save button it will prompt you for a name to save the preset as, then you enter in a preset name and hit "Save Wall Preset". You should then see the new preset added in the drop down box, if you do not then there was some type of an error. Please enable the ruby console and duplicate the error and send me the ruby console output if you encounter this behavior.

Second, when you are loading a preset it is a two step process. First you select your preset in the drop down box, then you click "Load", this loads the values into the HTML menu, it does not make them live just yet. To accept these parameters and draw the wall with them click on the "Update" button, and then begin drawing your wall(s).

I think it may be useful to just eliminate one of these steps and when a user click "Load" it automatically brings the presets parameters into the HTML form and also makes them the active parameters, thereby eliminating the step where you need to click the "Update" button. Thoughts?

Also note that you do not need to close out the Draw Wall Menu before drawing walls, nor should you, however the option to do that does exist. The idea is to keep the menu open so you can change up the wall parameters and keep drawing walls without having to continue to click on the draw wall icon. To quit the Draw Wall tool completely you simply click on the space bar. To start a new polyline of wall segments or just a single wall panel, click the ESC key.
 
OP
M

Medeek

Well-known member
Joined
Jan 13, 2013
Messages
550
Location
Copalis Beach, WA
Version 0.9.6 - 09.23.2018
- Created the initial framework of the Medeek Estimating Module.
- Added sheathing, cladding and gypsum to the Medeek Estimator.
- Corrected the group description for pressure treated bottom plates.
- Added the ability to export data from the Medeek Estimator in CSV format.

Currently only three items are added to the estimating module, many more items to add.

The saving grace is that I think I've set it up quite cleanly and organized so that adding in new elements should be relatively easy and really not a whole lot of coding.

I'm releasing it now in its prototype stage so that everyone will have a chance to test it out and put it through its paces. Once I return from the upcoming Basecamp I will hit it hard again and add in a multitude of building elements.

I also need to nail down the proper CSI numbers for the various elements, I'm sure I'll make a few mistakes along the way.

I haven't had much of chance to test it (Estimator) out in a metric template so I apologize if anyone encounters any bugs while using a metric template. Further testing in a metric template will be the first thing on my list when I return.
 
OP
M

Medeek

Well-known member
Joined
Jan 13, 2013
Messages
550
Location
Copalis Beach, WA
Version 2.2.1 - 10.05.2018
- The trim tool now allows for multiple trim operations once a trimming plane is selected.
- Pressing the ESC key will reinitialize the trim tool during multiple trim operations, space bar will terminate.
- The trim tool will now trim components as well as groups.
 
OP
M

Medeek

Well-known member
Joined
Jan 13, 2013
Messages
550
Location
Copalis Beach, WA
Version 0.9.7 - 10.06.2018
- Wall labels option added to the General tab of the Global Settings.
- Wall labels can be drawn/shown in all framing modes.
- Added two additional layers to the Layers tab of the Global Settings for dimensioning and annotations.

wall_su231_800.jpg


Note that wall labels are drawn on Dim Layer 3, Dim Layer 2 will be reserved for framing annotations (headers, cripples, trimmers, kings etc...), Dim Layer (1) is for standard callouts for windows and doors and their symbols. The idea being that even if you decide to enable all of the callouts you can easily toggle them by turning on and off the various dim layers.
 
OP
M

Medeek

Well-known member
Joined
Jan 13, 2013
Messages
550
Location
Copalis Beach, WA
The wall label prefix can now be defined in the global settings:

wall_su233_800.jpg


wall_su232_800.jpg


If left blank the wall name/label will be just a numeric value as shown.
 
OP
M

Medeek

Well-known member
Joined
Jan 13, 2013
Messages
550
Location
Copalis Beach, WA
Version 0.9.7b - 10.07.2018
- Wall label prefix can be customized in the General tab of the Global Settings.
- Licensee name now appears in the License tab of the Global Settings when plugin is registered.
 
OP
M

Medeek

Well-known member
Joined
Jan 13, 2013
Messages
550
Location
Copalis Beach, WA
Per requests from wall panel and component manufacturers I am adding in some additional framing callouts:

wall_su234_800.jpg


The first line is the standard window or door callout and is on dim layer #1. This has not changed from previous versions of the plugin.

The second line gives the header information (I will also need to add a species and grade callout ie. DF No. 2) and is toggled on by the header callout parameter, this line is on dim layer #2.

The third lines give the header height from the base of the wall (bottom of sole plate) to the bottom of the header. The value is in ft-inches or millimetres. This line is toggled on by the framing callout parameter and is also on dim layer #2.

The 4th line is the most interesting. For windows it gives six pieces of information for doors it gives four pieces of information:

Window: top cripple length, header length, king stud qty. and length, trimmer stud qty. and length, sill length, bottom cripple length.

Door: top cripple length, header length, king stud qty. and length, trimmer stud qty. and length

This line is also toggled on by the framing callout parameter and is on dim layer #2.
 
OP
M

Medeek

Well-known member
Joined
Jan 13, 2013
Messages
550
Location
Copalis Beach, WA
Version 0.9.7e - 10.10.2018
- Added labels and callouts for all beam types.
- Beam label prefix can be customized in the General tab of the Global Settings.
- Beam Z Floor parameter included in draw and edit menus (used to establish height of beam from sub-floor).
- "Regen Beam Assembly" action added to context menu for beams.

wall_su236_800.jpg


Labels and callouts for beams now up to par with the rest of the plugin (walls, windows and doors).

If the framing callouts are enabled then the beam length, beam height (bottom of beam to floor) and grade and species are displayed. The Z floor parameter allows one to establish where the floor should be referenced from.

The primary purpose of the regen action is if a beam is moved (with SU's native move tool) in the Z direction, this will recalculate the beam height.
 
OP
M

Medeek

Well-known member
Joined
Jan 13, 2013
Messages
550
Location
Copalis Beach, WA
Necessity is the mother of invention as they say, and as I was creating a small two story model of a garage for local customer today it quickly became painfully obvious that I still do not have a good stair plugin or module.

The toolbar for the stairs module will start out with the following two icons, there will probably be additional ones added for concrete or steel stairs in the future:

wall_stairs_su_menu_active.jpg


The basic parameters for the Draw Stairs Menu will be:

0.) Stair Assembly Name: Auto assigned by the plugin but user can edit this parameter.
1.) Stair Type: Straight, L-Shape, U-Shape
2.) Stair Width: 40 inches or 1000mm
3.) Stair Height: (This will be determined by the picking of points and the bottom floor plane) ft-in or mm
4.) Max. Riser Height: 7.75 inches or 200 mm
5.) Draw Risers: YES/NO
6.) Riser Thickness: 3/4" or 19 mm
7.) Riser Material: Lumber, Lumber PT, OSB, PLY
8.) Top Tread Flush: Yes or No (this option will make the top tread flush with the upper level/deck
9.) Tread Depth: 10" or 255 mm
10.) Tread Thickness: 1.25" or 32 mm
11.) Tread Nosing: 1.25" or 32 mm
12.) Nosing Shape: SQUARE or ROUND
13.) Tread Material: Lumber, Lumber PT, OSB, PLY, Oak, Birch, Maple, Pine etc... (custom material from material manager in global settings.
14.) Stringer Qty: 2, 3, 4, or 5
15.) Stringer Depth: 11.25" or 285 mm
16.) Stringer Thickness: 1.5" or 38 mm
17.) Stringer Material: Lumber, Lumber PT, LSL, LVL
18.) Stair Framing: YES, NO, 2D
19.) Advanced Options YES or NO

The advanced options or parameters are tentatively:

1.) Thrust Block: None, 2x4, 2x6, 2x8 or metric sizes for metric templates
2.) Hanger Board: Yes or No, will default to 3/4" or 19 mm OSB
3.) Landing Tread: Yes or No ( will default to a 3-1/2" landing tread with bull nose to match stair treads)

Eventually I will add other advanced options such as hand rails, skirt boards, gypsum spacers, blocking, brackets etc...

I'm not an expert on stairs but I do have a couple of details where I've considered the various elements of a typical stair case:

http://design.medeek.com/cad/autocad/STAIRHEADER_SECTION.pdf

http://design.medeek.com/cad/autocad/STAIR_SECTION.pdf

GARAGE4828-A6D-3_STAIRS.jpg


L-Shapes and U-Shapes get quite a bit more complicated with the inclusion of a landing. I will start with just a straight run of stairs first.

Right of the bat I will start with HTML draw and edit menus, no point in messing around with the traditional UI, especially with such a long list of parameters already.
 
To avoid these ads, REGISTER NOW!
Top Bottom