
You are using an out of date browser. It may not display this or other websites correctly.
You should upgrade or use an alternative browser.
You should upgrade or use an alternative browser.
Truss Design
- Thread starter Medeek
- Start date
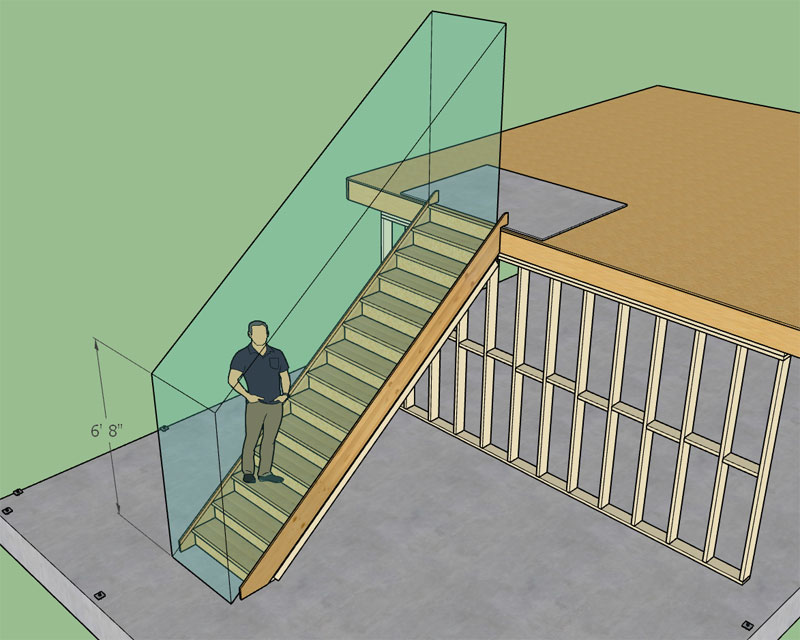
Here is a situation where the finished floor is 2" off of the bottom sub-floor (slab):
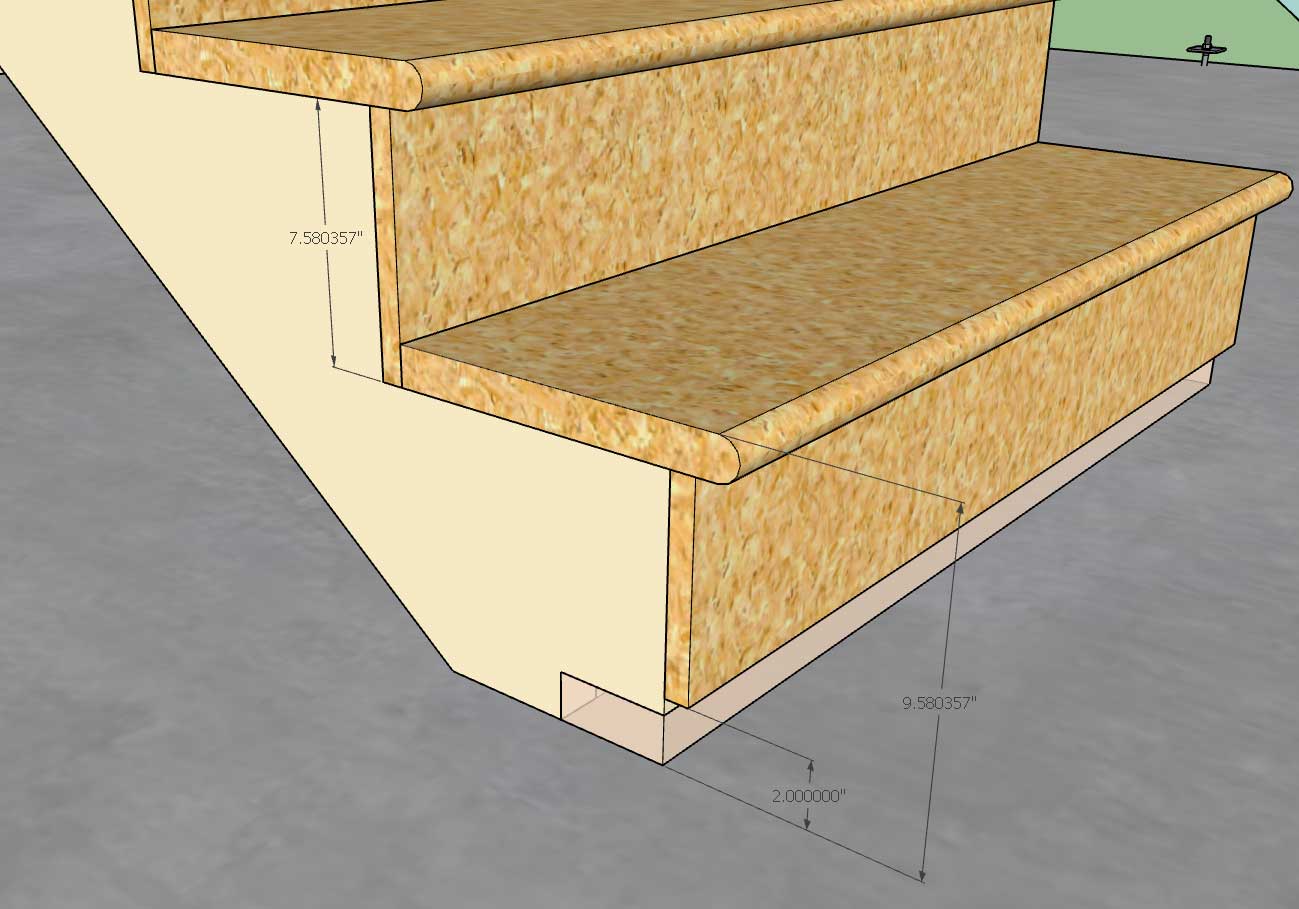
Note that the riser heights are correct and that the bottom riser has an additional 2" added to its height. The question I have is what to do with the riser board itself on this bottom tread?
I've shown it in the configuration where the finished floor can be applied underneath the riser board however is it more common just to extend the riser board to the bottom of the stringer so that it rests on the sub-floor or slab?
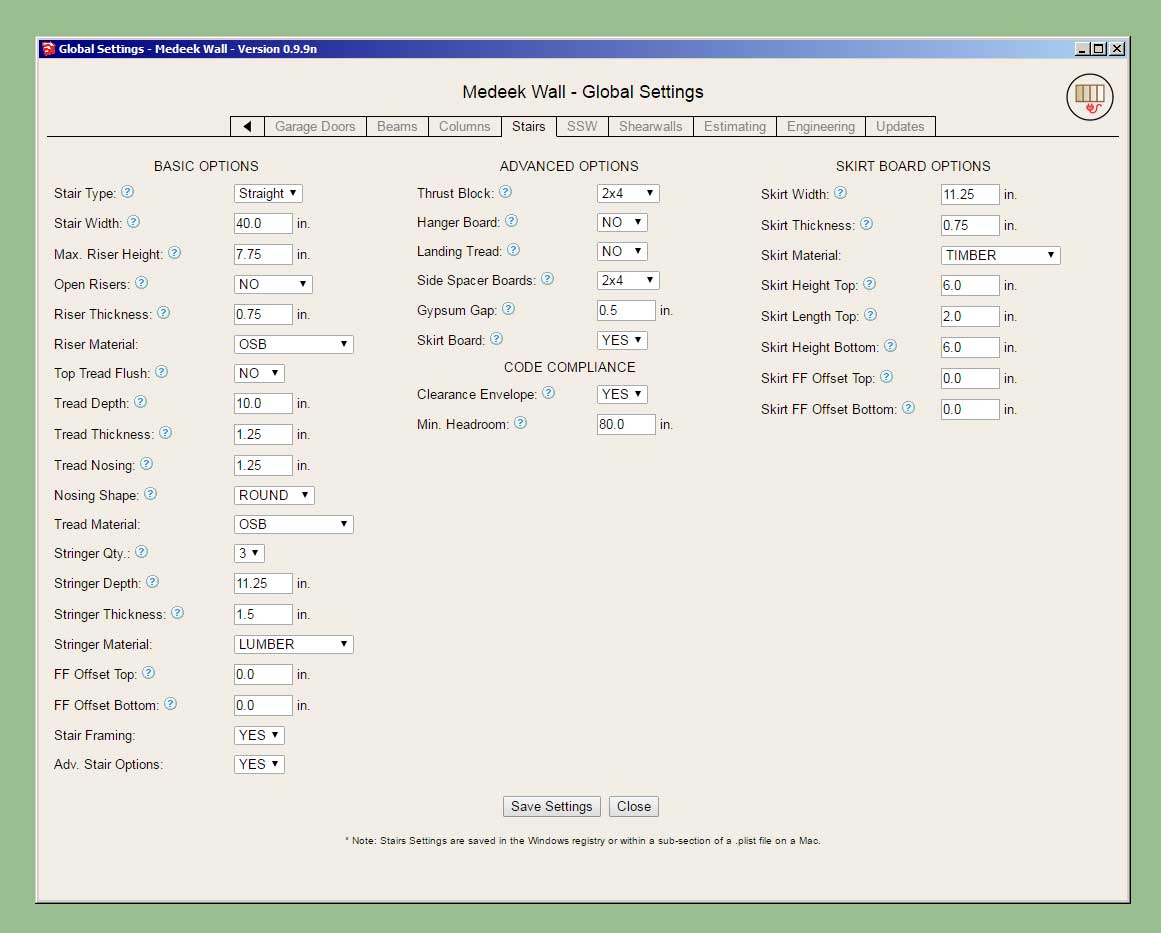
Version 0.9.9n - 11.25.2018
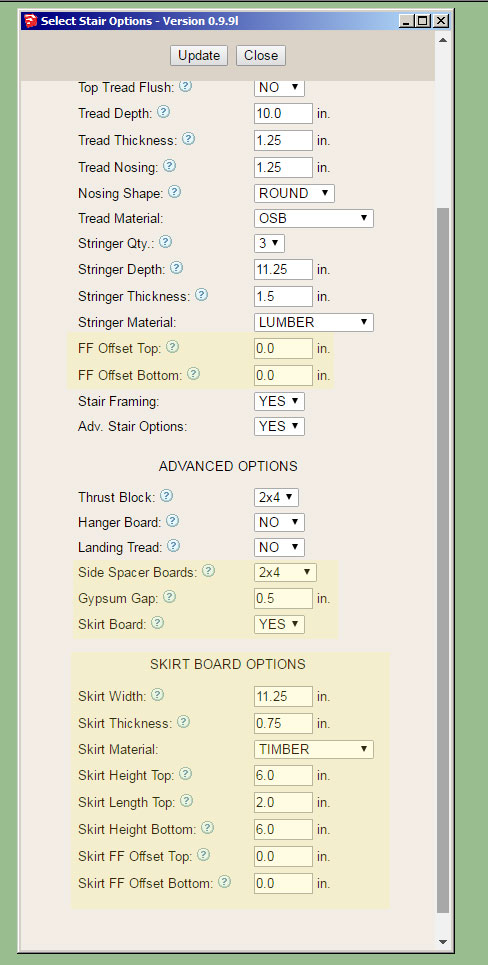
- Added the following options to the stair module: side spacers, skirt boards, finished floor offsets.
When selecting the points to define the stairs you will want to pick sub-floor to sub-floor now that the finished floor offsets are enabled. Stairs created in version 0.9.9m are not backward compatible with this latest version as I have made too many updates and improvements to the code.
Keep sending in your ideas on how to make this module better.
I will be moving back to work on the gable wall module and giving this one a rest for a while unless there is an unresolved bug or critical fix that needs attention. I have a separate "todo" list just for this module. Open sided staircases is something I will have to do some more study on:
Farmall450
Well-known member
Wow, this is awesome.
Version 0.9.9o - 11.26.2018
- Completed the Stairs tab within the global settings.
- Added the ability to draw a "Clearance Envelope" with an additional global parameter for specifying the minimum headroom.
- Added a Building Code layer and an Engineering layer to the Layers tab of the global settings.
The clearance envelope (if enabled) is placed on the "code" layer. For future reference all code related items and warnings will be placed on this layer. The engineering layer will be used for engineering callouts, warnings and other related items.
The envelope is placed exactly and if the nosing is rounded then the envelope is translated a specific amount so that the tread line is tangent to the nosing. If anyone is interested the horizontal translation is given by this expression:
x_trans = r/tan(theta) - r/sin(theta) + r
where:
r = radius of the bullnose or 1/2 tread thickness.
theta = angle of stringer from the horizontal
Hopefully the clearance envelope is useful to designers who want to check that their framed openings for their staircases are code compliant.
Now that I'm about halfway down this rabbit hole (stair module), I should probably go a bit further. Most stairs need a hand rail:
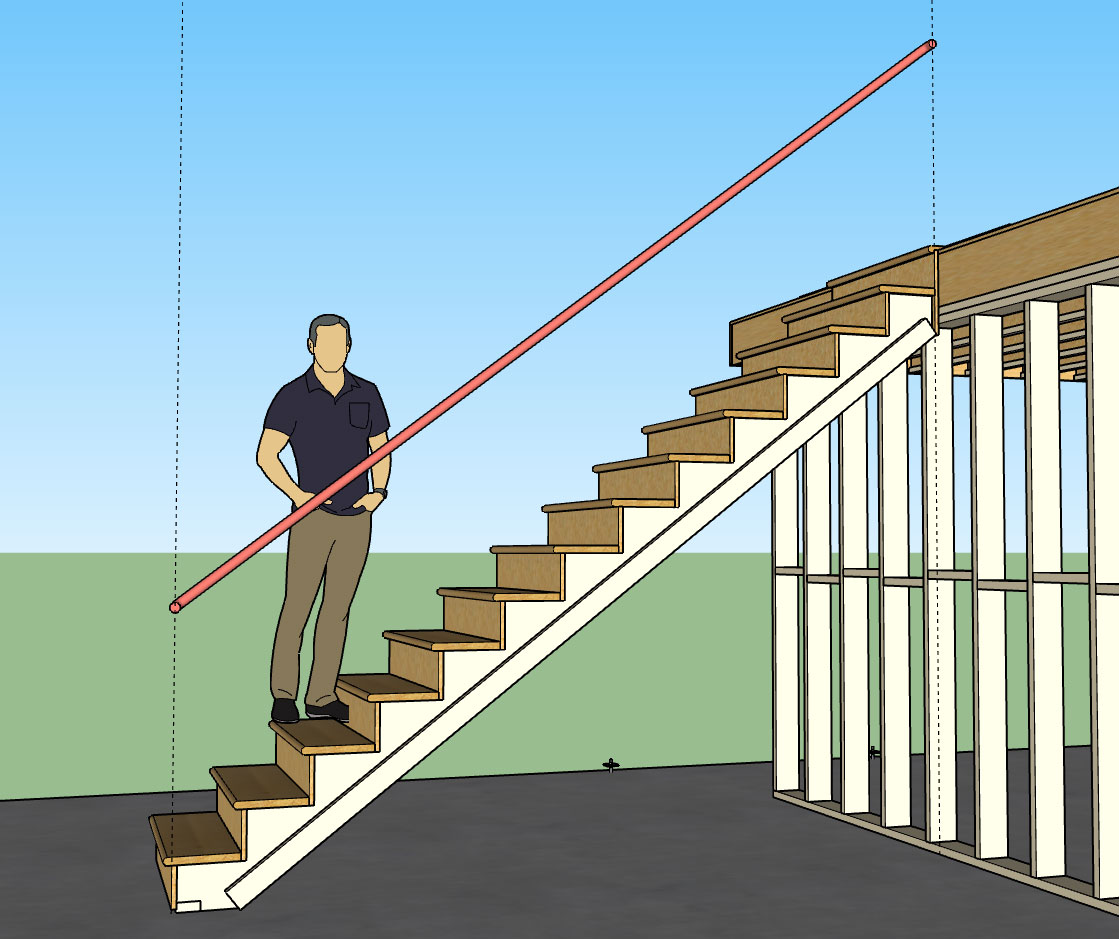
Additional advanced option: Handrails (Yes or No)
Then the handrail options shall be:
1.) Profile: Circle, Square, Custom1, Custom2 etc... (or any user defined profiles from sub-folder)
2.) Position: Left, Right, Both
3.) Height: 36" (default), vertical distance from tread line to top of handrail.
4.) Size: 1.5" (default), only applicable to circle and square profiles.
5.) Clearance: 1.5" (default), distance from inside edge of handrail to wall (gypsum).
6.) End Treatment: Cut/Vertical/Return (return shown above)
7.) Handrail Material: Default materials and custom materials from library
I think these seven parameters are enough to define a basic handrail(s) for a straight run of stairs as shown. The option to have a vertical end treatment will allow the user to insert newel posts, however I am not really giving the option to customize where exactly the handrail will terminate so there may be some manual editing required.
With regards to manual edits, similar to the wall assemblies, the user can include custom groups or components within the stair assembly group and have them retained simply by including the text "custom" or "CUSTOM" somewhere in the instance name. If the stair assembly is then edited or regenerated by the plugin these custom entities will not be blown away but will maintain their position and properties within the main group. So theoretically one could insert any number of items such as balusters, newel posts, additional molding etc...
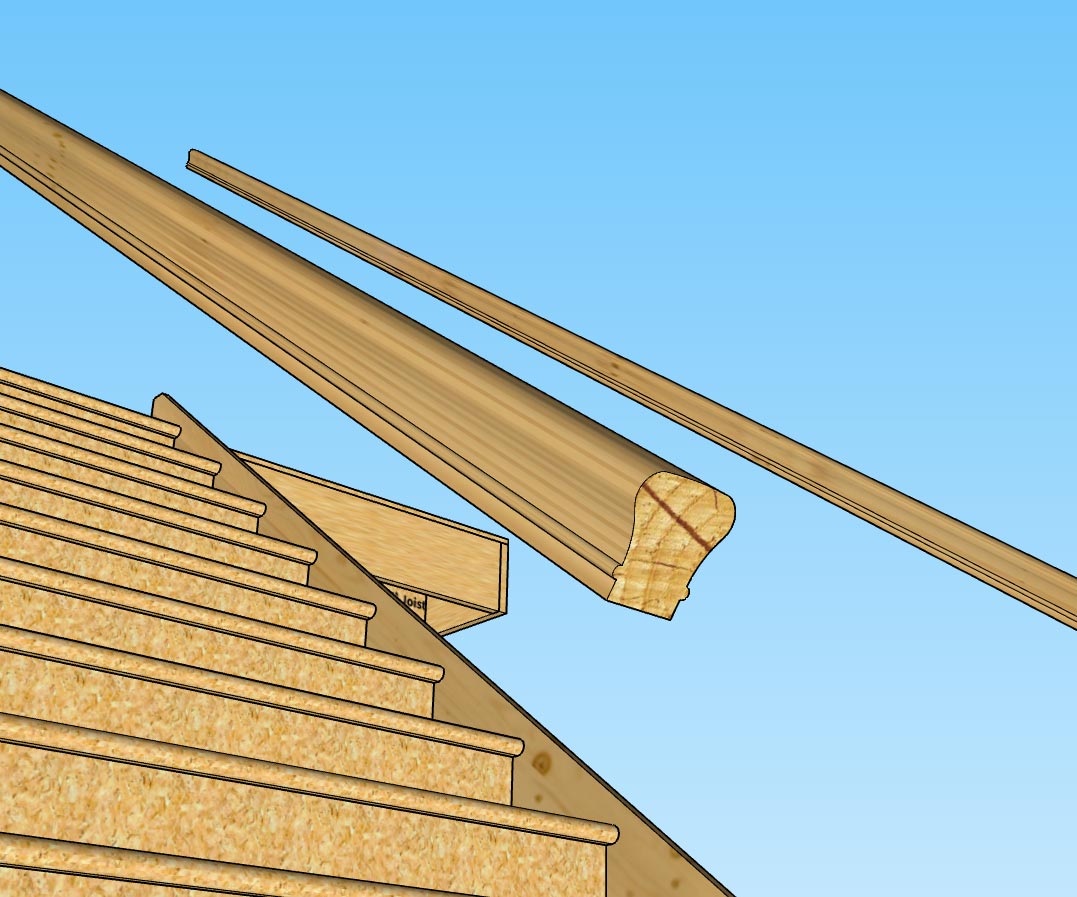
I will include some typical handrail profiles:
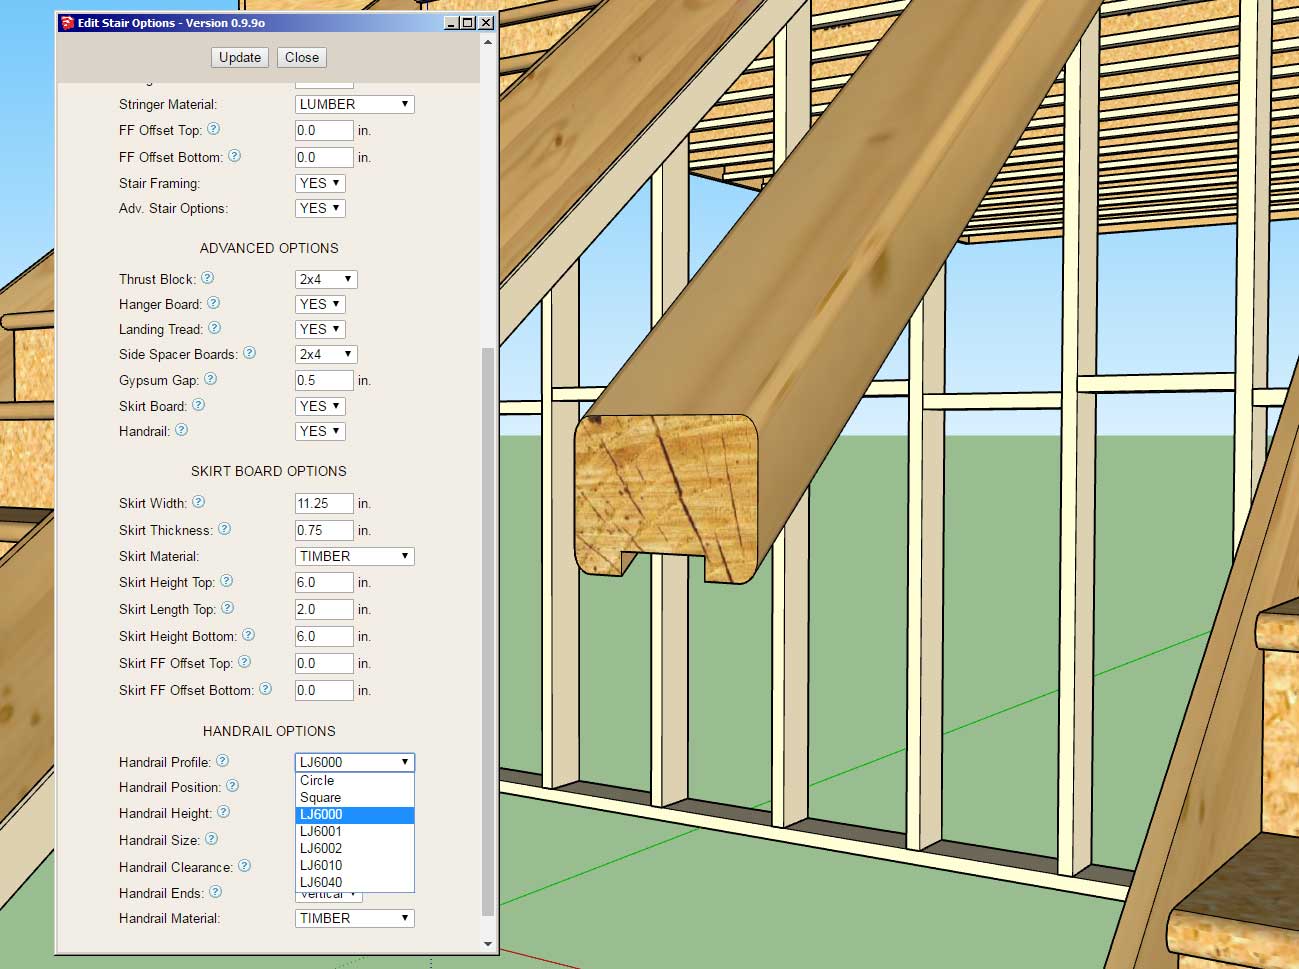
The part numbers shown are from LJ Smith and should coincide very closely with their exact geometry from their shop drawings:
https://www.ljsmith.com/product-drawings
I have contacted them in hopes that they can provide me exact DXF or even SketchUp files so that I can include their full handrail profile line within the library.
Adding your own custom profiles is as simple as dropping your SketchUp files into the library/handrail sub-folder.
If you have some accurate profiles that you would like added to the plugin please contact me, I reserve the right to edit any profile for accuracy and/or not include it.
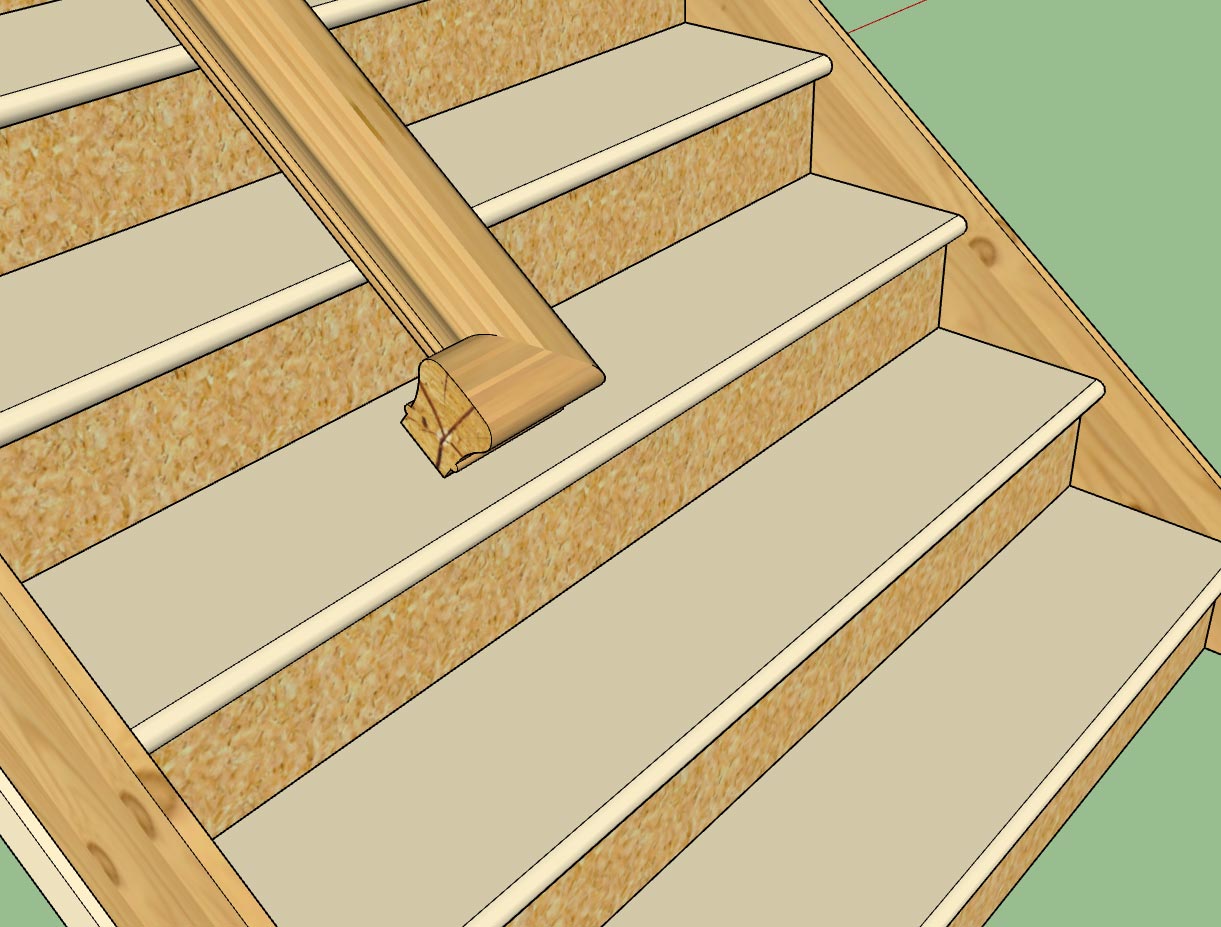
Some of these profiles are rather complicated and will add a bit of weight to the model but surprisingly the performance was much better than expected:
A good example is the LJ6010 profile shown above, with something like 80 line segments making up the profile.
On a related note I am just about to wrap up the handrail piece of the stair module, however I am looking at the end treatment where the user selects the "RETURN" option.
For a circle profile I typically see a radiused return rather than just a 90 degree return however I am curious as to what the preference is or if there is a typical solution here.
Version 0.9.9q - 12.03.2018
- Enabled "Over-the-Post" termination (single rise gooseneck and starting ease) for all handrail profiles.
The utilization of this termination option won't really become important until I setup open sided stairs with the accompanying newel posts and balusters.
Also note that the delta Z for the starting ease and also the gooseneck is plus 4" for now, at some point I will probably want to allow the user to customize this height differential(s), but in the US market 4" seems pretty much standard.
Tutorial 8 - Trim Function:
View model here:
https://3dwarehouse.sketchup.com/model/9cf8f6a5-6066-4d27-99e0-775608225e4c/Trim-Test
View model here:
https://3dwarehouse.sketchup.com/model/9cf8f6a5-6066-4d27-99e0-775608225e4c/Trim-Test
Version 2.2.5 - 12.08.2018
- Added Trim 2 icon to the Medeek Tools toolbar.
- Added the trim 2 function for (solid) groups and components. This trim function allows the user to select two trimming planes.
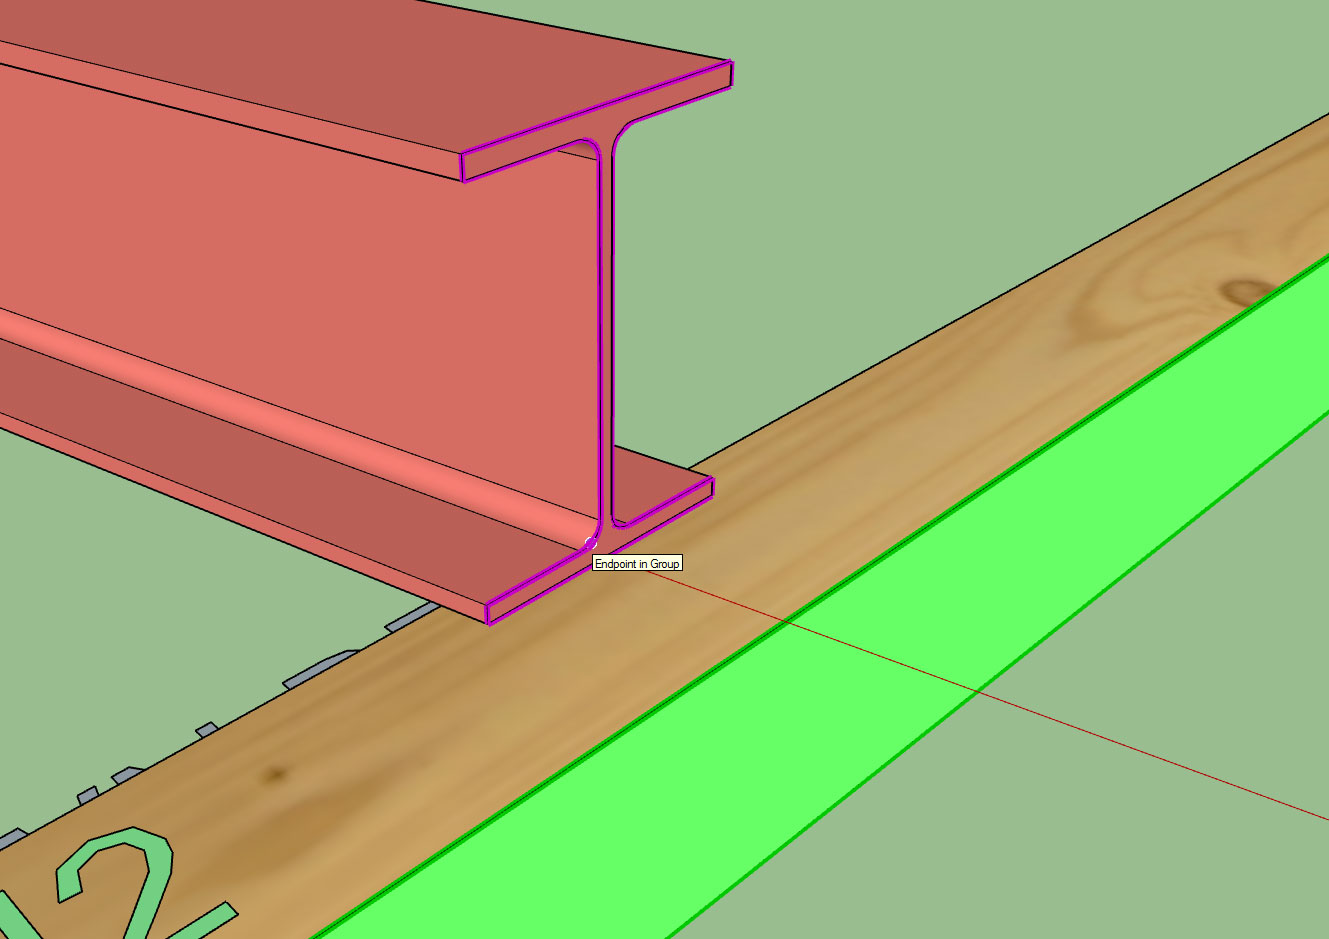
This additional trim function will be helpful in trimming more complicated geometry like hip rafters and triangular pieces of roof sheathing or cladding.
Similar to the regular trim function this tool can also be utilized on any non-plugin geometry so long as it is a (solid) group or component.
View video here:
- Added Trim 2 icon to the Medeek Tools toolbar.
- Added the trim 2 function for (solid) groups and components. This trim function allows the user to select two trimming planes.
This additional trim function will be helpful in trimming more complicated geometry like hip rafters and triangular pieces of roof sheathing or cladding.
Similar to the regular trim function this tool can also be utilized on any non-plugin geometry so long as it is a (solid) group or component.
View video here:
Version 0.9.9t - 12.09.2018
- Enabled temporary (construction) dimensions for wall panels in the Draw Wall tool.
- Added a section in the General tab of the global settings for configuring construction dimensions.
I've also added the option for closed arrows, open arrows and ticks:
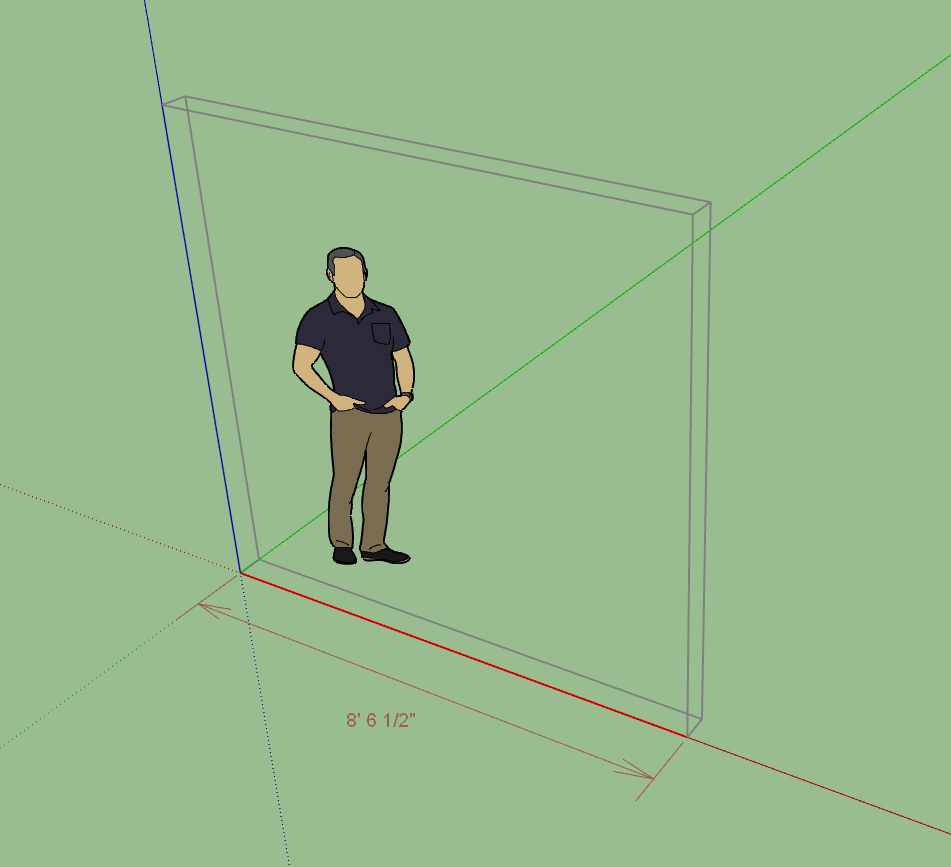
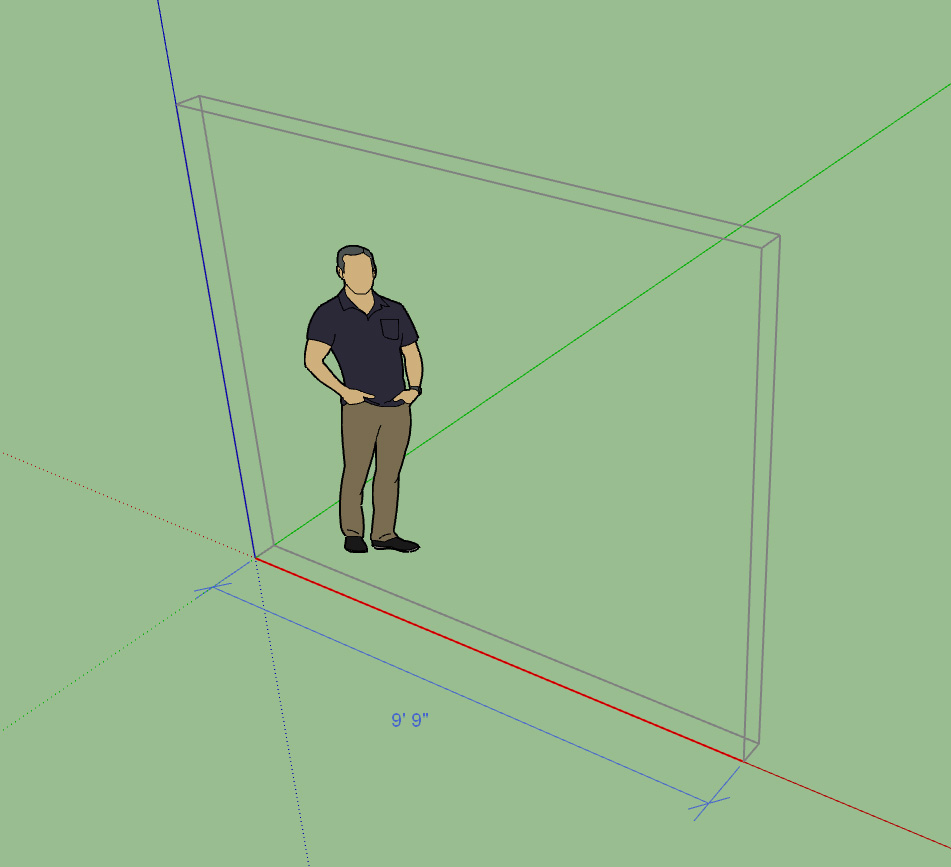
Note the larger text size set to 18PT versus 14PT in the previous to screenshots:
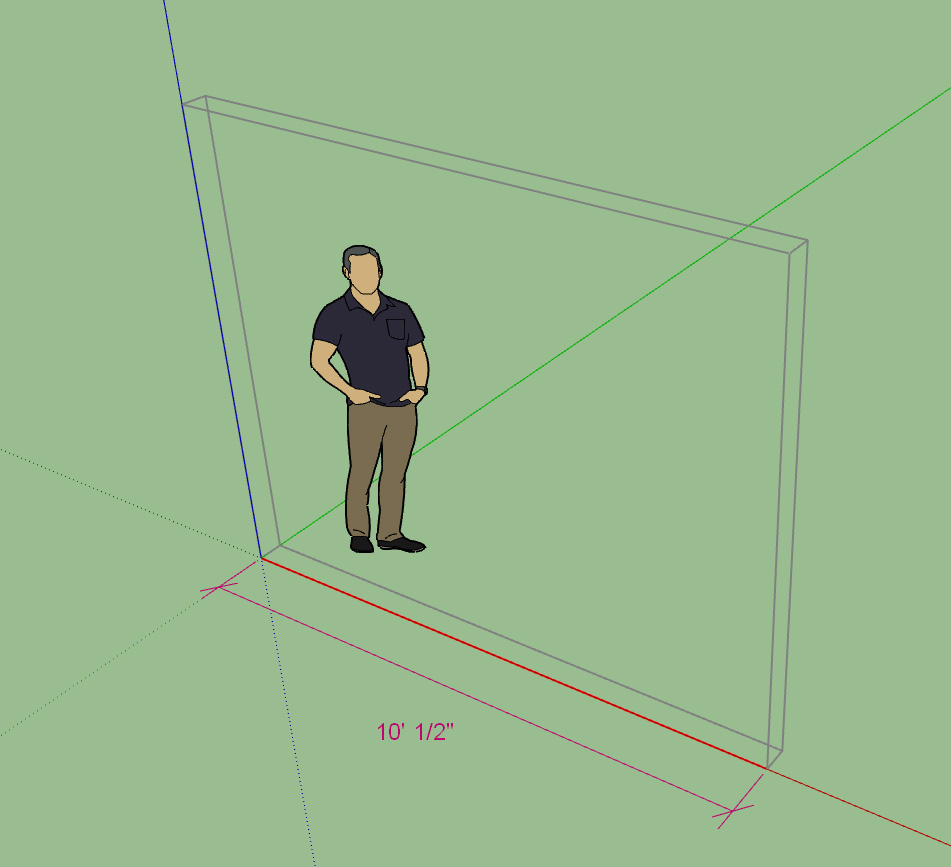
The endpoint, color and text size of the dimensions can be configured in the General tab of the global settings:
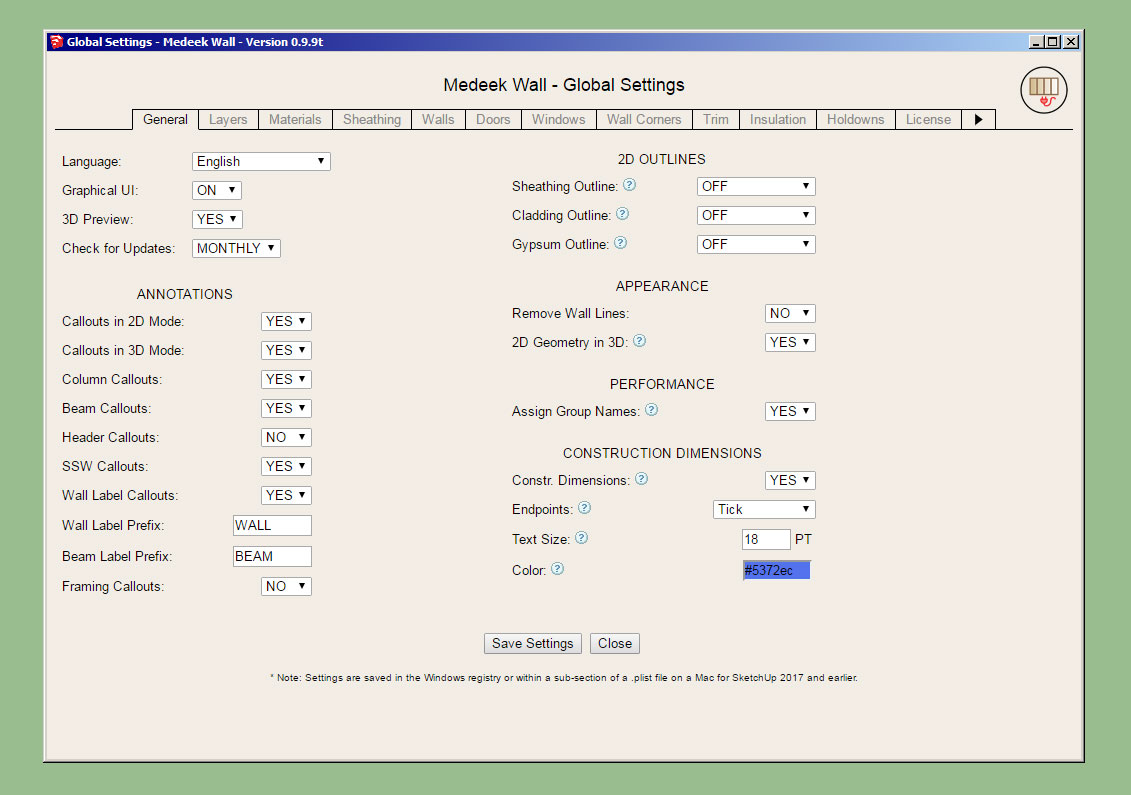
Hopefully this is flexible enough for most users. Alternatively you can also turn off the construction dimensions if you would rather not have them displayed.
- Enabled temporary (construction) dimensions for wall panels in the Draw Wall tool.
- Added a section in the General tab of the global settings for configuring construction dimensions.
I've also added the option for closed arrows, open arrows and ticks:
Note the larger text size set to 18PT versus 14PT in the previous to screenshots:
The endpoint, color and text size of the dimensions can be configured in the General tab of the global settings:
Hopefully this is flexible enough for most users. Alternatively you can also turn off the construction dimensions if you would rather not have them displayed.
Version 2.2.5b - 12.10.2018
- Added the Extend function for (solid) groups and components. This function allows the user to extend a member to a single plane/face.
The tool also has the ability to handle fairly complex, prismatic beams etc...
A huge shout out to ThomThom and John (John_DrivenuptheWall) from the SketchUp forums for helping me sort some of the issues out with the algorithm and code.
Tutorial 10:

Version 2.2.5c - 12.13.2018
- Added the Trim 3 icon to the Medeek Tools toolbar.
- Added the Trim 3 function for (solid) groups and components. This trim function allows the user to select three trimming planes.
- Enabled the ability to invert your selection within the Trim 2 and Trim 3 tools using the "CTRL" key in Windows.
Tutorial 11:
Note that the planes in either advanced trim tool do not need to be orthogonal.
When using the Trim 3 tool the suggested order of selecting the cutting planes/faces is:
Vertical - Vertical - Horizontal
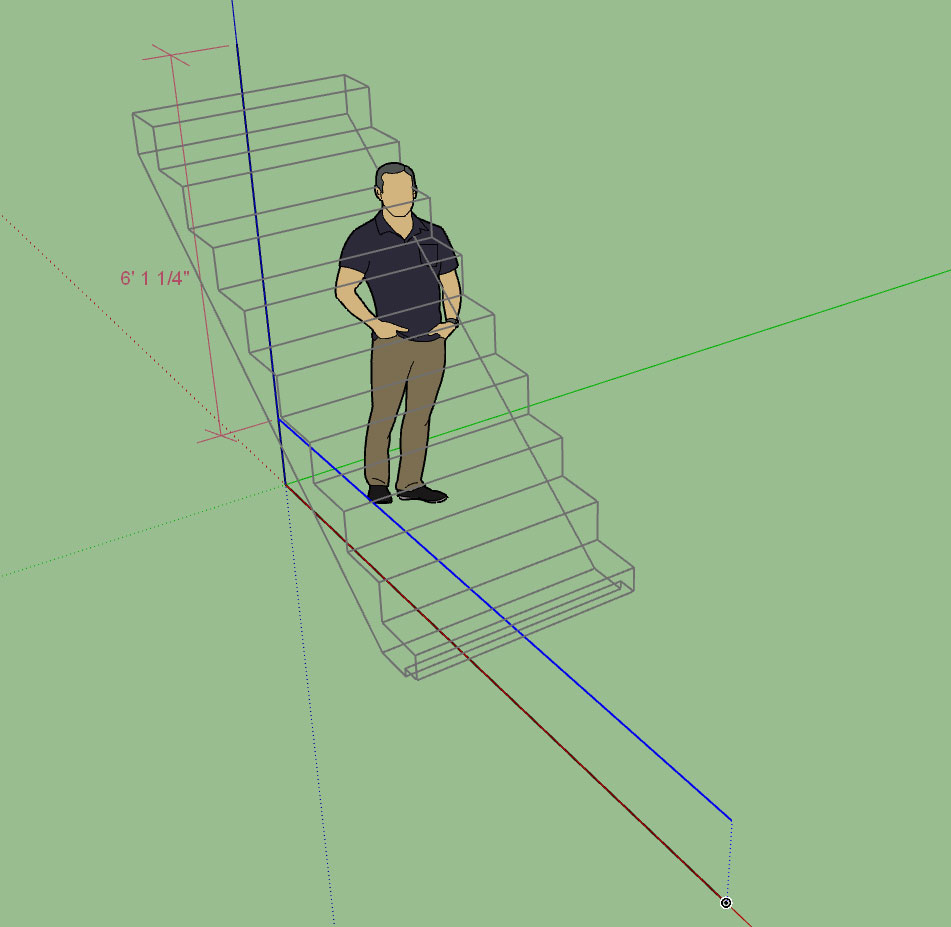
Tutorial 7 - Stairs (23:19 min.)
Unfortunately there is just too much information to convey regarding this new module and the video doesn't really dive deep enough into all of the details and options, but hopefully this will be enough of a primer for getting started with stairs.
I also discuss the new wall isolation concept in some detail in this video.
Version 2.2.6 - 12.16.2018
- Added the Miter Cut icon to the Medeek Tools toolbar.
- Added the Miter Cut function for (solid) groups and components.
- Enabled temporary (construction) dimensions for trusses, roofs and floor assemblies.
- Added a section in the General tab of the global settings for configuring construction dimensions.
Tutorial 12 - Miter Cut:
Version 0.9.9v - 12.29.2018
- Added roof sheathing to the Medeek Estimator (common and monopitch truss assemblies).
In order for this cross plugin communication/analysis to work correctly you must also upgrade the Truss plugin to the latest version (2.2.7b - 12.29.2018). The latest truss plugin version has statistics enabled for common and monopitch truss roofs.
Note that the Medeek Estimator is largely experimental (but functional) at this point. I am essentially setting up the templates and overall organization. Once I am satisfied with the general layout and system I will begin to fully flesh it out with all of the various construction elements (eg. studs, plates, windows, doors, etc...)
I may also separate the Medeek Estimator module into its own stand along plugin since technically it can work with either the Wall or Truss plugin or both. I will also be augmenting the Foundation plugin with statistics so that its output can also be analyzed in the estimator.
If I do pull it out then it will not really be a stand along plugin as much as an add on that works specifically with the mdkBIM suite since it is not setup to analyze generic models like Quantifier or Estimator (John Brock).
Version 2.2.7c - 12.30.2018
- Enabled roof labels and framing callouts for all rafter roof assemblies: Bable, Hip, Dutch Gable, TJI, TJI w/ Glulam, Shed etc...
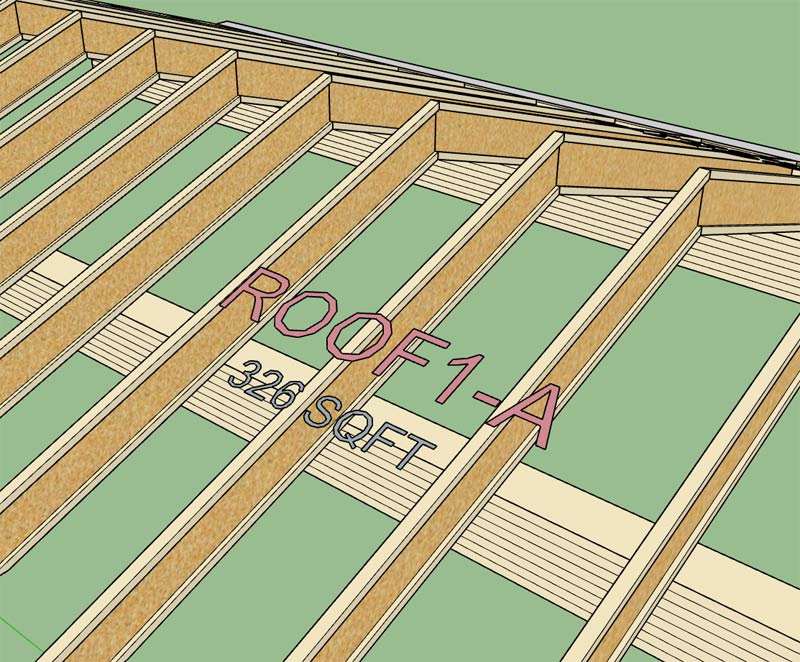
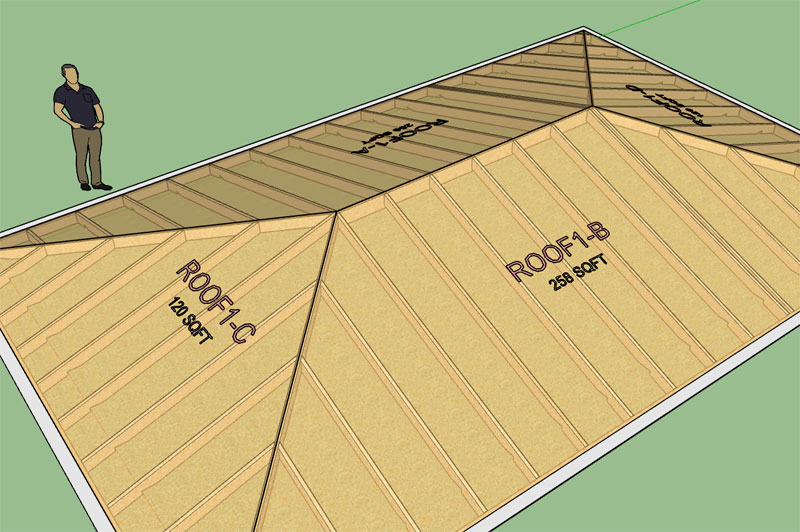
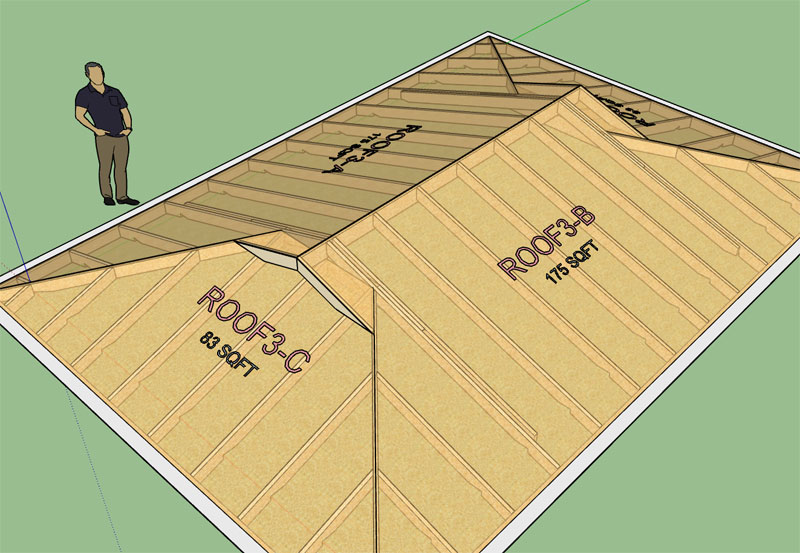
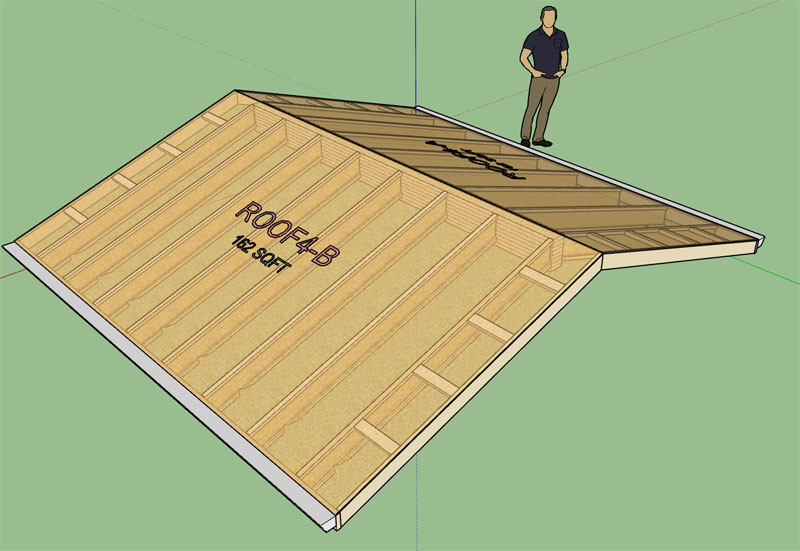
I've also been thinking about how to best handle holes or cutouts in the roof sheathing and cladding that are not only parametric but can be properly reported by the estimator (ie. net area vs. gross area). I think I have a system worked out, I just need to implement the prototype and test it out.
The cut out or hole tool will have a few options. One of the options will allow the user to specify whether to cut the cladding, sheathing or framing or all of them. If the framing is cut then another option for framing in the opening.
I may also provide another option to provide a skylight to cover an opening or other construction elements (eg. vents, whirlybirds etc...)
- Enabled roof labels and framing callouts for all rafter roof assemblies: Bable, Hip, Dutch Gable, TJI, TJI w/ Glulam, Shed etc...
I've also been thinking about how to best handle holes or cutouts in the roof sheathing and cladding that are not only parametric but can be properly reported by the estimator (ie. net area vs. gross area). I think I have a system worked out, I just need to implement the prototype and test it out.
The cut out or hole tool will have a few options. One of the options will allow the user to specify whether to cut the cladding, sheathing or framing or all of them. If the framing is cut then another option for framing in the opening.
I may also provide another option to provide a skylight to cover an opening or other construction elements (eg. vents, whirlybirds etc...)
Version 1.1.9 - 01.03.2019
- Foundation and Footing labels option added to the General tab of the Global Settings.
- Foundation and Footing label prefixes can be customized in the General tab of the Global Settings.
- Foundation labels enabled for slab-on-grade foundations.
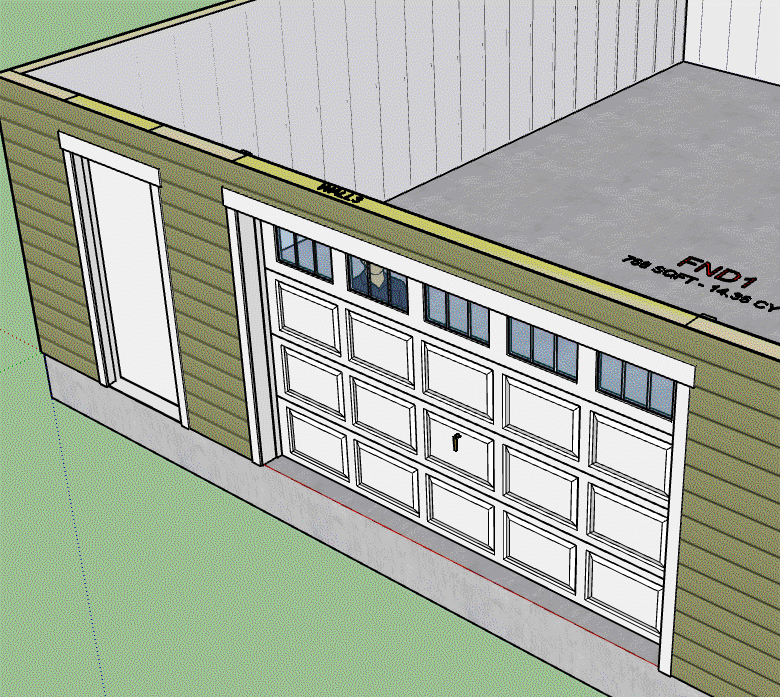
- When construction callouts are enabled the overall area and volume (concrete) of the foundation is displayed beneath foundation label (currently only slab-on-grade foundation assemblies have this feature available).
- Added customizable colors for lumber, PT Lumber and labels within the Materials tab of the Global Settings.
- Added additional layers for dimensions, annotations, 2d geometry, building code and engineering.
The customizable colors for the lumber (PT) will not take affect until I update the stemwall module. Currently the color of the lumber is still hard coded into this module.
I am also working on an update to the Medeek Estimator which will then allow the user to quantify foundations as well as roof and wall assemblies.
So far I have the concrete, rebar, and anchor bolts queued up for analysis in the estimator module. I will need to still work on adding in the insulation (foam) for the FPSF option. The first foundation type that will be made available in the estimator is the slab-on-grade. Once I am satisfied with the integration between the two plugins I will continue to flesh out the rest of the foundation types.
The bigger issue right now is the lack of parametrics for this plugin. With the addition of the attribute library I am one step closer to making this happen. There is really nothing special that needs to happen it is just a matter of pulling together the HTML menus and other tedious tasks within the Ruby code.
I apologize that it has taken this long to begin to address the parametrics issue. As can be seen in the changelog I had a burst of activity in 2017 and then only recently began to slowly process other updates.
http://design.medeek.com/resources/foundationpluginchangelog.html
Most of my time has been spent on the other two plugins but it is my goal this year to bring this plugin up to par with the other two.
- Foundation and Footing labels option added to the General tab of the Global Settings.
- Foundation and Footing label prefixes can be customized in the General tab of the Global Settings.
- Foundation labels enabled for slab-on-grade foundations.
- When construction callouts are enabled the overall area and volume (concrete) of the foundation is displayed beneath foundation label (currently only slab-on-grade foundation assemblies have this feature available).
- Added customizable colors for lumber, PT Lumber and labels within the Materials tab of the Global Settings.
- Added additional layers for dimensions, annotations, 2d geometry, building code and engineering.
The customizable colors for the lumber (PT) will not take affect until I update the stemwall module. Currently the color of the lumber is still hard coded into this module.
I am also working on an update to the Medeek Estimator which will then allow the user to quantify foundations as well as roof and wall assemblies.
So far I have the concrete, rebar, and anchor bolts queued up for analysis in the estimator module. I will need to still work on adding in the insulation (foam) for the FPSF option. The first foundation type that will be made available in the estimator is the slab-on-grade. Once I am satisfied with the integration between the two plugins I will continue to flesh out the rest of the foundation types.
The bigger issue right now is the lack of parametrics for this plugin. With the addition of the attribute library I am one step closer to making this happen. There is really nothing special that needs to happen it is just a matter of pulling together the HTML menus and other tedious tasks within the Ruby code.
I apologize that it has taken this long to begin to address the parametrics issue. As can be seen in the changelog I had a burst of activity in 2017 and then only recently began to slowly process other updates.
http://design.medeek.com/resources/foundationpluginchangelog.html
Most of my time has been spent on the other two plugins but it is my goal this year to bring this plugin up to par with the other two.
Version 0.9.9w - 01.04.2019
- Added Drip Edge and Hip & Ridge to the Medeek Estimator (common and monopitch truss assemblies).
- Added Concrete, Rebar and Anchor Bolts to the Medeek Estimator (slab-on-grade foundation assemblies).
- Made some improvements to the Medeek Estimator framework and user interface.
This recent release is a further test of the cross plugin integration. Assemblies from the Truss and Foundation plugins are now able to be analyzed with the Medeek Estimator.
I still have a long ways to go in order to flesh out all of the various building elements and configurations but at least I have a clear path now on how to make it happen.
With regards to the CSV output, I am still a bit unsure how to best format it so that it is fully optimized for further estimating and analysis. Any additional feedback on how best to preset the data is greatly appreciated.
This release is compatible with the following releases:
Medeek Truss: Version 2.2.7d
Medeek Foundation: Version 1.1.9
Version 0.9.9x - 01.07.2019
- License expiration date now appears in the License tab of the Global Settings when plugin is registered.
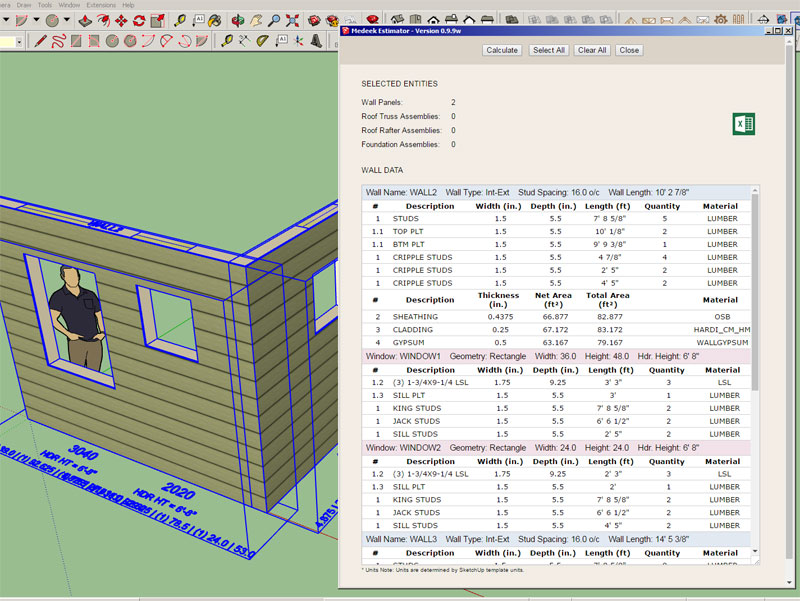
- Added (regular) wall studs to the Medeek Estimator.
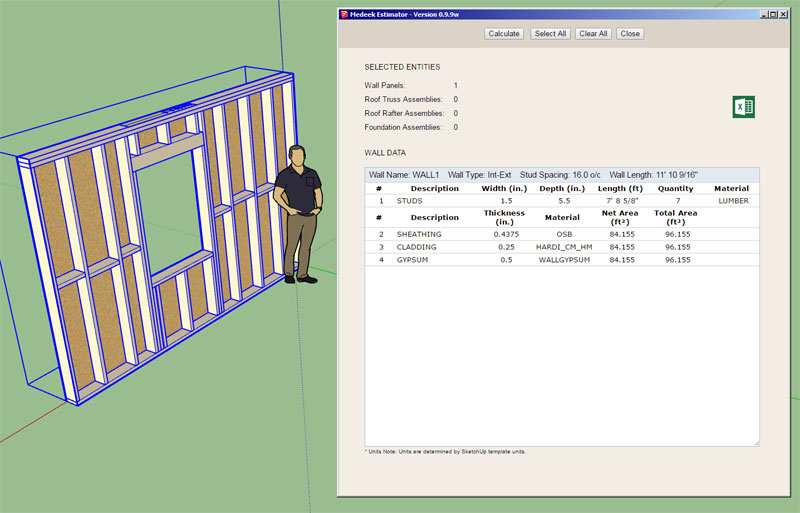
Note that this addition does not yet include cripple studs, kings studs, trimmer studs and corner studs (when they differ in dimension from the common studs).
The estimating module is a bit more complicated than I originally thought so I had to rewrite a good portion of it to make it more scalable. The HTML preview screen also needed some additional attention in that regard. I think I've finally got it setup now where I can much more easily flesh out the rest of the building elements for all three plugins.
The CSV is generated in parallel with the HTML preview however I can also add a lot more detail into this file if requested. There are no screen real estate limitations with spreadsheets, I can populate as many rows and columns as required.
- License expiration date now appears in the License tab of the Global Settings when plugin is registered.
- Added (regular) wall studs to the Medeek Estimator.
Note that this addition does not yet include cripple studs, kings studs, trimmer studs and corner studs (when they differ in dimension from the common studs).
The estimating module is a bit more complicated than I originally thought so I had to rewrite a good portion of it to make it more scalable. The HTML preview screen also needed some additional attention in that regard. I think I've finally got it setup now where I can much more easily flesh out the rest of the building elements for all three plugins.
The CSV is generated in parallel with the HTML preview however I can also add a lot more detail into this file if requested. There are no screen real estate limitations with spreadsheets, I can populate as many rows and columns as required.
Version 0.9.9y - 01.09.2019
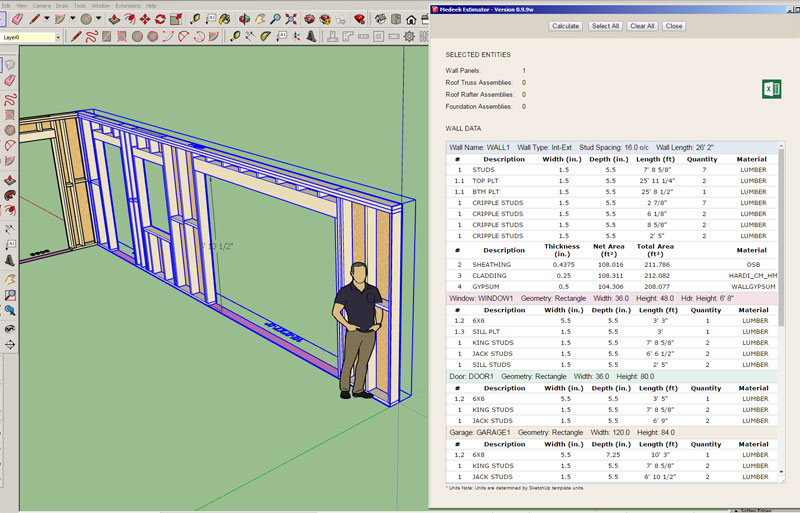
- Added cripple and corner studs to the Medeek Estimator.
- Added top and bottom plates to the Medeek Estimator.
- Added window framing: header, sill plate, king studs, trimmer studs and sill trimmer studs to the Medeek Estimator.
I shuffled things around a bit so the presentation is also more tidy both in the preview screen and in the CSV file.
Cripple studs are sorted per wall by length (shortest to longest), a shout out to Fredo6 and Eneroth for helping me tighten up the algorithm that does the sorting and enumeration.
https://forums.sketchup.com/t/sorting-a-list-of-values/84902
Windows for each wall appear below the wall's item listing, notice the different color header to help visually differentiate the sections. I will also use a unique color for doors, garage doors, columns and SSWs within the Wall table.
If there are sub-items that need similar treatment in roof and foundation assemblies I will utilize the same system, as it seems to work reasonably well.
I have not yet added doors and garage doors, they will be next. Windows are the guinea pigs. There is quite a bit of data to process so the ruby transmits the data to the HTML in blocks. Even so the speed is so fast there is hardly a lag when you hit the calculate button. I'm curious to try this with a full house model with 100+ walls.
I haven't gotten much feedback on the layout of my CSV file, I am hoping for more input in the near future so I can make it as effective and usable as possible.
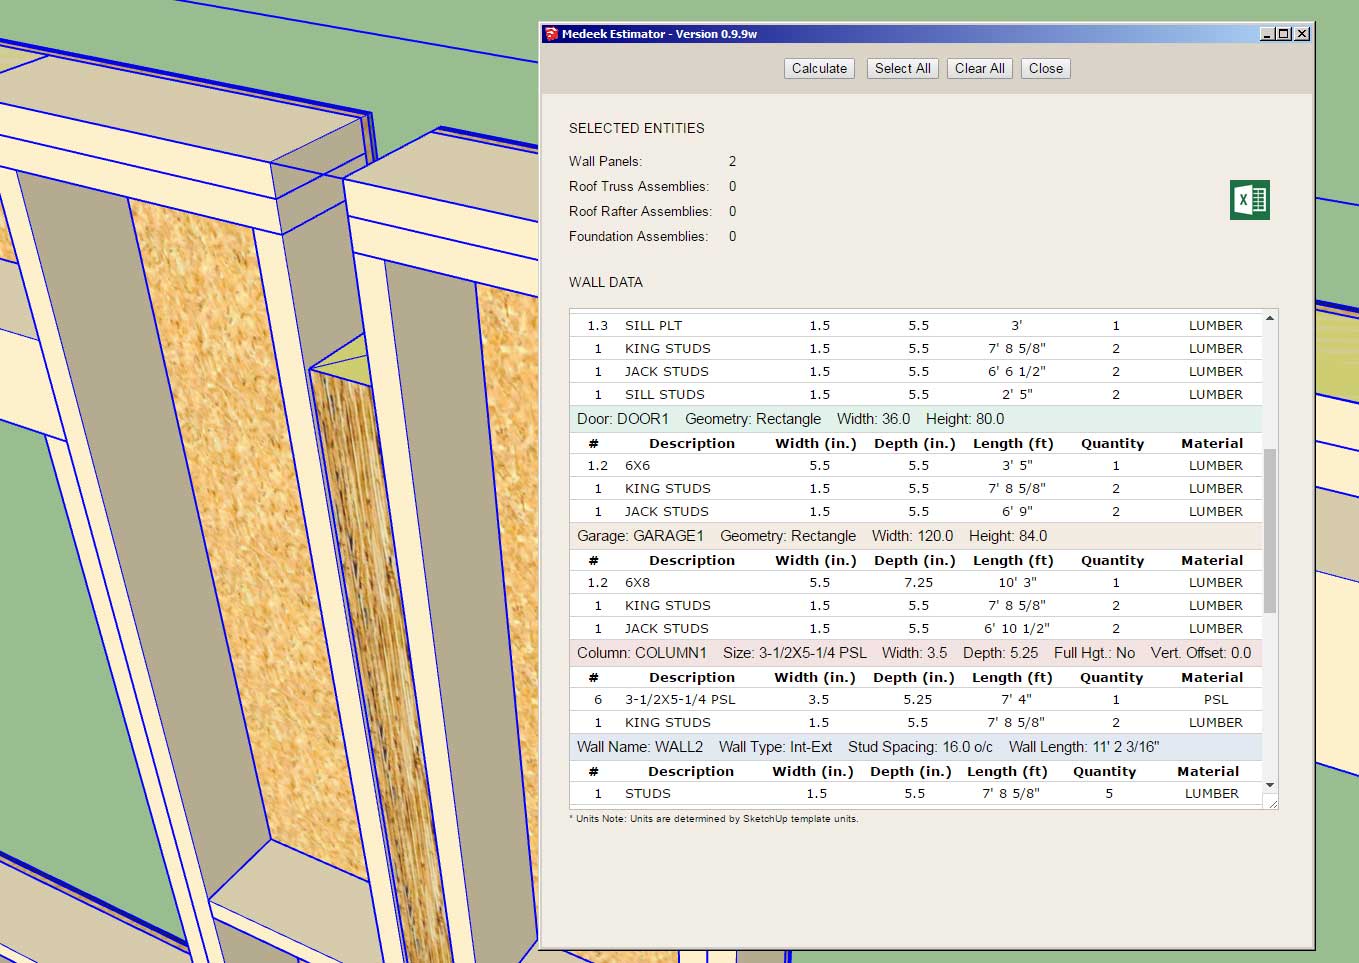
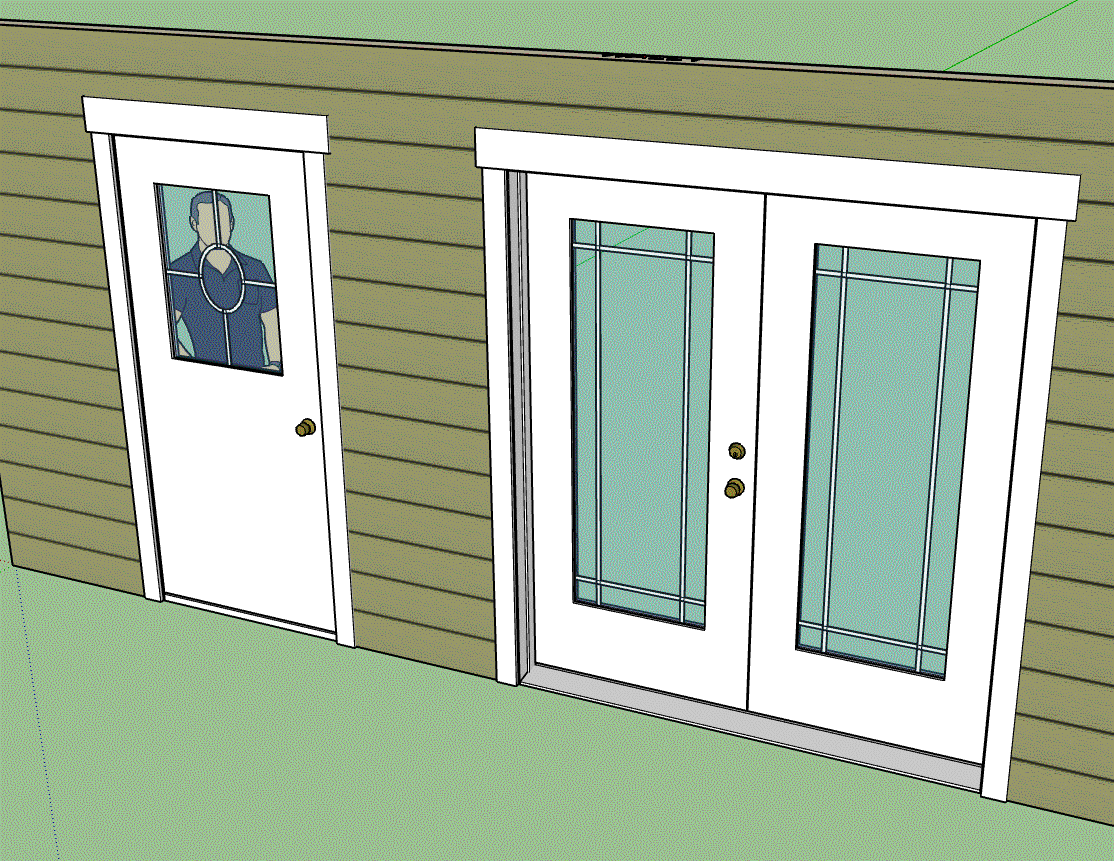
I've added doors and garage doors:
I've been working on incorporating the Ruby gem "prawn" for automatic PDF generation. In the case of the estimator it would be very nice to not only have the CSV export option but also the ability to instantly generate a PDF document of the material list.
I realize that you can always print the HTML preview screen as PDF but the formatting never comes out quite right with this sort of thing.
I will probably add in-wall columns next and if I get ambitious this evening maybe even beam and stair assemblies.
At this point I am focusing on just getting the basic framing data in place for the various elements. With doors and windows there is a vast amount of data that can be presented, all of this will be in good time. Right now it is baby steps...
Version 0.9.9z - 01.11.2019
- Added door framing: header, king studs and trimmer studs to the Medeek Estimator.
- Added garage door framing: header, king studs, trimmer studs and portal frame studs to the Medeek Estimator.
- Added in-wall columns to the Medeek Estimator.
I think I am done with the Estimator for a while, at least until someone makes a specific request.
The next big thing will be the roll out of the gable walls and the end of the BETA phase of development for the plugin.
After giving my pricing structure and licensing system much thought over the last few weeks I've decided to keep the licensing system the way it is.
Rather than trying to force people to renew their license (with a subscription system) it makes more sense that they should only renew if the added features actually warrant them doing so. This has always been my philosophy, however recent financial pressures have caused me to seriously reconsider this business model and waiver from my core beliefs. I think if you offer a decent product at a fair price then the economics will sort themselves out.
With that in mind I will also be lowering the renewal costs on all plugins in order to encourage existing license holders to renew their licenses and take advantage of new features that have been recently added (Medeek Estimator, labels, construction dimensions etc...).
In order to offset the decrease in renewal fees I will be increasing the initial cost of the plugins for new clients.
Later this month I will probably introduce a volume license (3-in-1 price) for all three plugins (mdkBIM Suite), however this will be only for new license purchases and renewals will still be handled on a per plugin basis.
Version 1.0.0 - 01.15.2019
- The Medeek Wall extension moved from BETA status to initial full release.
- Added the Open/Close (icon and function) to the Medeek Wall Tools toolbar.
- Enabled opening and closing of all man doors: 90 deg. or 45 deg.

When using the Open/Close tool the opening angle can be toggled (45 deg. / 90 deg.) with the CTRL key on windows.
When the wall is modified, regenerated or moved the doors will automatically close up and return to their default state.
I may also extend this function/tool so that it can utilized with garage doors and windows but its not a high priority at this time.
- The Medeek Wall extension moved from BETA status to initial full release.
- Added the Open/Close (icon and function) to the Medeek Wall Tools toolbar.
- Enabled opening and closing of all man doors: 90 deg. or 45 deg.
When using the Open/Close tool the opening angle can be toggled (45 deg. / 90 deg.) with the CTRL key on windows.
When the wall is modified, regenerated or moved the doors will automatically close up and return to their default state.
I may also extend this function/tool so that it can utilized with garage doors and windows but its not a high priority at this time.
Version 1.0.0b - 01.16.2019
- Enabled opening and closing of all garage doors.
Toggling the opening angle will have no affect when you open a garage door, it only affects the man door openings.
With the garage doors the assumption is a 12" radius for the track of the garage door. When I further flesh out the Garage Door tab in the global settings I will make this parameter user definable. It appears that the most common radius for the garage door track is somewhere between 12" - 24". So for now I am using the minimum radius of 12" since it provides the least amount of headroom when the garage door is open but also allows for the least amount of installed space required (clearance between top of garage door and ceiling).
Version 1.0.1 - 01.18.2019
- Added octagon windows to the window draw and edit modules.
- Fixed a bug in the license and registration module.
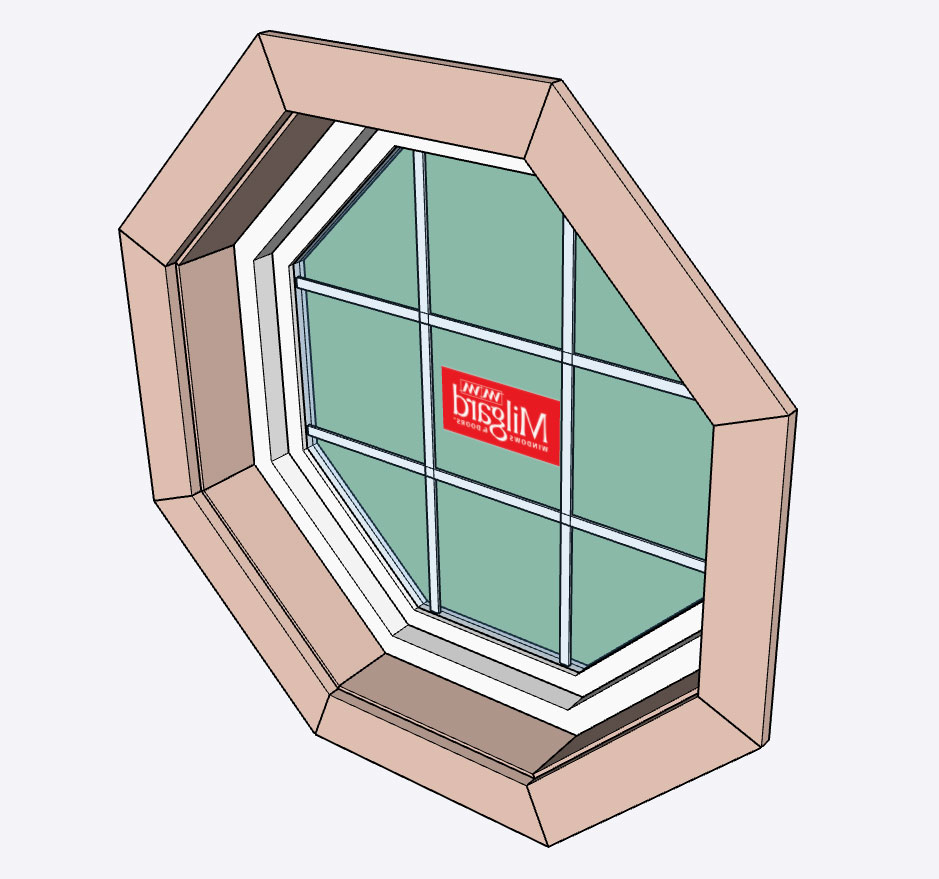
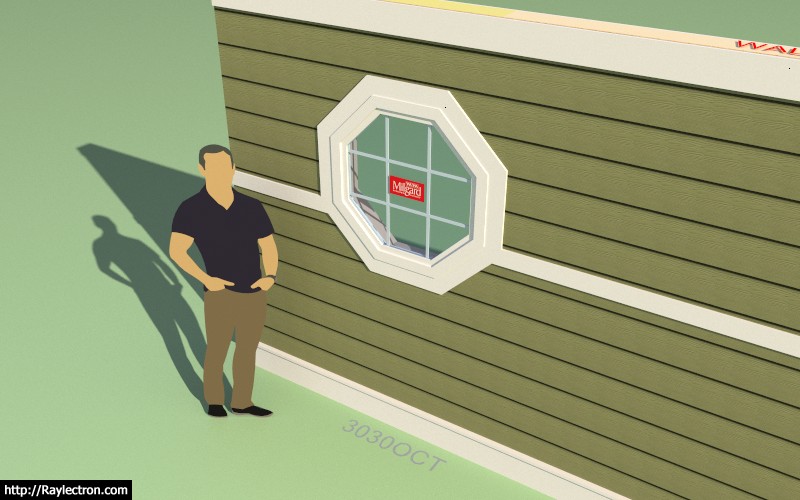
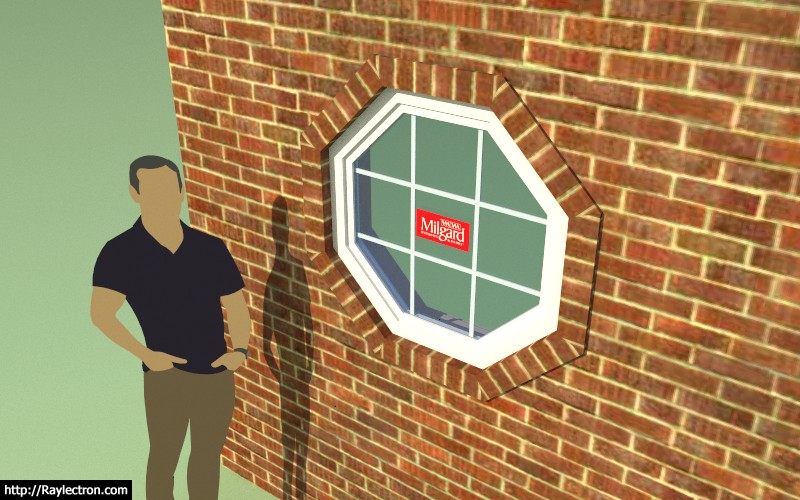
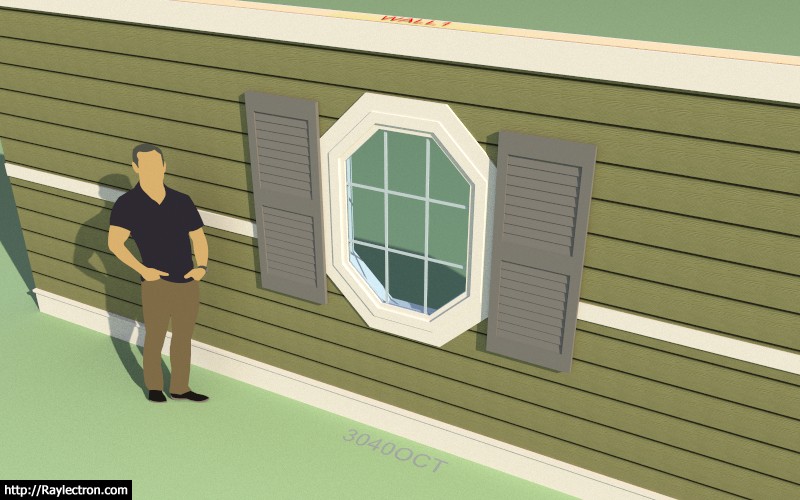
I've never actually seen an octagon window with ext. shutters so for now I will use rectangular shaped shutters on octagon windows until told to do otherwise.
I kind of forgot how much work it is to add in a new windows shape, there are so many options and elements and each one must be dealt with: sheathing, cladding, framing, trim, casing, shutters, band boards, frieze boards, water boards, wainscoting, labels.
The good news is that as I add in more window shapes/types a lot of the code begins to overlap so I can usually cobble together the logic based on work I've already done, which of course is easier and faster than creating something from scratch.
- Added octagon windows to the window draw and edit modules.
- Fixed a bug in the license and registration module.
I've never actually seen an octagon window with ext. shutters so for now I will use rectangular shaped shutters on octagon windows until told to do otherwise.
I kind of forgot how much work it is to add in a new windows shape, there are so many options and elements and each one must be dealt with: sheathing, cladding, framing, trim, casing, shutters, band boards, frieze boards, water boards, wainscoting, labels.
The good news is that as I add in more window shapes/types a lot of the code begins to overlap so I can usually cobble together the logic based on work I've already done, which of course is easier and faster than creating something from scratch.
Version 1.0.2 - 01.19.2019
- Added a louver vent option for all window shapes: Rectangle, Half Round, Segmented Arch, Gothic Arch, Oval/Circle, Octagon
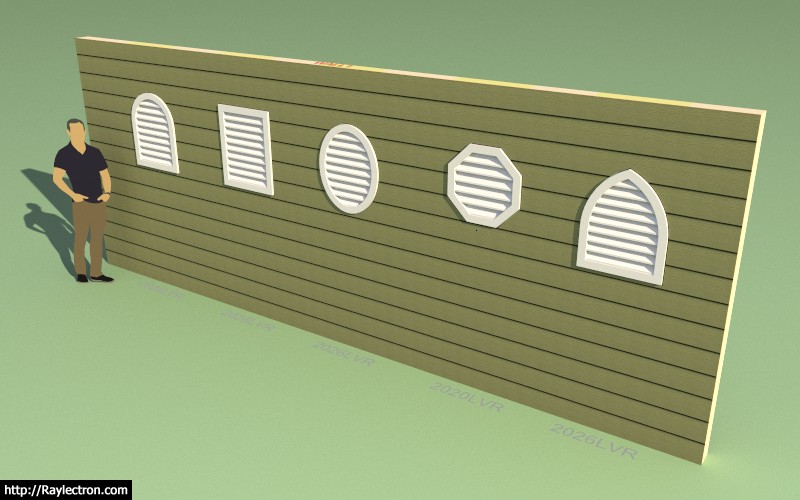
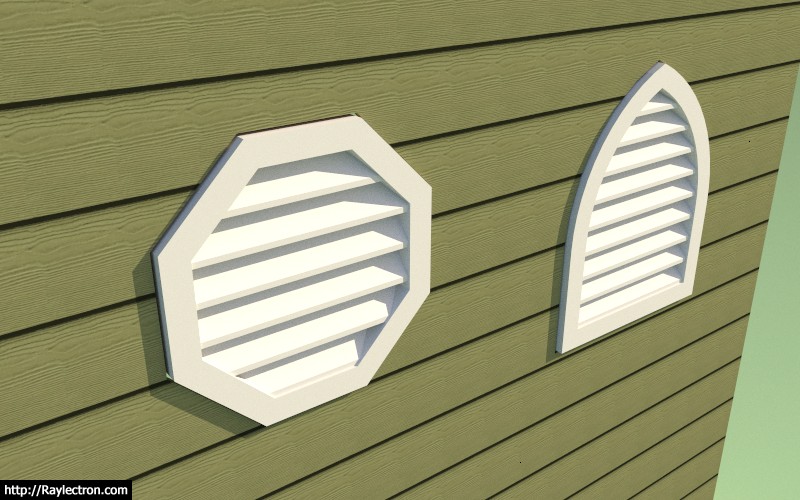
Louver vents are really nothing more than removing the sash and glass from a window assembly and replacing them with slats. Exterior trim around the louvers can also be applied (the same as regular windows).
- Added a louver vent option for all window shapes: Rectangle, Half Round, Segmented Arch, Gothic Arch, Oval/Circle, Octagon
Louver vents are really nothing more than removing the sash and glass from a window assembly and replacing them with slats. Exterior trim around the louvers can also be applied (the same as regular windows).
I am adding a sponsors section to each plugin page:
http://design.medeek.com/resources/medeekwallplugin.pl#Sponsors
Hopefully this will be another small source of revenue to help offset my recent decision to skip out on subscription licensing. I am also excited to be able to provide some recognition to those who have been instrumental in the development of these plugins.
If you feel like you should be included as one of the development or finanicial sponsors please contact me via email.
Each sponsorship includes a listing with your logo, name (individual or company), a short paragraph explaining your business, credentials, products etc... and a link to your website.
The same sponsors section will be shown at the bottom of all three plugin pages.
I am also open to suggestions on how to make this feature/listing more attractive to potential sponsors.
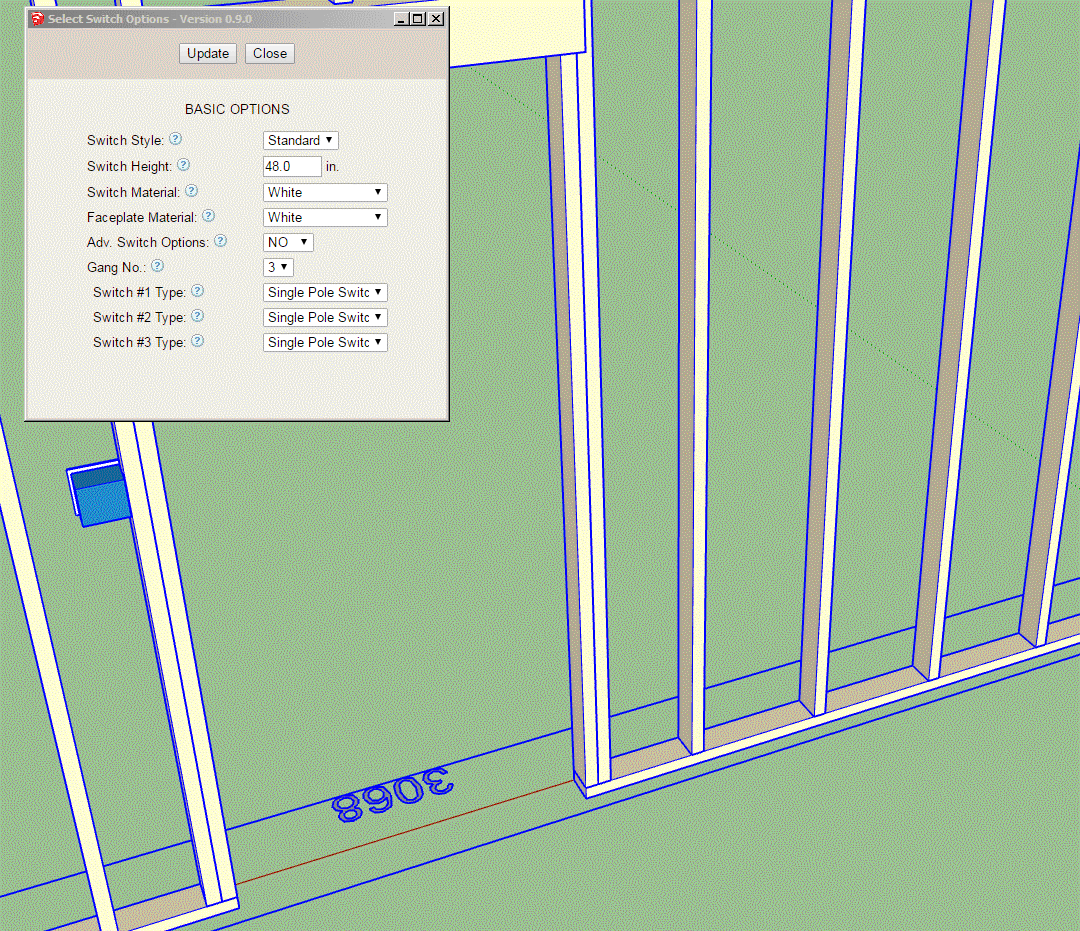
First look at the draw switch menu:
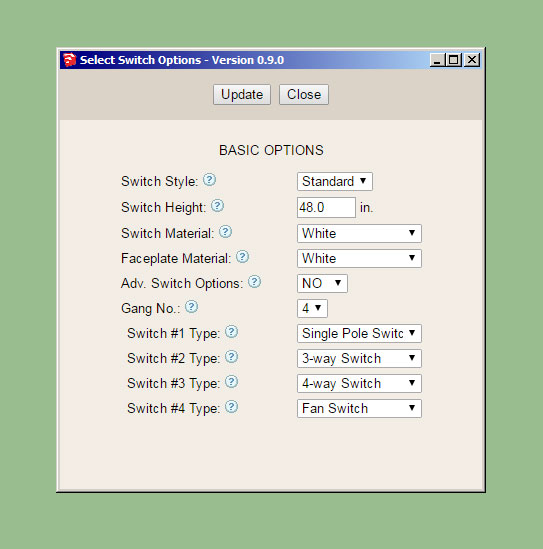
Currently there are no advanced options but I am including that parameter since I am almost 95% sure that something will come along that will dictate the use of this parameter.
This plugin seems fairly basic when compared with the other plugins but I may be missing some additional parameters here.
Currently there are no advanced options but I am including that parameter since I am almost 95% sure that something will come along that will dictate the use of this parameter.
This plugin seems fairly basic when compared with the other plugins but I may be missing some additional parameters here.
Flybye
Well-known member
Have you looked into Solidworks for truss design & stress analysis?
Last edited:
The draw tool is now working and able to insert switches on both sides of the walls:
Now I just need to work on the edit menu and global settings.
The outlet module will be almost identical to the switch module so once I have the switch module done it is just a matter of copying and pasting and making some minor edits.
The Wall Plugin will require a minor edit to retain the electrical groups, this means that previous versions of the Wall Plugin will not work with the new Electrical Plugin.
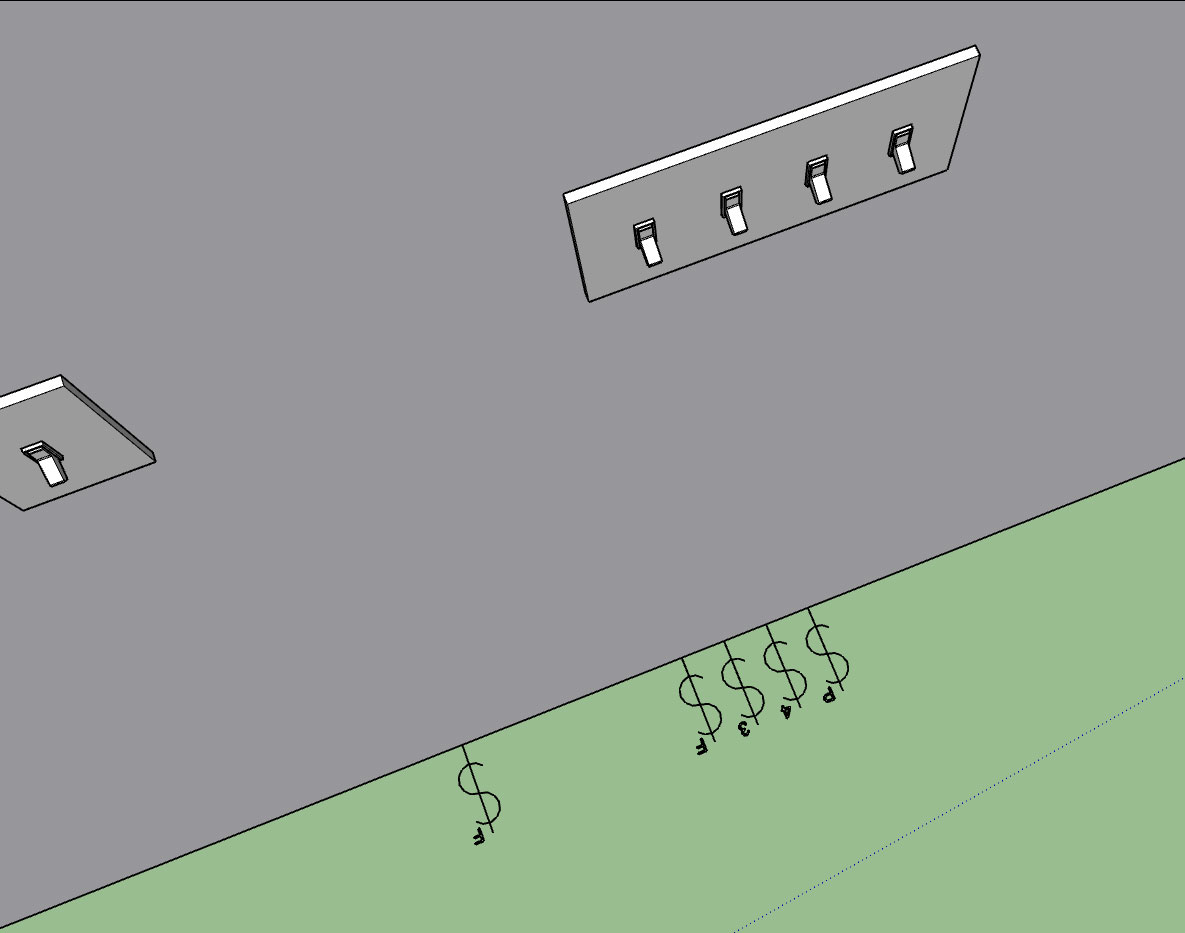
As can be seen in the image below a gang of switches can all be different types:
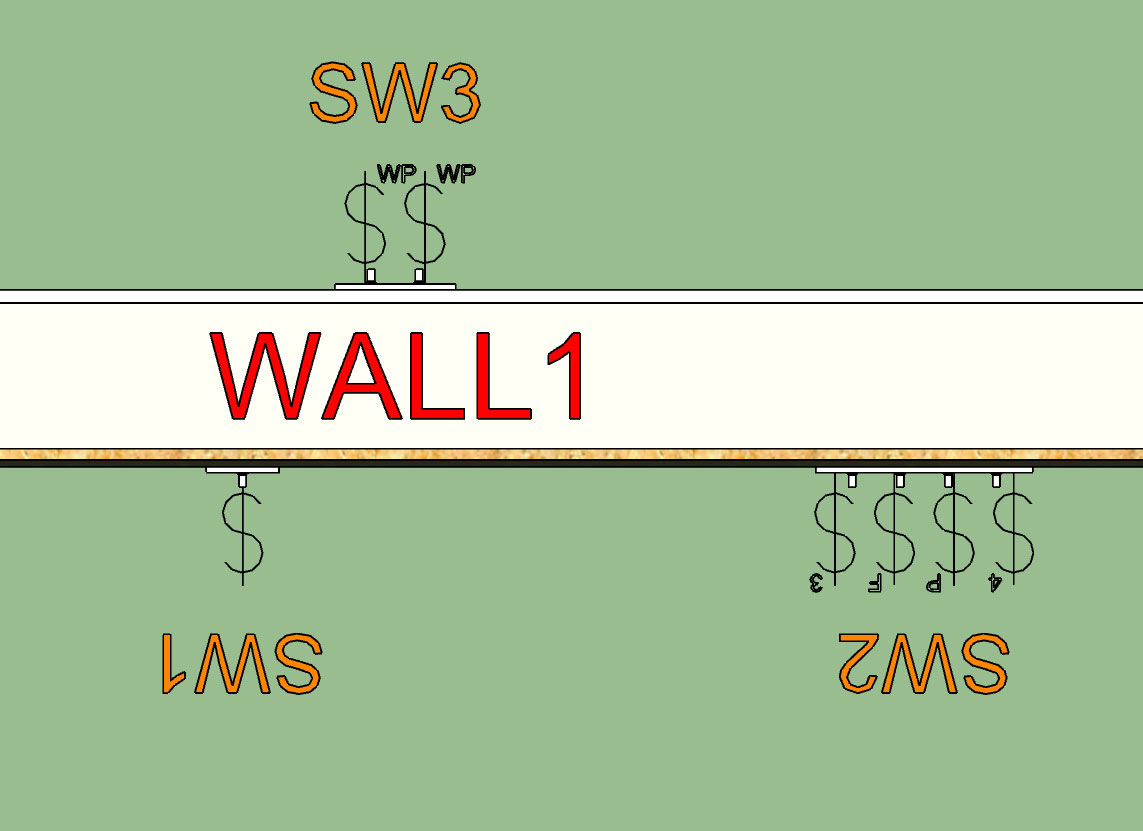
In the image below I've turned on the "Labels" for the switch boxes. The Switch (box) name can be edited in the switch edit menu for each switch:
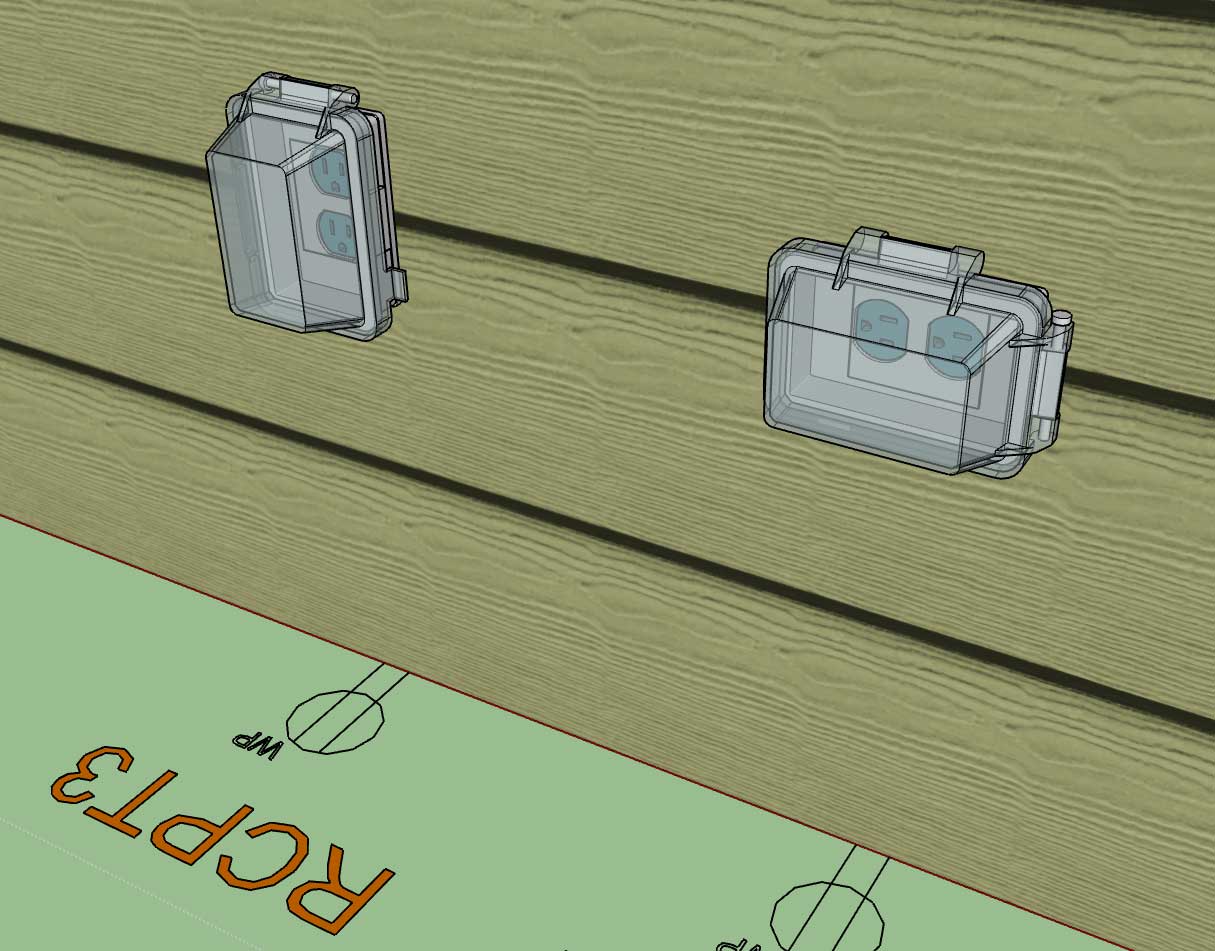
With weatherproof switches I will need to have a different faceplate but for now it will default to the generic toggle switch.
Tomorrow I will spend a few minutes and model up a low poly version of the Leviton Decora switch and outlet series and then we will have at least two options for switch and outlet styles.
Similar to the Wall Plugin the labels are assigned by default to the Dim3 layer and can be toggled separately from the symbols, or be turned off completely in the global settings.
In the image below I've turned on the "Labels" for the switch boxes. The Switch (box) name can be edited in the switch edit menu for each switch:
With weatherproof switches I will need to have a different faceplate but for now it will default to the generic toggle switch.
Tomorrow I will spend a few minutes and model up a low poly version of the Leviton Decora switch and outlet series and then we will have at least two options for switch and outlet styles.
Similar to the Wall Plugin the labels are assigned by default to the Dim3 layer and can be toggled separately from the symbols, or be turned off completely in the global settings.
I have a 1-gang GFCI as well as a two gang GFCI-Duplex and GFCI-Decora combo. What other combinations of GFCI/Outlets are common? (I will handle the GFCI/switch combo later)
The possible permutations are crazy so I am trying to limit things slightly for certain outlet types, I think this makes the most sense. Just trying to rein in the madness.
For instance I have never seen multiple GFCI outlets ganged up in a single box, only ever one with another switch or regular duplex/decora receptacles.
Also what type of weather proof outlet would you prefer I include as the default? I'm looking at Leviton's offerings and also at Taymac, too bad I can't seem to find readily made models for any of these. Oh well, I would probably have to remodel them anyways because the poly count would probably be obnoxious.
After digging through Leviton's website straight for the last 3-4 days I now know more about switches and receptacles than I care to really, but it certainly is an education. I'm still amazed at all of the possible combinations of switches and outlets that are possible and how the manufacturers do their best to provide as complete coverage as possible, there are literally hundreds of face plates (configurations).
Added the advanced option which will allow for a horizontal mount of any receptacle:
First look at the the following: GFCI, USB, Simplex, Horizontally mounted Duplex
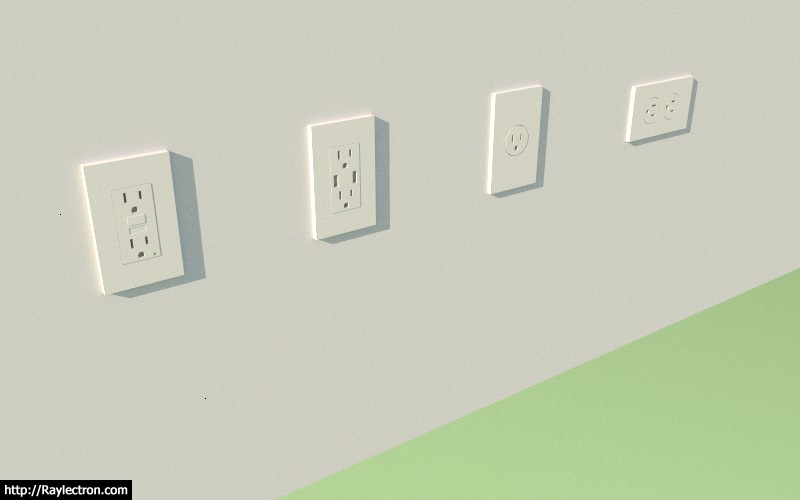
I will also extend this same functionality to the switch module so that they can be mounted in any orientation.
First look at the the following: GFCI, USB, Simplex, Horizontally mounted Duplex
I will also extend this same functionality to the switch module so that they can be mounted in any orientation.