

dladcock
Well-known member
I had posted in the "What did you do in your garage" thread a couple of weeks ago. Post #7391 http://www.garagejournal.com/forum/showthread.php?p=3595889#post3595889 There was some interest in the process of using Castable Urethane, as promised, here's a walk-thru of the process and materials.
I'll add, to do this correctly, it's going to take more than one post. I'll do this post, then add-on until we've made the journey just to keep it all together.
I've been using castable Urethane materials for a bit over 10 years. It started as a want, later becoming a need. I had been researching methods and materials for a couple of years to fill a void in the supply of NOS and aftermarket rubber seals and the like for the Classic Car hobby.
Some of the applications I've encountered, are low production, with no hope of being reproduced by any of the major suppliers. Traditional method tooling costs alone for some of the parts I've reproduced can exceed $20,000. With that kind of overhead, the 3 major players in the U.S. restoration rubber and weather strip business just can't afford to invest that kind of money in tooling for low volume repop parts.
Now, NOS parts for Classics, are well........ you know what they are. Hard to find, very expensive and even if stored in the best of conditions, probably won't last once put into service. I mean, if you should replace a fan belt or radiator hose every 4 years, what can be expected of a 43 year old part?
The upper and lower shifter boots for 1968/69 Impalas (GM refers to them as "Seals") are very hard to come by NOS or used. I gave 500 bucks for this set. As a rule they sold around 1200.00 a set and up...... when you can find them. I might add that since these have become available the price of a NOS boot has dropped dramatically.

Here's one I made:

And here is a cowl extension rubber for 1968-69 Impala, Caprice, Belair and Biscayne in the same foam type rubber as original.

So, that's the why.
The how is, done correctly, a longer story. The actual process is really not a difficult one. The materials are hazardous and just like anything else, deserve the same respect as painting or handling any chemicals. READ THE MSDS!!!
All the research I've done has been online. Just about anything you want to know regarding mold making and casting urethane is online...... then again, the stuff you can't find online you learn the hard way. I can help with that up to a point. I learn something new every part I cast. Each part is different in it's own way, it may have heavy under cuts, thick/thin sections, or cast-in inserts. Maybe they have any combination of all the above.
Some can be simple one-part molds and there are multi-part molds. I'll try to show what I've done with those as we go along.
The process also has another positive.... It's cost effective. I do have a tidy sum invested in equipment, although it's not prohibitive, I would have not purchased some of this equipment if this was a one-shot venture for me. I have something of a part-time mold shop going on here.
Some of the equipment you would need to do a one time project would include:
Electronic Gram Scale
Mold Forms
Glue Gun
Mold Release
A simple mold will consist of a containment field made from sulfur free clay, Masonite, Lexan or just about anything that will contain the liquid material until cured. I normally use Delrin and/or Lexan due to the fact that's what is easiest for me to access.
The mold form serves to hold the model in place and stable while the mold is being formed. I try to make the molds in two parts, simply because that's the easiest way to go. Some parts require multiple part molds and the complexity increases with every section that's added.
Here's the mold used for the 1969 Chevrolet clutch rod boot posted elsewhere:

And the reproduction boot:

So, this is the first installment. I'll leave a link to a preferred supplier who has a ton of information and videos showing their products in use.
http://www.smooth-on.com/
What ever the part may be I study the part and determine basically three things. Weight, Durometer and how I'll approach the mold configuration.
Weight is straight forward, simply weighing the part tells me how much material is required to cast the item. Most of the material I'm using is 1:1 and can be mixed by volume. However using an accurate gram scale helps maintain closer ratios and at the bottom of the bucket, there is no unused A or B component.
Durometer of the original part is critical if you're interested in reproducing an accurate representation of your part. I have Durometer Testers for both A and D Shore materials. "A" Shore material will be your softer, rubber type material and "D" Shore is for the harder, plastics. While not totally necessary, a tester will provide the best measurement of the hardness/softness of a given material.
As a rule, a rubber band is 25-30 Duro, a car tire is 55-60 Duro. Here's a chart the will give some insight regarding Durometer:
http://www.smooth-on.com/Durometer-Shore-Ha/c1370/index.html
Now, mold configuration is sort of a learned process and can take a fair amount of time to accomplish. It's two fold with a lot of preparation involved, but it's like painting..... You get what you put into it.
Look at almost any cast, injected molded part. Try to envision what the MOLD looks like, not the part. Try to see what's not there. That is what the mold looks like. The mold is a reverse of the part. At first, I had to look at parts a VERY long time to see the mold, now I can see it almost immediately unless it is a complex part.
The simple part is the containment field or mold box. Here's a better description than I can give:
http://www.smooth-on.com/pages.php?pID=53&cID=11
Here is a tutorial that got my attention early on. The intricate detail in reproduction of a given part is unbelievable. This is also an example of a very simple project using the most basic techniques. Check it out.
http://www.smooth-on.com/gallery.php?galleryid=157
2-4-2014
Still Waiting for materials. In the meantime, here is the project so far. Doing a few things different than I have in the past, so if this turns to do-do, we'll all see it at the same time.
I made a leveling plate to rest the mold form on during the casting of the form. It's 12"x24"x3/4" Delrin with 4 3/8-24 socket head Allen bolts for leveling legs. All I'm shooting for here is a level surface that's easy to move around the shop. A couple of machinists levels and a couple of minutes, it's done.


This is the part. Obsolete and very expensive when available from the original vendor. We could CNC this part out of Delrin, but there are some contours that are challenging. The bigger issue is that in Delrin, the fingers tend to snap off when put into a bind. 80-85 Durometer urethane is hard enough to maintain the shape and has enough flex to prevent breakage.


This is the inner structure of the mold form. It's purpose is to support the original part inside the containment field during the casting of the mold material. BTW, this time I'll be using a 30 Duro Silicone material. The mold material should be softer than the part or harder than the part to facilitate removal. If both sides (mold or part) are the same Durometer, it is difficult, if not impossible to remove the mold halves or part. You should be able to "peel" either the mold from the part or the part from the mold.


Here's the part in place on the inner form.


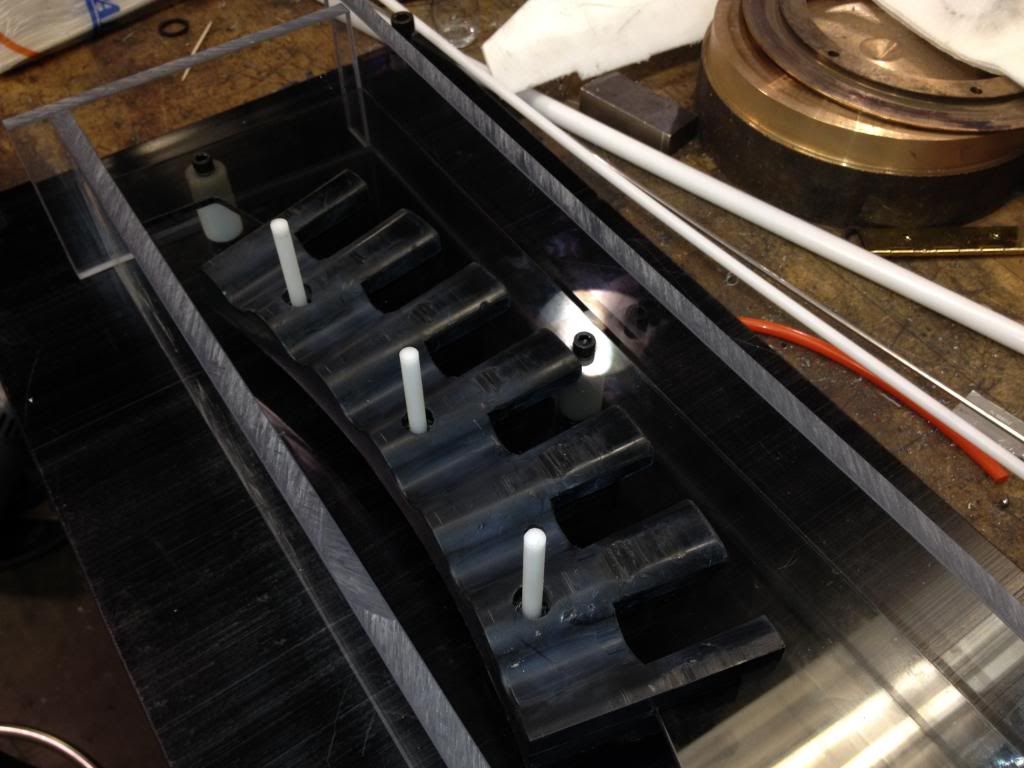
The part, inner form with the containment field walls.


Here the white Delrin pins will serve to form the holes for the mounting bolts. We could just drill these after the casting, but it will save that step later. Since these parts will be ongoing for some time to come, it's just smart to "mold in" as many machining steps as possible.
dla
I'll add, to do this correctly, it's going to take more than one post. I'll do this post, then add-on until we've made the journey just to keep it all together.
I've been using castable Urethane materials for a bit over 10 years. It started as a want, later becoming a need. I had been researching methods and materials for a couple of years to fill a void in the supply of NOS and aftermarket rubber seals and the like for the Classic Car hobby.
Some of the applications I've encountered, are low production, with no hope of being reproduced by any of the major suppliers. Traditional method tooling costs alone for some of the parts I've reproduced can exceed $20,000. With that kind of overhead, the 3 major players in the U.S. restoration rubber and weather strip business just can't afford to invest that kind of money in tooling for low volume repop parts.
Now, NOS parts for Classics, are well........ you know what they are. Hard to find, very expensive and even if stored in the best of conditions, probably won't last once put into service. I mean, if you should replace a fan belt or radiator hose every 4 years, what can be expected of a 43 year old part?
The upper and lower shifter boots for 1968/69 Impalas (GM refers to them as "Seals") are very hard to come by NOS or used. I gave 500 bucks for this set. As a rule they sold around 1200.00 a set and up...... when you can find them. I might add that since these have become available the price of a NOS boot has dropped dramatically.

Here's one I made:
And here is a cowl extension rubber for 1968-69 Impala, Caprice, Belair and Biscayne in the same foam type rubber as original.
So, that's the why.
The how is, done correctly, a longer story. The actual process is really not a difficult one. The materials are hazardous and just like anything else, deserve the same respect as painting or handling any chemicals. READ THE MSDS!!!
All the research I've done has been online. Just about anything you want to know regarding mold making and casting urethane is online...... then again, the stuff you can't find online you learn the hard way. I can help with that up to a point. I learn something new every part I cast. Each part is different in it's own way, it may have heavy under cuts, thick/thin sections, or cast-in inserts. Maybe they have any combination of all the above.
Some can be simple one-part molds and there are multi-part molds. I'll try to show what I've done with those as we go along.
The process also has another positive.... It's cost effective. I do have a tidy sum invested in equipment, although it's not prohibitive, I would have not purchased some of this equipment if this was a one-shot venture for me. I have something of a part-time mold shop going on here.
Some of the equipment you would need to do a one time project would include:
Electronic Gram Scale
Mold Forms
Glue Gun
Mold Release
A simple mold will consist of a containment field made from sulfur free clay, Masonite, Lexan or just about anything that will contain the liquid material until cured. I normally use Delrin and/or Lexan due to the fact that's what is easiest for me to access.
The mold form serves to hold the model in place and stable while the mold is being formed. I try to make the molds in two parts, simply because that's the easiest way to go. Some parts require multiple part molds and the complexity increases with every section that's added.
Here's the mold used for the 1969 Chevrolet clutch rod boot posted elsewhere:
And the reproduction boot:
So, this is the first installment. I'll leave a link to a preferred supplier who has a ton of information and videos showing their products in use.
http://www.smooth-on.com/
What ever the part may be I study the part and determine basically three things. Weight, Durometer and how I'll approach the mold configuration.
Weight is straight forward, simply weighing the part tells me how much material is required to cast the item. Most of the material I'm using is 1:1 and can be mixed by volume. However using an accurate gram scale helps maintain closer ratios and at the bottom of the bucket, there is no unused A or B component.
Durometer of the original part is critical if you're interested in reproducing an accurate representation of your part. I have Durometer Testers for both A and D Shore materials. "A" Shore material will be your softer, rubber type material and "D" Shore is for the harder, plastics. While not totally necessary, a tester will provide the best measurement of the hardness/softness of a given material.
As a rule, a rubber band is 25-30 Duro, a car tire is 55-60 Duro. Here's a chart the will give some insight regarding Durometer:
http://www.smooth-on.com/Durometer-Shore-Ha/c1370/index.html
Now, mold configuration is sort of a learned process and can take a fair amount of time to accomplish. It's two fold with a lot of preparation involved, but it's like painting..... You get what you put into it.
Look at almost any cast, injected molded part. Try to envision what the MOLD looks like, not the part. Try to see what's not there. That is what the mold looks like. The mold is a reverse of the part. At first, I had to look at parts a VERY long time to see the mold, now I can see it almost immediately unless it is a complex part.
The simple part is the containment field or mold box. Here's a better description than I can give:
http://www.smooth-on.com/pages.php?pID=53&cID=11
Here is a tutorial that got my attention early on. The intricate detail in reproduction of a given part is unbelievable. This is also an example of a very simple project using the most basic techniques. Check it out.
http://www.smooth-on.com/gallery.php?galleryid=157
2-4-2014
Still Waiting for materials. In the meantime, here is the project so far. Doing a few things different than I have in the past, so if this turns to do-do, we'll all see it at the same time.
I made a leveling plate to rest the mold form on during the casting of the form. It's 12"x24"x3/4" Delrin with 4 3/8-24 socket head Allen bolts for leveling legs. All I'm shooting for here is a level surface that's easy to move around the shop. A couple of machinists levels and a couple of minutes, it's done.
This is the part. Obsolete and very expensive when available from the original vendor. We could CNC this part out of Delrin, but there are some contours that are challenging. The bigger issue is that in Delrin, the fingers tend to snap off when put into a bind. 80-85 Durometer urethane is hard enough to maintain the shape and has enough flex to prevent breakage.
This is the inner structure of the mold form. It's purpose is to support the original part inside the containment field during the casting of the mold material. BTW, this time I'll be using a 30 Duro Silicone material. The mold material should be softer than the part or harder than the part to facilitate removal. If both sides (mold or part) are the same Durometer, it is difficult, if not impossible to remove the mold halves or part. You should be able to "peel" either the mold from the part or the part from the mold.
Here's the part in place on the inner form.
The part, inner form with the containment field walls.
Here the white Delrin pins will serve to form the holes for the mounting bolts. We could just drill these after the casting, but it will save that step later. Since these parts will be ongoing for some time to come, it's just smart to "mold in" as many machining steps as possible.
dla
Last edited:


 )
)


 I'm working on it.


