
You are using an out of date browser. It may not display this or other websites correctly.
You should upgrade or use an alternative browser.
You should upgrade or use an alternative browser.
west of Philly - barn saving
- Thread starter rieferman
- Start date
BuickFarmer
Well-known member
Great job! on a very interesting table! I could sense all your anxiety of not doing well going into the learning curve but you drifted through it well and stayed out of the ditches. It's always tough doing things the first time and typically just as you finish you get the hang of it. Just wait til you see the mess I make when I start my cabinets. Again, GREAT job, looking forward to the deck build.
PatStroud
Well-known member
Very nice job on that table. 
Thanks guys!! Love to get encouragement after a big project like this!!!
Thanks!! If you google "lift top coffee table mechanism" (or "hardware") you should get plenty of results. There are many styles, just make sure you pick one that will nest within your table nicely.
Thanks!! It turned out nicely, I'm happy with the design for sure. It's funny that you mention anxiety, because I finally slept well last night for the first time in weeks. I was trying so hard to do a good job on this project, but so many of the skills were a stretch for my level that I was constantly thinking about how to do the next step. The number of things I figured out and solved during this project is a big number. The number of things I royally screwed up is actually a pretty small number. I'll call it a win
Thanks!! I'm definitely giving it an honest try. Attempting this project took a leap of faith. While not complicated for pro's and really experienced woodworkers, this was a huge step up in complexity for me. From designing the entire thing, hitting that design (it ended up being 1/8" different than paper plan), to machine setup and tuning, to executing, and problem solving... It was a lot.
Funny thing is, the project reminded me of barn building in some regards. While barn building (and construction in general) doesn't require the same precision and perfection, it's a huge learning curve activity when you're new to it. But if you keep plugging along using your best common sense (along with plenty of google searches, advice from GJ and friends etc.) you can get there step by step.
really nice. I've been looking to build something similar myself. What is the actual name for the hardware that brings the top of the table up and over?
Thanks!
Thanks!! If you google "lift top coffee table mechanism" (or "hardware") you should get plenty of results. There are many styles, just make sure you pick one that will nest within your table nicely.
Buick Farmer: Great job! on a very interesting table! I could sense all your anxiety of not doing well going into the learning curve but you drifted through it well and stayed out of the ditches. It's always tough doing things the first time and typically just as you finish you get the hang of it.
Thanks!! It turned out nicely, I'm happy with the design for sure. It's funny that you mention anxiety, because I finally slept well last night for the first time in weeks. I was trying so hard to do a good job on this project, but so many of the skills were a stretch for my level that I was constantly thinking about how to do the next step. The number of things I figured out and solved during this project is a big number. The number of things I royally screwed up is actually a pretty small number. I'll call it a win
Fergus: Nice table man. REALLY nice. I knew we would see that kind of quality coming out of your shop!
Thanks!! I'm definitely giving it an honest try. Attempting this project took a leap of faith. While not complicated for pro's and really experienced woodworkers, this was a huge step up in complexity for me. From designing the entire thing, hitting that design (it ended up being 1/8" different than paper plan), to machine setup and tuning, to executing, and problem solving... It was a lot.
Funny thing is, the project reminded me of barn building in some regards. While barn building (and construction in general) doesn't require the same precision and perfection, it's a huge learning curve activity when you're new to it. But if you keep plugging along using your best common sense (along with plenty of google searches, advice from GJ and friends etc.) you can get there step by step.
christopher.layton
Well-known member
Re: west of Philly - barn saving (tours on pages 14, 19, and FINAL tour on 35)
I'm a little late to the party but I have chime in. That's a really nice table! Great work. Nobody will notice the mistakes you see unless you point them out. They may look huge to you, but to everyone else the table looks perfect.
Sent from my iPad using Tapatalk
I'm a little late to the party but I have chime in. That's a really nice table! Great work. Nobody will notice the mistakes you see unless you point them out. They may look huge to you, but to everyone else the table looks perfect.
Sent from my iPad using Tapatalk
Hey Christopher! Thanks for chiming in! Totally agree... I'm ok with mentioning to you guys that there are flaws I'd like to improve upon next time, but I have learned to keep my mouth shut about those flaws to everyone else.
I'm going to be building the companion pieces to accompany this table soon, and I'm really looking forward to that work. I actually have experience to build on now!
I'm going to be building the companion pieces to accompany this table soon, and I'm really looking forward to that work. I actually have experience to build on now!
1/2 Cup
Member Emeritus
Fantastic job on the table, keep up the great work. You should be proud of your achievements...
Regards
Regards
Ahhhhh, spring is in the air.
Oh... wait... it's freezing rain outside and my kids have a late opening to school today.
BUT, the optimist and planner in me is ready for warmer weather. When the temps start to rise, I have work to do!
The big project this year is to add a small deck onto the end of our above ground pool.
We have a screened in porch on one side of the pool, which is great for sitting away from bugs to watch everyone splash around - but you can't get into the pool from there.
You may also remember the lifeguard chairs that I built last year - great for poolside beer sipping.... but you can't get in the pool from those either.
So, the new project is a 5 x 8 deck that will serve the purpose of providing a spot to remove your flip flops, and to do canon balls into the pool. It is not intended to be a lounging deck. It's a pool access deck.
To begin, I met with my township code enforcer to figure out what specifications I needed to hit. He provided a 40 page guide that took a little studying to understand.
With the help of that guide, I designed the deck and drew plans, including a detailed materials list and submitted to the code enforcer for approval.
Once the code enforcer approved my plans (he only had 2 minor changes! not bad!) I submitted the materials list to the lumber yard (they beat big box pricing, and offer free order pick and delivery... plus, many of their materials are much better).
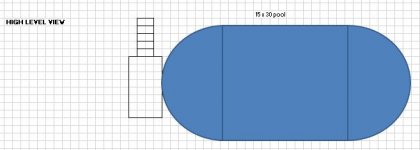
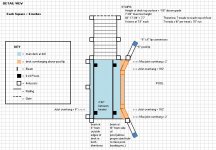
Anyways, here's a couple pics of what I'm aiming for. And a few bullets of explanation:
- 5 x 8, overhanging the pool lip (so that kids don't ruin the pool when jumping in)
- Trex decking
- Metal ballusters
- Stairs with self closing gate outfitted with safety latch
- Solar safety lighting (or maybe low voltage lighting...we'll see)
Plan is to start digging for posts by end of March.
Oh... wait... it's freezing rain outside and my kids have a late opening to school today.
BUT, the optimist and planner in me is ready for warmer weather. When the temps start to rise, I have work to do!
The big project this year is to add a small deck onto the end of our above ground pool.
We have a screened in porch on one side of the pool, which is great for sitting away from bugs to watch everyone splash around - but you can't get into the pool from there.
You may also remember the lifeguard chairs that I built last year - great for poolside beer sipping.... but you can't get in the pool from those either.
So, the new project is a 5 x 8 deck that will serve the purpose of providing a spot to remove your flip flops, and to do canon balls into the pool. It is not intended to be a lounging deck. It's a pool access deck.
To begin, I met with my township code enforcer to figure out what specifications I needed to hit. He provided a 40 page guide that took a little studying to understand.
With the help of that guide, I designed the deck and drew plans, including a detailed materials list and submitted to the code enforcer for approval.
Once the code enforcer approved my plans (he only had 2 minor changes! not bad!) I submitted the materials list to the lumber yard (they beat big box pricing, and offer free order pick and delivery... plus, many of their materials are much better).
Anyways, here's a couple pics of what I'm aiming for. And a few bullets of explanation:
- 5 x 8, overhanging the pool lip (so that kids don't ruin the pool when jumping in)
- Trex decking
- Metal ballusters
- Stairs with self closing gate outfitted with safety latch
- Solar safety lighting (or maybe low voltage lighting...we'll see)
Plan is to start digging for posts by end of March.
Attachments

DaleJR88Fan
Well-known member
Great job on the table. I bet the "boss" was happy with it. Any pictures of it in use? Good luck with the upcoming deck build.Whew! DONE with the table.
I am SOOOO glad to be done. That was a LOT of work.
This table isn't perfect (although I aimed for perfection), but I'm pretty proud of the result considering this is my first try at something this complex.
I'm going to take a little break from woodworking to build up some energy for a deck build that I'm starting in March.
Please leave me a comment if you think I did ok
[emoji481]
Thanks Brian!
Hmmmm, I just checked and I don't have a pic of the table in use - but I can say it's been used a lot! I wasn't sure if the lift top would be something we'd really use, and am happy to report that it's very useful on a day to day basis.
--------
Regarding the deck build... getting the deck squared to the end of an oval pool takes some doing. We had a nice warm (50 degrees F) day last weekend, so I started doing my layout.
To begin, we established a string line that was just touching the long "straight" side of the pool (which was slightly curved). Then, I used another string line and the 3-4-5 method to create a right angle.
I found center of the end of the pool, and transferred that mark to the 2nd, right angle, string using my 4 foot level. I measured from center out in both directions and marked the ends of the deck and where the posts should be. Using a plumb bob, I transferred marks from string to ground and marked with marking paint.
The reason for the strings is because I couldn't think of another way to square up effectively, and because I can take the strings down to dig, and then reinstall them to final check post placement before they're locked in. This is how my former company marked out post locations for pole barns, so I figure it will work here too.
Hmmmm, I just checked and I don't have a pic of the table in use - but I can say it's been used a lot! I wasn't sure if the lift top would be something we'd really use, and am happy to report that it's very useful on a day to day basis.
--------
Regarding the deck build... getting the deck squared to the end of an oval pool takes some doing. We had a nice warm (50 degrees F) day last weekend, so I started doing my layout.
To begin, we established a string line that was just touching the long "straight" side of the pool (which was slightly curved). Then, I used another string line and the 3-4-5 method to create a right angle.
I found center of the end of the pool, and transferred that mark to the 2nd, right angle, string using my 4 foot level. I measured from center out in both directions and marked the ends of the deck and where the posts should be. Using a plumb bob, I transferred marks from string to ground and marked with marking paint.
The reason for the strings is because I couldn't think of another way to square up effectively, and because I can take the strings down to dig, and then reinstall them to final check post placement before they're locked in. This is how my former company marked out post locations for pole barns, so I figure it will work here too.
Attachments
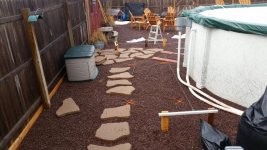
2 holes partially dug so far.
About 5 years ago, this area of my yard was built up about 8 feet above it's natural grade using non-settling fill (stone, recycled concrete and brick). The deeper you dig, the bigger the fill gets. So, at about 20" down, I'm hitting major obstacles.
I purchased a digging bar and will attempt to get deeper this weekend, but doubt I can get to the code-required 36" depth. In speaking with my township code enforcer, we agreed that a non-attached, small deck, sitting on 8 feet of non-settling fill is unlikely to cause issues, so he's not going to bust my stones if I'm not quite to full depth on all holes.
More digging this weekend. Materials get delivered next week!
About 5 years ago, this area of my yard was built up about 8 feet above it's natural grade using non-settling fill (stone, recycled concrete and brick). The deeper you dig, the bigger the fill gets. So, at about 20" down, I'm hitting major obstacles.
I purchased a digging bar and will attempt to get deeper this weekend, but doubt I can get to the code-required 36" depth. In speaking with my township code enforcer, we agreed that a non-attached, small deck, sitting on 8 feet of non-settling fill is unlikely to cause issues, so he's not going to bust my stones if I'm not quite to full depth on all holes.
More digging this weekend. Materials get delivered next week!
Whew! That was hard work. Got all 4 holes to 36" depth after lots of digging bar persuasion.
I started out by using the shop vac to empty water out of the 2 holes that I'd started. Then, a combination of digging bar, shovel, and post hole digger got me down to depth. To keep the patio stone clean, all material was carefully delivered via wheel barrow and 5 gallon bucket to a pile on a nearby tarp. Periodically, I measured my progress with a piece of PVC pipe that I had marked with a 3 foot indicator.
A couple things made the work less of a chore than it could have been. For one, my wife helped for awhile so I was able to share some of the effort. For another, I was worried about hitting the bonding wire around the pool perimeter and / or conduit that carries electric to my nearby shed. By my calculations, both were within the risk zone. Sure enough, as we carefully dug, we found both. Being very cautious, we were able to dig the holes without disturbing either obstacle. Thank goodness, as that would have been a pain to fix.
I'll be setting posts and beginning framing next weekend.
I started out by using the shop vac to empty water out of the 2 holes that I'd started. Then, a combination of digging bar, shovel, and post hole digger got me down to depth. To keep the patio stone clean, all material was carefully delivered via wheel barrow and 5 gallon bucket to a pile on a nearby tarp. Periodically, I measured my progress with a piece of PVC pipe that I had marked with a 3 foot indicator.
A couple things made the work less of a chore than it could have been. For one, my wife helped for awhile so I was able to share some of the effort. For another, I was worried about hitting the bonding wire around the pool perimeter and / or conduit that carries electric to my nearby shed. By my calculations, both were within the risk zone. Sure enough, as we carefully dug, we found both. Being very cautious, we were able to dig the holes without disturbing either obstacle. Thank goodness, as that would have been a pain to fix.
I'll be setting posts and beginning framing next weekend.
BuickFarmer
Well-known member
I bet you couldn't draw a dollar bill through you **** cheeks while you were digging around that electrical wire. That would have been a pisser to have to deal with. Ain't it nice to have your wifey help out some time. Sometime, I said....
congrats on the successful hold digging through rock fill and no sparks.
congrats on the successful hold digging through rock fill and no sparks.
Ha ha! Great saying Buick!!! I was definitely slightly worried about hitting the electrical, but figured it's on a GFCI and would pop if I hit it.
As for wife helping.... I've learned to give her "effort tasks" rather than "precision tasks". Whenever I tell her to "hold this right there..." she invariably lets it move. "Hold this level"... she holds it crooked. Etc. So, now I focus on "get my saw from the barn" and "help me dig that" types of work.
As for wife helping.... I've learned to give her "effort tasks" rather than "precision tasks". Whenever I tell her to "hold this right there..." she invariably lets it move. "Hold this level"... she holds it crooked. Etc. So, now I focus on "get my saw from the barn" and "help me dig that" types of work.
We got 6 wet inches of snow yesterday... first day of spring my ***.
While my material delivery still occurred as planned, this meant that I could not get concrete in the holes yesterday, and also meant I had to start my work today by clearing snow from my work area.
But, so far, so good. All 4 holes have the footers poured at the bottom of the holes now, and I have measured for the post lengths. After I finish the leftover pizza, I'll cut the 6x6's to length, and notch for the beams. I'll do other prep work today while the concrete cures, and then get to setting posts and beams tomorrow.
While my material delivery still occurred as planned, this meant that I could not get concrete in the holes yesterday, and also meant I had to start my work today by clearing snow from my work area.
But, so far, so good. All 4 holes have the footers poured at the bottom of the holes now, and I have measured for the post lengths. After I finish the leftover pizza, I'll cut the 6x6's to length, and notch for the beams. I'll do other prep work today while the concrete cures, and then get to setting posts and beams tomorrow.
Crazy weather is right! I had to shovel to do work... spent the day working in a t-shirt... next to piles of snow. Got a sunburn even. Shrug.
---
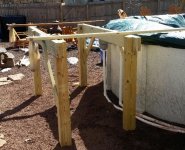
Got the posts and beams in today.
I'm happy to report that the diagonals measured out exactly the same, and I achieved a level in all directions (well, I intentionally put 1/4" of pitch in to shed constant water). Solid as a rock and ready for next steps next weekend.
edit: The 2x4's on top are just temporary braces until I get the permanent diagonals installed. And, the grocery bags hanging on the end are so that I notice the ends as I walk past - and hopefully avoid walking into them.
---
Got the posts and beams in today.
I'm happy to report that the diagonals measured out exactly the same, and I achieved a level in all directions (well, I intentionally put 1/4" of pitch in to shed constant water). Solid as a rock and ready for next steps next weekend.
edit: The 2x4's on top are just temporary braces until I get the permanent diagonals installed. And, the grocery bags hanging on the end are so that I notice the ends as I walk past - and hopefully avoid walking into them.
Attachments
Progress!
The remaining diagonal braces are in - this thing is impervious to racking. I gave it a few football style shoulder bumps and couldn't budge it at all.
And, the first joist (or "beam joist" since all of them will be doubled 2x6's to account for the cantilever) is in. I was able to use my square to transfer the pool edge up to the joist - made most of the cut on my miter saw and completed the cut with my sawzall. Some hurricane straps hold it in place.
As you can see, the first joist on either end has quite a cantilevered overhang. To test uplift action, I sat on the end and bounced around a bit. Not even the slightest quiver to the assembly. Once the entire system is up, it will be even stronger, but I'm satisfied so far.
The remaining diagonal braces are in - this thing is impervious to racking. I gave it a few football style shoulder bumps and couldn't budge it at all.
And, the first joist (or "beam joist" since all of them will be doubled 2x6's to account for the cantilever) is in. I was able to use my square to transfer the pool edge up to the joist - made most of the cut on my miter saw and completed the cut with my sawzall. Some hurricane straps hold it in place.
As you can see, the first joist on either end has quite a cantilevered overhang. To test uplift action, I sat on the end and bounced around a bit. Not even the slightest quiver to the assembly. Once the entire system is up, it will be even stronger, but I'm satisfied so far.
Attachments
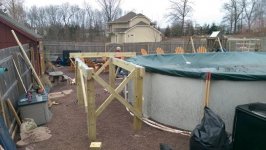

In between freezing cold baseball practices for my boy, I was able to use his help to complete the joist/beam installation process... and I think he learned a few things along the way too.
A few cold beers (real ones for me, root beer for him) and some cheese steaks afterwards hit the spot for the guys while the wife and daughter are out for a girl's day. Now we're settling down for some March Madness fun.
More work tomorrow, but satisfied with our progress today.
A few cold beers (real ones for me, root beer for him) and some cheese steaks afterwards hit the spot for the guys while the wife and daughter are out for a girl's day. Now we're settling down for some March Madness fun.
More work tomorrow, but satisfied with our progress today.
Attachments
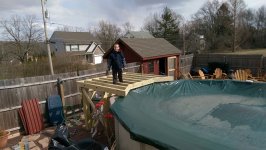
Not to be out done, my daughter wanted her picture on top of the work-in-progress pool deck. First, I completed installing the posts for the railings, and then helped her carefully climb up. The railings posts turned out really well, and I quickly figured out an efficient process to make the work enjoyable.
As a side note, I didn't think that the Simpson post anchors would add that much strength to the railing posts.... I was wrong. I tested one post with the anchor installed vs. one post without an anchor. It's night and day. So, I proceeded to install them on all posts.
While I was working on those tasks, my wife dug the last two holes that will hold the posts at the bottom of the stairs, as well as the safety gate. We carefully squared up the locations and put the posts in and surrounded them with concrete for a nice solid connection point.
This week and weekend, I hope to be able to complete, or nearly complete the rest of the build. I suspect that the baluster installation will need to wait a couple of weeks because we want to stain wood railing parts before the metal balusters are in the way.
So far, so good!
As a side note, I didn't think that the Simpson post anchors would add that much strength to the railing posts.... I was wrong. I tested one post with the anchor installed vs. one post without an anchor. It's night and day. So, I proceeded to install them on all posts.
While I was working on those tasks, my wife dug the last two holes that will hold the posts at the bottom of the stairs, as well as the safety gate. We carefully squared up the locations and put the posts in and surrounded them with concrete for a nice solid connection point.
This week and weekend, I hope to be able to complete, or nearly complete the rest of the build. I suspect that the baluster installation will need to wait a couple of weeks because we want to stain wood railing parts before the metal balusters are in the way.
So far, so good!
Attachments
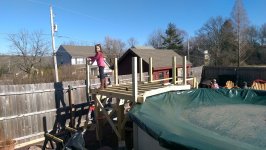
I finished the stairs today. I used a solid stringer style, mainly because I'd done that style twice before and felt like I could accomplish the task.
It wasn't easy, but the stairs are in, and are rock solid. 1/2" lag screws, proper point loading, liquid nails in addition to mechanical fasteners... Seriously, you could take a family reunion picture on these stairs without any fear at all.
On paper, I had these stairs figured out exactly - in reality I missed by 1/8th of an inch overall. Not bad.
It wasn't easy, but the stairs are in, and are rock solid. 1/2" lag screws, proper point loading, liquid nails in addition to mechanical fasteners... Seriously, you could take a family reunion picture on these stairs without any fear at all.
On paper, I had these stairs figured out exactly - in reality I missed by 1/8th of an inch overall. Not bad.
Attachments

I have the day off today, and it's nice and warm out.... and rainy.
Bummer. I was hoping to complete the deck build today.
But... on the bright side, that would have meant that I would need to build the gate tomorrow... So I just flip flopped the days.
Here's what I came up with:
Bummer. I was hoping to complete the deck build today.
But... on the bright side, that would have meant that I would need to build the gate tomorrow... So I just flip flopped the days.
Here's what I came up with:
Attachments

NASMAN
Well-known member
Still subscribed and watching, and I might add, still enjoying. The deck around the above ground sure brings back memories. Did one back in the Eighties. Wish I had digital pics of it to show you.
The family will enjoy it, for sure.
The family will enjoy it, for sure.
rieferman - I subscribed to this post since day one. All I can say is WOW. Nice work on the barn/shop and your wood working projects. Can I ask a favor? Can you give me the part number of the Simpson post anchors you used and maybe a close up pic of the install? Can't wait to see the finished pool deck. Awesome job!!
Thanks for the replies guys!
Dave - I (along with this entire site) have been following your inspirational thread, so your encouragement is like a celebrity endorsement to me
Cadman - Thanks for the kind words! As for your question: The Simpson part number is DTT2Z. They're available at my big box store as well as our lumber yard, so I'm sure you'll have no trouble sourcing in your town. I've heard them use the term "post anchor" and "tension tie". Anyways, the principle is that as you're carriage bolting your railing post to your deck, the DTT2Z gets bolted on the inside of the assembly and is then tied into a perpendicular decking member (in many cases, you have to add blocking in specifically for this purpose). Railings create a strong lever action that can torque out your rim joist, so this tie at a 90 degree angle adds a lot of strength (seriously, I was very impressed with the difference). I've also included a pic that I stole from home depot's website.
Dave - I (along with this entire site) have been following your inspirational thread, so your encouragement is like a celebrity endorsement to me
Cadman - Thanks for the kind words! As for your question: The Simpson part number is DTT2Z. They're available at my big box store as well as our lumber yard, so I'm sure you'll have no trouble sourcing in your town. I've heard them use the term "post anchor" and "tension tie". Anyways, the principle is that as you're carriage bolting your railing post to your deck, the DTT2Z gets bolted on the inside of the assembly and is then tied into a perpendicular decking member (in many cases, you have to add blocking in specifically for this purpose). Railings create a strong lever action that can torque out your rim joist, so this tie at a 90 degree angle adds a lot of strength (seriously, I was very impressed with the difference). I've also included a pic that I stole from home depot's website.
Attachments

I'm so sore. My right arm is numb/tingly due to the number of screws that I have driven over the last couple of days (Trex is hard to work with in my opinion), and my lower back is killing me due to the nature of that work (down low attaching floor boards mostly).
But....
I got the deck project "done" yesterday!
I say "done" in quotes because we plan to sand the touchable surfaces this week (reminder, only the floor boards are composite... everything else is PT lumber), and my wife is staining the railings next weekend before I attach the balusters. So the final reveal pics will have to wait another week.
Happy Easter!
But....
I got the deck project "done" yesterday!
I say "done" in quotes because we plan to sand the touchable surfaces this week (reminder, only the floor boards are composite... everything else is PT lumber), and my wife is staining the railings next weekend before I attach the balusters. So the final reveal pics will have to wait another week.
Happy Easter!
Craptain
Well-known member
Re: west of Philly - barn saving (tours on pages 14, 19, and FINAL tour on 35)
Sanding PT can be very dangerous. Make sure to wear a good respirator.
Looking forward to pictures.
Sent from my LG-D801 using Tapatalk
Sanding PT can be very dangerous. Make sure to wear a good respirator.
Looking forward to pictures.
Sent from my LG-D801 using Tapatalk
Sometimes, easy little projects can be very satisfying.
Yesterday, I had 2 free hours, a pile of scrap/left over lumber and Trex, and an idea of what I wanted to build to enhance the pool deck.
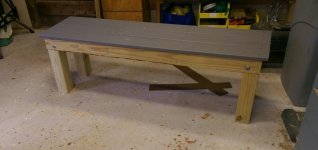
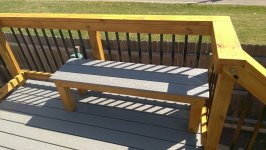
Simply, I wanted a rock solid bench that wouldn't give the kids any splinters, and would tie into the look of the deck. It's a place for kids to sit and warm up, or eat a popsicle. Or a place to rest for a parent or grand parent that wants to be near the action without actually getting into the pool.
I sketched up a simple design and searched my pile of scraps and cutoffs to find enough components to build what I had in mind. For the leg connections, I used the dado blade on my table saw to create a shoulder to carry the load of the bench.
Happy to report that the simple bench turned out as expected, took less than 2 hours to build, and will be solid as can be for many years to come.
Yesterday, I had 2 free hours, a pile of scrap/left over lumber and Trex, and an idea of what I wanted to build to enhance the pool deck.
Simply, I wanted a rock solid bench that wouldn't give the kids any splinters, and would tie into the look of the deck. It's a place for kids to sit and warm up, or eat a popsicle. Or a place to rest for a parent or grand parent that wants to be near the action without actually getting into the pool.
I sketched up a simple design and searched my pile of scraps and cutoffs to find enough components to build what I had in mind. For the leg connections, I used the dado blade on my table saw to create a shoulder to carry the load of the bench.
Happy to report that the simple bench turned out as expected, took less than 2 hours to build, and will be solid as can be for many years to come.
Attachments
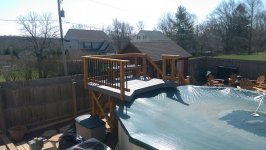
And now, I'm truly done with the pool deck project. (well... there's a small piece of blue plexiglass coming in the mail to make the dolphin cutout on the door really pop, but that'll take like 4 minutes to install... so for all practical purposes, I'm DONE)
I'm proud to say that this thing is well-built and will provide years of enjoyment for our family and friends.
Total price came to $2000 even. The same sized aluminum deck from the pool company was similarly priced and does not look nearly as nice, nor is it even close to as sturdy as this. So, money well spent in my opinion.
The wife is thrilled, and the kids are now bugging me to open the pool as soon as possible.
I'm proud to say that this thing is well-built and will provide years of enjoyment for our family and friends.
Total price came to $2000 even. The same sized aluminum deck from the pool company was similarly priced and does not look nearly as nice, nor is it even close to as sturdy as this. So, money well spent in my opinion.
The wife is thrilled, and the kids are now bugging me to open the pool as soon as possible.
Attachments



Kevin54
MEMBER EMERITUS
Riefer......I love your thread. If people don't start back at square one on it, then they just can imagine the work that you put into it to save the barn. Every time I check you thread, it's something different that you have done. You definitely have a place to be proud of.
Yes Sir you have created one of the best threads to follow along with. You are great at explaining how you build pieces and your photos are also wonderful my only suggestion would be for you to make the pics bigger. Thanks for sharing all your hard work with us.
Thanks guys! I often wonder if people are still reading - I like documenting this stuff for my own purposes, but it's even better if others are enjoying the ride too. Much appreciated!
--
As for picture size... I'm a tech idiot... My phone takes pics that are like 2 MB each... and to get them to load up here, I re-size them to 25% (which I've found works every time... whereas 50% sometimes bombs out). So, I'm not really sure how to make them bigger on a reliable basis, nor do I know how to post the pics inline with the story I'm telling. Any pointers?
--
As for picture size... I'm a tech idiot... My phone takes pics that are like 2 MB each... and to get them to load up here, I re-size them to 25% (which I've found works every time... whereas 50% sometimes bombs out). So, I'm not really sure how to make them bigger on a reliable basis, nor do I know how to post the pics inline with the story I'm telling. Any pointers?
madison069
Well-known member
A little late, but I was catching up a few pages back. I really like how that coffee table came out!
I need to build a coffee table but the one I have in plans don't require that much skill.
But then again your table is making me think about adding more details to mine now! LOL
I need to build a coffee table but the one I have in plans don't require that much skill.
But then again your table is making me think about adding more details to mine now! LOL
BuickFarmer
Well-known member
Deck turned out great rieferman, the gate being the crowning touch. Good job. What's next? ;-)
Madison - Thanks for the coffee table comments! It was a bit of an intimidating project because of my goal to do most of the project the "purist" way with true mortise and tenon. However, if you're skill building, using a pocket hole jig (e.g. Kreg or similar) can be an option to achieve great results with a lot less hassle.
--
BuickFarmer!!! Always an honor to have you swing by! Still loving your thread too!
Yeah, the deck ain't too bad after all that work, and the gate is definitely the "set it off" piece that people have been noticing when they come to visit.
What's next? Hmmmm.... I have a bunch of mini-projects, but the most interesting one coming up is a bench and hook setup for inside our front door. Then bench will store our shoes, and the upper piece (affixed to the wall) will be for hanging coats, storing hats/gloves/mail etc. We have a cheap one-piece entry bench that has both of these components, but it's **** construction and not big enough... plus, since it's a one-piece, it blocks view of our interior stone wall - my design will leave the wall space open.
Clear as mud?
--
BuickFarmer!!! Always an honor to have you swing by! Still loving your thread too!
Yeah, the deck ain't too bad after all that work, and the gate is definitely the "set it off" piece that people have been noticing when they come to visit.
What's next? Hmmmm.... I have a bunch of mini-projects, but the most interesting one coming up is a bench and hook setup for inside our front door. Then bench will store our shoes, and the upper piece (affixed to the wall) will be for hanging coats, storing hats/gloves/mail etc. We have a cheap one-piece entry bench that has both of these components, but it's **** construction and not big enough... plus, since it's a one-piece, it blocks view of our interior stone wall - my design will leave the wall space open.
Clear as mud?
mwbailey
Well-known member
Hey, rieferman, get on with the "mudroom" bench. That's on my current list. I need about 36" wide. Sounds like yours might be a bit larger. I'm getting tired of leaving my shoes stacked on the back stairs in the garage. . . .
I did finally stain the Adirondack chairs -- pretty much according to your plans. Used an ebony stain. I think it will be OK once the one on the right dries. They're for my daughter's birthday which was last Valentine's Day -- I waited a few weeks (!?!) to let the pretreated lumber dry out.
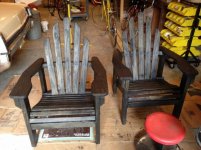
I did finally stain the Adirondack chairs -- pretty much according to your plans. Used an ebony stain. I think it will be OK once the one on the right dries. They're for my daughter's birthday which was last Valentine's Day -- I waited a few weeks (!?!) to let the pretreated lumber dry out.