To avoid these ads, REGISTER NOW!

west of Philly - barn saving

OP
R

rieferman

Well-known member
Joined
May 18, 2009
Messages
2,586
Location
Collegeville PA (30 min west of Philly)
Thanks Kev!!! :beer:


---

Got a lot done in the last couple days...

First, I re-ran electric on the new wall to ensure that I have receptacles where I need them. This entailed pulling down some wall panels etc. but it wasn't too bad.

With that wall now a blank canvas, I set about installing the Yukon cabinets. I really want to use the counter top above the cabinets as a reference surface to check long planks for straight edge, so I took a lot of care to make sure they were coplanar to each other, and level / plumb in all directions etc.

To do that, I started by building two riser boxes that would support the cabinets and lift them to my desired height of 36 inches. I used the straightest lumber I could find, and was careful to shim joints as needed to create nice flat platforms. I temporarily attached bracing to the two riser boxes to ensure they were properly spaced, would remain in the same plane during install, and would maintain a constant spacing from the wall of the barn.

bases for new cabinets.jpg

I then placed the assembly on the floor, leveled with levelling feet in the front and shims in the back, and then bolted the entire assembly to the barn sill plate before removing the temporary braces.

bases for new cabinets being leveled.jpg

Then, the boxes were set on the frames and then affixed by temporarily removing a couple drawers, drilling a couple pilot holes, and installing some screws with washers into the frame below. I re-checked for level etc. and found everything to be in good order.

new cabinets on their bases.jpg

Lastly, I trimmed a piece of laminate countertop to 10 feet long by 23 inches deep, affixed with silicone, and added a backsplash. I was able to move my woodworking bench into it's spot nearby too.

countertop installed.jpg

I also framed out a chase for the plumber to bring water/sewer up to 2nd story, and I installed the floor joists that will allow the stairwell to accept subfloor. We'll install the subfloor from the top side when the exterior stairs are finished.

joists in stairwell.jpg

Throughout this work, my teenage son has been especially helpful. He's getting very strong these days, and can hold the other end of heavy items, help me keep things steady while I perform a cut, call out measurements etc. Really fun to have a shop buddy!


Edit - Next up:
- White pegboard will go above the new counter top, along with a power strip
- To the left of the counter will have the sink
- To the right of the counter I will be installing the shop vac / cyclone setup for use with hand tools etc.
- And, the most fun will be putting all my tools in their new spots!
 
To avoid these ads, REGISTER NOW!
OP
R

rieferman

Well-known member
Joined
May 18, 2009
Messages
2,586
Location
Collegeville PA (30 min west of Philly)
Got the cubbies next to counter built out of some scrap materials. Just glued and screwed together MDF. Heavy, solid, not-fancy, very functional.

Then, after furring out the wall above the new counter top to create a plumb plane for pegboard, and waiting for the Triton HDF material to arrive in the mail for longer than expected, I have the pegboard installed. Some of my tools hung up already, and others still in progress. Plenty of space!

Also, the shop vac / mini-cyclone are installed and ready to go.

barn pegboard done.jpg

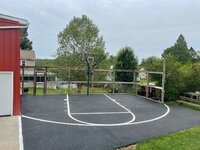
Separately, the lines on our resurfaced bball court are in now. Wish I was young again and could really use it, but I still manage to have fun shooting around (and I'll admit that I can still shoot the lights out despite being unable to run/jump) and love watching the kids and their friends play.

bball court finished.jpg
 
OP
R

rieferman

Well-known member
Joined
May 18, 2009
Messages
2,586
Location
Collegeville PA (30 min west of Philly)
So tired :)

Workshop updates are done now other than the usual minor tweaks that are implemented over time. Having the sink hooked up has already been so useful.

shop sink yayyyyy.jpg

Upstairs apartment is nearly finished too. I had to do all sorts of tricky maneuvers to install the bathroom because the old barn has so much "character", but it all turned out really nicely. Just some nesting and decorating left to do there.

apartment entry nearly done.jpgapartment kitchenette and bathroom almost done.jpgapartment crooked bathroom almost done.jpg

In other news, I am scheduled to have foot surgery to remove bone spurs near Halloween, and will be off my feet for multiple weeks (2 weeks strictly, 4-6 additional weeks in a boot with limited mobility). Ugh.
 
OP
R

rieferman

Well-known member
Joined
May 18, 2009
Messages
2,586
Location
Collegeville PA (30 min west of Philly)
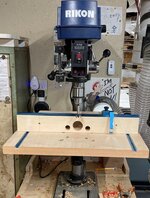
Finished my new drill press table today. Much nicer than the one I used to have. Some key features:

- Circular backer inserts to prevent blow out when drilling... rotate to get to a fresh spot, flip over when one side is spent

- T-track allows fence to slide foreward/back and lock in... another track accepts a flip down stop for repeat positioning of pieces

- The fence has built in dust collection to my main system... and it really ***** (but in a good way)

drill press table with dust collection 1.jpg

drill press table with dust collection 2.jpg
 
OP
R

rieferman

Well-known member
Joined
May 18, 2009
Messages
2,586
Location
Collegeville PA (30 min west of Philly)
And today I finished "spray booth 2.0" work...

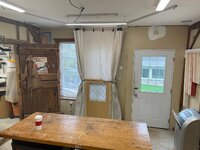
Adjusted the curtain tracks to allow space for easy access to the next room and create a better shape to contain over spray.

I also used a solid panel beneath the fan which created a strong base for converting the center panel (which always remains installed now) to be very stable.

To setup or take down the booth it takes about 15 seconds. Undo bungies on left/right curtain, pull curtains out, reach behind center panel to open window glass, hit remote switch to turn fan on. Done.

I may decide to add an extra panel to left and right of the workbench, but will only do that if over spray is obnoxiously messing up the room (a little mess is "patina"... or character... a lotta mess is "reason to extend the curtains).

Shop spray booth 1.jpg
Shop spray booth 2.jpg
 
OP
R

rieferman

Well-known member
Joined
May 18, 2009
Messages
2,586
Location
Collegeville PA (30 min west of Philly)
Had a chance to use the spray booth recently. Not bad at all! :)

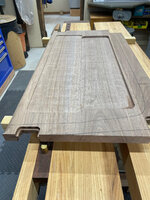
Just started building a "Sam Maloof inspired" bench for our new bedroom. Sculpted joints are a new skill for me, so that will be fun. So far, I have just built the plank that will become the seat. Using black walnut for the entire project.

I have a couple customer orders coming in again too, so that will be fun.

Oh, and my foot surgery... the doctor totally oversold how long it would take to recover. I was hobbling the same day, in normal shoes by 2 weeks, and can walk multiple miles now with minimal pain. MUCH better than before, and hopefully I will be 100% before too long.
 

Jim_No_Garage

Well-known member
Joined
Jan 15, 2011
Messages
3,317
Location
Millington NJ
Had a chance to use the spray booth recently. Not bad at all! :)

Just started building a "Sam Maloof inspired" bench for our new bedroom. Sculpted joints are a new skill for me, so that will be fun. So far, I have just built the plank that will become the seat. Using black walnut for the entire project.

I have a couple customer orders coming in again too, so that will be fun.

Oh, and my foot surgery... the doctor totally oversold how long it would take to recover. I was hobbling the same day, in normal shoes by 2 weeks, and can walk multiple miles now with minimal pain. MUCH better than before, and hopefully I will be 100% before too long.
Please post pictures as you progress on the bench - I'm interested to see what you are making.

I'm glad you healed well from your surgery. Doc was being cautious I guess . . .

Cheers

Jim
 
OP
R

rieferman

Well-known member
Joined
May 18, 2009
Messages
2,586
Location
Collegeville PA (30 min west of Philly)
Hey Jim! Will do... It's been slow going on the bench build as my actual job has been a bit hectic, and I had a few surprise honey-do-list items to take care of.. but progress will pick back up.

-----

Also, in fun "got a new toy for Christmas" news... I've been eyeing Festool stuff for quite some time and finally pulled the trigger. Track saw and tracks, router and accessory to use the tracks, domino and tenons packs, miscellaneous accessories.

Price tag wasn't for the faint hearted. I think all my other tools combined probably cost what I just spent. But the quality and speed will be well worth it in my opinion.

Happy holidays everyone!
 
OP
R

rieferman

Well-known member
Joined
May 18, 2009
Messages
2,586
Location
Collegeville PA (30 min west of Philly)
I have gotten very far on the bench build now.

The seat is contoured for comfort.. I have never done this before but chose to get various zones of the seat to a prescribed depth using my router, a huge bit, and a trolley.

walnut bench prepping for carving.jpg

walnut bench large router bit.jpg

walnut bench routing before carving.jpg

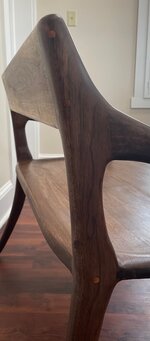
Then, using an angle grinder with a carving disc (and then 24 grit sand paper) I fine tuned the seat. You can also see the "Maloof joints" in this picture.

walnut bench seat carving complete.jpg

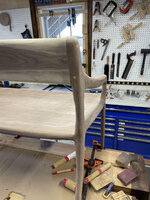
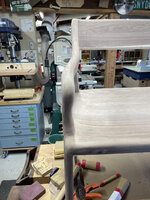
Lots of other steps ranging from simple to quite complicated eventually led me to having the bench completely assembled. At this point, I again used the angle grinder to rough carve the bench to shape. Some filler in a few spots as needed etc.

I'm awaiting my new Foredom rotary tool which will allow me to fine tune the carving... then hand rasps and hand sanding will take this one to the finish line.

walnut bench rough carved.jpg
 
OP
R

rieferman

Well-known member
Joined
May 18, 2009
Messages
2,586
Location
Collegeville PA (30 min west of Philly)
Thank you!! And, great question...

The shop is like an entirely new shop now.

Firstly, it's astonishing how big of a difference removing those stairs has made. The assembly area of my shop (the heart of the shop) is so comfortable to move around in, and I can easily access all sides of whatever I'm working on. The workbench's capabilities are now able to be be used to their fullest. And, the bank of drawers and wall storage keeps everything I need nearby and easily accessible.

Secondly, and this sort of goes along with above since these improvements are in the assembly space... The excellent wi-fi connection, and the shop utility sink have both been huge wins. At times, I'll bring out my laptop to watch a technique on youtube as I try it for the first time. Being able to wash hands and brushes, have a wet rag for glue cleanup, refill my drink... just great.

Thirdly, finally dedicating the "extra" room for glue ups and finishing has allowed the other spaces to shine since they no longer have to do double duty. And, being able to glue up a component and return to the shop for other tasks is just very efficient. The new spray booth has been used a few times recently too and it's very convenient to be able to setup/breakdown so easily.

Lastly, the machine side of my shop has remained basically unchanged, but the fact that portions of projects never migrate over to that space (e.g. I don't use the table saw as an extra work surface anymore) has been great. I hadn't anticipated how much I would value being able to use any machine at any time until I removed the obstacles of half-finished projects.

-----

On top of all this, I just (after about a decade) accepted a new job that I will begin just after the holidays. As you know, I have always been a frugal wood worker, but have begun to ramp up the spending as my skills grow in recent years.... the signing bonus from the new job had enough slush in it that I have made a large (for my usual standards) investment in Festool products. Domino 700, cordless track saw and tracks, and a router (which also works with the tracks).

I had resisted buying these in the past because I wanted to learn "long division" before adding some of these efficiencies. But the time has come where it makes sense in my workflows. Portions of the order have arrived already so I have begun testing and learning.

Happy new years everyone!
 

Kevkx125

Well-known member
Joined
Dec 26, 2013
Messages
3,394
Location
DOUGLASSVILLE, PA
Bob the new lay out of the shop looks and sounds like it is working really well for you, great I am really happy for you that the idea's and plans that you had worked so well.

Hope you have a great new year!!
 

Seagoon

Well-known member
Joined
Jan 23, 2014
Messages
859
Location
Scunthorpe. UK.
Your wife ought to love it! That is beautiful. Time well spent without a doubt.

Just because I'm nosy can you tell us what the new job is. If the answer is no then I shan't be offended ;)
 

jar944

Well-known member
Joined
Jul 26, 2010
Messages
5,950
Location
Northern VA
Thank you!! And, great question...

The shop is like an entirely new shop now.

Firstly, it's astonishing how big of a difference removing those stairs has made. The assembly area of my shop (the heart of the shop) is so comfortable to move around in, and I can easily access all sides of whatever I'm working on. The workbench's capabilities are now able to be be used to their fullest. And, the bank of drawers and wall storage keeps everything I need nearby and easily accessible.

Secondly, and this sort of goes along with above since these improvements are in the assembly space... The excellent wi-fi connection, and the shop utility sink have both been huge wins. At times, I'll bring out my laptop to watch a technique on youtube as I try it for the first time. Being able to wash hands and brushes, have a wet rag for glue cleanup, refill my drink... just great.

Thirdly, finally dedicating the "extra" room for glue ups and finishing has allowed the other spaces to shine since they no longer have to do double duty. And, being able to glue up a component and return to the shop for other tasks is just very efficient. The new spray booth has been used a few times recently too and it's very convenient to be able to setup/breakdown so easily.

Lastly, the machine side of my shop has remained basically unchanged, but the fact that portions of projects never migrate over to that space (e.g. I don't use the table saw as an extra work surface anymore) has been great. I hadn't anticipated how much I would value being able to use any machine at any time until I removed the obstacles of half-finished projects.

-----

On top of all this, I just (after about a decade) accepted a new job that I will begin just after the holidays. As you know, I have always been a frugal wood worker, but have begun to ramp up the spending as my skills grow in recent years.... the signing bonus from the new job had enough slush in it that I have made a large (for my usual standards) investment in Festool products. Domino 700, cordless track saw and tracks, and a router (which also works with the tracks).

I had resisted buying these in the past because I wanted to learn "long division" before adding some of these efficiencies. But the time has come where it makes sense in my workflows. Portions of the order have arrived already so I have begun testing and learning.

Happy new years everyone!

The 700 is really nice to have, and I wouldn't be without a track saw of some sort. I think those will have a profound effect on how, (and how fast) you can build things.
 
OP
R

rieferman

Well-known member
Joined
May 18, 2009
Messages
2,586
Location
Collegeville PA (30 min west of Philly)
Your wife ought to love it! That is beautiful. Time well spent without a doubt.

Just because I'm nosy can you tell us what the new job is. If the answer is no then I shan't be offended ;)


Thanks!!!

Happy to share... I have been a management consultant in the pharmaceutical industry for the past 9+ years, and am moving to a new firm in the same space. My new position elevates my role to "principal" which basically means I'll focus more on wielding a team of consultants as opposed to doing all the consulting myself as I've done in the past. My favorite part of the work is when I am able to be close to improvements that benefit patients - as an example, I've helped launch innovative cancer therapies.


The 700 is really nice to have, and I wouldn't be without a track saw of some sort. I think those will have a profound effect on how, (and how fast) you can build things.


I think so too. There have been several recent projects where I would have had much faster and easier processes with the help of these tools. I think one of the things I'm most looking forward to is being able to use the router in the tracks... in my mind, this may enable me to greatly reduce the number of times I need to install dado blades at the table saw (which is such a time ****).
 
To avoid these ads, REGISTER NOW!
OP
R

rieferman

Well-known member
Joined
May 18, 2009
Messages
2,586
Location
Collegeville PA (30 min west of Philly)
Thanks guys! This was a fun project that somewhat proved to me that I think I can tackle basically whatever I want from here on out. Hard to explain, but I'll try a sports analogy... they say that there's a point where the game "slows down" for experienced players. That's kind of what woodworking feels like these days - difficult challenges feel manageable.
 
OP
R

rieferman

Well-known member
Joined
May 18, 2009
Messages
2,586
Location
Collegeville PA (30 min west of Philly)
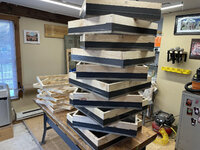
A friend/neighbor came to me with an interesting request... his company (huge organization) needed some wooden frames constructed to specific dimensions and requirements to enable them to run certain engineering / quality checks, and he was wondering of I could do the work for them.

So, I worked with their engineers to propose improvements from their initial prototype, provided them an initial sample, made minor modifications per their request, figured out pricing, and then made them an initial batch of 10 frames. When I deliver them next week, we agreed that a tour of the facility would be time well-spent (perhaps other areas I can assist them).

My 16 year old son helped me with the production, I made a couple bucks along the way (which I split with my boy), and I made a new connection with a cool guy in a business that I would otherwise never have known about.

Not fine woodworking, and not my ultimate ambition, but it was a fun experience that I thought the crew here would appreciate.

:beer:


wood frames for engineer testing.jpg
 
  • Like
Reactions: JJC
OP
R

rieferman

Well-known member
Joined
May 18, 2009
Messages
2,586
Location
Collegeville PA (30 min west of Philly)
I've been busy lately building a table for a friend/customer a couple towns away. I've been a bit slow on this project because I decided it was a good opportunity to learn to use the new Festool equipment... and wow, was it worth the time to pickup the new skills.

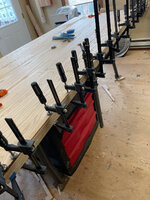
This table is quite long, so jointing is a pain... I instead used the track saw to establish a straight edge, and then ripped parallel on the table saw. Later, I again used the track saw to trim the edges of the table top.

ash table top.jpg

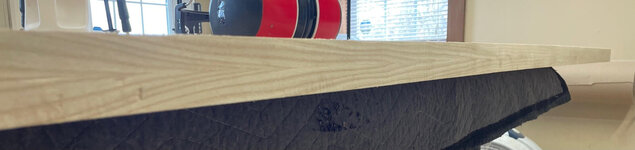
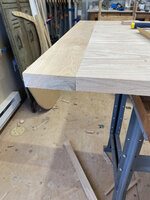
This table would have weighed a ton and cost a lot more than the customer was willing to pay if I used thicker lumber, so I decided to "fold" the edges over to make it appear thicker, while also creating a nice grain match. Once again, the track saw made quick work of this effort.

ash table top folded edge.jpgash table top folded edge grain match.jpg

Next, I used the track with the new Festool router to cut the tenons on each end of the table to accept the breadboard ends. The mortise on the breadboard end was cut at the table saw using the dado stack.

ash table top breadboard end.jpg

And then, I used the new domino to put the legs sets together. Two sides of each leg received a slight taper over the bottom 13 inches (cut at the table saw) and the lower support was placed at 'footrest height' to benefit whoever sits at the end of the table. The legs will be set in 10 inches from the end to prevent bumping shins etc.


ash table legs out of poplar.jpg

Separately, I used the track saw for a bunch of steps while rebuilding / improving our ******** court... we previously had lights suspended between two trees - one of which fell this winter. The new setup features four 6x6 posts, and a privacy screen.

******** court redo.jpg
 

Seagoon

Well-known member
Joined
Jan 23, 2014
Messages
859
Location
Scunthorpe. UK.
I've been busy lately building a table for a friend/customer a couple towns away. I've been a bit slow on this project because I decided it was a good opportunity to learn to use the new Festool equipment... and wow, was it worth the time to pickup the new skills.

This table is quite long, so jointing is a pain... I instead used the track saw to establish a straight edge, and then ripped parallel on the table saw. Later, I again used the track saw to trim the edges of the table top.

ash table top.jpg

This table would have weighed a ton and cost a lot more than the customer was willing to pay if I used thicker lumber, so I decided to "fold" the edges over to make it appear thicker, while also creating a nice grain match. Once again, the track saw made quick work of this effort.

ash table top folded edge.jpgash table top folded edge grain match.jpg

Next, I used the track with the new Festool router to cut the tenons on each end of the table to accept the breadboard ends. The mortise on the breadboard end was cut at the table saw using the dado stack.

ash table top breadboard end.jpg

And then, I used the new domino to put the legs sets together. Two sides of each leg received a slight taper over the bottom 13 inches (cut at the table saw) and the lower support was placed at 'footrest height' to benefit whoever sits at the end of the table. The legs will be set in 10 inches from the end to prevent bumping shins etc.


ash table legs out of poplar.jpg

Separately, I used the track saw for a bunch of steps while rebuilding / improving our ******** court... we previously had lights suspended between two trees - one of which fell this winter. The new setup features four 6x6 posts, and a privacy screen.

cornhole court redo.jpg
It's always a pleasure to see your posts - you do such good quality work. It's a shame we live about 4,000 miles apart or I would be a customer.
 
OP
R

rieferman

Well-known member
Joined
May 18, 2009
Messages
2,586
Location
Collegeville PA (30 min west of Philly)
The table started above is now complete. The full story:

A friend asked me to build her a table, and we settled upon Ash for the top.

To be friendlier to her budget, and keep the weight down, the top was built at 3/4" thick.

But, to give the impression of a thicker table, the edges were trimmed and folded over (bookmatch), and full thickness breadboards were used. She wanted to see the pegs, so they are visible on the top side. Danish oil mixed with walnut danish oil was used to slightly tint the top per customer request.

She insisted on a painted base, so poplar was used there. The legs have a slight taper on two sides. This was my first use of dominoes. The goal was for the base to be sturdy/chunky looking, but for the apron to disappear a bit. I also set the lower cross support at footrest height. A 10" overhang on the ends allow seating at the short side of the table.

All touch edges are eased with ~ 1/8" chamfer at 45 degrees.

Seasonal wood movement was accounted for with traditional breadboard install approach, and by using hold down clips in biscuit slots.

Customer was very happy, and it was a fun project. My 16 year old son helped me quite a bit and was paid for his time even smile.gif

Thanks,

Bob R.
ash top table 1.jpgash top table 2.jpgash top table 3.jpg
 
OP
R

rieferman

Well-known member
Joined
May 18, 2009
Messages
2,586
Location
Collegeville PA (30 min west of Philly)
white wash pine top, mineral stained poplar base table

The recent table I built for a local customer got my wife wanting an upgrade for our table in our sunroom. So I used a similar design and cranked this out for her.

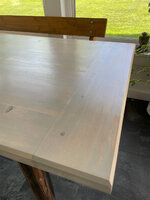
The top is pine because she asked me to try to "white wash" it, and this seemed the most sensible choice for a first attempt at this (plus the sawmill had a nice selection). I used a "sun bleached" stain, wiped most of it off as quickly as possible, and then came back with rub on poly.

I made my own super-wide dominoes to hold the breadboards in place - each measures about 1/2" thick x 3" wide x 5.5" long. The center domino is tight and draw bore pinned/glued. The outside dominoes are tight on the table side, but have room for expansion on the breadboard side (and draw bore holes are elongated).

The base was originally going to be for the customer project, but I liked the mineral stained poplar which I was able to book match for a nice look (and the customer was adamant that she wanted a black painted base... so I built her another base). Slight taper on 2 sides, clear danish oil.

This table is 29" wide x 8.5' long. A new bench is in the works already.

My son and daughter both helped me with this project, and I got it done much faster than the first table since I had already learned to use some of the new tools this time around.

pine top table 1.jpgpine top table 2.jpgpine top table 3.jpgpine top table 4.jpgpine top table 5.jpg
 

Seagoon

Well-known member
Joined
Jan 23, 2014
Messages
859
Location
Scunthorpe. UK.
white wash pine top, mineral stained poplar base table

The recent table I built for a local customer got my wife wanting an upgrade for our table in our sunroom. So I used a similar design and cranked this out for her.

The top is pine because she asked me to try to "white wash" it, and this seemed the most sensible choice for a first attempt at this (plus the sawmill had a nice selection). I used a "sun bleached" stain, wiped most of it off as quickly as possible, and then came back with rub on poly.

I made my own super-wide dominoes to hold the breadboards in place - each measures about 1/2" thick x 3" wide x 5.5" long. The center domino is tight and draw bore pinned/glued. The outside dominoes are tight on the table side, but have room for expansion on the breadboard side (and draw bore holes are elongated).

The base was originally going to be for the customer project, but I liked the mineral stained poplar which I was able to book match for a nice look (and the customer was adamant that she wanted a black painted base... so I built her another base). Slight taper on 2 sides, clear danish oil.

This table is 29" wide x 8.5' long. A new bench is in the works already.

My son and daughter both helped me with this project, and I got it done much faster than the first table since I had already learned to use some of the new tools this time around.

pine top table 1.jpgpine top table 2.jpgpine top table 3.jpgpine top table 4.jpgpine top table 5.jpg
Good work! Personally I dislike every decorative idea in that table but I can recognize the quality of the work.:)
 

Seagoon

Well-known member
Joined
Jan 23, 2014
Messages
859
Location
Scunthorpe. UK.
The one I dislike the most is the stain on the top. I have always preferred wood to look like wood unless a painted finish would match the surroundings better. I also dislike the look of the legs although I can't work out if it is the natural finish of the wood or if it has been treated some way.
I must add that my opinion of your decorative choices(or more importantly, your wife's o_O) is totally irrelevant and I am not trying to say they are wrong - simply that they are not to my taste. I would never want to impose my choices on anyone else.
 
OP
R

rieferman

Well-known member
Joined
May 18, 2009
Messages
2,586
Location
Collegeville PA (30 min west of Philly)
The one I dislike the most is the stain on the top. I have always preferred wood to look like wood unless a painted finish would match the surroundings better. I also dislike the look of the legs although I can't work out if it is the natural finish of the wood or if it has been treated some way.
I must add that my opinion of your decorative choices(or more importantly, your wife's o_O) is totally irrelevant and I am not trying to say they are wrong - simply that they are not to my taste. I would never want to impose my choices on anyone else.

It's all good! Everyone likes what they like. (edit: But I would say that your delivery in this case wasn't the greatest)

In this case, the top is only pine so white washing wasn't hiding anything beautiful, and the wife wanted it to match a room of similar color tones. In the space, I quite like the look, but agree with you in that I don't typically add much color (instead preferring natural color) - this was an exception to my usual rule.

The legs are finished clear and without any gloss specifically to allow the natural mineral staining to show through. Poplar is normally "paint grade" material, but finding the streaks is considered a nice find... some high end wood dealers place "purple poplar" in the "exotics" section even. In this case, I disagree with you - I think that unusual wood features are cool.
 

Max Power

Well-known member
Joined
Aug 8, 2010
Messages
65
Location
Lakewood Colorado
Nice table. I like using poplar because it is a good value. That base would have been a shame to paint. Over 25 years ago I did a side job where I had to white wash all the cabinets in a custom home build. Kitchen, bar, and more baths than I can remember. I started with the maid's bath because I didn't know what I was doing and thought that was the best place to learn. I think it looks great.
 
OP
R

rieferman

Well-known member
Joined
May 18, 2009
Messages
2,586
Location
Collegeville PA (30 min west of Philly)
Thanks Max! I feel the same about poplar.. good value. I have woodworking buddies that are all about the most figured expensive wood they can find - that is also cool, but not a necessity for all designs.

Side note since I saw you are in Colorado... Dream vacation is on the horizon for our family.. Visiting Red Rocks for a concert (Avett Brothers) along with a week of adventure and farmer's markets etc. Can't wait!!!!!
 
To avoid these ads, REGISTER NOW!
Top Bottom