To avoid these ads, REGISTER NOW!

Woodworking 101--Tools and Tips

BikerDad

Well-known member
Joined
Apr 24, 2014
Messages
975
Location
Utah
Any tips for cutting mortise and tenon joints? I'm trying to do them for a Paul sellers style workbench I'm building using his method. The mortise seems ok for the first half inch of depth, but seems to go crooked after that. The tenon does not sit square to the leg, but rather angles in quite a bit. I'm using a standard half inch chisel that is good and sharp. I don't own a mortise chisel.


Sent from my iPhone using Tapatalk

If you have space, clamp a block with a plumb vertical face adjacent to the hole, it can serve as a guide for the chisel.
 
To avoid these ads, REGISTER NOW!

hunterguy86

Well-known member
Joined
Jan 22, 2012
Messages
168
Location
Central Texas
If you have space, clamp a block with a plumb vertical face adjacent to the hole, it can serve as a guide for the chisel.


I'll try that. Thanks.

I'm kinda tired of fooling with this on the bench. I may just pocket hole the legs and finish the assembly. Then I can practice these joints on a better work surface with a decent vice.


Sent from my iPhone using Tapatalk
 
OP
J

jimreed2160

Well-known member
Joined
Aug 7, 2016
Messages
3,589
Location
Tallahassee FL
Mirror project update

The glass people called today and I was able to pick up the mirror. I had to install it in the frame, so I cut new cardboard and used the brad pusher to install it. Then I installed some stout fixtures and a double strand of wire.

It went up on the wall with two 50 lb hooks even though it weighs less than 20 lbs. It looks nice but more importantly, The Queen likes it. Project done.
 

Attachments

  • DSCN4739.jpg
    DSCN4739.jpg
    144.3 KB · Views: 68
  • DSCN4742.jpg
    DSCN4742.jpg
    140.2 KB · Views: 66
  • DSCN4744.jpg
    DSCN4744.jpg
    139.8 KB · Views: 71
  • DSCN4750.jpg
    DSCN4750.jpg
    136.7 KB · Views: 70
  • DSCN4751.jpg
    DSCN4751.jpg
    141.7 KB · Views: 64
  • DSCN4753.jpg
    DSCN4753.jpg
    134.3 KB · Views: 68

jar944

Well-known member
Joined
Jul 26, 2010
Messages
5,908
Location
Northern VA
Just sprayed the final coat of Precat lacquer on these sapele counter tops a couple hours ago.
 

Attachments

  • 20171112_174527.jpg
    20171112_174527.jpg
    148 KB · Views: 86
  • 20171114_191037.jpg
    20171114_191037.jpg
    149.7 KB · Views: 82
  • 20171128_181515.jpg
    20171128_181515.jpg
    149.7 KB · Views: 90
  • 20171130_195122.jpg
    20171130_195122.jpg
    130.7 KB · Views: 89

scarrylarry

Well-known member
Joined
Jun 26, 2010
Messages
494
Location
West Coast of Canada
Not quite fine woodworking but i no longer trip over my pile of clamps.

adcfd71bb5e30fa2ff159b86ad1bc77d.jpg

Hi Chrislehr

Are those metal cabinets and metal chest of drawers you have there in your shop ?

Are the chests with the drawers metal ? What were they used for prior to you putting them in your shop ? Are they suitable as tool drawers ?

Sorry for all the questions I'm thinking of going for something like that
Thanks
scarrylarry
 

Attachments

  • adcfd71bb5e30fa2ff159b86ad1bc77d.jpg
    adcfd71bb5e30fa2ff159b86ad1bc77d.jpg
    136.1 KB · Views: 3

rrich1

Well-known member
Joined
Oct 7, 2015
Messages
793
Got the mortise all cut out and parallel guide cut to fit. I routed out the back of the leg chop and made a tenon on the parallel guide to go into the chop. The test piece was a lot more snug than the guide was after it was cut. Oh well. It will be fine.

The grain is going to look great with finish on it. Can't wait to see it all done. Now I need to mark the holes for the pin to go into.dab7c0ea9fc281bf85afbab02a5ce2e3.jpgf33871651cce833db68b29658873b55d.jpg02909249b9d0ab7e806f38080a90448e.jpga02b55b4bfa10950248b700fda53d493.jpg

Sent from my Pixel XL using Tapatalk
 

Attachments

  • a02b55b4bfa10950248b700fda53d493.jpg
    a02b55b4bfa10950248b700fda53d493.jpg
    97.5 KB · Views: 1
  • dab7c0ea9fc281bf85afbab02a5ce2e3.jpg
    dab7c0ea9fc281bf85afbab02a5ce2e3.jpg
    84.2 KB · Views: 0
  • f33871651cce833db68b29658873b55d.jpg
    f33871651cce833db68b29658873b55d.jpg
    98.2 KB · Views: 0
  • 02909249b9d0ab7e806f38080a90448e.jpg
    02909249b9d0ab7e806f38080a90448e.jpg
    143.2 KB · Views: 2

CRSINMICH

Well-known member
Joined
Aug 15, 2015
Messages
2,397
Location
Southeastern Michigan
rrich: Very nice looking vise. You'll be surprised at the clamping power it has. Making a leg vise was one of the most enjoyable projects I've done in a long time. Since I have two more iron screws laying around I wanted to do it again but I ran out of bench legs. This one is on the workbench/**** collector in my garage. I use it for those times I have to rough cut 2x4's and things like that. Quite handy.
 

Attachments

  • Leg vise right front.jpg
    Leg vise right front.jpg
    148.9 KB · Views: 68
Last edited:

ALLFAST

Well-known member
Joined
Feb 20, 2017
Messages
1,233
Location
Northern California
Great work on all of these projects everyone.

Anyone in Northern California (within a few hours of Sonoma County ) have a line on a decent 14" bandsaw ? A buddy who is a cabinet maker lost EVERYTHING in the recent fires. He's slowly getting back online, tool wise, and he mentioned last night that a BS is what he is hunting for especially.

Thanks for the considerarion,

Shawn
 

chrislehr

Well-known member
Joined
Apr 10, 2009
Messages
1,704
Location
Portland, OR
Hi Chrislehr


Are those metal cabinets and metal chest of drawers you have there in your shop ?


Are the chests with the drawers metal ? What were they used for prior to you putting them in your shop ? Are they suitable as tool drawers ?


Sorry for all the questions I'm thinking of going for something like that

Thanks

scarrylarry


The left most is off a navy ship. The wheels were added by the prior owner. The drawers are too deep for most tool storage but are great for routers and other handheld power tools that before were just out. The tall two door cabinet is mostly paint glue and other materials. The toolboxes still hold all mechanics tools. But that left most cabinet was a cool score. Also has a slide out table which has been handy so many times!
 
OP
J

jimreed2160

Well-known member
Joined
Aug 7, 2016
Messages
3,589
Location
Tallahassee FL
More space

My shop cleanup continues. The back bump out of my shop has always been dedicated to dirty work and storage. I cleaned up the grinder end and then the milling machine end and the junk in the middle bothered me. During the black Friday sales I noticed that Lowes still had those nice tool boxes for sale so I picked up another one last night. It took awhile to clean out the area--there were a dozen machinists vises, a boatload of Bedrocks and lots of wood--mostly beech and apple.

This bench was a display model and had no crate. The good news is that those things are hard to break down. The bad news is that they are helpful for getting the thing on the ground undamaged. Lucky for me that I have a really stout sawbench. I slid the box down onto my sawbench, installed the feet, and then carefully lowered it down to the ground. I made a top for it out of plywood with a furring strip backsplash.

The drawers are good for storage and the workbench top can be dedicated to dirty work, like cleaning up planes and saws. Lighting is outstanding and the little swivel stool I got at Costco just fits. Turn on the tunes and I can stay in there for hours.

Of course, now the rest of the shop is filled with the clutter from that area...(sigh)... :willy_nil
 

Attachments

  • DSCN4758.jpg
    DSCN4758.jpg
    143.6 KB · Views: 59
  • DSCN4757.jpg
    DSCN4757.jpg
    142.4 KB · Views: 60
  • DSCN4754.jpg
    DSCN4754.jpg
    144.4 KB · Views: 60
  • DSCN4763.jpg
    DSCN4763.jpg
    149.1 KB · Views: 62
  • DSCN4764.jpg
    DSCN4764.jpg
    141 KB · Views: 63
  • DSCN4765.jpg
    DSCN4765.jpg
    143.7 KB · Views: 63
  • DSCN4762.jpg
    DSCN4762.jpg
    136.1 KB · Views: 61

tombell572

Well-known member
Joined
Oct 3, 2015
Messages
1,034
Location
Sea Cliff, NY & Portland, OR
I'm looking for some input on buying a used chop saw. I've written in other threads that we are in an ongoing process restoring the craftsman-style bungalow of my wife's family (now ours) in Portland Oregon, a beautiful little single floor place built in 1912.

During the "modernization" craze f the 1950's, much of the interior trim detail was stripped away in a then-common effort to be up-to-date. We have been restoring these features as time and money allows--an interesting note is that we discovered some of the original trim profiles when we looked inside of a closet and saw a door casing cap molding and baseboard trim that had escaped the stripping away of these items in the rest of the house.

Anyhow, to the point. I tend to do things in an old school manner and have been using my old Stanley #358 hand miter box for all accurate cuts thus far but I'm at a point where I would like to buy a good used power miter saw and I know nothing about them. Any input on good brands and things to look for or avoid would be greatly appreciated.

Tom B.
 

DieselNut88

Well-known member
Joined
Dec 14, 2016
Messages
453
Location
Northern,IL
I have a 12" Bosch glider. Probably overkill for you. The 10" version would be good. Also dewalt makes a good saw. Stay away from lower quality brands as acuraccy and repeatability of a cut will not be there. Every saw needs to be adjusted and checked occasionally for accuracy.
 
To avoid these ads, REGISTER NOW!

scubadoober

Well-known member
Joined
Aug 15, 2017
Messages
511
Any used miter saw "could" work for you. Take a speed square with you to check the fence, blade at 90*, and blade at 45*.
 

rrich1

Well-known member
Joined
Oct 7, 2015
Messages
793
Vise is almost done. Got the guide holes drilled today and the rear shaped. Rounded over all the edges and sanded to 240.

The only thing left before glue up is to drill 2 holes for dowels to help pin the guide into the chop. I don't have any cherry dowels left so that won't happen until Monday unfortunately.

I oiled the vise screw and it glides smoother now. Once it is all in I will put some wax on it.

Using machines you restore for projects makes the whole process much more enjoyable. 2a3b91a4dcaff0bcd595a4ccd344f319.jpg8a2126c61c19ad29a3de2053531515fd.jpg06236243a07d288f306cb1d41adc1ea3.jpg

Sent from my Pixel XL using Tapatalk
 

Attachments

  • 06236243a07d288f306cb1d41adc1ea3.jpg
    06236243a07d288f306cb1d41adc1ea3.jpg
    81.6 KB · Views: 2
  • 8a2126c61c19ad29a3de2053531515fd.jpg
    8a2126c61c19ad29a3de2053531515fd.jpg
    94.1 KB · Views: 1
  • 2a3b91a4dcaff0bcd595a4ccd344f319.jpg
    2a3b91a4dcaff0bcd595a4ccd344f319.jpg
    196.8 KB · Views: 0

rrich1

Well-known member
Joined
Oct 7, 2015
Messages
793
Tombell: Hitachi offers many good entry miter saws at affordable prices. Personally I would look at new for marginally more than what used saws go for. Many great offerings from Ridgid, Ryobi, Hitachi, and kobalt.

Sent from my Pixel XL using Tapatalk
 

drivesitfar

Well-known member
Joined
Oct 23, 2013
Messages
36,007
Location
Pacific Northwest
RR: I'm loving the vise you are making for your AWESOME TABLE. :bowdown:

Tom: i bought a 3 or maybe a few years old Dewalt compound miter saw to replace my Makita chop saw and I've only used it for a few cuts, but I LOVE IT. i've used a few other chop saws and compound miters and even with the blade the Dewalt saw came with my cuts i've made are nice and clean.

here's a link to the new Dewalt version of the one i bought from a 75 year old that only used the one i bought to cut the trim in his kitchen with so it was like new for about half of what a new one is.

http://www.dewalt.com/en-us/product...12-305mm-singlebevel-compound-miter-saw/dw715

there's also a nice YouTube video on how to square up your blade on the Dewalt that i thought was pretty interesting cause i never could get my old saws to cut 45's so they'd line up.

good luck
 

Mr_P

Well-known member
Joined
May 29, 2015
Messages
557
Location
Tinley Park, IL
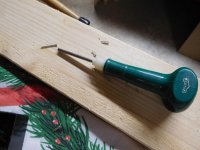
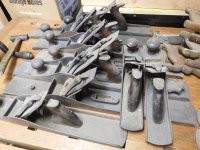
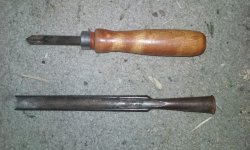
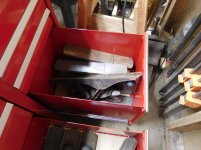
I've been on the lookout for a set a Lathe knives since I picked up my 1935 Walker Turner Lathe. I've also been on the lookout for a motor to go with said lathe. Tonight when looking through a drawer in my toolbox, I found two knives. One is a pairing knife and the other is a gouge made by Buck Brothers (missing a handle)....
attachment.php


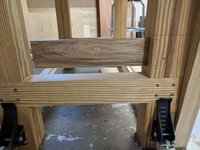
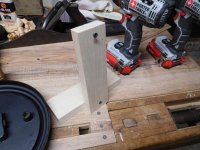
I went out to the shop and said to myself, "Self, you should rig up a hand-drill lathe until you have the motor for the Walker turner". I'm pretty good at listening to the voices in my head, so I went ahead and built myself this thing....
attachment.php


I was excited. I thought, "Why hadn't I done this sooner?" Then I remembered, "I didn't even know I had knives, that's why!" Does that count as responding to yourself? I guess I need to be sent to the mental ward. Lol.

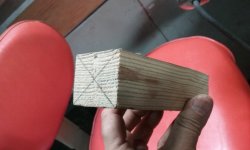
I even drew out the center to my scrap wood to make sure I was starting out on the right foot.
attachment.php


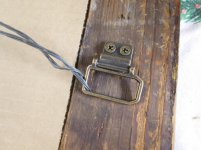
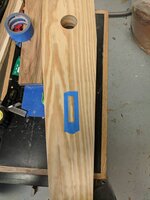
I tighten up the screws on the L-brackets acting as my tailstock and I was in business...
attachment.php


Not for very long though as the makeshift tailstock did nothing for me. My scrap trial wood kept flying off. And yes OSHA, I was using my Eye-protection.

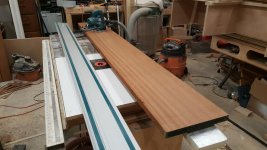
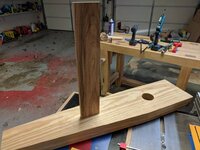
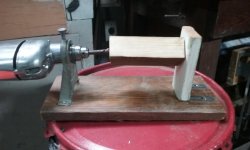
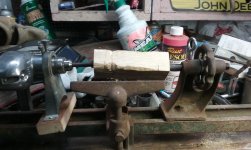
Then I thought, why not just try using my actual tailstock from the Walker Turner, so here is how I clamped down my Craftsman Home Woodworking Kit drill (purchased for $5 a couple of months ago) to the Lathe bed...
attachment.php

As you can see, I hardly made a dent on my test piece of wood.

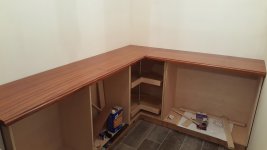
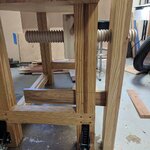
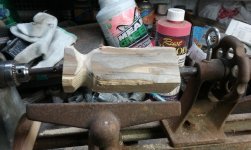
The setup on the Walker turner worked a lot better....
attachment.php


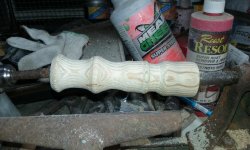
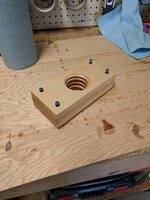
This is the final product after about an hour on the Walker Turner..
attachment.php


Oh, the possibilities of future projects. I can't wait. Any recommendations?

Here's the complete Drill kit mentioned above...
attachment.php
 

Attachments

  • 20171202_202046.jpg
    20171202_202046.jpg
    135.7 KB · Views: 358
  • 20171202_202105.jpg
    20171202_202105.jpg
    138.2 KB · Views: 361
  • 20171202_203055.jpg
    20171202_203055.jpg
    136 KB · Views: 362
  • 20171202_211229.jpg
    20171202_211229.jpg
    143.4 KB · Views: 359
  • 20171202_222610.jpg
    20171202_222610.jpg
    148.3 KB · Views: 360
  • 20171202_222659.jpg
    20171202_222659.jpg
    151.7 KB · Views: 355
  • 20171202_212411.jpg
    20171202_212411.jpg
    145.8 KB · Views: 360
Last edited:
OP
J

jimreed2160

Well-known member
Joined
Aug 7, 2016
Messages
3,589
Location
Tallahassee FL
Tom--My wife got me a Craftsman and I used it til it died. Replaced with a Hitachi. I really like the Hitachi. It is a simple no nonsense tool. Good luck on restoring your house. That is a labor of love that you can enjoy every day as you walk around.

rrich--Good set of holes. I admire your discipline and care.

Mr P--Nice turning. Of course, you are probably aware that turners are notorious for upgrading their equipment. You may have just started climbing a very slippery slope. Enjoy the trip.
 

Notgrownup

Well-known member
Joined
May 5, 2014
Messages
5,869
Location
Snow Hill NC
C12RSH2 Is what I got for Christmas this year, Black Friday it was $299.00. I like it. I am selling my 7.25” Craftsman one today for $75.
 

trainer

Well-known member
Joined
Nov 28, 2005
Messages
2,019
Location
Northern Ontario, Canada
A 10 inch mitre saw is practical because the blades will interchange with most table and bench saws.
In this day and age it's pretty hard to go wrong buying a major brand. Condition and price are much more important when buying used.
Figure on replacing the blade and factor that into the price.
Most saws can be adjusted if they are out of square and this is usually a part of setup for a new one, so it may not be a deal breaker if seems out of alignment.
 

Notgrownup

Well-known member
Joined
May 5, 2014
Messages
5,869
Location
Snow Hill NC
A 10 inch mitre saw is practical because the blades will interchange with most table and bench saws.
In this day and age it's pretty hard to go wrong buying a major brand. Condition and price are much more important when buying used.
Figure on replacing the blade and factor that into the price.
Most saws can be adjusted if they are out of square and this is usually a part of setup for a new one, so it may not be a deal breaker if seems out of alignment.

Great point about the size interchangeable blades...
 

rrich1

Well-known member
Joined
Oct 7, 2015
Messages
793
I find the need to switch blades on the miter saw non existent. It's meant to cross cut and not rip. Buying the extra blade is worth it compared to switching blades from different saws. I went with a 12" for the capacity of the cut and saving $50 in a blade purchase did out weight the benefits of a larger saw.

Sent from my Pixel XL using Tapatalk
 

drivesitfar

Well-known member
Joined
Oct 23, 2013
Messages
36,007
Location
Pacific Northwest
Tom: just an FYI. I've had my little Makita chop saw for maybe 30 years now and it's never failed me and i still use it to cut forms and shelving for storage where i don't need a nice finish on the end. if i changed the blade (i'd almost bet this is maybe the original or second blade still on my Makita and i have used it a lot). hence me being a WOOD BUTCHERER trying to be a WOODWORKER.

i bet my makita would cut nice straight cuts if i bothered to put a new nice blade on it, so put MAKITA on your list to look at for a good compound saw and i might have bought a used one of those if a nice one like my Dewalt had popped up for sale first.

MrP: very humorous and educating post. i wish i had an old WT motor to ship to you, but surprised with your shopping skills that you haven't found an old drill press or table saw motor you could buy cheaply and use. you had me laughing and impressed in the few minutes it took me to read your post and check out your pictures. WELL DONE!!
 
OP
J

jimreed2160

Well-known member
Joined
Aug 7, 2016
Messages
3,589
Location
Tallahassee FL
Found wood

So when I cleaned up the back area for the new workbench, I found a whole stash of wood. There were three 16/4 blocks of osage orange, some beech, some apple from 2008, and some dogwood. I sure am glad I marked the apple and dogwood with chalk when it came it--that saves lots of guessing.

The new bench has roomy bottom drawers. I filled one with Bedrocks. Those are rainy day projects for cleanup. The upper drawers held all of the wood so now my workbench top is again clean.
 

Attachments

  • DSCN4798.jpg
    DSCN4798.jpg
    143.4 KB · Views: 50
  • DSCN4795.jpg
    DSCN4795.jpg
    135.3 KB · Views: 49
OP
J

jimreed2160

Well-known member
Joined
Aug 7, 2016
Messages
3,589
Location
Tallahassee FL
New project--clockstand

I have clocks all over the house. I guess it is so I can maintain my nap schedule. :dunno:

Anyway, the clock above the sink is a flop-clock because there is no convenient place to hang it. And the kitties have knocked it over during nighttime patrols. Today I decided to make a stand.

We remodeled the kitchen in 2012 and I made the hickory windowsill to match the cabinets. I had to buy a bundle so I have lots of hickory available. Some of those scraps would be perfect for a clockstand to sit on said windowsill.

I made a 15 degree bevel and screwed the arm into the base. Then I added a screw at the top for hanging. Clock flop problem solved.
 

Attachments

  • DSCN4790.jpg
    DSCN4790.jpg
    142.1 KB · Views: 43
  • DSCN4789.jpg
    DSCN4789.jpg
    143.2 KB · Views: 43
  • DSCN4787.jpg
    DSCN4787.jpg
    139.4 KB · Views: 40
  • DSCN4792.jpg
    DSCN4792.jpg
    142.7 KB · Views: 40
  • DSCN4793.jpg
    DSCN4793.jpg
    141.5 KB · Views: 45
  • DSCN4791.jpg
    DSCN4791.jpg
    141.3 KB · Views: 42

rrich1

Well-known member
Joined
Oct 7, 2015
Messages
793
Did a little bit of sanding after church. Headed to work now. I was able to get a first coat of oil on the vise hub, garter, and nut. 145531d0c4d08a96a285aa28e9114fc7.jpg460e4602c502bef2368b10e7b850314b.jpg577f74b828cc46c9211bc0e1dc56fdc2.jpg7d24b9ddb6de3a5688920734316a2584.jpg

Sent from my Pixel XL using Tapatalk
 

Attachments

  • 460e4602c502bef2368b10e7b850314b.jpg
    460e4602c502bef2368b10e7b850314b.jpg
    69.8 KB · Views: 1
  • 7d24b9ddb6de3a5688920734316a2584.jpg
    7d24b9ddb6de3a5688920734316a2584.jpg
    105.9 KB · Views: 1
  • 145531d0c4d08a96a285aa28e9114fc7.jpg
    145531d0c4d08a96a285aa28e9114fc7.jpg
    90.2 KB · Views: 0
  • 577f74b828cc46c9211bc0e1dc56fdc2.jpg
    577f74b828cc46c9211bc0e1dc56fdc2.jpg
    73.1 KB · Views: 3

trainer

Well-known member
Joined
Nov 28, 2005
Messages
2,019
Location
Northern Ontario, Canada
I find the need to switch blades on the miter saw non existent. It's meant to cross cut and not rip. Buying the extra blade is worth it compared to switching blades from different saws. I went with a 12" for the capacity of the cut and saving $50 in a blade purchase did out weight the benefits of a larger saw.

Sent from my Pixel XL using Tapatalk


I've got a 25 year old craftsman 10" that maxes out at 6" at 90 degrees.
a bit more depth would be nice.

I've used it a few times for materials that destroys blades, like aluminum extrusions and laminate flooring. It's nice to be able to swap out for a $15 blade rather than buying a dedicated tool for those jobs.
 

rrich1

Well-known member
Joined
Oct 7, 2015
Messages
793
I've got a 25 year old craftsman 10" that maxes out at 6" at 90 degrees.
a bit more depth would be nice.

I've used it a few times for materials that destroys blades, like aluminum extrusions and laminate flooring. It's nice to be able to swap out for a $15 blade rather than buying a dedicated tool for those jobs.
In those cases you will buy a new blade anyways and not switch from the table saw to miter saw. Cheap blades can be had for any size saw.

Sent from my Pixel XL using Tapatalk
 
To avoid these ads, REGISTER NOW!
Top Bottom